
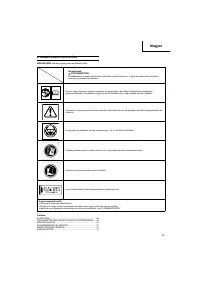
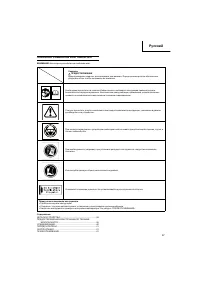
Триммеры Hitachi CG27EJ(SLN) - инструкция пользователя по применению, эксплуатации и установке на русском языке. Мы надеемся, она поможет вам решить возникшие у вас вопросы при эксплуатации техники.
Если остались вопросы, задайте их в комментариях после инструкции.
"Загружаем инструкцию", означает, что нужно подождать пока файл загрузится и можно будет его читать онлайн. Некоторые инструкции очень большие и время их появления зависит от вашей скорости интернета.


7
English
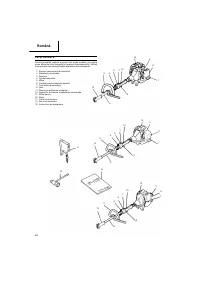
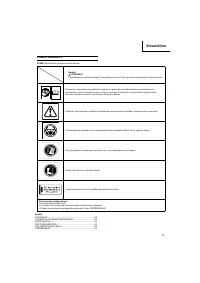
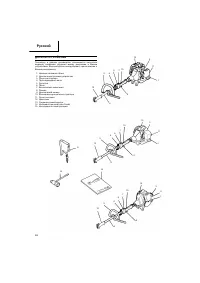
ASSEMBLY
PROCEDURES
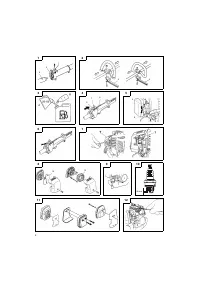
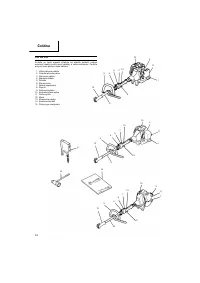
Installation
of
attachment
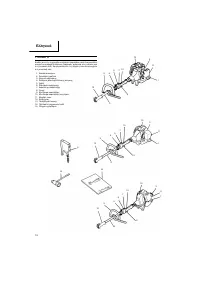
1. Join the attachment in place of it.
2. Make sure the lock pin (1)
fi
ts in the location hole (2) of tube and
that the tube will not come o
ff
. (
Fig.
1
)
3. Tighten the knob nut (3) securely. (
Fig.
1
)
Installation
of
handle
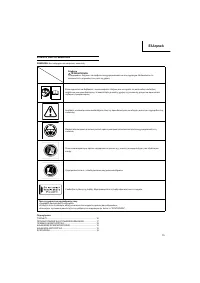
WARNING
When you use steel/rigid blades on unit, always use a barrier bar
(4) and shoulder harness with the loop handle. (
Fig.
2
)
Attach the handle to the drive shaft tube with the angle towards the
engine.
Adjust the location to the most comfortable position before operation.
NOTE
If your unit has handle location label on drive shaft tube, follow the
illustration.
OPERATING
PROCEDURES
Fuel
(
Fig.
3
)
WARNING
The unit is equipped with a two-stroke engine. Always run the
engine on fuel, which is mixed with oil.
Provide good ventilation, when fueling or handling fuel.
Fuel
○
Always use branded 89 octane unleaded gasoline.
○
Use genuine two-cycle oil or use a mix between 25:1 to 50:1,
please consult the oil bottle for the ratio or Hitachi dealer.
○
If genuine oil is not available, use an anti-oxidant added quality
oil expressly labeled for air-cooled 2-cycle engine use (JASO
FC GRADE OIL or ISO EGC GRADE). Do not use BIA or TCW
(2-stroke water-cooling type) mixed oil.
○
Never use multi-grade oil (10 W/30) or waste oil.
○
Always mix fuel and oil in a separate clean container.
Always start by
fi
ling half the amount of fuel, which is to be used. Then
add the whole amount of oil. Mix (shake) the fuel mixture. Add the
remaining amount of fuel.
Mix (shake) the fuel-mix thoroughly before
fi
lling the fuel tank.
Fueling
WARNING
○
Always shut o
ff
the engine before refueling.
○
Slowly open the fuel tank, when
fi
lling up with fuel, so that possible
over-pressure disappears.
○
Tighten the fuel cap carefully, after fueling.
○
Always move the unit at least 3 m from the fueling area before
starting.
Before fueling, clean the tank cap area carefully, to ensure that no dirt
falls into the tank. Make sure that the fuel is well mixed by shaking the
container, before fueling.
Starting
(
Fig.
4,
5
)
CAUTION
Before starting, make sure the cutting attachment does not touch
anything.
1. Set ignition switch (5) to ON position. (
Fig.
4
)
* Push priming bulb (8) several times so that fuel
fl
ows through the
bulb or return pipe. (If so equipped) (
Fig.
5
)
2. With the safety trigger (6) pressed (if so equipped), pull throttle
trigger and push throttle lock (7), then slowly release the throttle
trigger
fi
rst, then the safety trigger. This will lock the throttle in
starting position.
3. Set choke lever to CLOSED position (9). (
Fig.
5
)
4. Pull recoil starter briskly, taking care to keep the handle in your
grasp and not allowing it to snap back.
5. When you hear the engine want to start, return choke lever to RUN
position (open). Then pull recoil starter briskly again.
NOTE
If engine does not start, repeat procedures from 2 to 5.
6. After starting engine, pull throttle trigger to release throttle lock.
Then allow the engine about 2–3 minutes to warm up before
subjecting it to any load.
Stopping
(
Fig.
6
)
Decrease engine speed and run at an idle for a few minutes, then turn
o
ff
ignition switch (5).
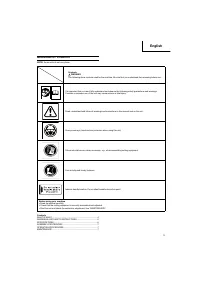
MAINTENANCE
MAINTENANCE, REPLACEMENT OR REPAIR OF THE EMISSION
CONTROL DEVICES AND SYSTEMS MAY BE PERFORMED BY ANY
NON-ROAD ENGINE REPAIR ESTABLISHMENT OR INDIVIDUAL.
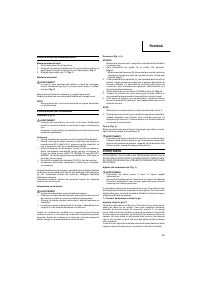
Carburetor
adjustment
(
Fig.
7
)
WARNING
○
The cutting attachment may be spinning during carburetor
adjustments.
○
Never start the engine without the complete clutch cover and
tube assembled! Otherwise the clutch can come loose and cause
personal injuries.
In the carburetor, fuel is mixed with air. When the engine is test run at
the factory, the carburetor is basically adjusted. A further adjustment
may be required, according to climate and altitude. The carburetor has
one adjustment possibility:
T
=
Idle
speed
adjustment
screw.
Idle
speed
adjustment
(
T
)
Check that the air
fi
lter is clean. When the idle speed is correct, the
cutting attachment will not rotate. If adjustment is required, close
(clockwise) the T-screw, with the engine running, until the cutting
attachment starts to rotate. Open (counter-clockwise) the screw until
the cutting attachment stops. You have reached the correct idle speed
when the engine runs smoothly in all positions well below the rpm when
the cutting attachment starts to rotate.
If the cutting attachment still rotates after idle speed adjustment,
contact your Hitachi dealer.
NOTE
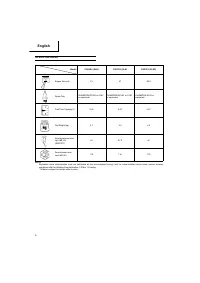
○
Standard Idle rpm is 2500–3000 rpm.
○
Some models sold areas with strict exhaust emission regulation
do not have high and low speed carburetor adjustments. Such
adjustments may allow the engine to be operated outside of their
emission compliance limits. For these models, the only carburetor
adjustment is idle speed.
For models that equipped with low and high speed adjustments;
carburetors are preset at the factory. Minor adjustments may optimize
performance based on climate, altitude, etc. Never turn the adjustment
screws in increments greater than 90 degrees, as engine damage can
result from incorrect adjustment, If you are not familiar with type of
adjustment-assistance Hitachi dealer.
WARNING
When the engine is idling the cutting attachment must under no
circumstances rotate.
Air
fi
lter
(
Fig.
8
)
The air
fi
lter must be cleaned from dust and dirt in order to avoid:
○
Carburetor
malfunctions
○
Starting
problems
○
Engine power reduction
○
Unnecessary wear on the engine parts
○
Abnormal fuel consumption
000Book̲CG22EJ̲EE.indb 7
000Book̲CG22EJ̲EE.indb 7
2009/08/28 15:22:28
2009/08/28 15:22:28


