Телевизоры кинескопные Sharp 28JF-76E_32JF-76E - инструкция пользователя по применению, эксплуатации и установке на русском языке. Мы надеемся, она поможет вам решить возникшие у вас вопросы при эксплуатации техники.
Если остались вопросы, задайте их в комментариях после инструкции.
"Загружаем инструкцию", означает, что нужно подождать пока файл загрузится и можно будет его читать онлайн. Некоторые инструкции очень большие и время их появления зависит от вашей скорости интернета.


31
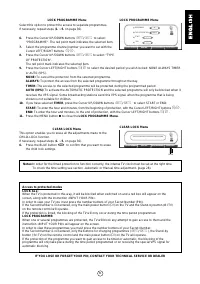
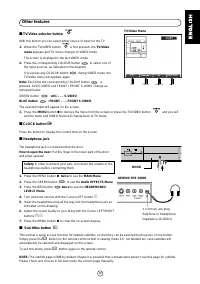
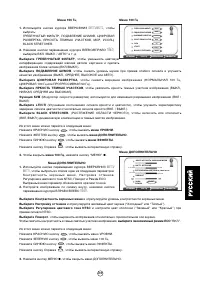
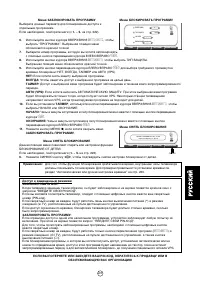
LOCK PROGRAMME Menu
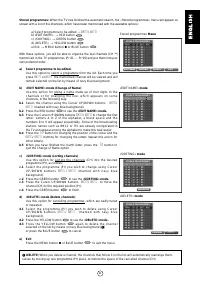
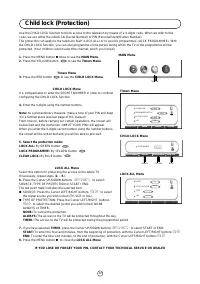
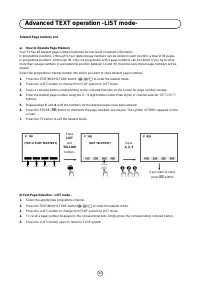
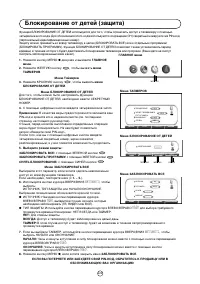
Select this option to protect the access to separate programmes.
If necessary, repeat steps (1. ~ 5. on page 30).
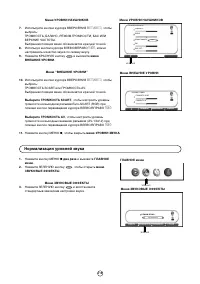
6.
Press the Cursor UP/DOWN buttons
E
/
F
to select
“PROGRAMME”. The red point mark indicates the selected item.
7.
Select the programme channel number you want to set with the
Cursor LEFT/RIGHT buttons
C
/
I
.
8.
Press the Cursor UP/DOWN buttons
E
/
F
to select “TYPE
OF PROTECTION”.
The red point mark indicates the selected item.
9.
Press the Cursor LEFT/RIGHT buttons
C
/
I
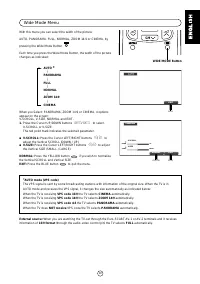
to select the desired period you wish locked: NONE ALWAYS TIMER
or AUTO (VPS).
NONE: To cancel the protection from the selected programme.
ALWAYS: To protect the access from the selected programme throughout the day.
TIMER: The access to the selected programme will be protected during the programmed period.
AUTO (VPS): To activate the AUTOMATIC PROTECTION and the selected programme will only be blocked when it
receives the VPS signal. Some broadcasting stations send this VPS signal, when the programme that is being
shown is not suitable for children.
10. If you have selected TIMER, press the Cursor UP/DOWN buttons
E
/
F
to select START or END:
START: To enter the hour and minutes, from the beginning of protection, with the Cursor LEFT/RIGHT buttons
C
/
I
.
END: To enter the hour and minutes, to the end of protection, with the Cursor LEFT/RIGHT buttons
C
/
I
.
11. Press the MENU button
●
to close the LOCK PROGRAMME Menu.
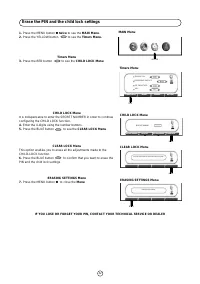
CLEAR LOCK Menu
This option enables you to erase all the adjustments made to the
CHILD-LOCK function.
If necessary, repeat steps (1. ~ 5. on page 30).
6.
Press the BLUE button
to confirm that you want to erase
the child lock settings.
Notes: In order for the timed protection to function correctly, the internal TV clock must be set at the right time.
To check the time setting see section -Automatic or Manual time adjustment- (page 28).
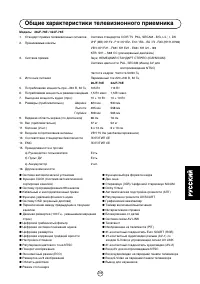
LOCK PROGRAMME Menu
PROGRAMME
TYPE OF PROTECTION
START
END
07
ALWAYS
CLEAR LOCK
CLEAR LOCK
LOCK PROGRAMME
LOCK PROGRAMME
LOCK ALL
LOCK ALL
SECRET NUMBER
SECRET NUMBER
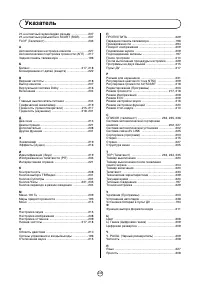
CLEAR LOCK Menu
Press the BLUE button to clear all the child lock system
CLEAR LOCK
CLEAR LOCK
LOCK PROGRAMME
LOCK PROGRAMME
LOCK ALL
LOCK ALL
SECRET NUMBER
SECRET NUMBER
BLUE
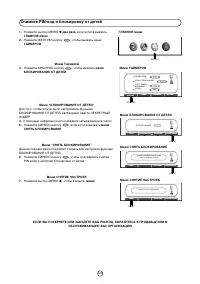
Access to protected modes
LOCK ALL:
When the TV is protected in this way, it will be blocked when switched on and a red box will appear on the
screen, along with the instruction «INPUT YOUR PIN».
In order to view your TV you must press the number buttons of your Secret Number (PIN).
If the Secret Number is not entered, only the main power button (
®
) on the TV and the Stand-by button (
æ
TV)
on the remote control will operate.
If the protection is timed, the blocking of the TV will only occur during the time period programmed.
LOCK PROGRAMME:
When one or several programmes are protected, the TV will block any attempt to gain access to them and the
instruction «INPUT YOUR PIN» will appear on the screen.
In order to view these programmes you must press the number buttons of your Secret Number.
If the Secret Number is not entered, only the buttons for changing programmes (
E
/
F
), the Stand-by
button (
æ
TV) on the remote control and the main power button (
®
) on the TV will operate.
If the protection of the programme you want to gain access to be timed or automatic, the blocking of the
programme will only take place during the time period programmed or on receiving the special VPS signal for
automatic blocking.
IF YOU LOSE OR FORGET YOUR PIN, CONTACT YOUR TECHNICAL SERVICE OR DEALER
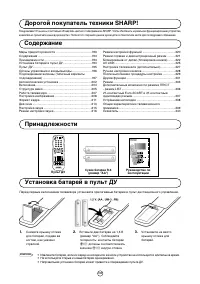
Содержание
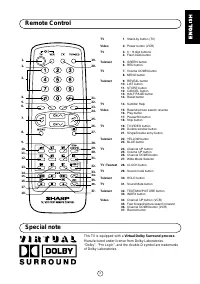
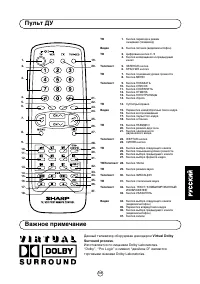
- 51 Пульт ДУ; должны соответствовать
- 52 Данный телевизор оборудован декодером; Virtual Dolby
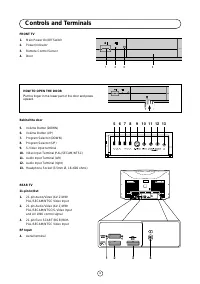
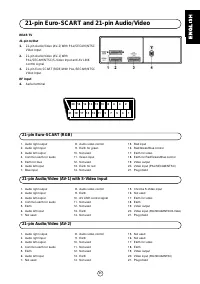
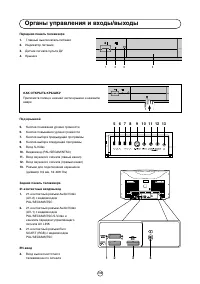
- 53 Органы управления и входы/выходы; Передняя панель телевизора
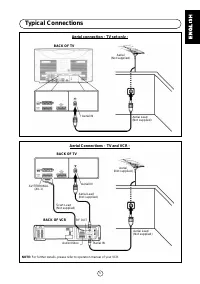
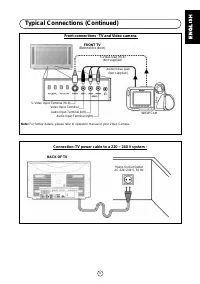
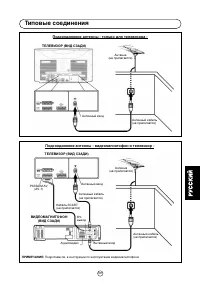
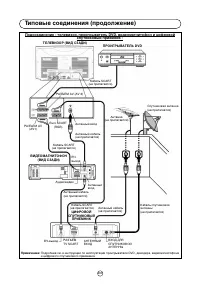
- 54 Типовые соединения; Подсоединение антенны - только для телевизора -; ВИДЕОМАГНИТОФОН
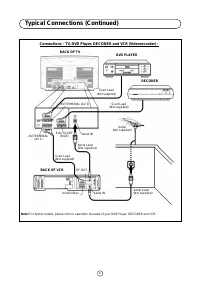
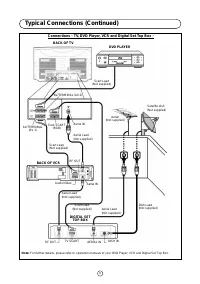
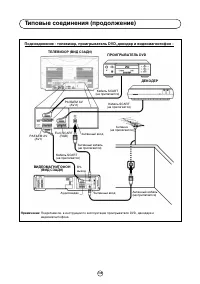
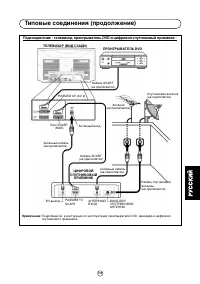
- 56 ПРОИГРЫВАТЕЛЬ DVD; Кабель SCART; ЦИФРОВОЙ
- 57 спутниковый приемник -
- 58 Подсоединение шнура питания телевизора к сети с напряжением 220; ВИДЕОКАМЕРА
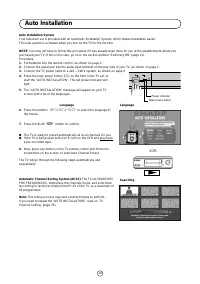
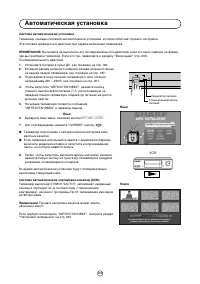
- 59 Выберите язык меню, нажимая кнопки; Автоматическая установка; Язык
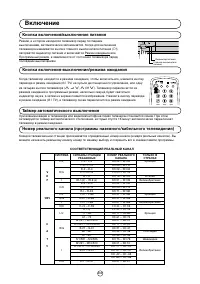
- 61 Включение; TV) на пульте дистанционного управления, или одну; Кнопка включения/выключения питания; СООТВЕТСТВУЮЩИЙ РЕАЛЬНЫЙ КАНАЛ
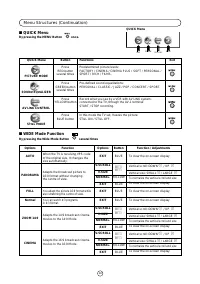
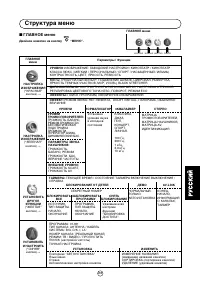
- 62 Структура меню; ГЛАВНОЕ меню
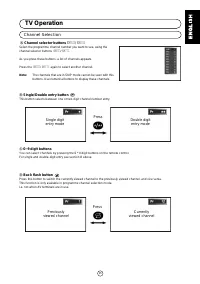
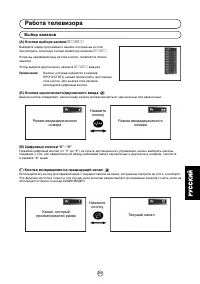
- 64 Работа телевизора; Чтобы выбрать другой канал, нажмите; (Г) Кнопка возвращения на предыдущий канал; Выбор каналов
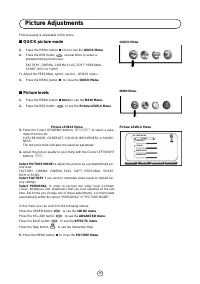
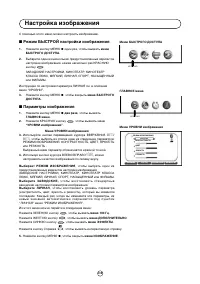
- 65 Настройка изображения
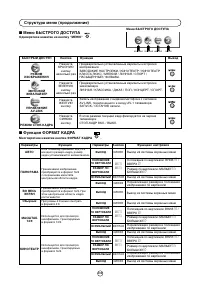
- 68 Формат кадра
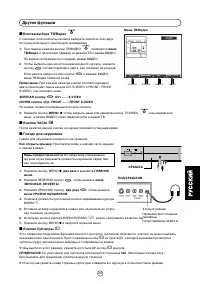
- 70 Два окна
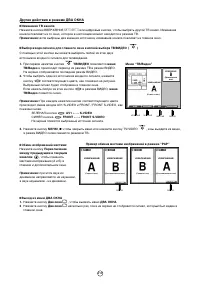
- 71 Другие действия в режиме ДВА ОКНА
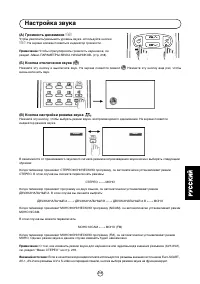
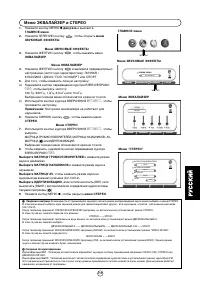
- 72 Настройка звука
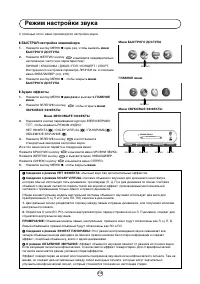
- 73 Режим настройки звука
- 74 Меню УРОВНИ ЗВУКА
- 75 Нормализация уровней звука
- 76 Меню ЭКВАЛАЙЗЕР и СТЕРЕО
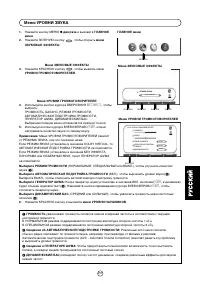
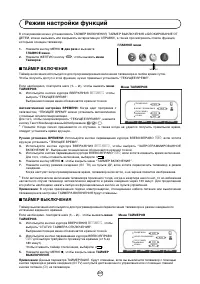
- 77 Режим настройки функций
- 78 Справка
- 81 Снимите PIN-код и блокировку от детей
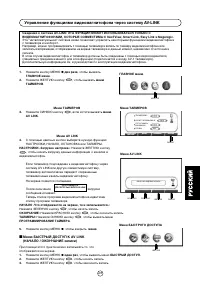
- 82 Управление функциями видеомагнитофона через систему AV-LINK; Меню БЫСТРЫЙ ДОСТУП К AV LINK
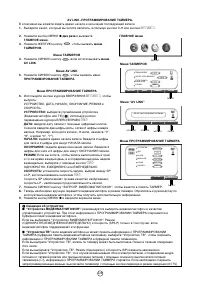
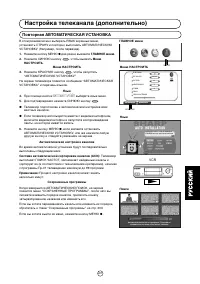
- 84 Повторная АВТОМАТИЧЕСКАЯ УСТАНОВКА
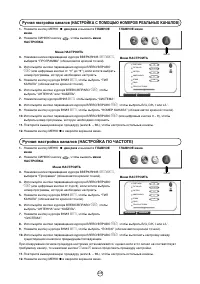
- 85 Ручная настройка каналов (НАСТРОЙКА ПО ЧАСТОТЕ)
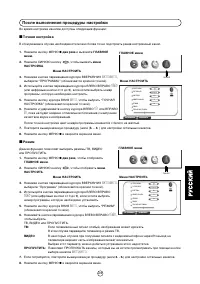
- 86 После выполнения процедуры настройки
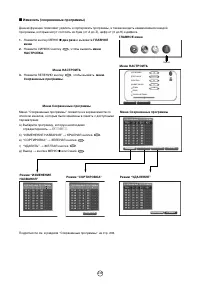
- 88 Другие функции
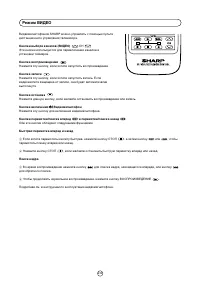
- 89 Режим ВИДЕО
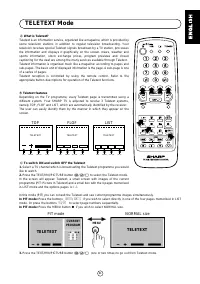
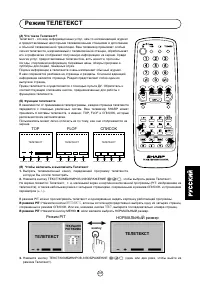
- 90 Режим ТЕЛЕТЕКСТ; ТЕЛЕТЕКСТ; кнопку; ТЕЛЕТЕКСТ
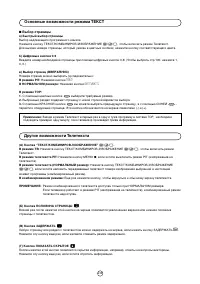
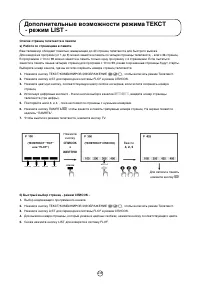
- 91 Выбор страницы; а) Быстрый выбор страницы; Основные возможности режима ТЕКСТ; В режиме телетекста PIT:; Другие возможности Телетекста
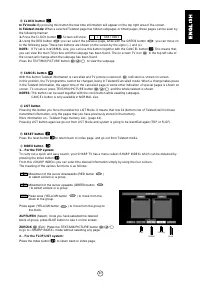
- 93 Дополнительные воэможности режима ТЕКСТ
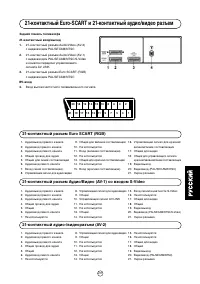
- 94 Задняя панель телевизора; Вход высокочастотного телевизионного сигнала
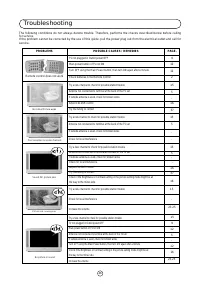
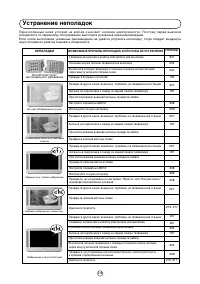
- 95 Устранение неполадок; НЕПОЛАДКИ
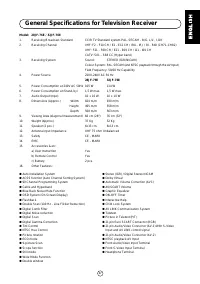
- 96 Общие характеристики телевизионного приемника
- 97 Указатель


