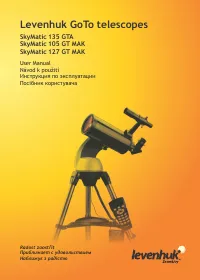
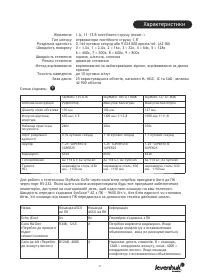
Телескопы Levenhuk SkyMatic 127 GT MAK - инструкция пользователя по применению, эксплуатации и установке на русском языке. Мы надеемся, она поможет вам решить возникшие у вас вопросы при эксплуатации техники.
Если остались вопросы, задайте их в комментариях после инструкции.
"Загружаем инструкцию", означает, что нужно подождать пока файл загрузится и можно будет его читать онлайн. Некоторые инструкции очень большие и время их появления зависит от вашей скорости интернета.

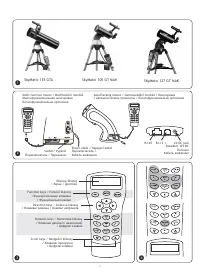

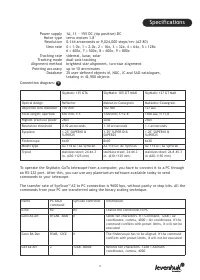


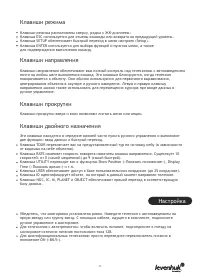
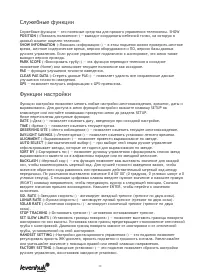


Function keys
Function keys are located at the top of the hand controller, directly below the display.
ESC key may be used to cancel a command or to go up the menu tree. SETUP key may be used to
quickly access the Setup menu. ENTER key may be used to confirm selections and commands.
Direction keys
Direction keys give you complete control over your telescope. When automatically navigating to
the object, these keys are temporarily blocked. They may be used for telescope alignment,
centering on a celestial object and manual navigation. The left and right keys are also used to
control the display cursor when entering data.
Scroll keys
Scroll keys may be used to navigate the menu tree on the display.
Numeric keys
These keys have two functions: numeric entry of coordinates and quick navigation.
TOUR key activates an automatic tour across the observed region of the celestial sphere.
RATE key changes the rotation rate of the servo motors when navigating with direction keys.
There are 10 rates in total, from 0 (lowest) to 9 (fastest).
UTILITY key opens the utility functions, e.g. Show Position, Display Time, etc.
USER key opens the user-created database (up to 25 user-defined objects).
ID key identifies the currently observed object.
NGC, IC, M, PLANET and OBJECT keys open the corresponding catalogue in the database.
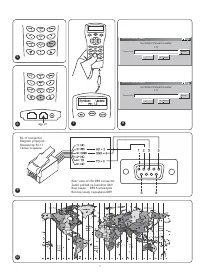
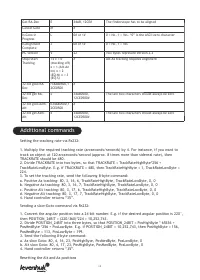
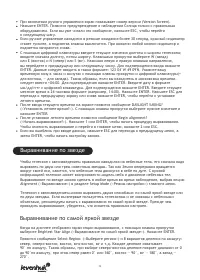
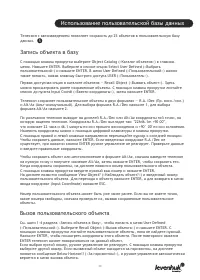
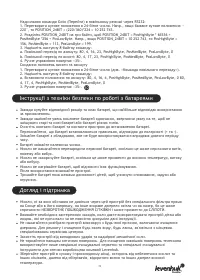
First setup
Make sure the mount is leveled. Point your telescope at a bright star or a star cluster. Connect
the hand controller to the mount.
For Auto-Tracking telescopes: power up your telescope by plugging it into a 12V DC power source.
For multi-function telescopes: simply power it up with the ON/OFF switch.
When the hand controller is connected, its display will show the current version number (Version
Screen). Press ENTER. A health warning regarding solar observations will be displayed. If you have
already read this warning, you can press ESC to continue.
If you are not using the hand controller for 30 seconds, it will enter the sleeping mode, the red
LED will be dimmed and the keypad backlight will be switched off. Upon pressing any key, the
sleeping mode will be cancelled.
Enter the longitude and latitude of your current location (in that order) with numeric keys.
Use scroll keys to scroll through cardinal directions: W for west, E for east, N for north and S for
south.
By using the left and right direction keys, you can scroll between the latitude and longitude.
Pressing ENTER will confirm your entry. Data should be entered in the following format: 123° 04’
W 49° 09’ N. Select your time zone by entering the hours and minutes using scroll and numeric
keys (+ for east, - for west). The PST time zone (e.g.) should look like this: -08:00.
5
Содержание
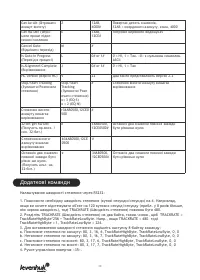
- 33 Телескопы Levenhuk с автонаведением
- 35 Клавиши двойного назначения
- 37 Выравнивание по двум звездам
- 38 Улучшение точности наведения
- 45 Дополнительные команды
- 47 Международная гарантия
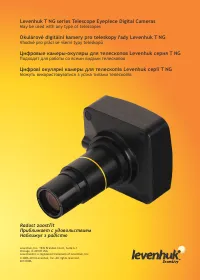
- 64 Levenhuk T NG series Telescope Eyepiece Digital Cameras; May be used with any type of telescopes; Okulárové digitální kamery pro teleskopy řady Levenhuk T NG; Vhodné pro práci se všemi typy teleskopů; Цифровые камеры-окуляры для телескопов Levenhuk серия T NG; Подходят для работы со всеми видами телескопов; Цифрові окулярні камеры для телескопів Levenhuk серії T NG; Можуть використовуватися з усіма типами телескопів


