
Строительные пылесосы Makita DVC864LZ - инструкция пользователя по применению, эксплуатации и установке на русском языке. Мы надеемся, она поможет вам решить возникшие у вас вопросы при эксплуатации техники.
Если остались вопросы, задайте их в комментариях после инструкции.
"Загружаем инструкцию", означает, что нужно подождать пока файл загрузится и можно будет его читать онлайн. Некоторые инструкции очень большие и время их появления зависит от вашей скорости интернета.


13 ENGLISH
Cancelling tool registration for the
cleaner
Perform the following procedure when cancelling the
tool registration for the cleaner.
1.
Install the batteries to the cleaner and the tool.
2.
Set the stand-by switch on the cleaner to "AUTO".
►
Fig.15:
1.
Stand-by switch
3.
Press the wireless activation button on the cleaner
for 6 seconds. The wireless activation lamp blinks in
green and then become red. After that, press the wire-
less activation button on the tool in the same way.
►
Fig.16:
1.
Wireless activation button
2.
Wireless
activation lamp
If the cancellation is performed successfully, the wire
-
less activation lamps will light up in red for 2 seconds
and start blinking in blue.
NOTE:
The wireless activation lamps finish blinking in
red after 20 seconds elapsed. Press the wireless acti
-
vation button on the tool while the wireless activation
lamp on the cleaner is blinking. If the wireless acti
-
vation lamp does not blink in red, push the wireless
activation button briefly and hold it down again.
Erasing all tool registrations
You can erase all tool registrations from the cleaner as
follows.
►
Fig.17:
1.
Stand-by switch
2.
Wireless activation
button
3.
Wireless activation lamp
1.
Install the batteries to the cleaner.
2.
Set the stand-by switch to "AUTO".
3.
Hold down the wireless activation button for about
6 seconds until the wireless activation lamp blinks in red
(about twice per one second).
4.
When the wireless activation lamp starts blinking
in red, release your finger from the wireless activation
button. Thereafter, hold down the wireless activation
button again for about 6 seconds.
5.
When the wireless activation lamp starts blinking
fast (about 5 times per one second) in red, release your
finger from the wireless activation button. When the
wireless activation lamp lights up in red and later lights
off, all tool registrations are erased.
NOTE:
If the wireless activation lamp does not blink
in red, press the wireless activation button briefly and
try again.
Description of the wireless activation lamp status
►
Fig.18:
1.
Wireless activation button
2.
Wireless
activation lamp
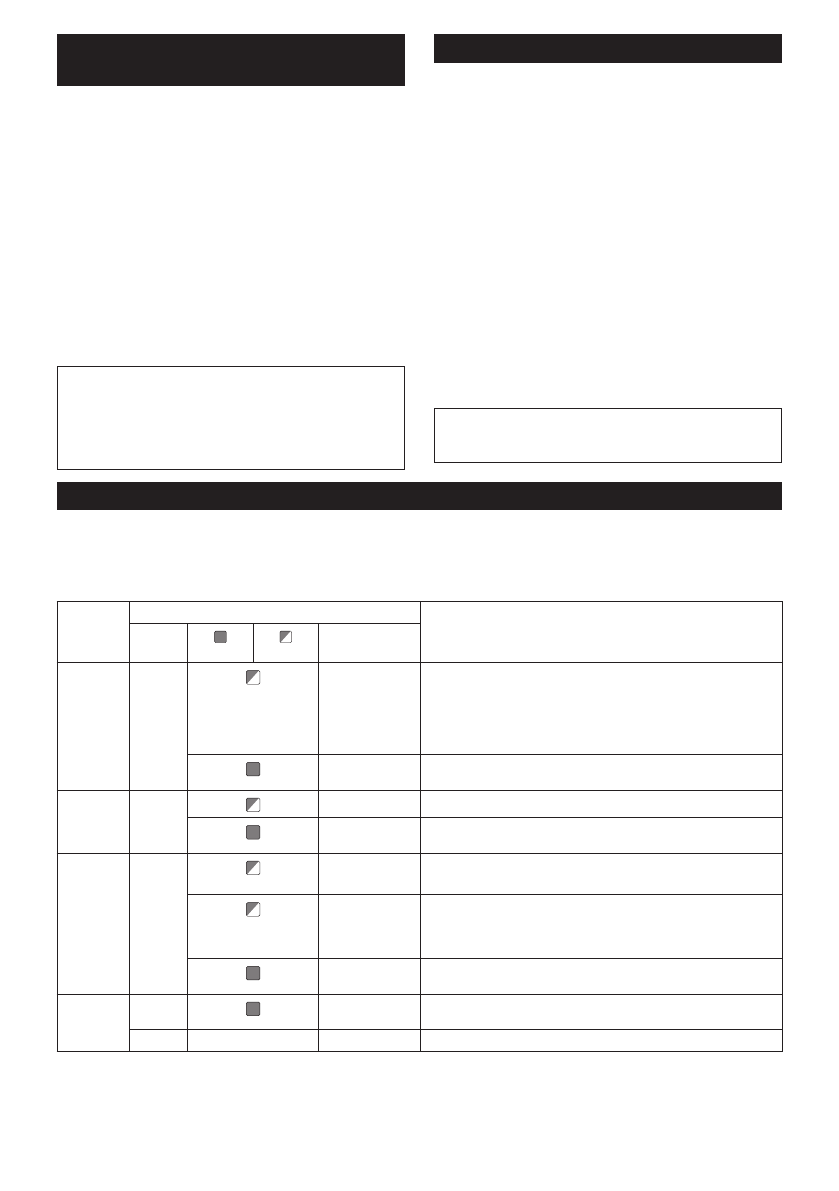
The wireless activation lamp shows the status of the wireless activation function. Refer to the below table for the
meaning of the lamp status.
Status
Wireless activation lamp
Description
Color
On
Blinking
Duration
Standby
Blue
Cleaner: con
-
tinuing
Tool: 2 hours
Waiting for the tool registration or the wireless activation function
is available.
The lamp on the cleaner blinks when the stand-by switch is set in
AUTO. The lamp on the tool blinks when the wireless activation
button is pushed. The lamp on the tool will automatically turn off
when no operation is performed for 2 hours.
When the tool is
running.
The wireless activation of the cleaner is available and the tool is
running.
Tool
registration
Green
20 seconds
Ready for the tool registration. Searching the tool to be registered.
2 seconds
The tool registration has been finished. The wireless activation
lamp will start blinking in blue.
Cancelling/
erasing
tool
registration
Red
(slow: 2 times/sec.)
20 seconds
Ready for the cancellation of the tool registration. Searching the
tool to be cancelled.
(fast: 5 times/sec.)
When the
wireless acti-
vation button is
pressed down.
Ready to erase all tool registrations.
2 seconds
The tool registration has been cancelled/erased. The wireless
activation lamp will start blinking in blue.
Others
Red
3 seconds
The power is supplied to the wireless unit and the wireless activa-
tion function is starting up.
Off
-
-
The stand-by switch is not set to "AUTO".
Содержание
- 85 ОСТОРОЖНО; Символы
- 86 МЕРЫ БЕЗОПАСНОСТИ
- 88 Важные правила техники; СОХРАНИТЕ ДАННЫЕ
- 89 Советы по обеспечению мак; ОПИСАНИЕ РАБОТЫ; Установка или снятие блока
- 90 Защита от перегрузки
- 91 ФУНКЦИЯ
- 92 Запуск функции беспроводной
- 93 Удаление всех записей
- 94 Поиск и устранение неисправностей для функции беспроводной
- 95 ОПИСАНИЕ ДЕТАЛЕЙ; Установка пылевого
- 97 Подсоединение шланга; ОБСЛУЖИВАНИЕ; Хранение дополнительного; ДОПОЛНИТЕЛЬНЫЕ
Характеристики

Остались вопросы?Не нашли свой ответ в руководстве или возникли другие проблемы? Задайте свой вопрос в форме ниже с подробным описанием вашей ситуации, чтобы другие люди и специалисты смогли дать на него ответ. Если вы знаете как решить проблему другого человека, пожалуйста, подскажите ему :)


