Страница 2 - En g l i sh; VisionTM camcorder. With your; W ARNING; or; Русский; ПРЕДУПРЕЖДЕНИЕ
2 En g l i sh We l co m e ! Congratulations on your purchase of this SonyHandycam Vision™ camcorder. With your Handycam Vision you can capture life’s preciousmoments with superior picture and soundquality.Your Handycam Vision is loaded with advancedfeatures, but at the same time it is very easy tous...
Страница 4 - Руский; Перед началом эксплуатации; Оглавление
4 Руский Перед началом эксплуатации Использование данного руководства ........... 5Проверка прилагаемых принадлежностей ... 6 Подготовка к эксплуатации Зарядка и установка баратейного блока ..... 7Вставка кассеты ........................................... 11 Основные операции Запись с помощью видео...
Страница 5 - Be f o r e y o u b e g i n; Usi n g t h i s m a n u a l; in the illustrations, you can; N o t e o n TV co l o u r sy st e m s; • Do not let the camcorder get wet. Keep the; Использование данного руководства; • Не позволяйте видеокамере делаться
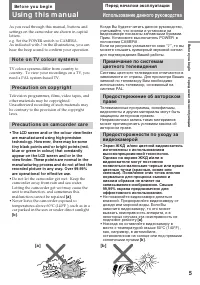
5 Be f o r e y o u b e g i n Usi n g t h i s m a n u a l As you read through this manual, buttons andsettings on the camcorder are shown in capitalletters.e.g. Set the POWER switch to CAMERA.As indicated with ≥ in the illustrations, you can hear the beep sound to confirm your operation. N o t e o n ...
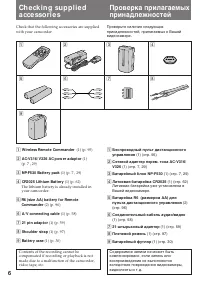
Страница 7 - Ch a r g i n g t h e b a t t e r y p a ck; Connect the mains lead to mains.; normal; Ge t t i n g st a r t e d; Зарядка батарейного блока; Когда лампочка CHARGE погаснет,; нормальная зарядка; будет завершена. Для; полной зарядки; , которая позволит Вам
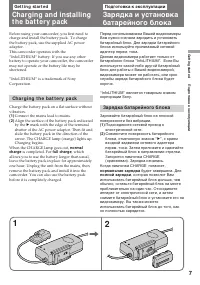
7 G etting s tarted Подготовка к эксплуатации Before using your camcorder, you first need tocharge and install the battery pack. To chargethe battery pack, use the supplied AC poweradaptor.This camcorder operates with the“InfoLITHIUM“ battery. If you use any otherbattery to operate your camcorder, t...
Страница 8 - Bat t ery pack; Время зарядки; Батарейный блок; Срок службы заряда батарейного блока; • Время оставшегося заряда батарейного
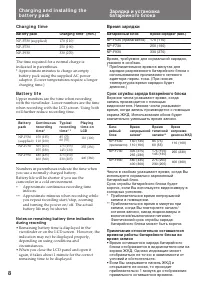
8 The time required for a normal charge isindicated in parentheses.* Approximate minutes to charge an empty battery pack using the supplied AC poweradaptor. (Lower temperatures require a longercharging time.) Ba t t e r y l i f e Upper numbers are the time when recordingwith the viewfinder. Lower nu...
Страница 9 - To r e m o v e t h e b a t t e r y p a ck; Not es on charging t he bat t ery pack; • The CHARGE lamp will remain lit for a while; Для снятия батарейного блока; Примечания по зарядке батарейного блока
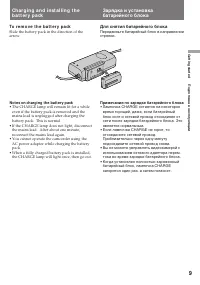
9 G etting s tarted Подготовка к эксплуатации To r e m o v e t h e b a t t e r y p a ck Slide the battery pack in the direction of thearrow. Not es on charging t he bat t ery pack • The CHARGE lamp will remain lit for a while even if the battery pack is removed and themains lead is unplugged after c...
Страница 10 - I n st a l l i n g t h e b a t t e r y p a ck; Inst alling t he bat t ery pack; Установка батарейного блока
10 BATT RELEASE (PUSH) Ch a r g i n g a n d i n st a l l i n g t h eb a t t e r y p a ck I n st a l l i n g t h e b a t t e r y p a ck Inst alling t he bat t ery pack Align the grooves of the battery pack with thereceptacles of the camcorder and slide the batterypack down until it catches on the bat...
Страница 11 - I n se r t i n g a ca sse t t e; Insert a cassette with the window facing out.; To e j e ct t h e ca sse t t e; and; Вставка кассеты; Для выталкивания кассеты; будут мигать и Вы не сможете
11 G etting s tarted Подготовка к эксплуатации EJECT I n se r t i n g a ca sse t t e Make sure that the power source is installed.When you want to record in the Hi8 system, useHi8 video cassette H . (1 ) While pressing the small blue button on theEJECT switch, slide it in the direction of thearrow. ...
Страница 12 - Ba si c o p e r a t i o n s; Ca m e r a re co rd i n g; Turn STANDBY up to STANDBY.; Основные операции; Запись с помощью видеокамеры
12 Ba si c o p e r a t i o n s Ca m e r a re co rd i n g Make sure that the power source is installed anda cassette is inserted and that the START/STOPMODE switch inside the LCD panel is set to . Before you record one-time events, you maywant to make a trial recording to make sure thatthe camcorder ...
Страница 13 - To st o p r e co r d i n g m o m e n t a r i l y [ a ]; Ca m e r a r e co r d i n g; Not e on St andby mode
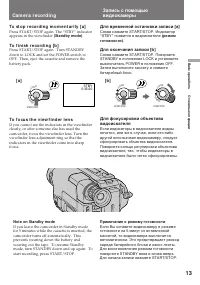
13 B asic operat ions Основные операции START/STOP LO CK S TA N D B Y START/STOP LO CK S TA N D B Y To st o p r e co r d i n g m o m e n t a r i l y [ a ] Press START/STOP again. The “STBY” indicatorappears in the viewfinder (St andby mode) . To f i n i sh r e co r d i n g [ b ] Press START/STOP aga...
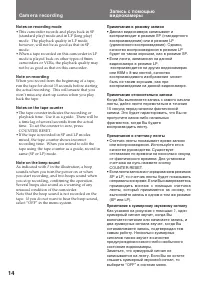
Страница 14 - Not es on recording mode; • Данная видеокамера записывает и; Примечание относительно записи; • Счетчик ленты показывает время записи; Примечание к зуммерному звуковому сигналу; Как указано на рисунках с помощью
14 Ca m e r a r e co r d i n g Not es on recording mode • This camcorder records and plays back in SP (standard play) mode and in LP (long play)mode. The playback quality in LP mode,however, will not be as good as that in SPmode. • When a tape recorded on this camcorder in LP mode is played back on ...
Страница 15 - Not e on t he AUTO DATE f eat ure; ON again in the menu system.; Usi n g t h e zo o m f e a t u r e; - Вы извлекли и снова вставили кассету с
15 B asic operat ions Основные операции W T T W T W Not e on t he AUTO DATE f eat ure The clock is set at the factory to London time forUnited Kingdom and to Paris time for the otherEuropean countries. You can reset the clock inthe menu system. You can change the AUTODATE settings by selecting ON or...
Страница 16 - Not es on digit al zoom; • Правая сторона
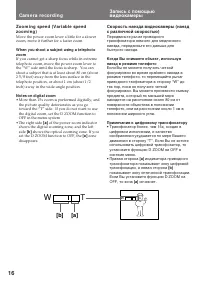
16 T W T W [a] [b] Ca m e r a r e co r d i n g Zo o m i n g sp e e d ( V a r i a b l e sp e e dzo o m i n g ) Move the power zoom lever a little for a slowerzoom, move it further for a faster zoom. W hen you shoot a subject using a t elephot ozoom If you cannot get a sharp focus while in extremetele...
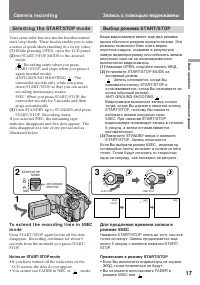
Страница 17 - Not es on START/ STOP mode; • If you have turned off the indicators on the; Запись с помощью видеокамеы; Примечание к режиму START/STOP; • Если Вы выключите индикаторы на экране; Se l e ct i n g t h e STA RT/STOP m o d e; : Recording starts when you press; Выбор режима START/STOP
17 B asic operat ions Основные операции Ca m e r a r e co r d i n g To e x t e n d t h e r e co r d i n g t i m e i n 5 SECm o d e Press START/STOP again before all the dotsdisappear. Recording continues for about 5seconds from the moment you press START/STOP. Not es on START/ STOP mode • If you hav...
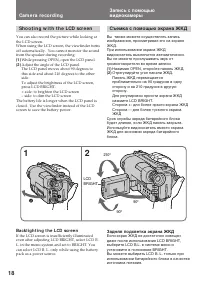
Страница 18 - Ba ck l i g h t i n g t h e LCD scr e e n; Sh o o t i n g w i t h t h e LCD scr e e n; Задняя подсветка экрана ЖКД
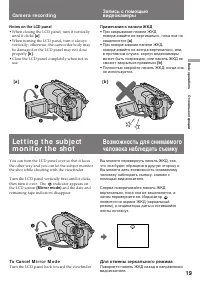
18 2 1 1 2 Ba ck l i g h t i n g t h e LCD scr e e n If the LCD screen is insufficiently illuminatedeven after adjusting LCD BRIGHT, select LCD B.L. in the menu system and set to BRIGHT. Youcan select LCD B. L. only while using the batterypack as a power source. Sh o o t i n g w i t h t h e LCD scr ...
Страница 19 - Not es on t he LCD panel; To Ca n ce l M i r r o r M o d e; Примечания к панели ЖКД; • При закрывании панели ЖКД; Для отмены зеркального режима
19 B asic operat ions Основные операции Not es on t he LCD panel • When closing the LCD panel, turn it vertically until it clicks [a ] . • When turning the LCD panel, turn it always vertically; otherwise, the camcorder body maybe damaged or the LCD panel may not closeproperly [b ] . • Close the LCD ...
Страница 20 - Not es on mirror mode; Примечания к зеркальному режиму; rP
20 Le t t i n g t h e su b j e ct m o n i t o r t h esh o t Not es on mirror mode • When you turn the LCD panel about 135 degrees to 210 degrees, the camcorder entersmirror mode. • Using the mirror mode, you can record yourself while watching yourself on the LCD [a ] . • The picture on the LCD looks...
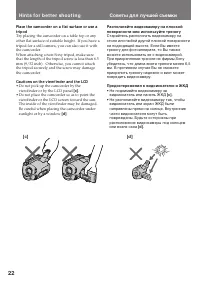
Страница 22 - Caut ions on t he view f inder and t he LCD; • Do not pick up the camcorder by the; Hi n t s f o r b e t t e r sh o o t i n g; Предостережения к видоискателю и ЖКД; • Не поднимайте видеокамеру за
22 Place t he camcorder on a f lat surf ace or use at ripod Try placing the camcorder on a table top or anyother flat surface of suitable height. If you have atripod for a still camera, you can also use it withthe camcorder.When attaching a non-Sony tripod, make surethat the length of the tripod scr...
Страница 24 - Ch e ck i n g t h e r e co r d e d p i ct u r e; Для останова воспроизведения
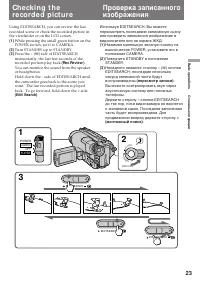
24 To st o p p l a y b a ck Release EDITSEARCH. To g o b a ck t o t h e l a st r e co r d e d p o i n ta f t e r e d i t se a r ch Press END SEARCH. The last recorded point isplayed back for about 5 seconds (10 seconds inLP mode) and stops. Note that this function doesnot work once you eject the cas...
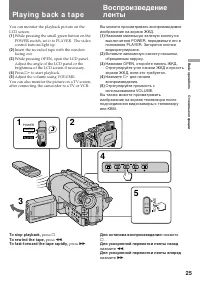
Страница 25 - Pl a y i n g b a ck a t a p e; Press; To rew ind t he t ape,; press; Для ускоренной перемотки ленты назад; нажмите; Для ускоренной перемотки ленты вперед; нажмите
25 B asic operat ions Основные операции 1 2 3 4 5 CAMERA POWER OFF PLAYER STOP REW PLAY FF PAUSE VOLUME Pl a y i n g b a ck a t a p e You can monitor the playback picture on theLCD screen. (1 ) While pressing the small green button on thePOWER switch, set it to PLAYER. The videocontrol buttons light...
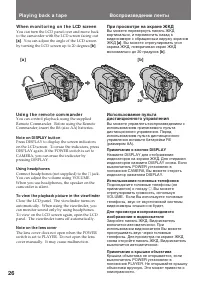
Страница 26 - W h e n m o n i t o r i n g o n t h e LCD scr e e n; . You can adjust the angle of the LCD screen; Usi n g t h e r e m o t e co m m a n d e r; Not e on DISPLAY but t on; Connect headphones (not supplied) to the; To view t he playback pict ure in t he view f inder; Воспроизведение ленты; При просмотре на экране ЖКД; . Вы можете отрегулировать угол; Примечание к кнопке DISPLAY
26 20° W h e n m o n i t o r i n g o n t h e LCD scr e e n You can turn the LCD panel over and move backto the camcorder with the LCD screen facing out [a] . You can adjust the angle of the LCD screen by turning the LCD screen up to 20 degrees [b ] . Pl a y i n g b a ck a t a p e Usi n g t h e r e m...
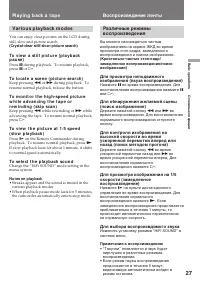
Страница 27 - V a r i o u s p l a y b a ck m o d e s; To l o ca t e a sce n e ( p i ct u r e se a r ch ); Not es on playback; Для выбора воспроизвдимого звука; Примечания к воспроизведению
27 B asic operat ions Основные операции V a r i o u s p l a y b a ck m o d e s You can enjoy clear pictures on the LCD duringstill, slow and picture search. (Cryst al-clear st ill/ slow / pict ure search) To v i e w a st i l l p i ct u r e ( p l a y b a ckp a u se ) Press P during playback. To resum...
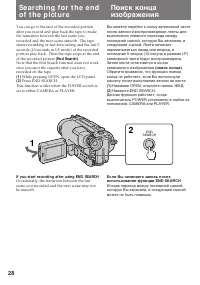
Страница 28 - While pressing OPEN, open the LCD panel.; If you st art recording af t er using END SEARCH
28 2 1 END SEARCH You can go to the end of the recorded portionafter you record and play back the tape to makethe transition between the last scene yourecorded and the next scene smooth. The tapestarts rewinding or fast-forwarding and the last 5seconds (10 seconds in LP mode) of the recordedportion ...
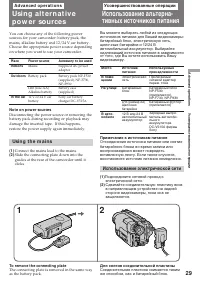
Страница 29 - To remove t he connect ing plat e; A d v a n ce d o p e r a t i o n s; Not e on pow er sources; Usi n g t h e m a i n s; Connect the mains lead to the mains.; Усовершенствованные операции; Примечание к источникам питания; Использование электрической сети; Подсоедините сетевой провод к; Для снятия соединительной пластины
29 Advanc ed operat ions Усовершенствованные операции Используемыепринадлежности Прилагаемыйсетевой адаптерперем. токаБатарейный блокNP-F530(прилагается),NP-F730, NP-F930Батарейный футляр(прилагается) Зарядный выпря-митель автомоби-льногоаккумулятораDC-V515A фирмыSony 2 1 To remove t he connect ing ...
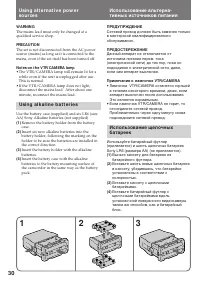
Страница 30 - • The VTR/CAMERA lamp will remain lit for a; Usi n g a l k a l i n e b a t t e r i e s; ПРЕДУПРЖДЕНИЕ; • Лампочка VTR/CAMERA останется горящей
30 W ARNING The mains lead must only be changed at aqualified service shop. PRECAUTION The set is not disconnected from the AC powersource (mains) as long as it is connected to themains, even if the set itself has been turned off. Not es on t he VTR/ CAM ERA lamp • The VTR/CAMERA lamp will remain li...
Страница 31 - Ba t t e r y Li f e; Not es; • You may not use the battery case in cold; W hen t he bat t ery case is inst alled; Usi n g a ca r b a t t e r y; To remove t he car bat t ery charger; • При низкой температуре Вы, возможно, не; Если установлен батарейный футляр; Срок службы батареек
31 Advanc ed operat ions Усовершенствованные операции Usi n g a l t e r n a t i v e p o w e rso u r ce s Ba t t e r y Li f e Using alkaline batteries at 25°C (77°F).Upper numbers are the time when recordingwith the viewfinder. Lower numbers are the timewhen recording with the LCD screen. Not es • Yo...
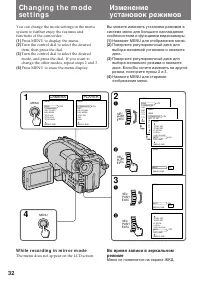
Страница 32 - W h i l e r e co r d i n g i n m i r r o r m o d e; The menu does not appear on the LCD screen.
32 Ch a n g i n g t h e m o d ese t t i n g s You can change the mode settings in the menusystem to further enjoy the features andfunctions of the camcorder. (1) Press MENU to display the menu. (2) Turn the control dial to select the desireditem, then press the dial. (3) Turn the control dial to sel...
Страница 33 - Ch a n g i n g t h e m o d e se t t i n g s
33 Advanc ed operat ions Усовершенствованные операции Se l e ct i n g t h e m o d e se t t i n g o fe a ch i t e m I t e m s f o r b o t h CA M ERA a n d PLA Y ERm o d e s COM M ANDER <ON/ OFF> • Select ON when using the supplied Remote Commander for the camcorder. • Select OFF when not using ...
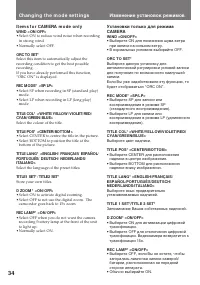
Страница 34 - I t e m s f o r CA M ERA m o d e o n l y
34 I t e m s f o r CA M ERA m o d e o n l y W IND <ON/ OFF> • Select ON to reduce wind noise when recording in strong wind. • Normally select OFF. ORC TO SET* Select this item to automatically adjust therecording condition to get the best possiblerecording.If you have already performed this fu...
Страница 35 - Примечания по режиму DEMO MODE
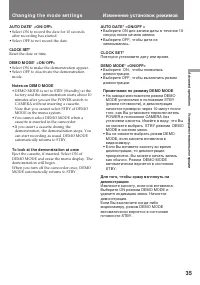
35 Advanc ed operat ions Усовершенствованные операции Ch a n g i n g t h e m o d e se t t i n g s Изменение установок режимов AUTO DATE* <ON/OFF > • Выберите ON для записи даты в течение 10 секунд после начала записи. • Выберите OFF, чтобы дата не записывалась. CLOCK SET* Повторно установите д...
Страница 36 - I t e m s f o r PLA Y ER m o d e o n l y; Not e on TBC set t ing; Изменение установок режимов; Примечания к установке TBC
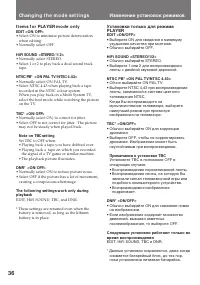
36 Ch a n g i n g t h e m o d e se t t i n g s I t e m s f o r PLA Y ER m o d e o n l y EDIT <ON/ OFF> • Select ON to minimize picture deterioration when editing. • Normally select OFF. HiFi SOUND <STEREO/ 1/ 2> • Normally select STEREO.• Select 1 or 2 to play back a dual sound track tap...
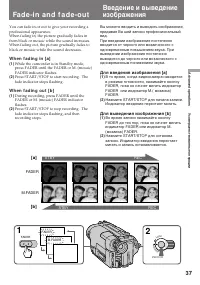
Страница 38 - You cannot use the fader function.; Во время отображения надписи
38 To ca n ce l t h e f a d e -i n /f a d e -o u tf u n ct i o n Before pressing START/STOP, press FADERuntil the fade indicator disappears. W hen t he dat e or t ime indicat or is displayed The date or time indicator does not fade in orfade out. W hen t he t it le is displayed You cannot use the fa...
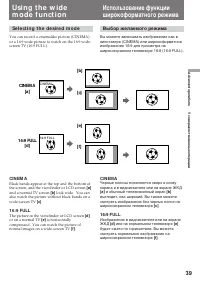
Страница 39 - CINEM A; Se l e ct i n g t h e d e si r e d m o d e; CI N EM A; and a normal TV screen; Выбор желаемого режима; CINEMA; и обычный телевизионный экран
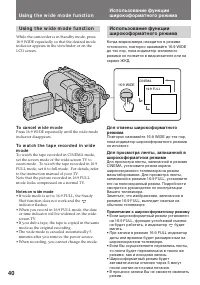
39 Advanc ed operat ions Усовершенствованные операции [b] CINEM A [a] [c] [e] [f ] CINEMA 16:9 FULL 16:9 FULL [d] Se l e ct i n g t h e d e si r e d m o d e You can record a cinemalike picture (CINEMA)or a 16:9 wide picture to watch on the 16:9 wide-screen TV (16:9 FULL). Usi n g t h e w i d em o d ...
Страница 40 - To ca n ce l w i d e m o d e; Not es on w ide mode; Usi n g t h e w i d e m o d e f u n ct i o n; Примечания к широкоформатному режиму
40 16:9 FULL CINEMA 16:9 WIDE Usi n g t h e w i d e m o d e f u n ct i o n While the camcorder is in Standby mode, press16:9 WIDE repeatedly so that the desired modeindicator appears in the viewfinder or on theLCD screen. To ca n ce l w i d e m o d e Press 16:9 WIDE repeatedly until the wide modeind...
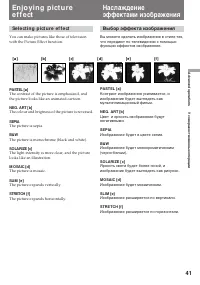
Страница 41 - Se l e ct i n g p i ct u r e e f f e ct; The colour and brigtness of the picture is reversed.; The picture is sepia.; Выбор эффекта изображения; SEPIA; Изображение будет в цвете сепия.
41 Advanc ed operat ions Усовершенствованные операции En j o y i n g p i ct u ree f f e ct Se l e ct i n g p i ct u r e e f f e ct You can make pictures like those of televisionwith the Picture Effect function. PASTEL [a] The contrast of the picture is emphasized, andthe picture looks like an animat...
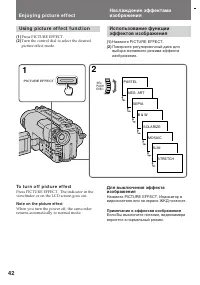
Страница 42 - Usi n g p i ct u r e e f f e ct f u n ct i o n; Press PICTURE EFFECT.; To t u r n o f f p i ct u r e e f f e ct; Not e on t he pict ure ef f ect; En j o y i n g p i ct u r e e f f e ct; Нажмите PICTURE EFFECT.; Примечание к эффектам изображения
42 PICTURE EFFECT 1 2 PASTEL NEG. ART SEPIA B & W SOLARIZE MOSAIC SLIM STRETCH SEL/ PUSH EXEC Usi n g p i ct u r e e f f e ct f u n ct i o n (1) Press PICTURE EFFECT. (2) Turn the control dial to select the desiredpicture effect mode. To t u r n o f f p i ct u r e e f f e ct Press PICTURE EFFECT...
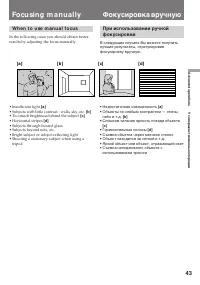
Страница 43 - Fo cu si n g m a n u a l l y; W h e n t o u se m a n u a l f o cu s; • Insufficient light; Фокусировка вручную; • Недостаточная освещенность
43 Advanc ed operat ions Усовершенствованные операции [ a ] [ b ] [ c] [ d ] Fo cu si n g m a n u a l l y W h e n t o u se m a n u a l f o cu s In the following cases you should obtain betterresults by adjusting the focus manually. • Insufficient light [a ] • Subjects with little contrast - walls, s...
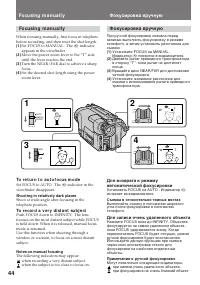
Страница 44 - To r e t u r n t o a u t o f o cu s m o d e; Shoot ing in relat ively dark places; To r e co r d a v e r y d i st a n t su b j e ct; Not es on manual f ocusing; Съемка в относительно темных местах; Для записи очень удаленного объекта; Примечания к ручной фокусировке
44 Fo cu si n g m a n u a l l y When focusing manually, first focus in telephotobefore recording, and then reset the shot length. (1 ) Set FOCUS to MANUAL. The f indicator appears in the viewfinder. (2 ) Move the power zoom lever to the “T” sideuntil the lever reaches the end. (3 ) Turn the NEAR/FAR...
Страница 45 - Se l e ct i n g t h e b e st m o d e; Spot light mode; Выбор наилучшего режима
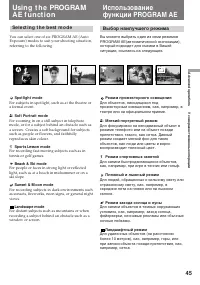
45 Advanc ed operat ions Усовершенствованные операции Usi n g t h e PROGRA MA E f u n ct i o n Se l e ct i n g t h e b e st m o d e You can select one of six PROGRAM AE (AutoExposure) modes to suit your shooting situation,referring to the following. Spot light mode For subjects in spotlight, such as...
Страница 46 - To t u r n o f f p r o g r a m A E; Not es on f ocus set t ing; • In the Spotlight, Sports lesson and Beach & Ski; Not e on PROGRAM AE; AE; Примечания к установке фокуса; • В режимах прожекторного освещения,; Примечание к функции PROGRAM AE
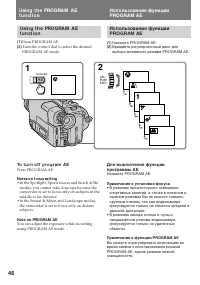
46 Usi n g t h e PROGRA M A Ef u n ct i o n (1 ) Press PROGRAM AE. (2 ) Turn the control dial to select the desiredPROGRAM AE mode. To t u r n o f f p r o g r a m A E Press PROGRAM AE. Not es on f ocus set t ing • In the Spotlight, Sports lesson and Beach & Ski modes, you cannot take close-ups b...
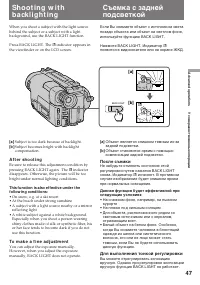
Страница 47 - A f t e r sh o o t i n g; Нажмите BACK LIGHT. Индикатор; После съемки; исчезнет. В противном; Для выполнения тонкой регулировки
47 Advanc ed operat ions Усовершенствованные операции Sh o o t i n g w i t hb a ck l i g h t i n g When you shoot a subject with the light sourcebehind the subject or a subject with a lightbackground, use the BACK LIGHT function. Press BACK LIGHT. The c indicator appears in the viewfinder or on the ...
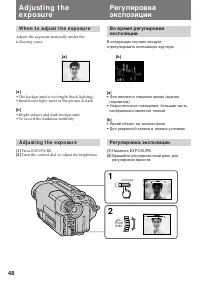
Страница 48 - A d j u st i n g t h e e x p o su r e; Turn the control dial to adjust the brightness.; Регулировка экспозиции; • Фон является слишком ярким (задняя
48 A d j u st i n g t h e e x p o su r e (1 ) Press EXPOSURE. (2 ) Turn the control dial to adjust the brightness. Регулировка экспозиции (1 ) Нажмите EXPOSURE. (2 ) Вращайте регулировочный диск длярегулировки яркости. A d j u st i n g t h ee x p o su re W h e n t o a d j u st t h e e x p o su r e A...
Страница 49 - Press EXPOSURE again.; Shoot ing w it h t he sun behind you; Снова нажмите EXPOSURE.; Съемка в темных условиях
49 Advanc ed operat ions Усовершенствованные операции To r e t u r n t o a u t o m a t i c e x p o su r em o d e Press EXPOSURE again. Shoot ing w it h t he sun behind you If the light source is behind your subject, or in thefollowing situations, the subject will be recordedtoo dark.• The subject is...
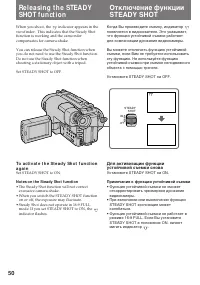
Страница 50 - Not es on t he St eady Shot f unct ion; Установите STEADY SHOT на OFF.; Примечания к функции устойчивой съемки; • Функция устойчивой съемки не сможет
50 ON OFF STEADY SHOT When you shoot, the indicator appears in the viewfinder. This indicates that the Steady Shotfunction is working and the camcordercompensates for camera-shake. You can release the Steady Shot function whenyou do not need to use the Steady Shot function.Do not use the Steady Shot...
Страница 51 - Se l e ct i n g t h e l a n g u a g e; Press MENU to erase the menu display.; Usi n g t i t l e s; To a d d t h e t i t l e f r o m t h e b e g i n n i n g; While the camcorder is in Standby mode,; Наложение надписи; Выбор языка; Для наложения надписи от начала
51 Advanc ed operat ions Усовершенствованные операции Su p e r i m p o si n g at i t l e You can select one of eight preset titles. You canalso select the language, position, and colour oftitles in the menu system. Se l e ct i n g t h e l a n g u a g e (1 ) While the camcorder is in Standby mode,pre...
Страница 52 - Su p e r i m p o si n g a t i t l e; Примечания к наложению надписи
52 To a d d t h e t i t l e w h i l e y o u a r er e co r d i n g (1 ) While the camcorder is in Standby mode, press TITLE repeatedly until the desired titleappears.Each time a new title appears, it is flashing. (2 ) When the desired title appears, wait for it to stop flashing, and press TITLE again...
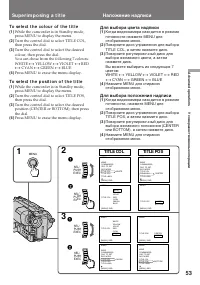
Страница 53 - To se l e ct t h e co l o u r o f t h e t i t l e; TITLE COL; Для выбора цвета надписи
53 Advanc ed operat ions Усовершенствованные операции To se l e ct t h e co l o u r o f t h e t i t l e (1 ) While the camcorder is in Standby mode,press MENU to display the menu. (2 ) Turn the control dial to select TITLE COL,then press the dial. (3 ) Turn the control dial to select the desiredcolo...
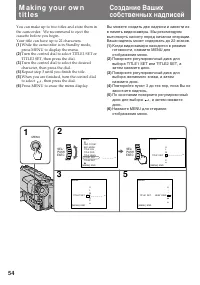
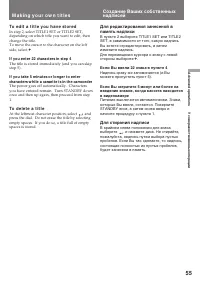
Страница 55 - To e d i t a t i t l e y o u h a v e st o r e d; If you ent er 22 charact ers in st ep 4; To d e l e t e a t i t l e; At the leftmost character position, select; M a k i n g y o u r o w n t i t l e s; Если Вы ввели 22 знака в пункте 4; Для стирания надписи
55 Advanc ed operat ions Усовершенствованные операции To e d i t a t i t l e y o u h a v e st o r e d In step 2, select TITLE1 SET or TITLE2 SET,depending on which title you want to edit, thenchange the title.To move the cursor to the character on the leftside, select M . If you ent er 22 charact er...
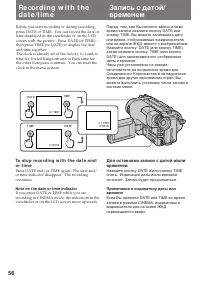
Страница 56 - Not e on t he dat e or t ime indicat or
56 Re co rd i n g w i t h t h ed a t e /t i m e Запись с датой/временем Перед тем, как Вы начнете запись или вовремя записи нажмите кнопку DATE иликнопку TIME. Вы можете записывать датуили время, отображаемые в видоискателеили на экране ЖКД, вместе с изображением.Нажмите кнопку DATE (или кнопку TIME...
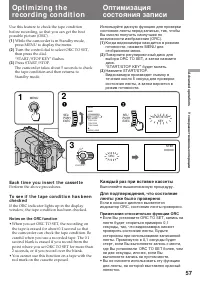
Страница 57 - Ea ch t i m e y o u i n se r t t h e ca sse t t e; Not es on t he ORC f unct ion; Каждый раз при вставке кассеты; Выполняйте вышеописанную процедуру.; Примечания относительно функции ORC; • Если Вы установите ORC TO SET, запись на
57 Advanc ed operat ions Усовершенствованные операции Op t i m i zi n g t h ere co rd i n g co n d i t i o n Use this feature to check the tape conditionbefore recording, so that you can get the bestpossible picture (ORC). (1 ) While the camcorder is in Standby mode, press MENU to display the menu. ...
Страница 58 - Передача сигнала
58 Wa t ch i n g o n a TVscre e n : Signal flow/ Передача сигнала Просмотр на экранетелевизора Подсоедините видеокамеру к Вашему КВМили телевизору для просмотравоспроизводимого изображения нателевизионном экране.При просмотре воспроизводимогоизображения посредством подсоединениявидеокамеры к Вашему ...
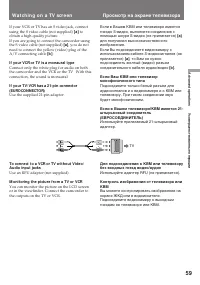
Страница 59 - to; If your VCR or TV is a monaural t ype; W a t ch i n g o n a TV scr e e n
59 Advanc ed operat ions Усовершенствованные операции If your VCR or TV has an S video jack, connectusing the S video cable (not supplied) [a] to obtain a high quality picture.If you are going to connect the camcorder usingthe S video cable (not supplied) [a ] , you do not need to connect the yellow...
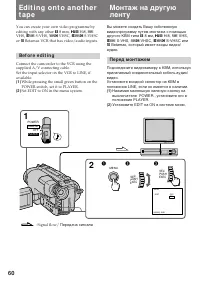
Страница 60 - Be f o r e e d i t i n g; Set EDIT to ON in the menu system.; Перед монтажем; Установите EDIT на ON в системе меню.
60 Ed i t i n g o n t o a n o t h e rt a p e You can create your own video programme byediting with any other h 8 mm, H Hi8, j VHS, k S-VHS, VHSC, K S-VHSC or l Betamax VCR that has video/audio inputs. Be f o r e e d i t i n g Connect the camcorder to the VCR using thesupplied A/V connecting cable...
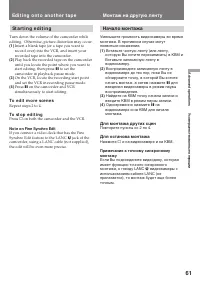
Страница 61 - St a r t i n g e d i t i n g; To e d i t m o r e sce n e s; Not e on Fine Synchro Edit; Ed i t i n g o n t o a n o t h e r t a p e; Для монтажа других сцен
61 Advanc ed operat ions Усовершенствованные операции St a r t i n g e d i t i n g Turn down the volume of the camcorder whileediting. Otherwise, picture distortion may occur. (1 ) Insert a blank tape (or a tape you want torecord over) into the VCR, and insert yourrecorded tape into the camcorder. (...
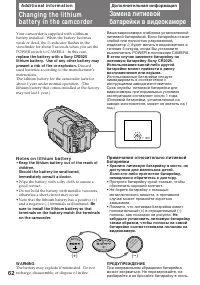
Страница 62 - N o t e s o n l i t h i u m b a t t e r y; • Wipe the battery with a dry cloth to assure a; A d d i t i o n a l i n f o r m a t i o n; indicator flashes in the; Дополнительная информация; будет мигать в видоискателе в; немедленно обратитесь к доктору.; • Протрите батарейку сухой тканью, чтобы; Не
62 W ARNING The battery may explode if mistreated. Do notrecharge, disassemble, or dispose of in fire. N o t e s o n l i t h i u m b a t t e r y • Keep t he lit hium bat t ery out of t he reach ofchildren.Should t he bat t ery be sw allow ed,immediat ely consult a doct or. • Wipe the battery with a ...
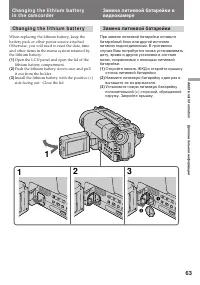
Страница 63 - Ch a n g i n g t h e l i t h i u m b a t t e r y
63 Addit ional inf ormat ion Дополнительная информация Ch a n g i n g t h e l i t h i u m b a t t e r y When replacing the lithium battery, keep thebattery pack or other power source attached.Otherwise, you will need to reset the date, timeand other items in the menu system retained bythe lithium ba...
Страница 64 - To co r r e ct t h e d a t e a n d t i m e se t t i n g; Repeat the above procedure.; Повторите вышеописанную процедуру.
64 Re se t t i n g t h e d a t ea n d t i m e You can reset the date and time in the menusystem. (1 ) While the camcorder is in Standby mode,press MENU to display the menu. (2 ) Turn the control dial to select CLOCK SET,then press the dial. (3 ) Turn the control dial to adjust the desiredyear, then ...
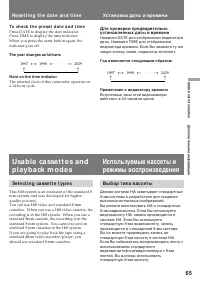
Страница 65 - To ch e ck t h e p r e se t d a t e a n d t i m e; The year changes as f ollow s:; Se l e ct i n g ca sse t t e t y p e s; Год изменяется следующим образом:; Выбор типа кассеты
65 Addit ional inf ormat ion Дополнительная информация To ch e ck t h e p r e se t d a t e a n d t i m e Press DATE to display the date indicator.Press TIME to display the time indicator.When you press the same button again, theindicator goes off. The year changes as f ollow s: Not e on t he t ime i...
Страница 66 - W h e n y o u p l a y b a ck; N o t e o n A FM Hi Fi st e r e o; Playing back an NTSC-recorded t ape; Режимы воспроизведения; Примечание к стереозвучанию AFM HiFi
66 W h e n y o u p l a y b a ck The playback mode (SP/LP) and system (Hi8/standard 8 mm) are selected automaticallyaccording to the format in which the tape hasbeen recorded. The quality of the recordedpicture in LP mode, however, will not be as goodas that in SP mode. N o t e o n A FM Hi Fi st e r ...
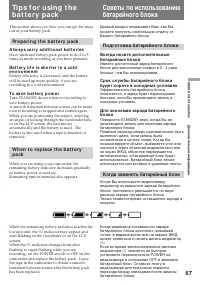
Страница 67 - Pr e p a r i n g t h e b a t t e r y p a ck; A l w a y s ca r r y a d d i t i o n a l b a t t e r i e s; indicator may appear and; Подготовка батарейного блока; сменится на быстрое,
67 Addit ional inf ormat ion Дополнительная информация Ti p s f o r u si n g t h eb a t t e r y p a ck This section shows you how you can get the mostout of your battery pack. Pr e p a r i n g t h e b a t t e r y p a ck A l w a y s ca r r y a d d i t i o n a l b a t t e r i e s Have sufficient batte...
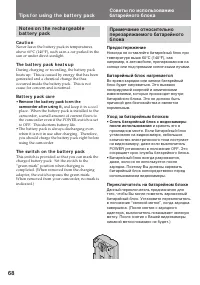
Страница 68 - and keep it in a cool; Th e sw i t ch o n t h e b a t t e r y p a ck; Ti p s f o r u si n g t h e b a t t e r y p a ck; Предостережение; и хранить его в; Переключатель на батарейном блоке
68 N o t e s o n t h e r e ch a r g e a b l eb a t t e r y p a ck Ca u t i o n Never leave the battery pack in temperaturesabove 60°C (140°F), such as in a car parked in thesun or under direct sunlight. Th e b a t t e r y p a ck h e a t s u p During charging or recording, the battery packheats up. T...
Страница 69 - Th e l i f e o f t h e b a t t e r y p a ck; How t he bat t ery consumpt ion is displayed; indicator may also flash under; Срок службы батарейного блока; также может мигать при
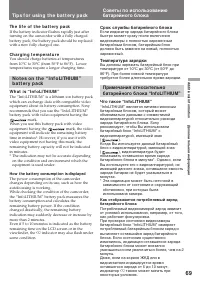
69 Addit ional inf ormat ion Дополнительная информация Ti p s f o r u si n g t h e b a t t e r y p a ck Th e l i f e o f t h e b a t t e r y p a ck If the battery indicator flashes rapidly just afterturning on the camcorder with a fully chargedbattery pack, the battery pack should be replacedwith a ...
Страница 70 - N o t e s o n ch a r g i n g; A b r a n d -n e w b a t t e r y p a ck; • После того, как Вы использовали; Примечания к зарядке; Совершенно новый батарейный блок
70 To obt ain more accurat e remaining bat t eryindicat ion Set the camcorder to recording standby modeand point towards a stationary object. Do notmove the camcorder for 30 seconds or more.• If the indication seems incorrect, use up the battery pack and then recharge it fully (Fullcharge 1) ). Note...
Страница 71 - Be su r e t o o b se r v e t h e f o l l o w i n g; N o t e s o n t h e b a t t e r y ca se; Обязательно соблюдайте следующее
71 Addit ional inf ormat ion Дополнительная информация Ti p s f o r u si n g t h e b a t t e r y p a ck N o t e s o n t h e t e r m i n a l s If t he t erminals (met al part s on t he back) arenot clean, t he bat t ery charge durat ion w ill beshort ened. When the terminals are not clean or when the...
Страница 72 - M o i st u r e co n d e n sa t i o n; I n si d e t h e ca m co r d e r; indicator flashes. If this; On t h e l e n s; Конденсация влаги; Внутри видеокамеры; будет; На объективе
72 M aint enance inf orm at ionand precaut ions M o i st u r e co n d e n sa t i o n If the camcorder is brought directly from a coldplace to a warm place, moisture may condenseinside the camcorder, on the surface of the tape,or on the lens. In this condition, the tape maystick to the head drum and ...
Страница 73 - V i d e o h e a d cl e a n i n g; indicator and; Ca u t i o n; Not e; Очистка видеоголовок; сообщение “; Примечание
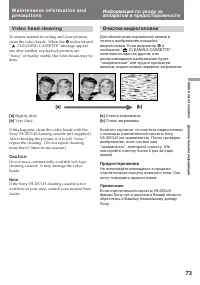
73 Addit ional inf ormat ion Дополнительная информация V i d e o h e a d cl e a n i n g To ensure normal recording and clear pictures,clean the video heads. When the v indicator and “ CLEANING CASSETTE” message appear one after another or playback pictures are“noisy” or hardly visible, the video hea...
Страница 74 - To r e a t t a ch t h e e y e cu p; Установите наглазник так, чтобы канавка; Caut ion
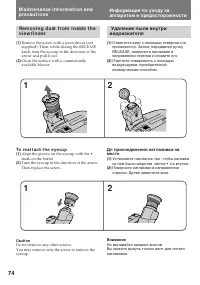
74 M a i n t e n a n ce i n f o r m a t i o n a n dp r e ca u t i o n s Информация по уходу зааппаратом и предосторожности Re m o v i n g d u st f r o m i n si d e t h ev i e w f i n d e r (1) Remove the screw with a screwdriver (notsupplied). Then, while sliding the RELEASEknob, turn the eyecup in ...
Страница 75 - Pr e ca u t i o n s; Ca m co r d e r o p e r a t i o n; Предосторожности; Эксплуатация видеокамеры
75 Addit ional inf ormat ion Дополнительная информация M a i n t e n a n ce i n f o r m a t i o n a n dp r e ca u t i o n s Информация по уходу зааппаратом и предосторожности Pr e ca u t i o n s Ca m co r d e r o p e r a t i o n • Operate the camcorder on 7.2 V (battery pack) or 8.4 V (AC power adap...
Страница 76 - A C p o w e r a d a p t o r; Charging; Сетевой адаптер перем. тока; Зарядка; Прочее
76 • Clean the camcorder body with a dry soft cloth, or a soft cloth lightly moistened with a milddetergent solution. Do not use any type ofsolvent which may damage the finish. • If fingerprints or debris make the LCD screen dirty, we recommend using a LCD Cleaning Kit(not supplied) to clean the LCD...
Страница 77 - N o t e s o n d r y b a t t e r i e s; If bat t ery leakage occurred
77 Addit ional inf ormat ion Дополнительная информация • While the unit is in use, particularly during charging, keep it away from AM receivers andvideo equipment because it will disturb AMreception and video operation. • The unit becomes warm while in use. This is normal. • Do not place the unit in...
Страница 78 - PAL syst em; Brazil; NTSC syst em; Источники питания; Система PAL; Бразилия; Система NTSC
78 Usi n g y o u rca m co rd e r a b ro a d Each country or area has its own electric and TVcolour systems. Before using your camcorderabroad, check the following points. Po w e r so u r ce s You can use your camcorder in any country orarea with the supplied AC power adaptor within110 V to 240 V AC,...
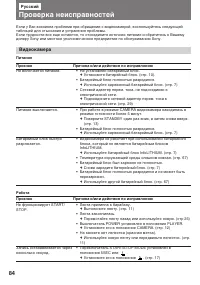
Страница 84 - Видеокамера; Питание; Проверка неисправностей
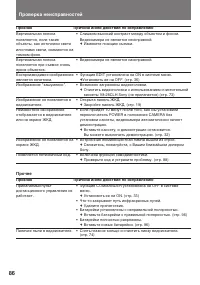
84 Признак Не включается питание. Питание выключается. Батарейный блок быстроразряжается. • Не установлен батарейный блок. m Установите батарейный блок. (стр. 10). • Батарейный блок полностью разрядился. m Используйте заряженный батарейный блок. (стр. 7) • Сетевой адаптер перем. тока. не подсоединен...
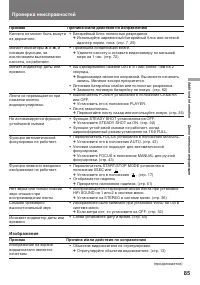
Страница 85 - Признак; Изображение; Причина и/или действия по исправлению
85 Addit ional inf ormat ion Дополнительная информация Признак Кассета не может быть вынутаиз держателя. Мигают иникаторы { и 6 , и никакие функции, заисключением выталкиваниякассеты, не работают.Мигает индикатор даты иливремени. Лента не перемещается принажатии кнопкивидеорегулировки. Не активизиру...
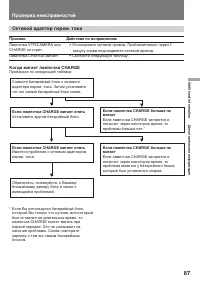
Страница 87 - Когда мигает лампочка CHARGE; Если лампочка CHARGE мигает опять
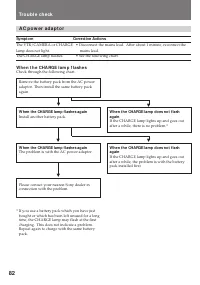
87 Addit ional inf ormat ion Дополнительная информация Сетевой адаптер перем. тока • Отсоедините сетевой провод. Приблизительно через 1 минуту снова подсоедините сетевой провод. • Смотрите следующую таблицу. Признак Лампочка VTR/CAMERA или CHARGE не горит. Лампочка CHARGE мигает. Когда мигает лампоч...
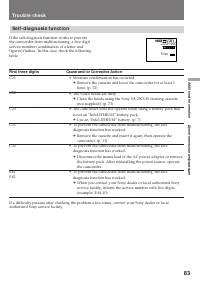
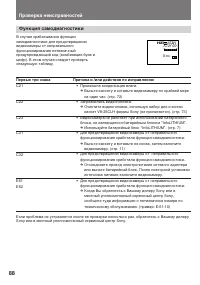
Страница 88 - Первые три знака; Функция самодиагностики; Произошла конденсация влаги.; Причина и /или действия по исправлению
88 Первые три знака C21 C22 C23 C31 C32 E61E62 Функция самодиагностики В случае срабатывания функциисамодиагностики для предотвращениявидеокамеры от неправильногофункционирования пятизначныйпредупреждающий код (комбинация букв ицифр). В этом случае следует провертьследующую таблицу. • Произошла конд...
Страница 90 - Технические харатеристики
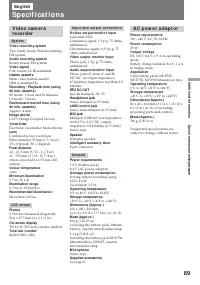
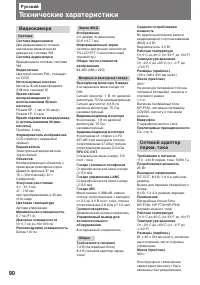
90 Русский Технические харатеристики Видеокамера Система Система видеозаписи Две вращающиеся головки,наклонная механическаяразвертка, система ЧМ Система аудиозаписи Вращающиеся головки, системаЧМ Видеосигнал Цветовой сигнал PAL, стандартпо CCIR Используемые кассеты Кассеты 8-мм видеоформата(Hi8 или ...
Страница 91 - I d e n t i f y i n g t h e p a r t s
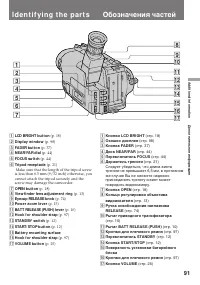
91 Addit ional inf ormat ion Дополнительная информация I d e n t i f y i n g t h e p a r t s 1234 6 5 7 8 9!º !¡!™!£!¢!∞!§!¶ 1 Кнопки LCD BRIGHT (стр. 18) 2 Окошко дисплея (стр. 98) 3 Кнопка FADER (стр. 37) 4 Диск NEAR/FAR (стр. 44) 5 Переключатель FOCUS (стр. 44) 6 Держатель треноги (стр. 21) Следу...
Страница 92 - означает систему канала местного; Обозначения частей
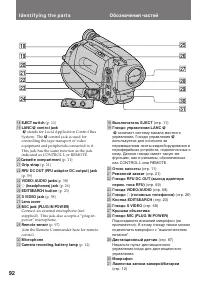
92 I d e n t i f y i n g t h e p a r t s !• @∞ @§ @•@ª #º#¡ @¶ !ª@º@¡@™@£ @¢ !• Выключатель EJECT (стр. 11) !ª Гнездо управления LANC l l означает систему канала местного управления. Гнездо управления l используется для контроля заперемещением ленты видеоборудования ипериферийных устройств, подключе...
Страница 93 - I d e n t i f y i n g t h e Pa r t s
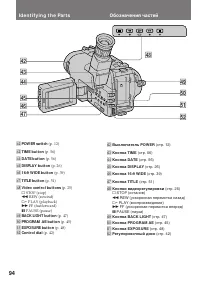
93 Addit ional inf ormat ion Дополнительная информация I d e n t i f y i n g t h e Pa r t s #™ Держатель для установки принадлежностей #£ Громкоговоритель (стр. 26) #¢ Экран ЖКД (стр. 18) #∞ Отсек литиевой батарейки (стр. 63) #§ Кнопка PICTURE EFFECT (стр. 41) #¶ Переключатель STEADY SHOT (стр. 50) ...
Страница 95 - Re m o t e Co m m a n d e r; Transmit t er; Передатчик
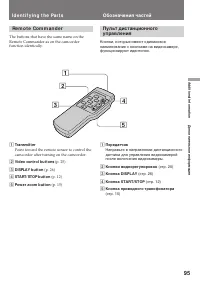
95 Addit ional inf ormat ion Дополнительная информация 5 1 2 3 4 Re m o t e Co m m a n d e r The buttons that have the same name on theRemote Commander as on the camcorderfunction identically. 1 Transmit t er Point toward the remote sensor to control thecamcorder after turning on the camcorder. 2 Vi...
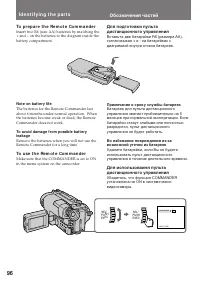
Страница 96 - To p r e p a r e t h e Re m o t e Co m m a n d e r; Not e on bat t ery lif e; To u se t h e Re m o t e Co m m a n d e r; Примечание к сроку службы батареек
96 ONOFF MENU COMMANDER [MENU]: END SEL/ PUSH EXEC SEL/ PUSH EXEC To p r e p a r e t h e Re m o t e Co m m a n d e r Insert two R6 (size AA) batteries by matching the+ and – on the batteries to the diagram inside thebattery compartment. Not e on bat t ery lif e The batteries for the Remote Commander...
Страница 97 - Re m o t e co n t r o l d i r e ct i o n; Not es on t he Remot e Commander; • Keep the remote sensor away from strong light; A t t a ch i n g t h e sh o u l d e r st r a p; • Держите дистанционный датчик подальше; Прикрепление плечевого ремня
97 Addit ional inf ormat ion Дополнительная информация Re m o t e co n t r o l d i r e ct i o n Not es on t he Remot e Commander • Keep the remote sensor away from strong light sources such as direct sunlight or illumination.Otherwise, the remote control may not beeffective. • Be sure that there is ...
Страница 98 - V i e w f i n d e r /; ORC
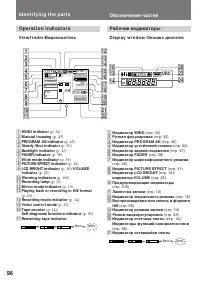
98 Op e r a t i o n i n d i ca t o r s I d e n t i f y i n g t h e p a r t s V i e w f i n d e r / Видоискатель D i sp l a y w i n d o w / Окошко дисплея Обозначения частей Рабочие индикаторы 1 Индикатор WIND (стр. 34) 2 Ручная фокусировка (стр. 43) 3 Индикатор PROGRAM AE (стр. 45) 4 Индикатор устой...
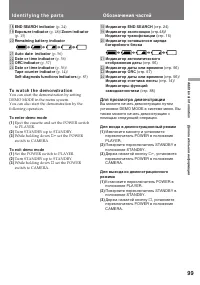
Страница 99 - Для просмотра демонстрации; Держа нажатой кнопку; To w a t ch t h e d e m o n st r a t i o n
99 Addit ional inf ormat ion Дополнительная информация I d e n t i f y i n g t h e p a r t s Обозначения частей !• Индикатор END SEARCH (стр. 24) !ª Индикатор экспозиции (стр.48) / Индикатор трансфокации (стр. 15) @º Индикатор оставшегося зарядабатарейного блока @¡ Индикатор автоматическогоотображен...
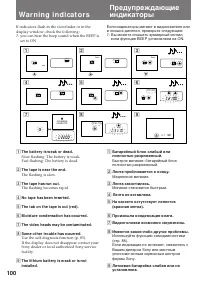
Страница 100 - Wa r n i n g i n d i ca t o r s; : you can hear the beep sound when the BEEP is; Лента приближается к концу.; Мигание становится быстрым.
100 1 2 3 4 5 6 7 8 9 4 7 1997 5min 0min CLEANING CASSETTE C:31:10 C:21:00 Wa r n i n g i n d i ca t o r s If indicators flash in the viewfinder or in thedisplay window, check the following: ≥ : you can hear the beep sound when the BEEP is set to ON. 1 The bat t ery is w eak or dead. Slow flashing: ...
Страница 102 - Алфавитный указатель
102 А, Б, В Автоматическая фокусировка .................... 43 Автомобильный аккумулятор ..................... 31 Введение/выведение изображения ................... 37 Г, Д, Е Гнездо дистанционного управления (LANC) .......... 92 Гнездо MIC (микрофона) ...... 92 Ж, З Задняя подсветка ..................