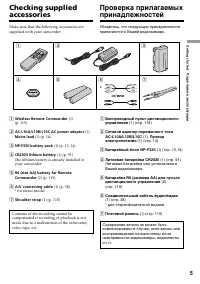
Страница 2 - English; VisionTM camcorder. With your; WARNING; Русский; ПРЕДУПРЕЖДЕНИЕ
2 English Welcome! Congratulations on your purchase of this SonyHandycam Vision™ camcorder. With your Handycam Vision, you can capture life’s preciousmoments with superior picture and soundquality.Your Handycam Vision is loaded with advancedfeatures, but at the same time it is very easy touse. You w...
Страница 4 - Оглавление; Подготовка к эксплуатации
4 Русский Оглавление Проверка прилагаемых принадлежностей ... 5 Руководство по быстромузапуску ........................................................ 8 Подготовка к эксплуатации Использование данного руководства ........................................................... 10 Пункт 1 Подготовка исто...
Страница 8 - Руководство по быстрому запуску; Установка кассеты; на кассетном; Сетевой адаптер
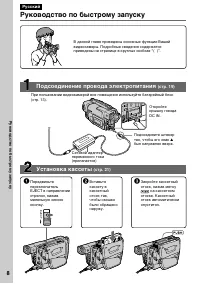
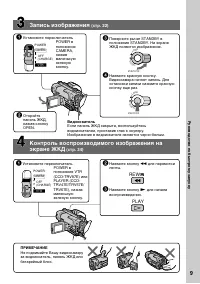
8 Руководство по быстрому запуску Русский Руководство по быстрому запуску В данной главе приведены основные функции Вашейвидеокамеры. Подробные сведения содержатсяприведены на странице в круглых скобках “( )”. Откройтекрышку гнездаDC IN. Подсоедините штекертак, чтобы его знак v был направлен вверх. ...
Страница 9 - Запись изображения; Видоискатель
9 Руководство по быстрому запуску Запись изображения (стр. 22) Видоискатель Если панель ЖКД закрыта, воспользуйтесьвидоискателем, приставив глаз к окуляру.Изображение в видоискателе является черно-белым. Контроль воспроизводимого изображения наэкране ЖКД (стр. 34) ПРИМЕЧАНИЕ Не поднимайте Вашу видео...
Страница 10 - — Getting started —; Using this manual; — Подготовка к эксплуатации —
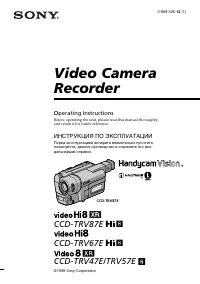
10 — Getting started — Using this manual The instructions in this manual are for the fourmodels listed in the table on the next page. Beforeyou start reading this manual and operating yourcamcorder, check the model number by lookingat the bottom of your camcorder. TheCCD-TRV87E is the model used for...
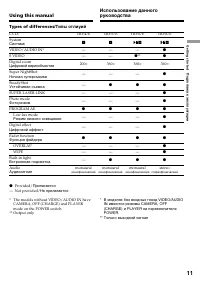
Страница 11 - Types of differences/; Типы отлиуий
11 Getting started Подготовка к эксплуатации Types of differences/ Типы отлиуий CCD- TRV47E TRV57E TRV67E TRV87E System Система VIDEO/AUDIO IN* — — — z S VIDEO — — z ** z Digital zoom 200 × 360 × 360 × 360 × Цифровой вариообъектив Super NightShot — — — z Ночная суперсъемка SteadyShot — z z z Устойчи...
Страница 12 - • Do not let your camcorder get wet. Keep your
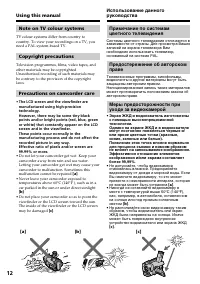
12 [a] [b] [c] Using this manual Note on TV colour systems TV colour systems differ from country tocountry. To view your recordings on a TV, youneed a PAL system-based TV. Copyright precautions Television programmes, films, video tapes, andother materials may be copyrighted.Unauthorized recording of...
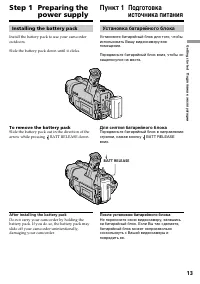
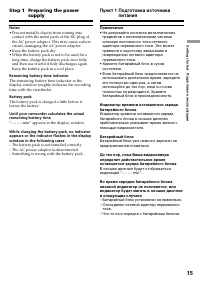
Страница 13 - Installing the battery pack; Slide the battery pack down until it clicks.; To remove the battery pack; After installing the battery pack; Step 1 Preparing the; Установка батарейного блока; Для снятия батарейного блока; После установки батарейного блока; Пункт 1 Подготовка; BATT RELEASE
13 Getting started Подготовка к эксплуатации Installing the battery pack Install the battery pack to use your camcorderoutdoors. Slide the battery pack down until it clicks. To remove the battery pack Slide the battery pack out in the direction of thearrow while pressing BATT RELEASE down. After ins...
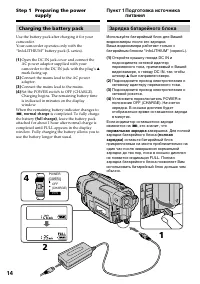
Страница 14 - Connect the mains lead to the mains.; normal charge; is completed. To fully charge; Пункт 1 Подготовка источника; был направлен вверх.; нормальная зарядка; завершена. Для полной
14 Step 1 Preparing the power supply Charging the battery pack Use the battery pack after charging it for yourcamcorder.Your camcorder operates only with the“InfoLITHIUM” battery pack (L series). ( 1 ) Open the DC IN jack cover and connect theAC power adaptor supplied with yourcamcorder to the DC IN...
Страница 15 - Notes; • Prevent metallic objects from coming into; Remaining battery time indicator; “– – – – min” appears in the display window.; Step 1 Preparing the power; Примечания; • Не допускайте контакта металлических; Батарейный блок; – Что-то не в порядке с батарейным блоком.
15 Getting started Подготовка к эксплуатации Notes • Prevent metallic objects from coming into contact with the metal parts of the DC plug ofthe AC power adaptor. This may cause a short-circuit, damaging the AC power adaptor. • Keep the battery pack dry.• When the battery pack is not to be used for ...
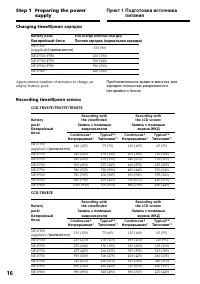
Страница 16 - Время зарядки
16 Step 1 Preparing the power supply Charging time/ Время зарядки Approximate number of minutes to charge anempty battery pack Recording time/ Время записи CCD-TRV47E/TRV57E/TRV67E CCD-TRV87E Пункт 1 Подготовка источника питания Приблизительное время в минутах длязарядки полностью разряженногобатаре...
Страница 17 - Время воспроизведения
17 Getting started Подготовка к эксплуатации Step 1 Preparing the power supply Пункт 1 Подготовка источника питания Approximate number of minutes when you use afully charged battery Numbers in parentheses “( )” indicate the timeusing a normally charged battery. * Approximate continuous recording tim...
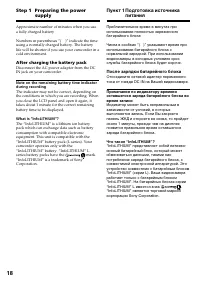
Страница 18 - После зарядки батарейного блока; Что такое “InfoLITHIUM”?; After charging the battery pack; What is ”InfoLITHIUM”?
18 Приблизительное время в минутах прииспользовании полностью заряженногобатарейного блока Числа в скобках “( )” указывают время прииспользовании батарейного блока снормальной зарядкой. При использованиивидеокамеры в холодных условиях срокслужбы батарейного блока будет короче. После зарядки батарейн...
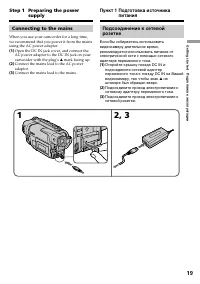
Страница 19 - на; Connecting to the mains
19 Getting started Подготовка к эксплуатации Подсоединение к сетевойрозетке Если Вы собираетесь использоватьвидеокамеру длительное время,рекомендуется использовать питание отэлектрической сети с помощью сетевогоадаптера переменного тока. ( 1 ) Откройте крышку гнезда DC IN иподсоедините сетевой адапт...
Страница 20 - PRECAUTION; • The AC power adaptor can supply power even; Using a car battery; • Питание от сетевого адаптера переменного
20 Step 1 Preparing the power supply Пункт 1 Подготовка источника питания PRECAUTION The set is not disconnected from the AC powersource (mains) as long as it is connected to themains, even if the set itself has been turned off. Notes • The AC power adaptor can supply power even if the battery pack ...
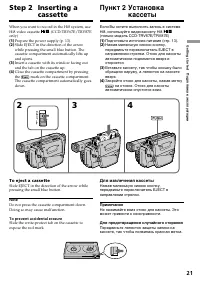
Страница 21 - Закройте отсек для кассеты, нажав метку; Для извлечения кассеты; Примечание; mark on the cassette compartment.; To eject a cassette; Note; Step 2 Inserting a; Пункт 2 Установка
21 Getting started Подготовка к эксплуатации Если Вы хотите выполнять запись в системеHi8, используйте видеокассету Hi8 . (только модель CCD-TRV67E/TRV87E) ( 1 ) Подготовьте источник питания (стр. 13). ( 2 ) Нажав маленькую синюю кнопку,передвиньте переключатель EJECT внаправлении стрелки. Отсек для...
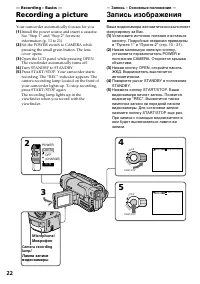
Страница 22 - — Recording – Basics —; Your camcorder automatically focuses for you.; Микрофон
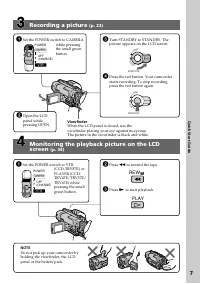
22 — Recording – Basics — Recording a picture Your camcorder automatically focuses for you. ( 1 ) Install the power source and insert a cassette.See “Step 1” and “Step 2” for moreinformation (p. 13 to 21). ( 2 ) Set the POWER switch to CAMERA whilepressing the small green button. The lenscover opens...
Страница 23 - After recording; Turn STANDBY down to LOCK.; После записи
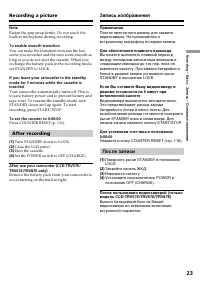
23 Recording – Basics Запись – Основные положения Note Fasten the grip strap firmly. Do not touch thebuilt-in microphone during recording. To enable smooth transition You can make the transition between the lastscene you recorded and the next scene smooth aslong as you do not eject the cassette. Whe...
Страница 24 - Xz; Зеркальный режим; • Индикатор STBY появится в виде; ярче
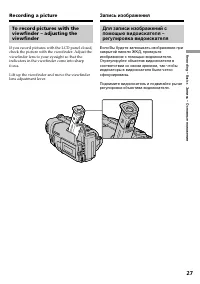
24 Recording a picture Adjusting the LCD screen To adjust the brightness of the LCD screen, presseither of the two buttons on LCD BRIGHT.The LCD panel moves about 90 degrees to theviewfinder side and about 180 degrees to the lensside.If you turn the LCD panel over so that it faces theother way, the ...
Страница 25 - Using the zoom feature; Zoom greater than 20
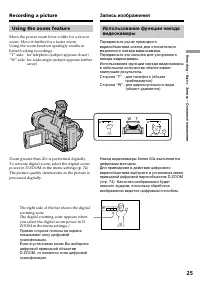
25 Recording – Basics Запись – Основные положения T W Using the zoom feature Move the power zoom lever a little for a slowerzoom. Move it further for a faster zoom.Using the zoom function sparingly results inbetter-looking recordings.“T” side: for telephoto (subject appears closer)“W” side: for wide...
Страница 26 - • Digital zoom starts to function when zoom
26 When you shoot close to a subject If you cannot get a sharp focus, move the powerzoom lever to the “W” side until the focus issharp. You can shoot a subject that is at leastabout 80 cm (about 2 feet 5/8 inch) away fromthe lens surface in the telephoto position, orabout 1 cm (about 1/2 inch) away ...
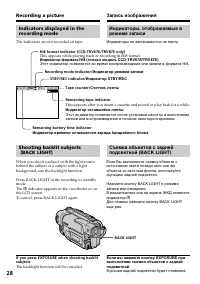
Страница 28 - Индикаторы не записываются на ленту.; Recording mode indicator/; BACK LIGHT
28 Indicators displayed in therecording mode The indicators are not recorded on tape. Shooting backlit subjects (BACK LIGHT) When you shoot a subject with the light sourcebehind the subject or a subject with a lightbackground, use the backlight function. Press BACK LIGHT in the recording or standbym...
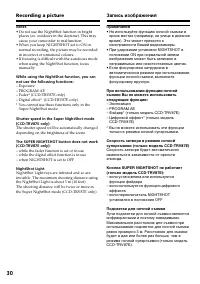
Страница 29 - and “NIGHTSHOT” indicators flash on the; Using the Super NightShot mode; indicator appears on the LCD screen; Using the NightShot Light; NightShot Light emitter/; и “NIGHTSHOT” начнут; – Только модель CCD-TRV87E; и “SUPER
29 Recording – Basics Запись – Основные положения NIGHTSHOT OFF ON SUPER NIGHTSHOT Shooting in the dark(NightShot) The NightShot function enables you to shoot asubject in a dark place. For example, you cansatisfactorily record the environment ofnocturnal animals for observation when you usethis func...
Страница 30 - • Do not use the NightShot function in bright; NightShot Light
30 Recording a picture Notes • Do not use the NightShot function in bright places (ex. outdoors in the daytime). This maycause your camcorder to malfunction. • When you keep NIGHTSHOT set to ON in normal recording, the picture may be recordedin incorrect or unnatural colours. • If focusing is diffic...
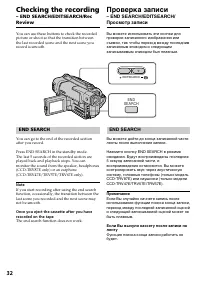
Страница 32 - Checking the recording; The end search function does not work.; Проверка записи; END SEARCH
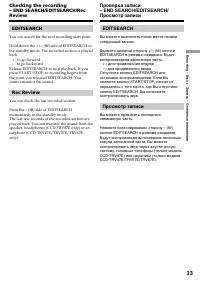
32 END SEARCH EDITSEARCH Checking the recording – END SEARCH/EDITSEARCH/RecReview You can use these buttons to check the recordedpicture or shoot so that the transition betweenthe last recorded scene and the next scene yourecord is smooth. END SEARCH You can go to the end of the recorded sectionafte...
Страница 33 - You can search for the next recording start point.; Rec Review; You can check the last recorded section.; Нажмите кратковременно сторону – (
33 Recording – Basics Запись – Основные положения Checking the recording– END SEARCH/EDITSEARCH/RecReview EDITSEARCH You can search for the next recording start point. Hold down the +/– ( 7 ) side of EDITSEARCH in the standby mode. The recorded section is playedback. + : to go forward– : to go backw...
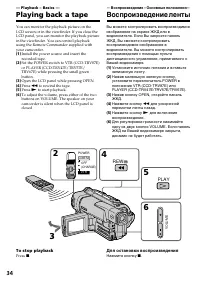
Страница 34 - — Playback – Basics —; Playing back a tape; Open the LCD panel while pressing OPEN.; — Воспроизведение – Основные положения—; Воспроизведение ленты; To stop playback; Press; Для остановки воспроизведения
34 — Playback – Basics — Playing back a tape You can monitor the playback picture on theLCD screen or in the viewfinder. If you close theLCD panel, you can monitor the playback picturein the viewfinder. You can control playbackusing the Remote Commander supplied withyour camcorder. ( 1 ) Install the...
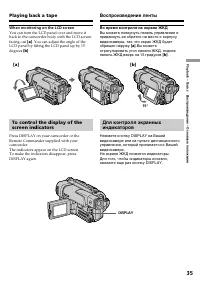
Страница 35 - DISPLAY; When monitoring on the LCD screen; . You can adjust the angle of the; Во время контроля на экране ЖКД
35 Playback – Basics Воспроизведение – Основные положения To control the display of thescreen indicators Press DISPLAY on your camcorder or theRemote Commander supplied with yourcamcorder.The indicators appear on the LCD screen.To make the indicators disappear, pressDISPLAY again. DISPLAY Playing ba...
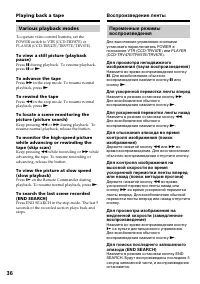
Страница 36 - Various playback modes; To advance the tape; Для ускоренной перемотки ленты вперед
36 Various playback modes To operate video control buttons, set thePOWER switch to VTR (CCD-TRV87E) orPLAYER (CCD-TRV47E/TRV57E/TRV67E). To view a still picture (playbackpause) Press X during playback. To resume playback, press X or N . To advance the tape Press M in the stop mode. To resume normal ...
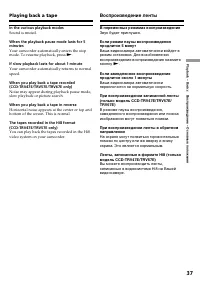
Страница 37 - In the various playback modes; Звук будет приглушен.
37 Playback – Basics Воспроизведение – Основные положения Playing back a tape Воспроизведение ленты In the various playback modes Sound is muted. When the playback pause mode lasts for 5minutes Your camcorder automatically enters the stopmode. To resume playback, press N . If slow playback lasts for...
Страница 38 - Передача сигнала
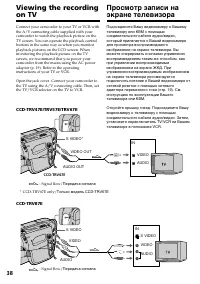
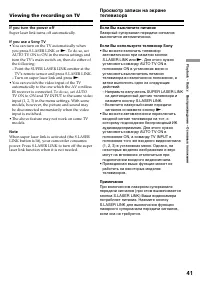
38 S VIDEO* VIDEO OUT AUDIO OUT VIDEO AUDIO IN Viewing the recordingon TV Connect your camcorder to your TV or VCR withthe A/V connecting cable supplied with yourcamcorder to watch the playback picture on theTV screen. You can operate the playback controlbuttons in the same way as when you monitorpl...
Страница 39 - Viewing the recording on TV
39 Playback – Basics Воспроизведение – Основные положения If your TV is already connectedto a VCR Connect your camcorder to the LINE IN input onthe VCR by using the A/V connecting cablesupplied with your camcorder. Set the inputselector on the VCR to LINE. If your TV or VCR is a monauraltype – CCD-T...
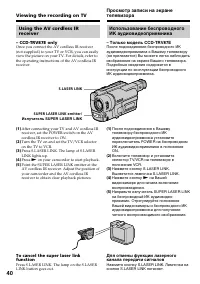
Страница 40 - Нажмите кнопку; SUPER LASER LINK emitter/
40 Viewing the recording on TV Using the AV cordless IRreceiver – CCD-TRV87E only Once you connect the AV cordless IR receiver(not supplied) to your TV or VCR, you can easilyview the picture on your TV. For details, refer tothe operating instructions of the AV cordless IRreceiver. ( 1 ) After connec...
Страница 41 - If you turn the power off; Если Вы выключите питание; • Вы можете включать телевизор
41 Playback – Basics Воспроизведение – Основные положения If you turn the power off Super laser link turns off automatically. If you use a Sony TV • You can turn on the TV automatically when you press S.LASER LINK or N . To do so, set AUTO TV ON to ON in the menu settings andturn the TV’s main switc...
Страница 42 - — Advanced Recording Operations —; NORMAL PHOTO; This mode records a still picture for about seven seconds.; — Усовершенствованные операции съемки —; Запись неподвижного; MENU
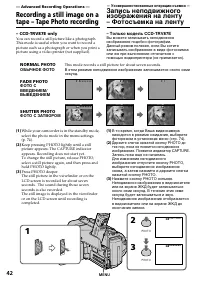
42 — Advanced Recording Operations — Recording a still image on atape – Tape Photo recording NORMAL PHOTO ОБЫЧНОЕ ФОТО FADE PHOTO ФОТО СВВЕДЕНИЕМ/ВЫВЕДЕНИЕМ SHUTTER PHOTO ФОТО С ЗАТВОРОМ This mode records a still picture for about seven seconds. В этом режиме неподвижное изображение записывается око...
Страница 44 - Printing the still picture; LINE IN
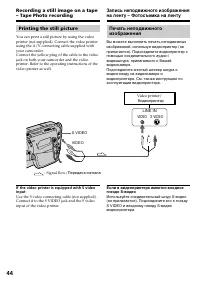
44 Recording a still image on a tape– Tape Photo recording Запись неподвижного изображенияна ленту – Фотосъемка на ленту Printing the still picture You can print a still picture by using the videoprinter (not supplied). Connect the video printerusing the A/V connecting cable supplied withyour camcor...
Страница 45 - back on a normal TV; Using the wide mode; CINEMA; CINEMA
45 Advanced Recording Operations Усовершенствованные операции съемки You can record a cinema-like picture (CINEMA)or a 16:9 wide picture to watch on the 16:9 wide-screen TV (16:9FULL). Refer to the operatinginstructions of your TV. CINEMA Black bands appear on the screen duringrecording in the CINEM...
Страница 46 - To cancel the wide mode; Set 16:9WIDE to OFF in the menu settings.; In the wide mode; ”, и функция устойчивой; В широкоэкранном режиме
46 Using the wide mode In the standby mode, set 16:9WIDE to CINEMAor 16:9FULL in the menu settings (p. 74). To cancel the wide mode Set 16:9WIDE to OFF in the menu settings. If the wide mode is set to 16:9FULL(CCD-TRV57E/TRV67E/TRV87E only) The SteadyShot function does not work. If youselect 16:9FUL...
Страница 47 - MONOTONE
47 Advanced Recording Operations Усовершенствованные операции съемки You can fade in or out to give your recording aprofessional appearance. Using the faderfunction MONOTONE When fading in, the picture gradually changesfrom black-and-white to colour.When fading out the picture gradually changesfrom ...
Страница 48 - Using the fader function; STRIPE; To cancel the fader function; Использование функции фейдера; При введении изображения; Для отмены функции фейдера
48 1 FADER FADER Using the fader function ( 1 ) When fading in [ a ] In the standby mode, press FADER until thedesired fader indicator flashes. When fading out [ b ] In the recording mode, press FADER until thedesired fader indicator flashes.The indicator changes as follows:FADER t M.FADER t STRIPE ...
Страница 49 - Note on the bounce function; the menu settings; Using the Fader function; Примечание по функции перескакивания
49 Advanced Recording Operations Усовершенствованные операции съемки Note (CCD-TRV87E only) You cannot use the following functions whileusing the fader function. Also, you cannot usethe fader function while using the followingfunctions.– Digital effect– Low lux mode of PROGRAM AE (Overlap/ Wipe func...
Страница 50 - : The colour and brightness of the; The picture is sepia.; SEPIA; : Яркость света будет
50 You can digitally process images to obtain specialeffects like those in films or on the TV. PASTEL [ a ] : The contrast of the picture isemphasized, and the picturelooks like an animated cartoon. NEG. ART [ b ] : The colour and brightness of the picture is reversed. SEPIA : The picture is sepia. ...
Страница 51 - When you turn the power off; PICTURE EFFECT
51 Advanced Recording Operations Усовершенствованные операции съемки Using special effects – Pictureeffect ( 1 ) Press PICTURE EFFECT in the standby orrecording mode.The picture effect indicator appears. ( 2 ) Turn the SEL/PUSH EXEC dial to select thedesired picture effect mode.The indicator changes...
Страница 52 - STILL
52 Using special effects –Digital effect – CCD-TRV87E only You can add special effects to recorded picturesusing the various digital functions. The sound isrecorded normally. STILL You can record a still picture so that it issuperimposed on a moving picture. FLASH (FLASH MOTION) You can record still...
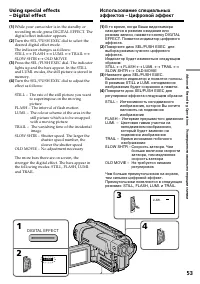
Страница 53 - DIGITAL EFFECT
53 Advanced Recording Operations Усовершенствованные операции съемки 3 4 LUMI. 1 2 LUMI. DIGITAL EFFECT Using special effects– Digital effect ( 1 ) While your camcorder is in the standby orrecording mode, press DIGITAL EFFECT. Thedigital effect indicator appears. ( 2 ) Turn the SEL/PUSH EXEC dial to...
Страница 54 - To cancel the digital effect; Для отмены цифрового эффекта
54 Using special effects– Digital Effect To cancel the digital effect Press DIGITAL EFFECT. The digital effectindicator disappears. Notes • The following functions do not work during digital effect:– Fader– Low lux mode of PROGRAM AE– Tape Photo recording– Super NightShot • The following function do...
Страница 55 - Spotlight mode
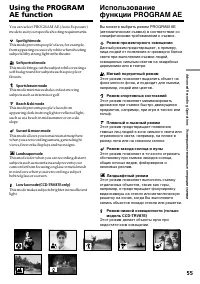
55 Advanced Recording Operations Усовершенствованные операции съемки Using the PROGRAMAE function You can select PROGRAM AE (Auto Exposure)mode to suit your specific shooting requirements. Spotlight mode This mode prevents people’s faces, for example,from appearing excessively white when shootingsub...
Страница 56 - Using the PROGRAM AE function; Нажмите кнопку PROGRAM AE.
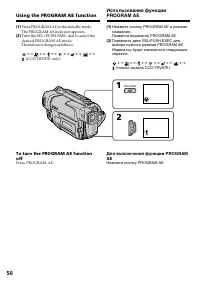
56 Using the PROGRAM AE function ( 1 ) Press PROGRAM AE in the standby mode.The PROGRAM AE indicator appears. ( 2 ) Turn the SEL/PUSH EXEC dial to select thedesired PROGRAM AE mode.The indicator changes as follows: y y y y y y (CCD-TRV87E only) To turn the PROGRAM AE functionoff Press PROGRAM AE. Ис...
Страница 57 - • In the spotlight, sports lesson and beach & ski
57 Advanced Recording Operations Усовершенствованные операции съемки Notes • In the spotlight, sports lesson and beach & ski modes, you cannot take close-ups. This isbecause your camcorder is set to focus only onsubjects in the middle to far distance. • In the sunset & moon and landscape mod...
Страница 58 - ночных сцен) с большой достоверностью; – Старинное кино (только модель
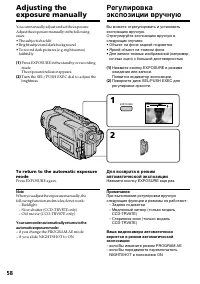
58 You can manually adjust and set the exposure.Adjust the exposure manually in the followingcases:• The subject is backlit• Bright subject and dark background• To record dark pictures (e.g. night scenes) faithfully ( 1 ) Press EXPOSURE in the standby or recordingmode.The exposure indicator appears....
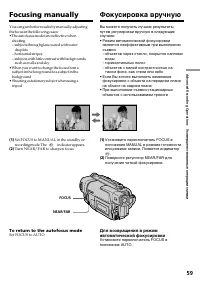
Страница 59 - FOCUS; Focusing manually; droplets; To return to the autofocus mode; Фокусировка вручную; воды
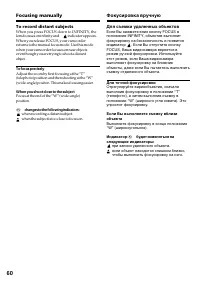
59 Advanced Recording Operations Усовершенствованные операции съемки FOCUS NEAR/FAR Focusing manually You can gain better results by manually adjustingthe focus in the following cases:•The autofocus mode is not effective when shooting– subjects through glass coated with water droplets – horizontal s...
Страница 60 - To record distant subjects; To focus precisely; Для съемки удаленных объектов; . Если Вы отпустите кнопку; Для точной фокусировки
60 To record distant subjects When you press FOCUS down to INFINITY, thelens focuses on infinity and indicator appears. When you release FOCUS, your camcorderreturns to the manual focus mode. Use this modewhen your camcorder focuses on near objectseven though you are trying to shoot a distantobject....
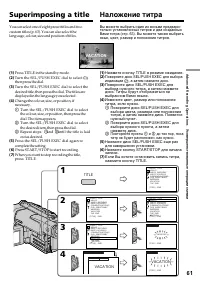
Страница 61 - Superimposing a title; Наложение титра; VACATION; TITLE
61 Advanced Recording Operations Усовершенствованные операции съемки Superimposing a title You can select one of eight preset titles and twocustom titles (p. 63). You can also select thelanguage, colour, size and position of titles. ( 1 ) Press TITLE in the standby mode. ( 2 ) Turn the SEL/PUSH EXEC...
Страница 62 - • Цвет титра изменяется следующим образом:; Во время выбора и установки титра; Зуммерного сигнала не будет.
62 To superimpose the title while youare recording Press TITLE while you are recording, and carryout steps 2 to 5. When you press the SEL/PUSHEXEC dial at step 5, the title is superimposed. To select the language of a presettitle If you want to change the language, select before step 2. Then select ...
Страница 63 - Turn the SEL/PUSH EXEC dial to select
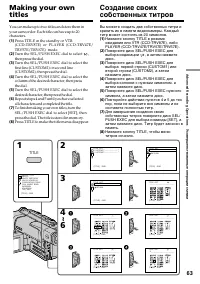
63 Advanced Recording Operations Усовершенствованные операции съемки Making your owntitles You can make up to two titles and store them inyour camcorder. Each title can have up to 20characters. ( 1 ) Press TITLE in the standby or VTR(CCD-TRV87E) or PLAYER (CCD-TRV47E/TRV57E/TRV67E) mode. ( 2 ) Turn ...
Страница 64 - To change a title you have stored; To delete the title; Making your own titles; Если Вы выбрали команду [; вернуться к предыдущему экрану.; Для удаления титра
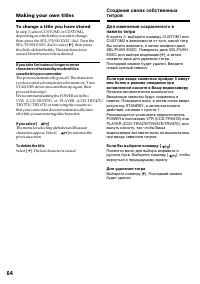
64 To change a title you have stored In step 3, select CUSTOM1 or CUSTOM2,depending on which title you want to change,then press the SEL/PUSH EXEC dial. Turn theSEL/PUSH EXEC dial to select [ C ], then press the dial to delete the title. The last character iserased. Enter the new title as desired. I...
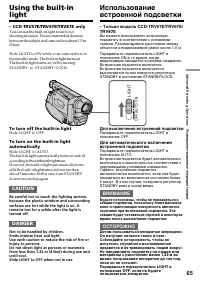
Страница 65 - To turn off the built-in light; CAUTION; Для выключения встроенной подсветки; ВНИМАНИЕ
65 Advanced Recording Operations Усовершенствованные операции съемки Using the built-inlight – CCD-TRV57E/TRV67E/TRV87E only You can use the built-in light to suit yourshooting situation. The recommended distancebetween the subject and camcorder is about 1.5 m(5 feet). Slide LIGHT to ON while your c...
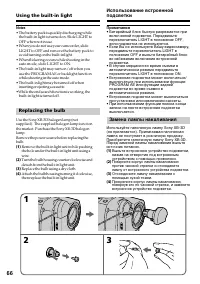
Страница 66 - Replacing the bulb; Замена лампы накаливания
66 Notes • The battery pack is quickly discharging while the built-in light is turned on. Slide LIGHT toOFF when not in use. • When you do not use your camcorder, slide LIGHT to OFF and remove the battery pack toavoid turning on the built-in light. • When flickering occurs while shooting in the auto...
Страница 67 - • When replacing the bulb, use only the Sony; Using the built-in light; • При замене лампы накаливания
67 Advanced Recording Operations Усовершенствованные операции съемки CAUTION • When replacing the bulb, use only the Sony XB-3D halogen lamp (not supplied) to reducethe risk of fire. • To prevent possible burn hazard, disconnect the power source before replacing and do nottouch the bulb until the bu...
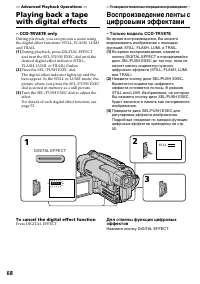
Страница 68 - — Advanced Playback Operations —; To cancel the digital effect function; Press DIGITAL EFFECT.; Усовершенствованные операции воспроизведения —; Нажмите кнопку DIGITAL EFFECT.
68 — Advanced Playback Operations — Playing back a tapewith digital effects – CCD-TRV87E only During playback, you can process a scene usingthe digital effect functions: STILL, FLASH, LUMI.and TRAIL. ( 1 ) During playback, press DIGITAL EFFECTand turn the SEL/PUSH EXEC dial until thedesired digital ...
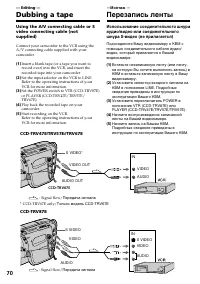
Страница 70 - — Editing —; Dubbing a tape; —Монтаж —; Перезапись ленты
70 AUDIO AUDIO VIDEO VIDEO S VIDEO S VIDEO IN S VIDEO* VIDEO AUDIO IN VIDEO OUT AUDIO OUT — Editing — Dubbing a tape Using the A/V connecting cable or Svideo connecting cable (notsupplied) Connect your camcorder to the VCR using theA/V connecting cable supplied with yourcamcorder. ( 1 ) Insert a bla...
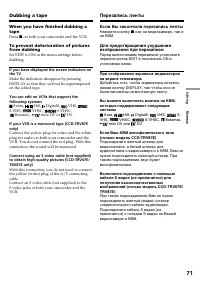
Страница 71 - Если Вы закончили перезапись ленты
71 Editing Монтаж Dubbing a tape When you have finished dubbing atape Press x on both your camcorder and the VCR. To prevent deterioration of picturesfrom dubbing Set EDIT to ON in the menu settings beforedubbing. If you have displayed the screen indicators onthe TV Make the indicators disappear by ...
Страница 73 - Recording video or TV programmes; You cannot record dual sound broadcasts.; If your VCR is a monaural type
73 Editing Монтаж Recording video or TV programmes Note You cannot record dual sound broadcasts. If your VCR is a monaural type Connect the yellow plug for video and the whiteplug for audio on both your camcorder and theVCR (you do not connect the red plug). With thisconnection, the sound will be mo...
Страница 74 - — Customizing Your Camcorder —
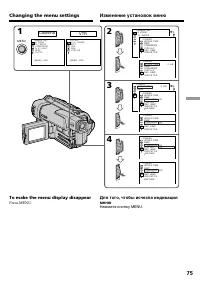
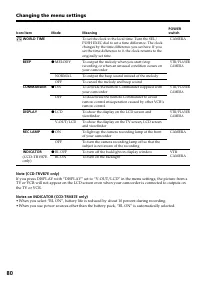
74 — Customizing Your Camcorder — Changing the menusettings To change the mode settings in the menusettings, select the menu items with the SEL/PUSH EXEC dial. The default settings can bepartially changed. First, select the icon, then themenu item and then the mode. ( 1 ) In the standby or VTR (CCD-...
Страница 81 - Выбор установок режима по каждому пункту; установки по умолчанию.
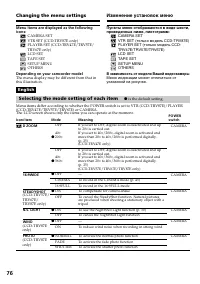
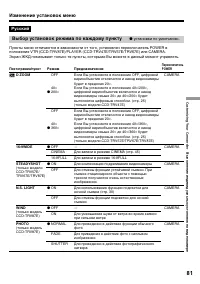
81 Customizing Your Camcorder Выполнение индивидуальных установок на видеокамере Русский Выбор установок режима по каждому пункту z установки по умолчанию. Пункты меню отличаются в зависимости от того, установлен переключатель POWER вположение VTR (CCD-TRV87E)/PLAYER (CCD-TRV47E/TRV57E/TRV67E) или C...
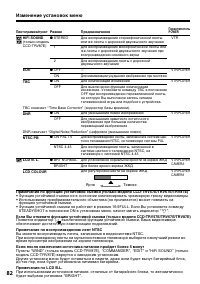
Страница 82 - Примечание по воспроизведению лент NTSC
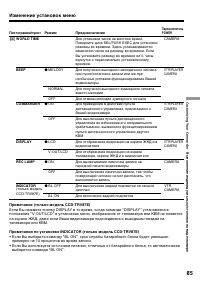
82 Изменение установок меню Пиктограмма/пункт HiFi SOUND EDIT TBC ТВС означает “Time Base Corrector” (корректор базы времени). DNR DNR означает “Digital Noise Reduction” (цифровое уменьшение помех). NTSC PB LCD B. L. LCD COLOUR Режим z STEREO 1 2 z OFFON z ONOFF z ONOFF z ON PAL TV NTSC 4.43 z BRT N...
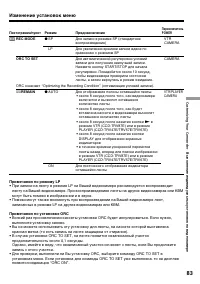
Страница 83 - Примечания по режиму LP; записанных в режиме LP на других видеокамерах или КВМ.; Примечания по установке ORC; выполните установку заново.
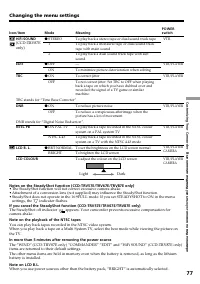
83 Customizing Your Camcorder Выполнение индивидуальных установок на видеокамере Изменение установок меню Пиктограмма/пункт REC MODE ORC TO SET ORC означает “Optimizing the Recording Condition” (оптимизация условий записи). q REMAIN Режим z SP LP z AUTO ON Предназначение Для записи в режиме SP (стан...
Страница 84 - Примечания по режиму DEMO MODE
84 Изменение установок меню Примечания по режиму DEMO MODE • Вы не можете выбрать команду DEMO MODE, если кассета вставлена в Вашу видеокамеру.• Команда DEMO MODE установлена в положение STBY (ожидание) на предприятии- изготовителе, и демонстрация начнется примерно через 10 минут после того, как Выу...
Страница 85 - примерно на 10 процентов во время записи.
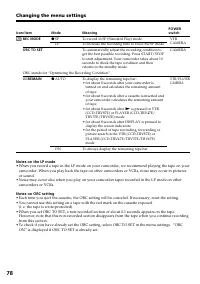
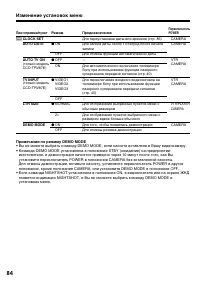
85 Customizing Your Camcorder Выполнение индивидуальных установок на видеокамере Изменение установок меню Пиктограмма/пункт WORLD TIME BEEP COMMANDER DISPLAY REC LAMP INDICATOR Режим z MELODY NORMAL OFF z ON OFF z LCD V-OUT/LCD z ON OFF z BL OFF BL ON Предназначение Для установки часов на местное вр...
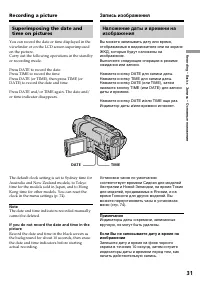
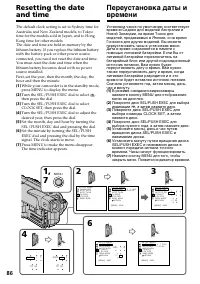
Страница 87 - To check the preset date and time; The year changes as follows:; function works only once a day.; Note on the time indicator; back ON in the menu settings.; Resetting the date and time; Нажмите кнопку DATE для отображения; Год изменяется следующим образом:; функция работает один раз в день.; Примечание по индикатору времени; Переустановка даты и времени
87 To check the preset date and time Press DATE to display the date indicator.Press TIME to display the time indicator.Press DATE (or TIME) and then press TIME (orDATE) to simultaneously display the date andtime indicator.Press DATE and/or TIME again. The date and/or time indicator disappears. The y...
Страница 88 - — Additional Information —; Selecting the cassette type; — Дополнительная информация —; Выбор типа кассеты
88 — Additional Information — Usable cassettes andplayback modes Selecting the cassette type – CCD-TRV67E/TRV87E only You can use both Hi8 and standard 8 mm videocassettes on your camcorder. When you use aHi8 video cassette, recording and playback arecarried out in the Hi8 system. When you use astan...
Страница 89 - When you play back; Note on AFM HiFi stereo; Playing back an NTSC-recorded tape; При выполнении воспроизведения; Примечание по системе AFM HiFi; Иностранные 8-мм видеоленты
89 Additional information Дополнительная информация Usable cassettes and playbackmodes When you play back The playback mode (SP/LP) and system, Hi8 orstandard 8 mm (CCD-TRV67E/TRV87E only) areautomatically selected according to the format inwhich the tape has been recorded. The quality ofthe recorde...
Страница 90 - Copyright signal; When you record; Сигнал авторского права; При записи; Звук от динамика
90 Copyright signal When you record – CCD-TRV87E only You cannot record software on your camcorderthat contains copyright control signals forcopyright protection of software.“COPY INHIBIT” appears on the LCD screen, inthe viewfinder or on the TV screen if you try torecord such software.Your camcorde...
Страница 91 - replace the battery
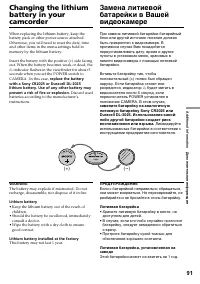
91 Additional information Дополнительная информация When replacing the lithium battery, keep thebattery pack or other power source attached.Otherwise, you will need to reset the date, timeand other items in the menu settings hold inmemory by the lithium battery. Insert the battery with the positive ...
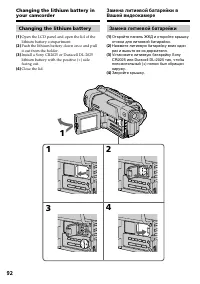
Страница 92 - Changing the lithium battery; Замена литиевой батарейки
92 Changing the lithium battery ( 1 ) Open the LCD panel and open the lid of thelithium battery compartment. ( 2 ) Push the lithium battery down once and pullit out from the holder. ( 3 ) Install a Sony CR2025 or Duracell DL-2025lithium battery with the positive (+) sidefacing out. ( 4 ) Close the l...
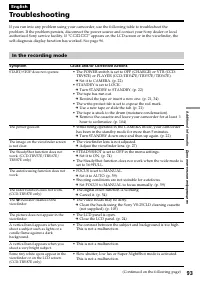
Страница 98 - Поиск и устранение неисправностей; В режиме записи; Возможная неисправность
98 Русский Поиск и устранение неисправностей Если у Вас возникла какая-либо проблема при использовании видеокамеры, воспользуйтесь следующей таблицей для отыскания и устранения проблемы. Если проблема не устраняется, то следует отсоединить источник питания и обратиться в сервисный центр Sony или в м...
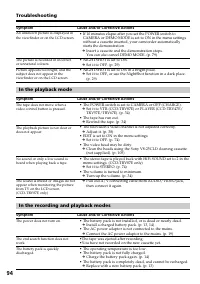
Страница 99 - В режиме воспроизведения
99 Additional informatio Дополнительная информация n Возможная причина Вероятная причина и/или метод устранения • Если пройдет 10 минут после того, как Вы установили переключатель POWER в положение CAMERA или команду DEMO MODE установили в положение ON в установках меню без вставленной кассеты, Ваша...
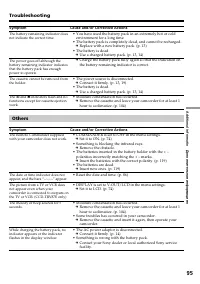
Страница 100 - Прочее; Возможная причина
100 Возможная причина Вероятная причина и/или метод устранения • Вы использовали длительное время батарейный блок в крайне жарких или холодных окружающих условиях. • Батарейный блок полностью разряжен, но не может перезаряжаться. c Замените его на новый батарейный блок. (стр. 13) • Батарейный блок п...
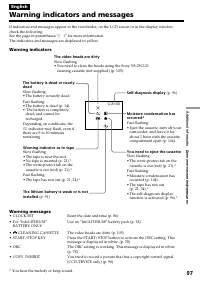
Страница 101 - Пятизначная индикация; Индикация самодиагностики
101 Additional informatio Дополнительная информация n C:21:00 Пятизначная индикация Вероятная причина и/или метод устранения • Вы используете батарейный блок, который не является батарейным блоком “InfoLITHIUM”. c Используйте батарейный блок “InfoLITHIUM” (стр. 18) • Произошла конденсация влаги. c В...
Страница 102 - Предупреждающие индикаторы и сообщения; Предупреждающие индикаторы; Загрязнились видеоголовки
102 C:21:00 Предупреждающие индикаторы и сообщения Если в видоискателе, на экране ЖКД или в окошке дисплея появятся индикаторы исообщения, проверьте следующее:См. страницу в круглых скобках “( )” для более подробной информации.Индикаторы и сообщения отображаются желтым цветом. Предупреждающие индика...
Страница 103 - Using your camcorder abroad; PAL system; Brazil; NTSC system; Бразилия; Система NTSC
103 Additional information Дополнительная информация Using your camcorder abroad You can use your camcorder in any country orarea with the AC power adaptor supplied withyour camcorder within 100 V to 240 V AC,50/60 Hz. Your camcorder is a PAL system basedcamcorder. If you want to view the playbackpi...
Страница 104 - Moisture condensation; If moisture condensation occurred; Note on moisture condensation; Конденсация влаги; Если произошла конденсация влаги; Примечание по конденсации влаги
104 Maintenanceinformation andprecautions Moisture condensation If your camcorder is brought directly from a coldplace to a warm place, moisture may condenseinside your camcorder, on the surface of the tape,or on the lens. In this condition, the tape maystick to the head drum and be damaged or yourc...
Страница 105 - Maintenance information; Cleaning the video head; indicator and “; Note on video heads; Cleaning the LCD screen; Информация по уходу за аппаратом; Чистка видеоголовок; Примечание по видеоголовкам; Чистка экрана ЖКД
105 Additional information Дополнительная информация [a] [b] Maintenance information Cleaning the video head To ensure normal recording and clear pictures,clean the video heads. The video head may bedirty when:• The x indicator and “ CLEANING CASSETTE” message appear one after anotheror the x indica...
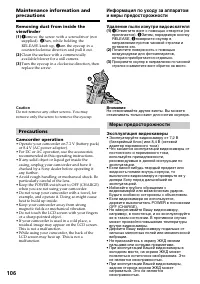
Страница 106 - Caution; Precautions; Camcorder operation; Удаление пыли изнутри видоискателя; Внимание; Меры предосторожности; Эксплуатация видеокамеры
106 Maintenance information andprecautions Removing dust from inside theviewfinder ( 1 ) 1 Remove the screw with a screwdriver (not supplied). 2 Then, while holding the RELEASE knob up, 3 turn the eyecup in a counterclockwise direction and pull it out. ( 2 ) Clean the surface with a commerciallyavai...
Страница 107 - On handling tapes; Встроенная подсветка
107 Additional information Дополнительная информация Built-in light – CCD-TRV57E/TRV67E/TRV87E only • Do not knock or jolt the built-in light while it is turned on as it may damage the bulb or shortenthe life of the bulb. • Do not leave the built-in light on while it is resting on or against somethi...
Страница 108 - If batteries are leaking
108 Maintenance information andprecautions • While the unit is in use, particularly during charging, keep it away from AM receivers andvideo equipment. AM receivers and videoequipment disturb AM reception and videooperation. • The unit becomes warm during use. This is not a malfunction. • Do not pla...
Страница 111 - Технические характеристики; Видеокамера
111 Additional information Дополнительная информация Русский Технические характеристики Видеокамера Система Система видеозаписи 2 вращающиеся головкиСистема наклонноймеханической развертки ЧМ Система аудиозаписи Вращающиеся головки, системаЧМ Видеосигнал Цветовой сигнал PAL, стандартМККР Используемы...
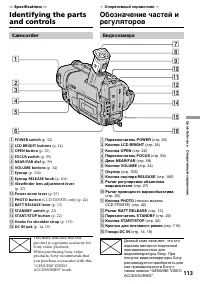
Страница 113 - — Specifications —; Camcorder
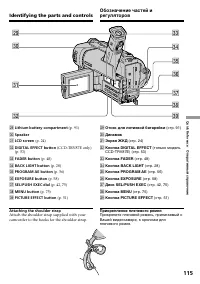
113 Quick Reference Оперативный справочник — Specifications — Identifying the partsand controls 1 POWER switch (p. 22) 2 LCD BRIGHT buttons (p. 24) 3 OPEN button (p. 22) 4 FOCUS switch (p. 59) 5 NEAR/FAR dial (p. 59) 6 VOLUME buttons (p. 34) 7 Eyecup (p. 106) 8 Eyecup RELEASE knob (p. 106) 9 Viewfin...
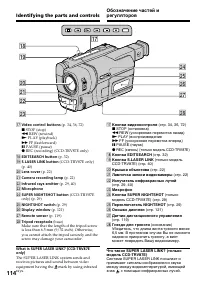
Страница 114 - Identifying the parts and controls
114 qj Video control buttons (p. 34, 36, 72) x STOP (stop) m REW (rewind) N PLAY (playback) M FF (fastforward) X PAUSE (pause) z REC (recording) (CCD-TRV87E only) qk EDITSEARCH button (p. 32) ql S.LASER LINK button (CCD-TRV87E only) (p. 40) w; Lens cover (p. 22) wa Camera recording lamp (p. 22) ws I...
Страница 117 - rj; Fasten the grip strap firmly.
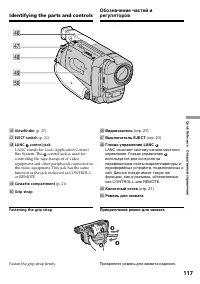
117 Quick Reference Оперативный справочник Identifying the parts and controls rh Viewfinder (p. 27) rj EJECT switch (p. 21) rk LANC control jack LANC stands for Local Application ControlBus System. The control jack is used forcontrolling the tape transport of videoequipment and other peripherals con...
Страница 118 - S VIDEO jack; ts
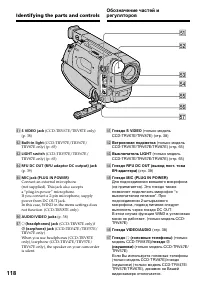
118 Identifying the parts and controls ta S VIDEO jack (CCD-TRV67E/TRV87E only) (p. 38) ts Built-in light (CCD-TRV57E/TRV67E/ TRV87E only) (p. 65) td LIGHT switch (CCD-TRV57E/TRV67E/ TRV87E only) (p. 65) tf RFU DC OUT (RFU adaptor DC output) jack (p. 39) tg MIC jack (PLUG IN POWER) Connect an extern...
Страница 119 - Remote Commander; Transmitter; Пульт дистанционного управления; Передатчик; To prepare the Remote Commander
119 Quick Reference Оперативный справочник Remote Commander The buttons that have the same name on theRemote Commander as on your camcorderfunction identically to the buttons on yourcamcorder. Identifying the parts and controls 1 Transmitter Point toward the remote sensor to controlyour camcorder af...
Страница 120 - Notes on the Remote Commander; • Point the remote sensor away from strong light
120 Identifying the parts and controls Notes on the Remote Commander • Point the remote sensor away from strong light sources such as direct sunlight or overheadlighting. Otherwise, the Remote Commandermay not function properly. • Your camcorder works in the commander mode VTR 2. Commander modes 1, ...
Страница 121 - Operation indicators; Рабочие индикаторы; LCD screen and Viewfinder/; Экран; STBY
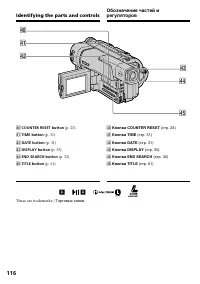
121 Quick Reference Оперативный справочник Operation indicators Рабочие индикаторы LCD screen and Viewfinder/ Экран ЖКД и видоискатель D isplay window/Окошко дисплея 1 Recording mode indicator (p. 78) /Mirror mode indicator (p. 24) 2 Hi8 format indicator (CCD-TRV67E/TRV87E only) (p. 28, 89) 3 Remain...
Страница 124 - Руководство по быстрым функциям
124 Функции для регулировки экспозиции (в режиме записи) • В темном месте• При недостаточном освещении • В темных окружающих условиях, например, заход солнца, фейерверки или общиеночные виды • Съемка объектов с задней подсветкой• При прожекторном освещении, например, в театре или на официальной цере...
Страница 126 - Алфавитный указатель
126 Русский Алфавитный указатель А, Б, В, Г Батарейный блок .................. 13 Батарейный блок “InfoLITHIUM” ...................... 18 Вариообъектив ...................... 25Введение/выведение изображения ....................... 47 Внешний микрофон (не прилагается) ..................... 118 Время...