Страница 2 - En g l i sh; W ARNING; Русский; ПРЕДУПРЕЖДЕНИЕ; or
2 En g l i sh We l co m e ! Congratulations on your purchase of this SonyHandycam ® camcorder. With your Handycam, you can capture life’s precious moments withsuperior picture and sound quality. YourHandycam is loaded with advanced features,but at the same time it is very easy to use. Youwill soon b...
Страница 4 - Функции для использования при монтаже (в режиме записи); Основные функции
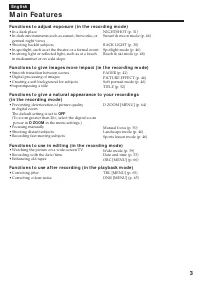
4 Функции для регулировки экспозиции (в режиме записи) • В темном месте• В темных окружающих условиях, например, заход солнца, фейерверки или общиеночные виды • Съемка объектов с задней подсветкой• При прожекторном освещении, например, в театре или на официальной церемонии • При сильном свете или от...
Страница 6 - Оглавление; Подготовка к эксплуатации
6 Русский Оглавление Основные функции ................................... 4Проверка прилагаемых принадлежностей ............................... 7 Руководство по быстромузапуску ..................................................... 10 Подготовка к эксплуатации Использование данного руководства .........
Страница 10 - Подсоединение провода электропитания; Сетевой адаптер; Установка кассеты; на кассетном; Руководство по быстрому запуску
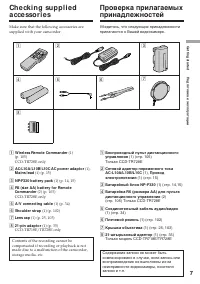
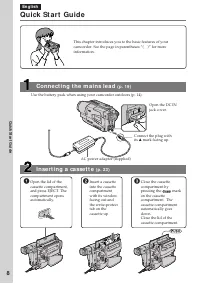
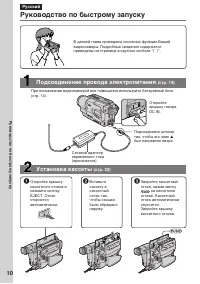
10 Русский Руководство по быстрому запуску В данной главе приведены основные функции Вашейвидеокамеры. Подробные сведения содержатсяприведены на странице в круглых скобках “( )”. Откройтекрышку гнездаDC IN. Подсоедините штекертак, чтобы его знак v был направлен вверх. Подсоединение провода электропи...
Страница 11 - Запись изображения; ПРИМЕЧАНИЕ; Видоискатель
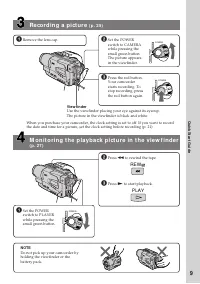
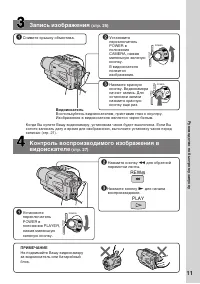
11 Руководство по быстрому запуску Запись изображения (стр. 25) Контроль воспроизводимого изображения ввидоискателе (стр. 27) ПРИМЕЧАНИЕ Не поднимайте Вашу видеокамеруза видоискатель или батарейныйблок. 1 Снимите крышку объектива. 2 Установите переключатель POWER в положение CAMERA, нажав маленькую ...
Страница 12 - — Ge t t i n g st a r t e d —; Usi n g t h i s m a n u a l; — Подготовка к эксплуатации —; Ty p e s o f d i f f e r e n ce s/; Цифровой вариообъектив; N o t e o n TV co l o u r sy st e m s
12 — Ge t t i n g st a r t e d — Usi n g t h i s m a n u a l The instructions in this manual are for the threemodels listed in the table below. Before you startreading this manual and operating yourcamcorder, check the model number by lookingat the bottom of your camcorder. TheCCD-TR728E is the mode...
Страница 13 - • Do not let your camcorder get wet. Keep your
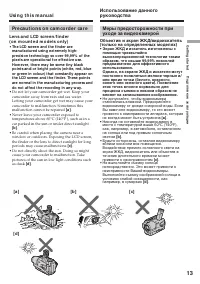
13 G etting s tarted Подготовка к эксплуатации [ a ] [ b ] [ c] Usi n g t h i s m a n u a l Pr e ca u t i o n s o n ca m co r d e r ca r e Le n s a n d LCD scr e e n /f i n d e r( o n m o u n t e d m o d e l s o n l y ) • The LCD screen and t he f inder aremanuf act ured using ext remely high-precis...
Страница 14 - I n st a l l i n g t h e b a t t e r y p a ck; Slide the battery pack down until it clicks.; To r e m o v e t h e b a t t e r y p a ck; St e p 1 Pre p a r i n g t h e; Установка батарейного блока; Для снятия батарейного блока; Пункт 1 Подготовка; BATT RELEASE
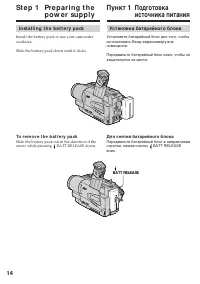
14 I n st a l l i n g t h e b a t t e r y p a ck Install the battery pack to use your camcorderoutdoors. Slide the battery pack down until it clicks. To r e m o v e t h e b a t t e r y p a ck Slide the battery pack out in the direction of thearrow while pressing BATT RELEASE down. St e p 1 Pre p a r...
Страница 15 - St e p 1 Pr e p a r i n g t h e p o w e r; Connect the mains lead to the mains.; Пункт 1 Подготовка источника; был направлен вверх.
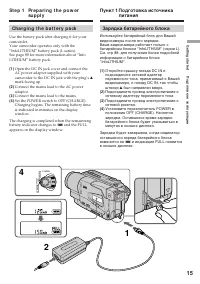
15 G etting s tarted Подготовка к эксплуатации St e p 1 Pr e p a r i n g t h e p o w e r su p p l y Ch a r g i n g t h e b a t t e r y p a ck Use the battery pack after charging it for yourcamcorder.Your camcorder operates only with the“InfoLITHIUM” battery pack (L series).See page 88 for more infor...
Страница 16 - A f t e r ch a r g i n g t h e b a t t e r y p a ck; Not es; • Prevent metallic objects from coming into; После зарядки батарейного блока; Примечания; • Не допускайте контакта металлических
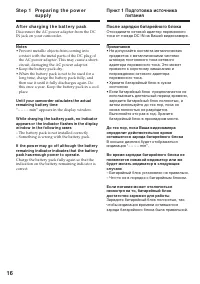
16 A f t e r ch a r g i n g t h e b a t t e r y p a ck Disconnect the AC power adaptor from the DCIN jack on your camcorder. Not es • Prevent metallic objects from coming into contact with the metal parts of the DC plug ofthe AC power adaptor. This may cause a short-circuit, damaging the AC power ad...
Страница 17 - Ch a r g i n g t i m e /; Батарейный блок
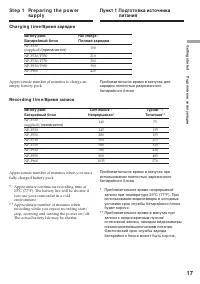
17 G etting s tarted Подготовка к эксплуатации St e p 1 Pr e p a r i n g t h e p o w e r su p p l y Ch a r g i n g t i m e / Время зарядки Approximate number of minutes to charge anempty battery pack Re co r d i n g t i m e / Время записи Approximate number of minutes when you use afully charged bat...
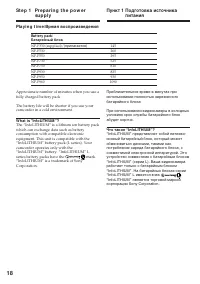
Страница 18 - Pl a y i n g t i m e /; W hat is ”Inf oLITHIUM ”?
18 St e p 1 Pr e p a r i n g t h e p o w e r su p p l y Пункт 1 Подготовка источника питания Pl a y i n g t i m e / Время воспроизведения Bat t ery pack/ Батарейный блок NP-F330 (supplied)/ (прилагается) 145 NP-F530 260 NP-F550 295 NP-F730 525 NP-F750 610 NP-F930 825 NP-F950 930 NP-F960 1090 Approxi...
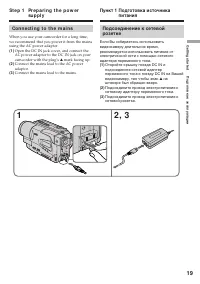
Страница 19 - на; Co n n e ct i n g t o t h e m a i n s
19 G etting s tarted Подготовка к эксплуатации Подсоединение к сетевойрозетке Если Вы собираетесь использоватьвидеокамеру длительное время,рекомендуется использовать питание отэлектрической сети с помощью сетевогоадаптера переменного тока. (1 ) Откройте крышку гнезда DC IN иподсоедините сетевой адап...
Страница 20 - PRECAUTION; • The AC power adaptor can supply power even; Using a car bat t ery; • Питание от сетевого адаптера переменного
20 St e p 1 Pr e p a r i n g t h e p o w e r su p p l y Пункт 1 Подготовка источника питания PRECAUTION The set is not disconnected from the AC powersource (mains) as long as it is connected to themains, even if the set itself has been turned off. Not es • The AC power adaptor can supply power even ...
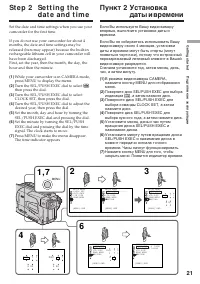
Страница 21 - St e p 2 Se t t i n g t h e; Turn the SEL/PUSH EXEC dial to select; Пункт 2 Установка
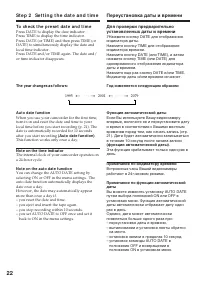
21 G etting s tarted Подготовка к эксплуатации St e p 2 Se t t i n g t h e d a t e a n d t i m e Set the date and time settings when you use yourcamcorder for the first time. If you do not use your camcorder for about 4months, the date and time settings may bereleased (bars may appear) because the b...
Страница 22 - To ch e ck t h e p r e se t d a t e a n d t i m e; The year changes as f ollow s:; This function works only once a day.; Not e on t he t ime indicat or; back to ON in the menu settings.; Год изменяется следующим образом:; Переустановка даты и времени
22 To ch e ck t h e p r e se t d a t e a n d t i m e Press DATE to display the date indicator.Press TIME to display the time indicator.Press DATE (or TIME) and then press TIME (orDATE) to simultaneously display the date andlocal time indicator.Press DATE and/or TIME again. The date and/or time indic...
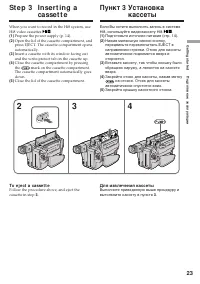
Страница 23 - Закройте отсек для кассеты, нажав метку; Для извлечения кассеты; mark on the cassette compartment.; To e j e ct a ca sse t t e; St e p 3 I n se r t i n g a
23 G etting s tarted Подготовка к эксплуатации Если Вы хотите выполнять запись в системеHi8, используйте видеокассету Hi8 . (1 ) Подготовьте источник питания (стр. 14). (2 ) Нажав маленькую синюю кнопку,передвиньте переключатель EJECT внаправлении стрелки. Отсек для кассетыавтоматически поднимется в...
Страница 24 - • Do not press the cassette compartment down.; To prevent accident al erasure; St e p 3
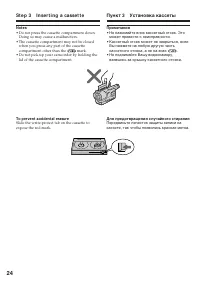
24 Not es • Do not press the cassette compartment down. Doing so may cause a malfunction. • The cassette compartment may not be closed when you press any part of the cassettecompartment other than the mark. • Do not pick up your camcorder by holding the lid of the cassette compartment. To prevent ac...
Страница 25 - — Re co r d i n g – Ba si cs —; Re co rd i n g a p i ct u re; Your camcorder automatically focuses for you.; Микрофон; Лампочка
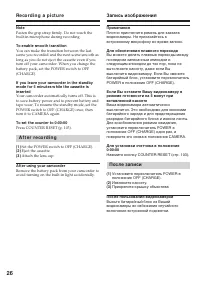
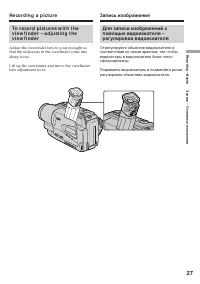
25 R ecording – B asic s Запись – Основные положения 4 3 1 2 40min REC 0:00:01 PLAYER POWER OFF CAMERA (CHARGE ) PLAYER POWER OFF CAMERA (CHARGE ) — Re co r d i n g – Ba si cs — Re co rd i n g a p i ct u re Your camcorder automatically focuses for you. (1 ) Remove the lens cap by pressing both knobs...
Страница 26 - A f t e r r e co r d i n g; Attach the lens cap; Af t er using your camcorder; После записи; Прикрепите крышку объектива; После пользования видеокамерой
26 Not e Fasten the grip strap firmly. Do not touch thebuilt-in microphone during recording. To enable smoot h t ransit ion You can make the transition between the lastscene you recorded and the next scene smooth aslong as you do not eject the cassette even if youturn off your camcorder. When you ch...
Страница 28 - Usi n g t h e zo o m f e a t u r e; Zoom greater than 20
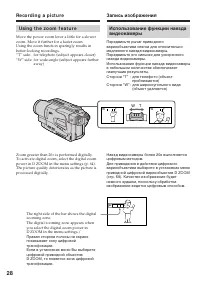
28 Usi n g t h e zo o m f e a t u r e Move the power zoom lever a little for a slowerzoom. Move it further for a faster zoom.Using the zoom function sparingly results inbetter-looking recordings.“T” side: for telephoto (subject appears closer)“W” side: for wide-angle (subject appears farther away) Z...
Страница 29 - The indicators are not recorded on tape.; Индикатор формата Hi8; • Digital zoom starts to function when zoom
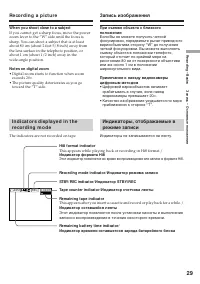
29 R ecording – B asic s Запись – Основные положения I n d i ca t o r s d i sp l a y e d i n t h er e co r d i n g m o d e The indicators are not recorded on tape. Индикаторы, отображаемые врежиме записи Индикаторы не записываются на ленту. Hi8 f ormat indicat or This appears while playing back or r...
Страница 30 - indicator appears in the viewfinder.; BACK LIGHT; Функция задней подсветки будет отменена.
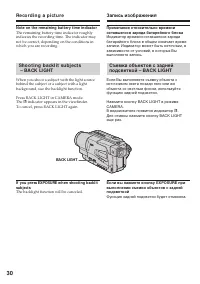
30 Re co r d i n g a p i ct u r e Запись изображения BACK LIGHT Not e on t he remaining bat t ery t ime indicat or The remaining battery time indicator roughlyindicates the recording time. The indicator maynot be correct, depending on the conditions inwhich you are recording. Sh o o t i n g b a ck l...
Страница 31 - and “NIGHTSHOT” indicators flash in the; Usi n g t h e N i g h t Sh o t Li g h t; Night Shot Light emit t er/; и “NIGHTSHOT” начнут
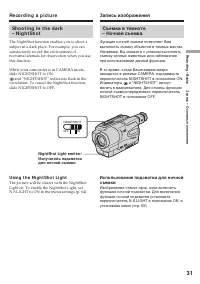
31 R ecording – B asic s Запись – Основные положения Sh o o t i n g i n t h e d a r k– N i g h t Sh o t The NightShot function enables you to shoot asubject in a dark place. For example, you cansatisfactorily record the environment ofnocturnal animals for observation when you usethis function. While...
Страница 32 - • Do not use the NightShot function in bright; Night Shot Light; • Не используйте функцию ночной съемки в; Подсветка для ночной съемки
32 Re co r d i n g a p i ct u r e Not es • Do not use the NightShot function in bright places (ex. outdoors in the daytime). This maycause your camcorder to malfunction. • When you keep NIGHTSHOT set to ON in normal recording, the picture may be recordedin incorrect or unnatural colours. • If focusi...
Страница 33 - Not e; Примечание
33 R ecording – B asic s Запись – Основные положения Re co r d i n g a p i ct u r e Su p e r i m p o si n g t h e d a t e a n dt i m e o n p i ct u r e s You can record the date and/or time displayed inthe viewfinder superimposed on the picture.Carry out the following operations in CAMERAmode. Press...
Страница 34 - Передача сигнала; Желтый
34 — Pl a y b a ck – Ba si cs — Co n n e ct i o n s f o rp l a y b a ck Connect your camcorder to your TV with the A/V connecting cable supplied with yourcamcorder to watch the playback picture on theTV screen. When monitoring the playbackpicture on the TV screen, we recommend thatyou power your cam...
Страница 35 - If your TV has an S video jack; TV; Co n n e ct i o n s f o r p l a y b a ck
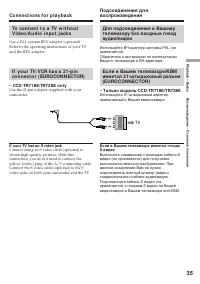
35 P laybac k – B asic s Воспроизведение – Основные положения To co n n e ct t o a TV w i t h o u tV i d e o /A u d i o i n p u t j a ck s Use a PAL system RFU adaptor (optional).Refer to the operating instructions of your TVand the RFU adaptor. I f y o u r TV /V CR h a s a 2 1 -p i nco n n e ct o r...
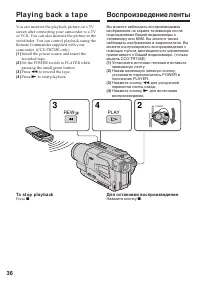
Страница 36 - Pl a y i n g b a ck a t a p e; Воспроизведение ленты; To st o p p l a y b a ck; Для остановки воспроизведения
36 Pl a y i n g b a ck a t a p e You can monitor the playback picture on a TVscreen after connecting your camcorder to a TVor VCR. You can also monitor the picture in theviewfinder. You can control playback using theRemote Commander supplied with yourcamcorder. (CCD-TR728E only) (1 ) Install the pow...
Страница 37 - V a r i o u s p l a y b a ck m o d e s; To a d v a n ce t h e t a p e; DISPLAY
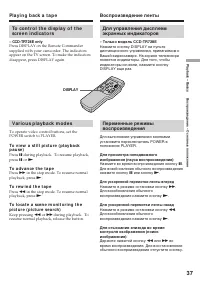
37 P laybac k – B asic s Воспроизведение – Основные положения To co n t r o l t h e d i sp l a y o f t h escr e e n i n d i ca t o r s – CCD-TR728E only Press DISPLAY on the Remote Commandersupplied with your camcorder. The indicatorsappear on the TV screen. To make the indicatorsdisappear, press DI...
Страница 38 - In t he various playback modes
38 Pl a y i n g b a ck a t a p e Воспроизведение ленты To m o n i t o r t h e h i g h -sp e e d p i ct u r ew h i l e a d v a n ci n g o r r e w i n d i n g t h et a p e ( sk i p sca n ) Keep pressing m while rewinding or M while advancing the tape. To resume rewinding oradvancing, release the butto...
Страница 39 - CI N EM A; back on a normal TV; — A d v a n ce d Re co r d i n g Op e r a t i o n —; Usi n g t h e w i d e m o d e; — Усовершенствованные операции съемки —; CINEM A
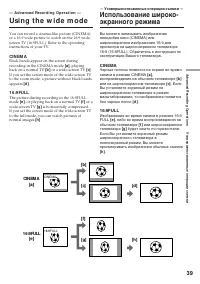
39 Advanc ed R ecording Operat ions Усовершенствованные операции съемки You can record a cinema-like picture (CINEMA)or a 16:9 wide picture to watch on the 16:9 wide-screen TV (16:9FULL). Refer to the operatinginstructions of your TV. CI N EM A Black bands appear on the screen duringrecording in the...
Страница 40 - To ca n ce l t h e w i d e m o d e; Set 16:9WIDE to OFF in the menu settings.; In t he w ide mode
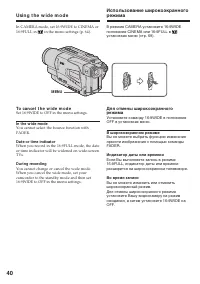
40 Usi n g t h e w i d e m o d e In CAMERA mode, set 16:9WIDE to CINEMA or16:9FULL in in the menu settings (p. 64). To ca n ce l t h e w i d e m o d e Set 16:9WIDE to OFF in the menu settings. In t he w ide mode You cannot select the bounce function withFADER. Dat e or t ime indicat or When you reco...
Страница 41 - M ONOTONE
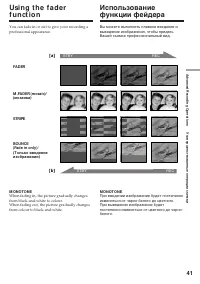
41 Advanc ed R ecording Operat ions Усовершенствованные операции съемки You can fade in or out to give your recording aprofessional appearance. Usi n g t h e f a d e rf u n ct i o n M ONOTONE When fading in, the picture gradually changesfrom black-and-white to colour.When fading out, the picture gra...
Страница 42 - Usi n g t h e f a d e r f u n ct i o n; To ca n ce l t h e f a d e r f u n ct i o n; Использование функции фейдера; При введении изображения; Для отмены функции фейдера; без индикатора
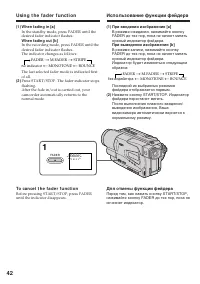
42 Usi n g t h e f a d e r f u n ct i o n (1 ) W hen f ading in [a] In the standby mode, press FADER until thedesired fader indicator flashes. W hen f ading out [b ] In the recording mode, press FADER until thedesired fader indicator flashes.The indicator changes as follows: The last selected fader ...
Страница 43 - Not e on t he bounce f unct ion; the menu settings; Примечание по функции перескакивания
43 Advanc ed R ecording Operat ions Усовершенствованные операции съемки The dat e, t ime indicat or and t it le do not f adein or f ade out Erase them before operating the fader function ifthey are not needed. W hile using t he bounce f unct ion, you cannotuse t he f ollow ing f unct ions: – Focus– ...
Страница 44 - The picture is sepia.; SEPIA; : Яркость света будет
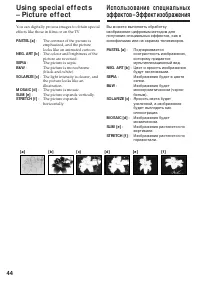
44 You can digitally process images to obtain specialeffects like those in films or on the TV. PASTEL [a] : The contrast of the picture isemphasized, and the picturelooks like an animated cartoon. NEG. ART [b ] : The colour and brightness of the picture are reversed. SEPIA : The picture is sepia. B&...
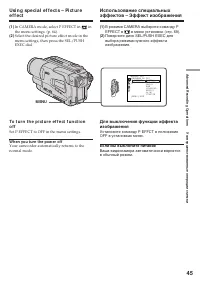
Страница 45 - In CAMERA mode, select P EFFECT in; W hen you t urn t he pow er of f
45 Advanc ed R ecording Operat ions Усовершенствованные операции съемки M A N U A L S E T O F F . N E G A R TS E P I AB & WS O L A R I Z E S L I MS T R E T C H P A S T E L MO S A I C P R O G R A M A EP E F F E C T R E T U R N [ M E N U ] : E N D Usi n g sp e ci a l e f f e ct s – Pi ct u r ee f ...
Страница 47 - Usi n g t h e PROGRA M A E f u n ct i o n; In CAMERA mode, select PROGRAM AE in; M ENU
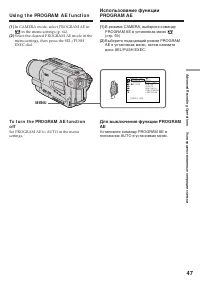
47 Advanc ed R ecording Operat ions Усовершенствованные операции съемки Usi n g t h e PROGRA M A E f u n ct i o n (1 ) In CAMERA mode, select PROGRAM AE in in the menu settings (p. 64). (2 ) Select the desired PROGRAM AE mode in themenu settings, then press the SEL/PUSHEXEC dial. To t u r n t h e PR...
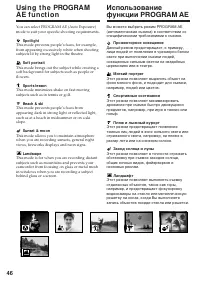
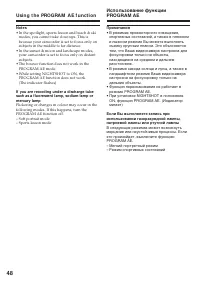
Страница 48 - • In the spotlight, sports lesson and beach & ski; • В режимах прожекторного освещения,
48 Not es • In the spotlight, sports lesson and beach & ski modes, you cannot take close-ups. This isbecause your camcorder is set to focus only onsubjects in the middle to far distance. • In the sunset & moon and landscape modes, your camcorder is set to focus only on distantsubjects. • The...
Страница 49 - faithfully; ночных сцен) с большой достоверностью; NIGHTSHOT в положение ON
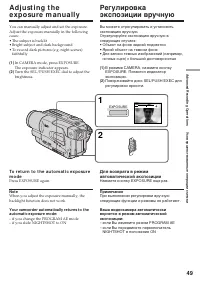
49 Advanc ed R ecording Operat ions Усовершенствованные операции съемки You can manually adjust and set the exposure.Adjust the exposure manually in the followingcases:• The subject is backlit• Bright subject and dark background• To record dark pictures (e.g. night scenes) faithfully (1 ) In CAMERA ...
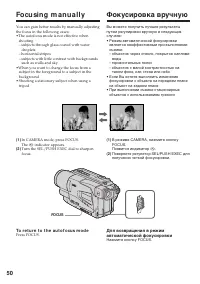
Страница 50 - To r e t u r n t o t h e a u t o f o cu s m o d e; Fo cu si n g m a n u a l l y; FOCUS
50 You can gain better results by manually adjustingthe focus in the following cases:•The autofocus mode is not effective when shooting– subjects through glass coated with water droplets – horizontal stripes– subjects with little contrast with backgrounds such as walls and sky •When you want to chan...
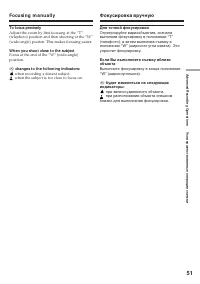
Страница 51 - To f ocus precisely; Для точной фокусировки; близко для выполнения фокусировки.; Фокусировка вручную
51 Advanc ed R ecording Operat ions Усовершенствованные операции съемки To f ocus precisely Adjust the zoom by first focusing at the “T”(telephoto) position and then shooting at the “W”(wide-angle) positon. This makes focusing easier. W hen you shoot close t o t he subject Focus at the end of the “W...
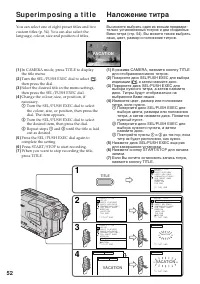
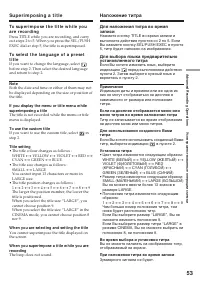
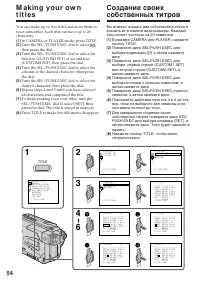
Страница 52 - Su p e r i m p o si n g a t i t l e; Наложение титра; VACATION
52 Su p e r i m p o si n g a t i t l e You can select one of eight preset titles and twocustom titles (p. 54). You can also select thelanguage, colour, size and position of titles. (1 ) In CAMERA mode, press TITLE to displaythe title menu. (2 ) Turn the SEL/PUSH EXEC dial to select , then press the ...
Страница 55 - To ch a n g e a t i t l e y o u h a v e st o r e d; To delet e t he t it le; M a k i n g y o u r o w n t i t l e s; Если Вы выбрали команду [; вернуться к предыдущему экрану.; Для удаления титра
55 Advanc ed R ecording Operat ions Усовершенствованные операции съемки To ch a n g e a t i t l e y o u h a v e st o r e d In step 3, select CUSTOM1 SET or CUSTOM2SET, depending on which title you want tochange, then press the SEL/PUSH EXEC dial.Turn the SEL/PUSH EXEC dial to select [ C ], then pres...
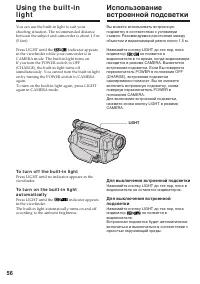
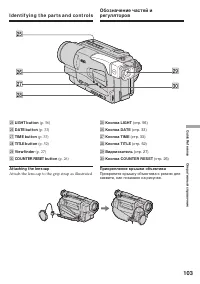
Страница 56 - To t u r n o f f t h e b u i l t -i n l i g h t; Press LIGHT until the; Для выключения встроенной подсветки; не появится в; LIGHT
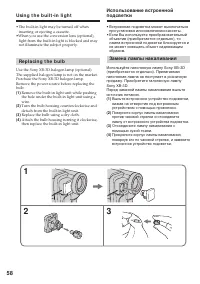
56 Usi n g t h e b u i l t -i nl i g h t You can use the built-in light to suit yourshooting situation. The recommended distancebetween the subject and camcorder is about 1.5 m(5 feet). Press LIGHT until the indicator appears in the viewfinder while your camcorder is inCAMERA mode The built-in light...
Страница 57 - CA UTI ON; W hen you press LIGHT; ВНИМАНИЕ; Если Вы нажмете кнопку LIGHT; Usi n g t h e b u i l t -i n l i g h t
57 Advanc ed R ecording Operat ions Усовершенствованные операции съемки CA UTI ON Be caref ul not t o t ouch t he light ing sect ion,because t he plast ic w indow and surroundingsurf aces are hot w hile t he light is on. Itremains hot f or a w hile af t er t he light ist urned of f . D A N GER Not t...
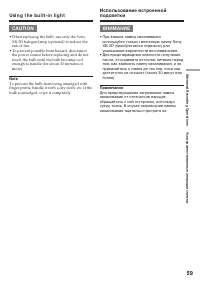
Страница 58 - • Встроенная подсветка может выключаться; Замена лампы накаливания; • The built-in light may be turned off when; Re p l a ci n g t h e b u l b; Replace the bulb using a dry cloth.
58 Usi n g t h e b u i l t -i n l i g h t • Встроенная подсветка может выключаться при установке или извлечении кассеты. • Если Вы используете преобразовательный объектив (приобретается отдельно), то лампа встроенной подсветки блокируется и не может освещать объект надлежащим образом. Замена лампы н...
Страница 59 - • When replacing the bulb, use only the Sony; • При замене лампы накаливания
59 Advanc ed R ecording Operat ions Усовершенствованные операции съемки Usi n g t h e b u i l t -i n l i g h t Использование встроеннойподсветки CA UTI ON • When replacing the bulb, use only the Sony XB-3D halogen lamp (optional) to reduce therisk of fire. • To prevent possible burn hazard, disconne...
Страница 60 - — Ed i t i n g —; D u b b i n g a t a p e; Usi n g t h e A /V co n n e ct i n g ca b l e; Set the POWER switch to PLAYER.; —Монтаж —; Перезапись ленты; Если Вы закончили перезапись ленты; Нажмите кнопку; Черный
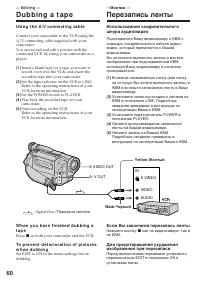
60 S VIDEO OUT A / V OUT S VIDEO IN VIDEO AUDIO — Ed i t i n g — D u b b i n g a t a p e Usi n g t h e A /V co n n e ct i n g ca b l e Connect your camcorder to the VCR using theA/V connecting cable supplied with yourcamcorder.You can record and edit a picture with theconnected VCR by using your cam...
Страница 61 - mini DV or; mini DV или
61 E diting Монтаж D u b b i n g a t a p e You can edit on VCRs t hat support t hef ollow ing syst ems 8 mm, Hi8, Digital8, VHS, S-VHS, VHSC, S-VHSC, Betamax, mini DV or DV Connect using an S video cable (opt ional) t oobt ain high-qualit y pict ures With this connection, you do not need to connectt...
Страница 62 - — Cu st o m i zi n g Y o u r Ca m co r d e r —
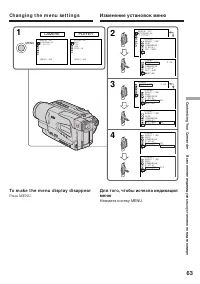
62 — Cu st o m i zi n g Y o u r Ca m co r d e r — Ch a n g i n g t h e m e n use t t i n g s To change the mode settings in the menusettings, select the menu items with the SEL/PUSH EXEC dial. The default settings can bepartially changed. First, select the icon, then themenu item and then the mode. ...
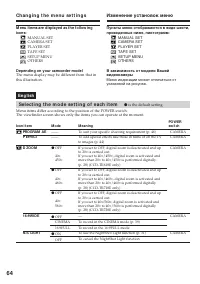
Страница 69 - Выбор установок режима по каждому пункту; установки по умолчанию.; Предназначение
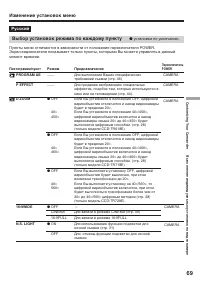
69 C ustomizing Your C amc order Выполнение индивидуальных установок на видеокамере Русский Выбор установок режима по каждому пункту z установки по умолчанию. Пункты меню отличаются в зависимости от положения переключателя POWER.Экран видоискателя показывает только пункты, которыми Вы можете управля...
Страница 70 - Примечание по воспроизведению лент NTSC
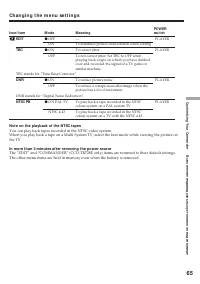
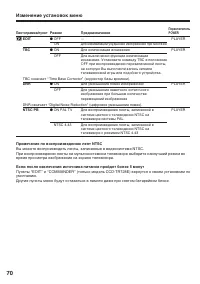
70 Изменение установок меню Пиктограмма/пункт EDIT TBC ТВС означает “Time Base Corrector” (корректор базы времени). DNR DNR означает “Digital Noise Reduction” (цифровое уменьшение помех). NTSC PB Режим z OFFON z ONOFF z ONOFF z ON PAL TV NTSC 4.43 Предназначение —Для минимизации ухудшения изображени...
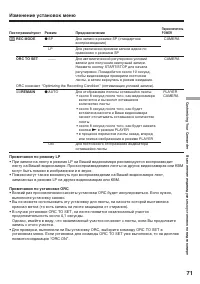
Страница 71 - REC MODE; Примечания по режиму LP; записанных в режиме LP на других видеокамерах или КВМ.; Примечания по установке ORC; выполните установку заново.
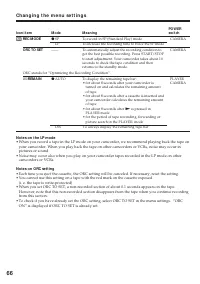
71 C ustomizing Your C amc order Выполнение индивидуальных установок на видеокамере Изменение установок меню Пиктограмма/пункт REC MODE ORC TO SET ORC означает “Optimizing the Recording Condition” (оптимизация условий записи). q REMAIN Режим z SP LP —— z AUTO ON Предназначение Для записи в режиме SP...
Страница 72 - Примечания по режиму DEMO MODE
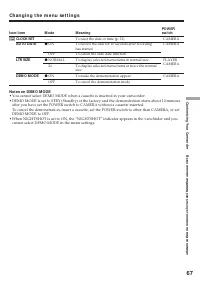
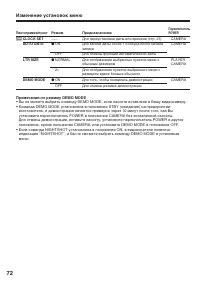
72 Изменение установок меню Примечания по режиму DEMO MODE • Вы не можете выбрать команду DEMO MODE, если кассета вставлена в Вашу видеокамеру.• Команда DEMO MODE установлена в положение STBY (ожидание) на предприятии- изготовителе, и демонстрация начнется примерно через 10 минут после того, как Выу...
Страница 73 - WORLD TIME
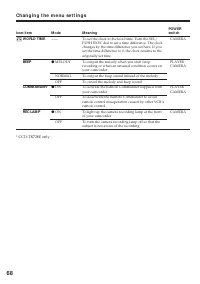
73 C ustomizing Your C amc order Выполнение индивидуальных установок на видеокамере Изменение установок меню Пиктограмма/пункт WORLD TIME BEEP COMMANDER* REC LAMP Режим —— z MELODY NORMAL OFF z ON OFF z ON OFF Предназначение Для установки часов на местное время.Поверните диск SEL/PUSH EXEC для устан...
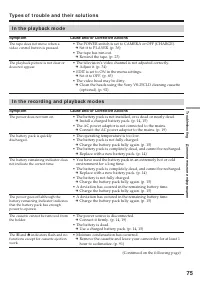
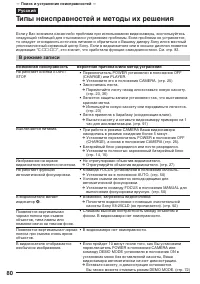
Страница 80 - Поиск и устранение неисправностей; Типы неисправностей и методы их решения; В режиме записи; Возможная неисправность
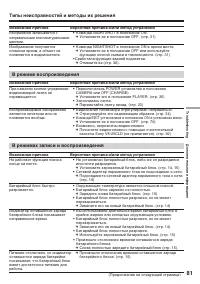
80 — Поиск и устранение неисправностей — Русский Типы неисправностей и методы их решения Если у Вас возникла какая-либо проблема при использовании видеокамеры, воспользуйтесь следующей таблицей для отыскания и устранения проблемы. Если проблема не устраняется, то следует отсоединить источник питания...
Страница 81 - В режиме воспроизведения
81 T roubles hoot ing Дополнительная информация n Возможная причина Вероятная причина и/или метод устранения • Команда NIGHTSHOT в положение ON. c Установите ее в положение OFF. (стр. 31) • Команда NIGHTSHOT в положение ON в ярком месте. c Установите ее в положение OFF или используйте функцию ночной...
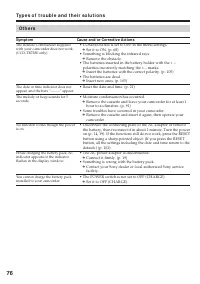
Страница 82 - Прочее
82 Возможная причина Вероятная причина и/или метод устранения • Отсоединен источник питания. c Подсоедините его плотно. (стр. 14, 19) • Батарейный блок разряжен. c Используйте заряженный батарейный блок. (стр. 14, 15) • Произошла конденсация влаги. c Выньте кассету и оставьте Вашу видеокамеру пример...
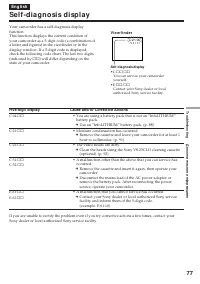
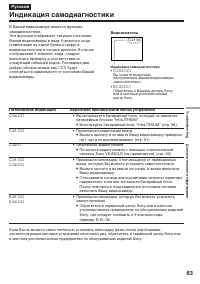
Страница 83 - Пятизначная индикация; Индикация самодиагностики
83 T roubles hoot ing Дополнительная информация n C:21:00 Пятизначная индикация Вероятная причина и/или метод устранения • Вы используете батарейный блок, который не является батарейным блоком “InfoLITHIUM”. c Используйте батарейный блок “InfoLITHIUM” (стр. 88) • Произошла конденсация влаги. c Выньт...
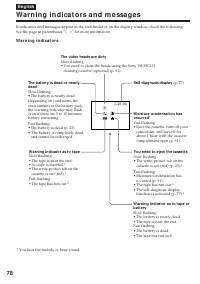
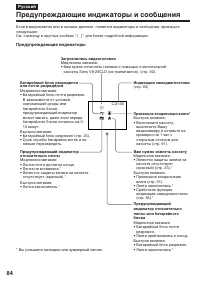
Страница 84 - Предупреждающие индикаторы и сообщения; Предупреждающие индикаторы; Загрязнились видеоголовки
84 C:21:00 Предупреждающие индикаторы и сообщения Если в видоискатле или в окошке дисплея появятся индикаторы и сообщения, проверьтеследующее:См. страницу в круглых скобках “( )” для более подробной информации. Предупреждающие индикаторы Батарейный блок разрядилсяили почти разрядился Медленное миган...
Страница 85 - Предупреждающие сообщения
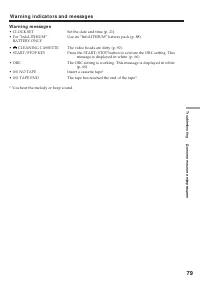
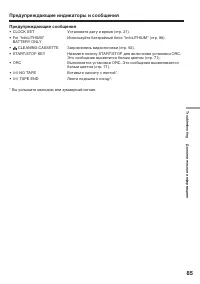
85 T roubles hoot ing Дополнительная информация n Предупреждающие сообщения • CLOCK SET Установите дату и время (стр. 21). • For “InfoLITHIUM” Используйте батарейный блок “InfoLITHIUM” (стр. 88). BATTERY ONLY • CLEANING CASSETTE Загрязнились видеоголовки (стр. 92). • START/STOP KEY Нажмите кнопку ST...
Страница 86 - — A d d i t i o n a l I n f o r m a t i o n —; Se l e ct i n g t h e ca sse t t e t y p e; Fo r e i g n 8 m m v i d e o; — Дополнительная информация —; Выбор типа кассеты; Иностранные 8-мм видеоленты
86 — A d d i t i o n a l I n f o r m a t i o n — Usa b l e ca sse t t e s a n dp l a y b a ck m o d e s Se l e ct i n g t h e ca sse t t e t y p e You can use both Hi8 and standard 8 mm videocassettes on your camcorder. When you use aHi8 video cassette, recording and playback arecarried out in the H...
Страница 87 - Playing back an NTSC-recorded t ape; • During playback, a black band appears on the
87 Addit ional inf ormat ion Дополнительная информация Usa b l e ca sse t t e s a n d p l a y b a ckm o d e s Playing back an NTSC-recorded t ape You can play back tapes recorded in the NTSCvideo system using the SP mode.However, note that the following will occurduring playback of an NTSC-recorded ...
Страница 89 - A b o u t “ I n f o LI THI UM ” b a t t e r y; Re m a i n i n g b a t t e r y t i m e i n d i ca t o r; О батарейном блоке “InfoLITHIUM”; Как хранить батарейный блок
89 Addit ional inf ormat ion Дополнительная информация A b o u t “ I n f o LI THI UM ” b a t t e r y Re m a i n i n g b a t t e r y t i m e i n d i ca t o r • If the power goes off although the remaining battery time indicator indicates that the batterypack has enough power to operate, charge thebat...
Страница 90 - Usi n g y o u r ca m co r d e r a b r o a d; PAL syst em; Brazil; NTSC syst em; Бразилия; Система NTSC
90 Usi n g y o u r ca m co r d e r a b r o a d You can use your camcorder in any country orarea with the AC power adaptor supplied withyour camcorder within 100 V to 240 V AC,50/60 Hz. Your camcorder is a PAL system basedcamcorder. If you want to view the playbackpicture on a TV, it must be a PAL sy...
Страница 91 - M o i st u r e co n d e n sa t i o n; I f m o i st u r e co n d e n sa t i o n o ccu r s; Not e on moist ure condensat ion; Конденсация влаги; Если произошла конденсация влаги; Примечание по конденсации влаги
91 Addit ional inf ormat ion Дополнительная информация M a i n t e n a n cei n f o r m a t i o n a n dp re ca u t i o n s M o i st u r e co n d e n sa t i o n If your camcorder is brought directly from a coldplace to a warm place, moisture may condenseinside your camcorder, on the surface of the tap...
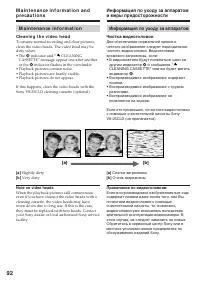
Страница 92 - M a i n t e n a n ce i n f o r m a t i o n; Cl e a n i n g t h e v i d e o h e a d; indicator and “; Not e on video heads; Информация по уходу за аппаратом; Чистка видеоголовок; Примечание по видеоголовкам
92 [a] [b] M a i n t e n a n ce i n f o r m a t i o n Cl e a n i n g t h e v i d e o h e a d To ensure normal recording and clear pictures,clean the video heads. The video head may bedirty when:• The x indicator and “ CLEANING CASSETTE” message appear one after anotheror the x indicator flashes in t...
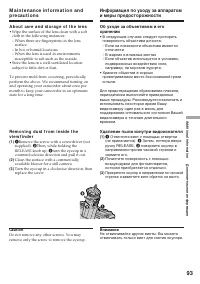
Страница 93 - A b o u t ca r e a n d st o r a g e o f t h e l e n s; Caut ion; Удаление пыли изнутри видоискателя; Внимание
93 Addit ional inf ormat ion Дополнительная информация M a i n t e n a n ce i n f o r m a t i o n a n dp r e ca u t i o n s A b o u t ca r e a n d st o r a g e o f t h e l e n s • Wipe the surface of the lens clean with a soft cloth in the following instances:– When there are fingerprints on the len...
Страница 94 - Charging t he rechargeable lit hium cell:; Pr e ca u t i o n s; Ca m co r d e r o p e r a t i o n; Зарядка перезаряжаемого элемента:; Меры предосторожности; Эксплуатация видеокамеры
94 Ch a r g i n g t h e b u i l t -i nr e ch a r g e a b l e l i t h i u m ce l l i ny o u r ca m co r d e r Your camcorder is supplied with a built-inrechargeable lithium cell so as to retain the dateand time, etc., regardless of the setting of thePOWER switch. The rechargeable lithium cell isalway...
Страница 95 - Bu i l t -i n l i g h t
95 Addit ional inf ormat ion Дополнительная информация Bu i l t -i n l i g h t • Do not knock or jolt the built-in light while it is turned on as it may damage the bulb or shortenthe life of the bulb. • Do not leave the built-in light on while it is resting on or against something; it may cause afir...
Страница 97 - N o t e s o n d r y b a t t e r i e s; using them for a long time.; If bat t eries are leaking; • Wipe off the liquid in the battery compartment; Примечания к сухим батарейкам; – Только модель CCD-TR728E; • Не используйте батарейки, которые потекли.
97 Addit ional inf ormat ion Дополнительная информация N o t e s o n d r y b a t t e r i e s – CCD-TR728E only To avoid possible damage from battery leakageor corrosion, observe the following:• Be sure to insert the batteries with the + – polarities matched to the + – marks. • Dry batteries are not ...
Страница 99 - Технические характеристики; Видеокамера
99 Addit ional inf ormat ion Дополнительная информация Русский Технические характеристики Видеокамера Система Система видеозаписи 2 вращающиеся головкиСистема наклонноймеханической развертки ЧМ Система аудиозаписи Вращающиеся головки, системаЧМ Видеосигнал Цветовой сигнал PAL, стандартМККР Используе...
Страница 101 - I d e n t i f y i n g t h e p a r t s a n d co n t r o l s; PLAY (воспроизведение
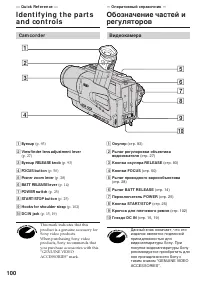
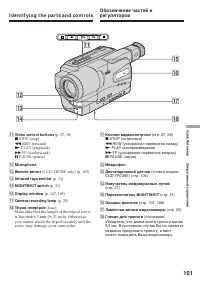
101 Quic k R eferenc e Оперативный справочник I d e n t i f y i n g t h e p a r t s a n d co n t r o l s qa Кнопки видеоконтроля (стр. 37, 38) x STOP (остановка) m REW (ускоренная перемотка назад) N PLAY (воспроизведение M FF (ускоренная перемотка вперед) X PAUSE (пауза) qs Микрофон qd Дистанционный...
Страница 102 - wa
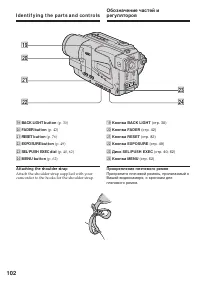
102 I d e n t i f y i n g t h e p a r t s a n d co n t r o l s ql Кнопка BACK LIGHT (стр. 30) w; Кнопка FADER (стр. 42) wa Кнопка RESET (стр. 82) ws Кнопка EXPOSURE (стр. 49) wd Диск SEL/PUSH EXEC (стр. 40, 62) wf Кнопка MENU (стр. 62) Прикрепление плечевого ремня Прикрепите плечевой ремень, прилага...
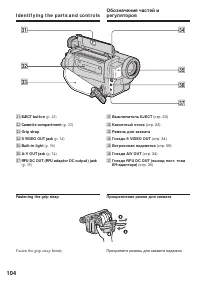
Страница 104 - Fasten the grip strap firmly.
104 I d e n t i f y i n g t h e p a r t s a n d co n t r o l s ea Выключатель EJECT (стр. 23) es Кассетный отсек (стр. 23) ed Ремень для захвата ef Гнездо S VIDEO OUT (стр. 34) eg Встроенная подсветка (стр. 56) eh Гнезда A/V OUT (стр. 34) ej Гнездо RFU DC OUT (выход пост. токаВЧ-адаптера) (стр. 35) ...
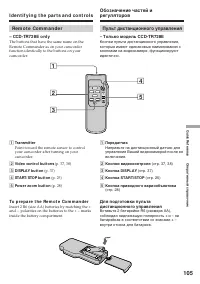
Страница 105 - Re m o t e Co m m a n d e r; – CCD -TR7 2 8 E o n l y; Transmit t er; To p r e p a r e t h e Re m o t e Co m m a n d e r; Пульт дистанционного управления; Передатчик
105 Quic k R eferenc e Оперативный справочник Re m o t e Co m m a n d e r – CCD -TR7 2 8 E o n l y The buttons that have the same name on theRemote Commander as on your camcorderfunction identically to the buttons on yourcamcorder. I d e n t i f y i n g t h e p a r t s a n d co n t r o l s 1 Transmi...
Страница 106 - Not es on t he Remot e Commander; • Point the remote sensor away from strong light
106 I d e n t i f y i n g t h e p a r t s a n d co n t r o l s Not es on t he Remot e Commander • Point the remote sensor away from strong light sources such as direct sunlight or overheadlighting. Otherwise, the Remote Commandermay not function properly. • Your camcorder works in the commander mode...
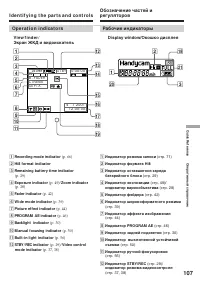
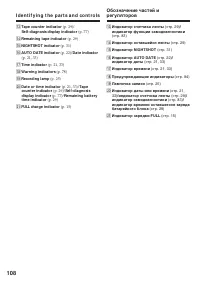
Страница 107 - Op e r a t i o n i n d i ca t o r s; V i e w f i n d e r /; qa
107 Quic k R eferenc e Оперативный справочник Op e r a t i o n i n d i ca t o r s Рабочие индикаторы V i e w f i n d e r / Экран ЖКД и видоискатель D isplay window/Окошко дисплея 1 Recording mode indicat or (p. 66) 2 Hi8 f ormat indicat or 3 Remaining bat t ery t ime indicat or (p. 29) 4 Exposure in...
Страница 110 - Алфавитный указатель
110 Русский Алфавитный указатель А, Б, В, Г Батарейный блок .................... 4 Батарейный блок “InfoLITHIUM” ...................... 88 Вариообъектив ...................... 88Введение/выведение изображения ....................... 41 Время записи ......................... 17 ВЧ-адаптер ..............