Страница 2 - En g l i sh; camcorder. With your; W ARNING; Русский; ПРЕДУПРЕЖДЕНИЕ
2 En g l i sh We l co m e ! Congratulations on your purchase of thisSony Handycam camcorder. With your Handycam, you can capture life’s preciousmoments with superior picture and soundquality. Your Handycam is loaded withadvanced features, but at the same time it isvery easy to use. You will soon b...
Страница 3 - Be f o r e y o u b e g i n; Changing the lithium battery; Ta b l e o f co n t e n t s; Перед началом работы; Использование альтернативных источников; Дополнительная информация; Замена литиевой батарейки в; Оглавление
3 B efore you begin Перед началом работы Be f o r e y o u b e g i n Using this manual .................................................. 4Checking supplied accessories ............................ 6 Ge t t i n g st a r t e d Charging and installing the battery pack .......... 7Inserting a cassette ....
Страница 4 - Usi n g t h i s m a n u a l; Использование данного руководства; Типы различий; N o t e o n TV co l o u r sy st e m s
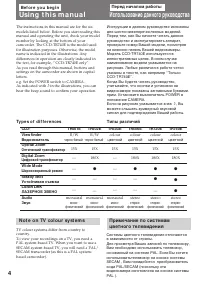
4 15X 15X 15X 15X 15X 15X — 180X — 180X 180X 180X — r — r r r — — — — r r — — — — — r The instructions in this manual are for the sixmodels listed below. Before you start reading thismanual and operating the unit, check your modelnumber by looking at the bottom of yourcamcorder. The CCD-TR740E is th...
Страница 5 - Pr e ca u t i o n o n co p y r i g h t; • Do not let the camcorder get wet. Keep the; • Экран ЖКД и/или цветной видоискатель
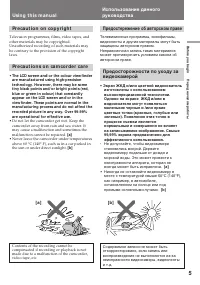
5 B efore you begin Перед началом работы Pr e ca u t i o n o n co p y r i g h t Television programmes, films, video tapes, andother materials may be copyrighted.Unauthorized recording of such materials maybe contrary to the provision of the copyrightlaws. Pr e ca u t i o n s o n ca m co r d e r ca r...
Страница 6 - или; Already installed in the camcorder.
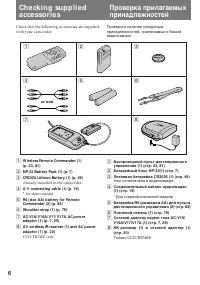
6 Ch e ck i n g su p p l i e da cce sso r i e s Check that the following accessories are suppliedwith your camcorder. 1 4 7 2 3 6 5 * or/ или 8 1 W ireless Remot e Commander (1)(p. 23, 81) 2 NP-33 Bat t ery Pack (1) (p. 7) 3 CR2025 Lit hium Bat t ery (1) (p. 49) Already installed in the camcorder. 4...
Страница 7 - Ch a r g i n g t h e b a t t e r y p a ck; Connect the AC power adaptor to the mains.; Ge t t i n g st a r t e d; Зарядка батарейного блока; Подготовка к началу работы; Bat t ery pack; Ch a r g i n g Ti m e; Батарейный блок
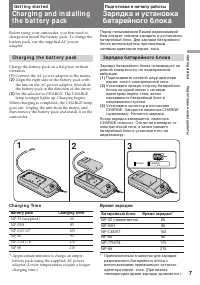
7 G etting s tarted Подготовка к началу работы Before using your camcorder, you first need tocharge and install the battery pack. To charge thebattery pack, use the supplied AC poweradaptor. Ch a r g i n g t h e b a t t e r y p a ck Charge the battery pack on a flat place withoutvibration. ( 1 ) Con...
Страница 8 - Ba t t e r y l i f e; Срок службы батарейки
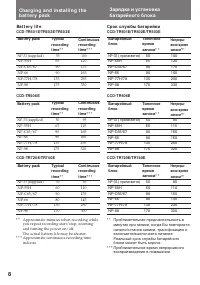
8 Ba t t e r y l i f e CCD -TR5 0 1 E/TR5 0 2 E/TR5 0 3 E Ch a r g i n g a n d i n st a l l i n g t h eb a t t e r y p a ck Cont inuousrecordingt ime* * * Typicalrecordingt ime* * Bat t ery pack NP-33 (supplied) 55 100 NP-55H 65 120 NP-C65/67 90 175 NP-66 90 165 NP-77H/78 135 255 NP-98 175 330 Заряд...
Страница 9 - To r e m o v e t h e b a t t e r y p a ck; N o t e s o n ch a r g i n g t h e b a t t e r y p a ck; • The POWER lamp will remain lit for a while; Примечания по зарядке батарейного блока
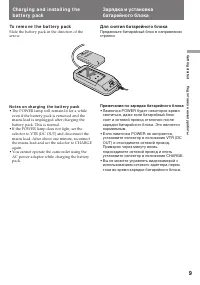
9 G etting s tarted Подготовка к началу работы To r e m o v e t h e b a t t e r y p a ck Slide the battery pack in the direction of thearrow. Ch a r g i n g a n d i n st a l l i n g t h eb a t t e r y p a ck Для снятия батарейного блока Предвиньте батарейный блок в направлениистрелки. N o t e s o n ...
Страница 10 - N o t e o n i n st a l l i n g t h e N P-9 8 b a t t e r y p a ck; Примечание к батарейному блоку; Для снятия батарейного блока
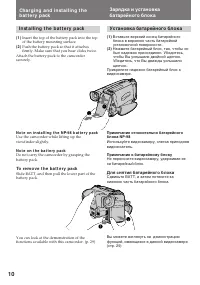
10 Ch a r g i n g a n d i n st a l l i n g t h eb a t t e r y p a ck I n st a l l i n g t h e b a t t e r y p a ck ( 1 ) Insert the top of the battery pack into the topof the battery mounting surface. ( 2 ) Push the battery pack so that it attachesfirmly. Make sure that you hear clicks twice. Attach...
Страница 11 - Make sure that a power source is installed.; I n se r t i n g a ca sse t t e; To e j e ct t h e ca sse t t e; and; Вставка кассеты; Для выталкивания кассеты
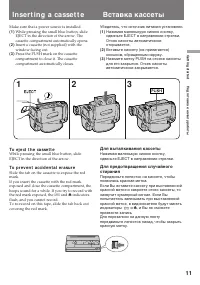
11 G etting s tarted Подготовка к началу работы Make sure that a power source is installed. ( 1 ) While pressing the small blue button, slideEJECT in the direction of the arrow. Thecassette compartment automatically opens. ( 2 ) Insert a cassette (not supplied) with thewindow facing out. ( 3 ) Press...
Страница 12 - Ba si c o p e r a t i o n s; Ca m e r a re co rd i n g; Основные операции; Запись с помощью видеокамеры
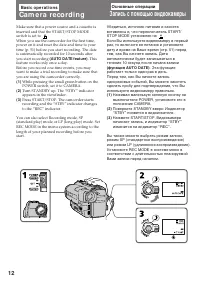
12 Ba si c o p e r a t i o n s Ca m e r a re co rd i n g Make sure that a power source and a cassette isinserted and that the START/STOP MODEswitch is set to . When you use the camcorder for the first time,power on it and reset the date and time to yourtime (p. 51) before you start recording. The da...
Страница 13 - To st o p r e co r d i n g m o m e n t a r i l y [ a ]; N o t e o n st a n d b y m o d e; • This camcorder records and plays back in SP; N o t e o n r e co r d i n g; Ca m e r a r e co r d i n g; Примечание к режиму готовности
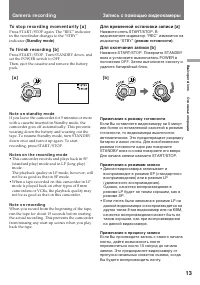
13 B asic operat ions Основные операции To st o p r e co r d i n g m o m e n t a r i l y [ a ] Press START/STOP again. The “REC” indicatorin the viewfinder changes to the “STBY”indicator (St andby mode) . To f i n i sh r e co r d i n g [ b ] Press START/STOP. Turn STANDBY down, andset the POWER swit...
Страница 14 - To f o cu s t h e v i e w f i n d e r l e n s; Для фокусировки объектива видоискателя; или переместите рычаг; Примечания к счетчику ленты; Как указано с помощью; N o t e s o n t h e t a p e co u n t e r; • The tape counter indicates the recording or; N o t e o n b e e p so u n d; As indicated with
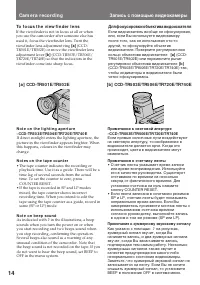
14 To f o cu s t h e v i e w f i n d e r l e n s If the viewfinder is not in focus at all or whenyou use the camcorder after someone else hasused it, focus the viewfinder lens. Turn theviewfinder lens adjustment ring [a ] (CCD- TR501E/TR502E) or move the viewfinder lensadjustment lever [b ] (CCD-TR5...
Страница 15 - N o t e o n t h e A UTO D A TE f e a t u r e; Usi n g t h e zo o m f e a t u r e; Примечание к функции AUTO DATE; Сторона “W”: для широкого угла съемки
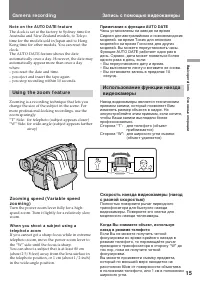
15 B asic operat ions Основные операции N o t e o n t h e A UTO D A TE f e a t u r e The clock is set at the factory to Sydney time forAustralia and New Zealand models, to Tokyotime for the models sold in Japan and to HongKong time for other models. You can reset theclock.The AUTO DATE feature shows...
Страница 16 - Правая сторона
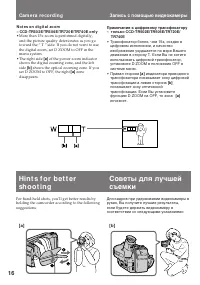
16 N o t e s o n d i g i t a l zo o m– CCD -TR5 0 2 E/TR5 0 6 E/TR7 2 0 E/TR7 4 0 E o n l y • More than 15x zoom is performed digitally, and the picture quality deteriorates as you gotoward the “ T ” side. If you do not want to usethe digital zoom, set D ZOOM to OFF in themenu system. • The right si...
Страница 17 - Ca u t i o n s o n t h e v i e w f i n d e r; Hi n t s f o r b e t t e r sh o o t i n g; Предостережения к видоискателю
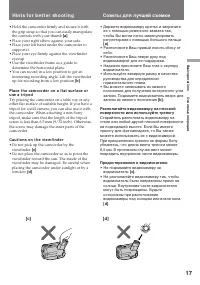
17 B asic operat ions Основные операции • Hold the camcorder firmly and secure it with the grip strap so that you can easily manipulatethe controls with your thumb [a] . • Place your right elbow against your side.• Place your left hand under the camcorder to support it. • Place your eye firmly again...
Страница 18 - To st o p p l a y b a ck
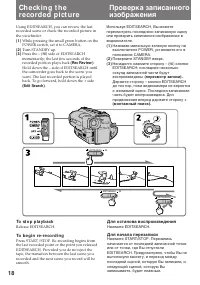
18 Using EDITSEARCH, you can review the lastrecorded scene or check the recorded picture inthe viewfinder. ( 1 ) While pressing the small green button on thePOWER switch, set it to CAMERA. ( 2 ) Turn STANDBY up. ( 3 ) Press the Р( Π) side of EDITSEARCH momentarily; the last few seconds of therecor...
Страница 19 - Передача сигнала
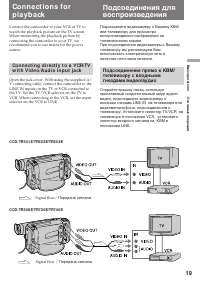
19 B asic operat ions Основные операции Co n n e ct i o n s f o rp l a y b a ck Connect the camcorder to your VCR or TV towatch the playback picture on the TV screen.When monitoring the playback picture byconnecting the camcorder to your TV, werecommend you to use mains for the powersource. Co n n e...
Страница 20 - Co n n e ct i o n s f o r p l a y b a ck; – CCD -TR7 4 0 E o n l y; mark by using infrared
20 Co n n e ct i o n s f o r p l a y b a ck I f y o u r TV o r V CR i s a m o n a u r a l t y p e– CCD -TR5 0 6 E/TR7 2 0 E/TR7 4 0 E o n l y Connect only the white plug for audio on boththe camcorder and the TV or the VCR. With thisconnection, the sound is monaural. To co n n e ct t o a V CR o r TV...
Страница 21 - I f y o u r TV o r V CR i s a m o n a u r a l t y p e; To p l a y b a ck o n a TV; Press; To r e l e a se LA SER LI N K; Press LASER LINK again.; Для воспроизведения на телевизоре; Нажмите кнопку; Для отпускания кнопки LASER LINK; Нажмите кнопку LASER LINK снова.
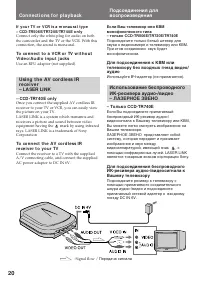
21 B asic operat ions Основные операции Co n n e ct i o n s f o r p l a y b a ck Подсоединения длявоспроизведения I f y o u r TV o r V CR i s a m o n a u r a l t y p e Connect the yellow plug for video and connectonly the white plug for audio on both the AVcordless IR receiver and the TV or VCR. Wit...
Страница 22 - Pl a y i n g b a ck a t a p e; press; To rew ind t he t ape; Для ускоренной перемотки ленты назад; нажмите; Для ускоренной перемотки ленты вперед; нажмите
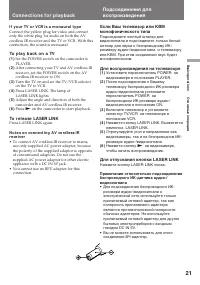
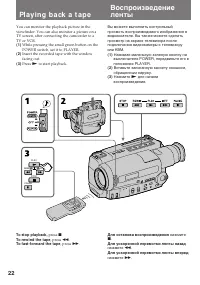
22 Pl a y i n g b a ck a t a p e You can monitor the playback picture in theviewfinder. You can also monitor a picture on aTV screen, after connecting the camcorder to aTV or VCR. ( 1 ) While pressing the small green button on thePOWER switch, set it to PLAYER. ( 2 ) Insert the recorded tape with th...
Страница 23 - Usi n g t h e Re m o t e Co m m a n d e r; To v i e w a st i l l p i ct u r e ( Pl a y b a ck p a u se ); Воспроизведение ленты; Для стирания экранных индикаторов; Примечания к воспроизведениию
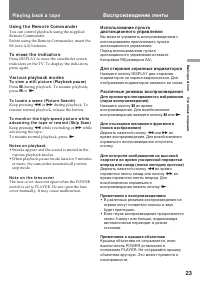
23 B asic operat ions Основные операции Usi n g t h e Re m o t e Co m m a n d e r You can control playback using the suppliedRemote Commander.Before using the Remote Commander, insert theR6 (size AA) batteries. To e r a se t h e i n d i ca t o r s Press DISPLAY to erase the viewfinder screenindicato...
Страница 24 - A d v a n ce d o p e r a t i o n s; Pow er source; Mains; Place; Indoors; Not e on pow er sources; Место; Примечание к источникам питания
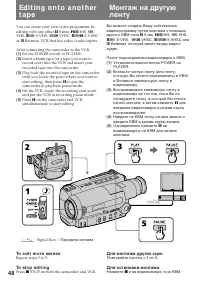
24 You can choose any of the following powersources for your camcorder: battery pack, themains and 12/24 V car battery. Choose theappropriate power source depending on whereyou want to use your camcorder. A d v a n ce d o p e r a t i o n s Usi n g a l t e r n a t i v ep o w e r so u rce s Accessory ...
Страница 25 - Usi n g a l t e r n a t i v e p o w e r so u r ce s; To use the supplied AC power adaptor:; Использование электрической сети; W A RN I N G
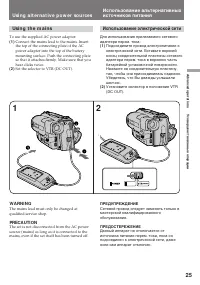
25 Advanc ed operat ions Усовершенствованные операции Usi n g a l t e r n a t i v e p o w e r so u r ce s Usi n g t h e m a i n s To use the supplied AC power adaptor: ( 1 ) Connect the mains lead to the mains. Insertthe top of the connecting plate of the ACpower adaptor into the top of the batterym...
Страница 26 - N o t e s o n t h e POW ER l a m p; To r e m o v e t h e a d a p t o r; Usi n g a ca r b a t t e r y; To r e m o v e t h e D C p a ck; Примечания к лампочке POWER; Для снятия адаптера
26 N o t e s o n t h e POW ER l a m p • The POWER lamp will remain lit for a while even if the unit is unplugged after use. This isnormal. • If the POWER lamp does not light, set the selector to VTR (DC OUT) and disconnect themains lead. After about one minute, reconnectthe mains lead. To r e m o v ...
Страница 27 - Press MENU to display the menu.
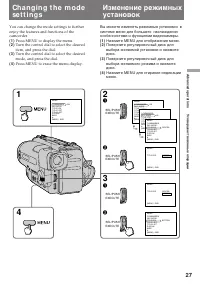
27 Advanc ed operat ions Усовершенствованные операции You can change the mode settings to furtherenjoy the features and functions of thecamcorder. ( 1 ) Press MENU to display the menu. ( 2 ) Turn the control dial to select the desired item, and press the dial. ( 3 ) Turn the control dial to select t...
Страница 28 - I t e m s f o r CA M ERA m o d e o n l y; Ch a n g i n g t h e m o d e se t t i n g s; Запоминание Ваших собственных надписей.
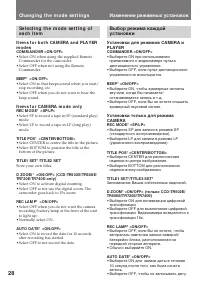
28 Se l e ct i n g t h e m o d e se t t i n g o fe a ch i t e m I t e m s f o r b o t h CA M ERA a n d PLA Y ERm o d e s COM M A N D ER <ON /OFF> • Select ON when using the supplied Remote Commander for the camcorder. • Select OFF when not using the Remote Commander. BEEP* <ON /OFF> • Se...
Страница 29 - Reset the date or time.; I t e m s f o r PLA Y ER m o d e o n l y; N o t e s o n D EM O M OD E; • DEMO MODE is set to STBY at the factory and; To l o o k a t t h e d e m o n st r a t i o n a t o n ce; Пункты только для режима PLAYER; Обычно выбирайте STEREO.
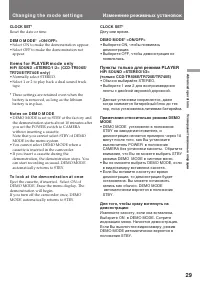
29 Advanc ed operat ions Усовершенствованные операции CLOCK SET* Reset the date or time. D EM O M OD E* <ON /OFF> • Select ON to make the demonstration appear.• Select OFF to make the demonstration not appear. I t e m s f o r PLA Y ER m o d e o n l y Hi Fi SOUN D <STEREO/1 /2 > ( CCD -TR...
Страница 30 - N o t e; Примечаие
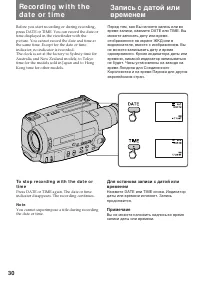
30 Re co rd i n g w i t h t h ed a t e o r t i m e Before you start recording or during recording,press DATE or TIME. You can record the date ortime displayed in the viewfinder with thepicture. You cannot record the date and time atthe same time. Except for the date or timeindicator, no indicator is...
Страница 31 - : Recording starts when you press; If you selected; ANTI GROUND SHOOTING; Если Вы выбираете режим
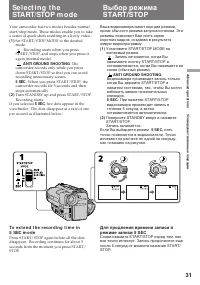
31 Advanc ed operat ions Усовершенствованные операции Your camcorder has two modes besides normalstart/stop mode. These modes enable you to takea series of quick shots resulting in a lively video. ( 1 ) Set START/STOP MODE to the desiredmode. : Recording starts when you press START/STOP, and stops w...
Страница 33 - o r 5 SEC
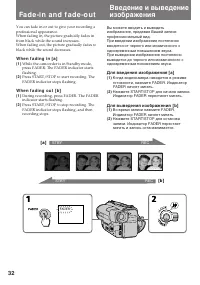
33 Advanc ed operat ions Усовершенствованные операции To ca n ce l t h e f a d e -i n /f a d e -o u tf u n ct i o n Before pressing START/STOP, press FADER toturn off the FADER indicator. W h e n t h e d a t e o r t i m e i n d i ca t o r i sd i sp l a y e d The date or time and a title indicator do...
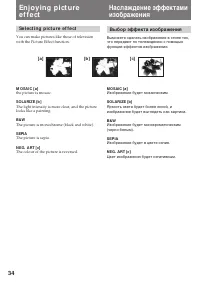
Страница 34 - the picture is mosaic.; SEPI A; The picture is sepia.; SEPIA; Изображение будет в цвете сепия.
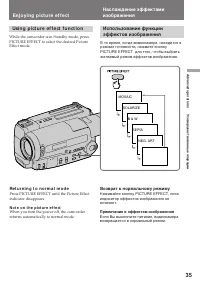
34 En j o y i n g p i ct u ree f f e ct Se l e ct i n g p i ct u r e e f f e ct You can make pictures like those of televisionwith the Picture Effect function. Наслаждение эффектамиизображения Выбор эффекта изображения Выможете сделать изображение в стиле тех,что передают по телевидению с помощьюфун...
Страница 35 - Usi n g p i ct u r e e f f e ct f u n ct i o n; Re t u r n i n g t o n o r m a l m o d e; N o t e o n t h e p i ct u r e e f f e ct; Возврат к нормальному режиму; Примечание к эффектам изображения
35 Advanc ed operat ions Усовершенствованные операции Usi n g p i ct u r e e f f e ct f u n ct i o n While the camcorder is in Standby mode, pressPICTURE EFFECT to select the desired PictureEffect mode. En j o y i n g p i ct u r e e f f e ct Наслаждение эффектамиизображения Использование функцииэффе...
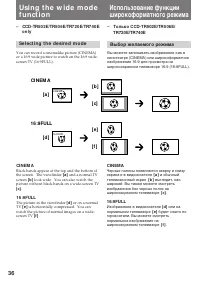
Страница 36 - o n l y; Se l e ct i n g t h e d e si r e d m o d e; Выбор желаемого режима; CINEMA; CI N EM A
36 – CCD -TR5 0 2 E/TR5 0 6 E/TR7 2 0 E/TR7 4 0 E o n l y Se l e ct i n g t h e d e si r e d m o d e You can record a cinemalike picture (CINEMA)or a 16:9 wide picture to watch on the 16:9 wide-screen TV (16:9FULL). CI N EM A Black bands appear at the top and the bottom ofthe screen. The viewfinder ...
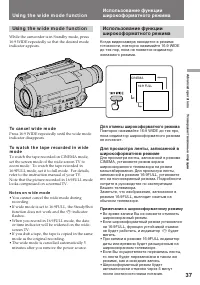
Страница 37 - Usi n g t h e w i d e m o d e f u n ct i o n; To ca n ce l w i d e m o d e; N o t e s o n w i d e m o d e; Для отмены широкоформатного режима; Примечания к широкоформатному режиму; • Во время записи Вы не сможете отменить
37 Advanc ed operat ions Усовершенствованные операции Usi n g t h e w i d e m o d e f u n ct i o n While the camcorder is in Standby mode, press16:9 WIDE repeatedly so that the desired modeindicator appears. Usi n g t h e w i d e m o d e f u n ct i o n Использование функцииширокоформатного режима Ис...
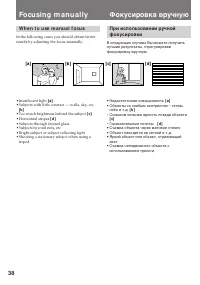
Страница 38 - Fo cu si n g m a n u a l l y; W h e n t o u se m a n u a l f o cu s; • Insufficient light; Фокусировка вручную
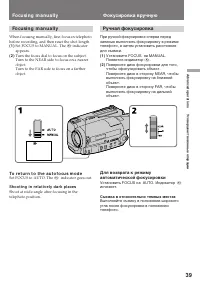
38 Fo cu si n g m a n u a l l y W h e n t o u se m a n u a l f o cu s In the following cases you should obtain betterresults by adjusting the focus manually. • Insufficient light [ a ] • Subjects with little contrast — walls, sky, etc. [ b ] • Too much brightness behind the subject [ c] • Horizontal...
Страница 39 - Set FOCUS to MANUAL. The; To r e t u r n t o t h e a u t o f o cu s m o d e; Set FOCUS to AUTO. The; Sh o o t i n g i n r e l a t i v e l y d a r k p l a ce s; Установить FOCUS на AUTO. Индикатор; Съемка в относительно темных местах
39 Advanc ed operat ions Усовершенствованные операции Fo cu si n g m a n u a l l y When focusing manually, first focus in telephotobefore recording, and then reset the shot length. ( 1 ) Set FOCUS to MANUAL. The f indicator appears. ( 2 ) Turn the focus dial to focus on the subject.Turn to the NEAR ...
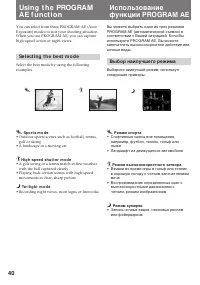
Страница 40 - Se l e ct i n g t h e b e st m o d e; Sp o r t s m o d e; Выбор наилучшего режима; Режим спорта; Ландшафт из движущегося автомобиля; Режим высокоскоростного затвора
40 Usi n g t h e PROGRA MA E f u n ct i o n A Å å You can select from three PROGRAM AE (AutoExposure) modes to suit your shooting situation.When you use PROGRAM AE, you can capturehigh-speed action or night views. Se l e ct i n g t h e b e st m o d e Select the best mode by using the followingexampl...
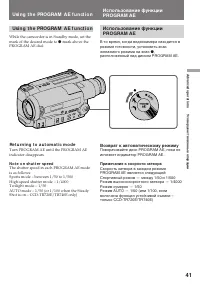
Страница 41 - Re t u r n i n g t o a u t o m a t i c m o d e; N o t e o n sh u t t e r sp e e d; mark above the; Usi n g t h e PROGRA M A E f u n ct i o n; расположенный над диском PROGRAM AE.; Возврат к автоматическому режиму; Примечание к скорости затвора
41 Advanc ed operat ions Усовершенствованные операции Re t u r n i n g t o a u t o m a t i c m o d e Turn PROGRAM AE until the PROGRAM AEindicator disappears. N o t e o n sh u t t e r sp e e d The shutter speed in each PROGRAM AE modeis as follows:Sports mode – between 1/50 to 1/500High-speed shutte...
Страница 42 - A f t e r sh o o t i n g; indicator; После съемки; исчезнет. В противном
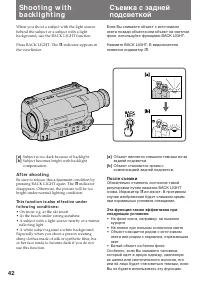
42 Sh o o t i n g w i t hb a ck l i g h t i n g When you shoot a subject with the light sourcebehind the subject or a subject with a lightbackground, use the BACK LIGHT function. Press BACK LIGHT. The c indicator appears in the viewfinder. [ a ] Subject is too dark because of backlight. [ b ] Subjec...
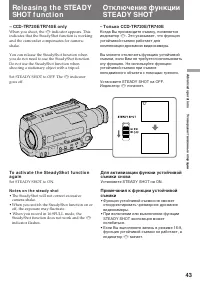
Страница 43 - N o t e s o n t h e st e a d y sh o t; Установите STEADY SHOT на ON.
43 Advanc ed operat ions Усовершенствованные операции – CCD -TR7 2 0 E/TR7 4 0 E o n l y When you shoot, the Ó indicator appears. This indicates that the SteadyShot function is workingand the camcorder compensates for camera-shake. You can release the SteadyShot function whenyou do not need to use t...
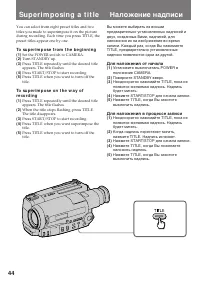
Страница 44 - Su p e r i m p o si n g a t i t l e; To su p e r i m p o se f r o m t h e b e g i n n i n g; Set the POWER switch to CAMERA.; Для наложения от начала; Поверните STANDBY вверх.; Для наложения в процессе записи; Наложение надписи
44 Su p e r i m p o si n g a t i t l e You can select from eight preset titles and twotitles you made to superimpose it on the pictureduring recording. Each time you press TITLE, thepreset titles appear one by one. To su p e r i m p o se f r o m t h e b e g i n n i n g ( 1 ) Set the POWER switch to ...
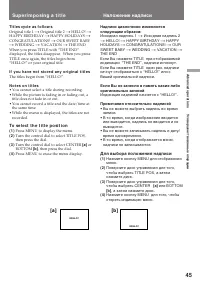
Страница 45 - Ti t l e s cy cl e a s f o l l o w s; To se l e ct t h e t i t l e p o si t i o n; Примечания относительно надписей; Для выбора положения надписи
45 Advanc ed operat ions Усовершенствованные операции Ti t l e s cy cl e a s f o l l o w s Original title 1 n Original title 2 n HELLO! n HAPPY BIRTHDAY n HAPPY HOLIDAYS n CONGRATULATIONS! n OUR SWEET BABY n WEDDING n VACATION n THE END When you press TITLE with “THE END”displayed, the titles disapp...
Страница 46 - Поверните диск, чтобы выбрать
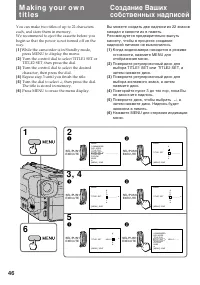
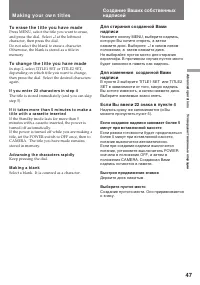
46 M a k i n g y o u r o w nt i t l e s You can make two titles of up to 22 characterseach, and store them in memory.We recommend to eject the cassette before youbegin so that the power is not turned off on theway. ( 1 ) While the camcorder is in Standby mode, press MENU to display the menu. ( 2 ) T...
Страница 47 - To e r a se t h e t i t l e y o u h a v e m a d e; at the leftmost; To ch a n g e t h e t i t l e y o u h a v e m a d e; I f y o u e n t e r 2 2 ch a r a ct e r s i n st e p 4; Keep pressing the dial.; M a k i n g a b l a n k; Select a blank. It is counted as a character.; M a k i n g y o u r o w n t i t l e s; в самом левом; Если Вы ввели 22 знака в пункте 4; Быстрое продвижение знаков; Держите диск нажатым.; Выберите пустое место
47 Advanc ed operat ions Усовершенствованные операции To e r a se t h e t i t l e y o u h a v e m a d e Press MENU, select the title you want to erase,and press the dial. Select ↵ at the leftmost character, then press the dial.Do not select the blank to erase a character.Otherwise, the blank is stor...
Страница 49 - A d d i t i o n a l I n f o r m a t i o n; indicator flashes in; замените батарейку на литиевую; Ликвидируйте использованные; • Wipe the battery with a dry cloth to assure a; Be sure t o; Примечания по литиевой батарейке; Храните литиевую батарейку в месте, не; Протрите батарейку сухой тканью для; Не забудьте установить
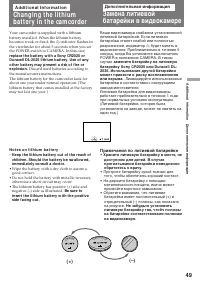
49 Addit ional inf ormat ion Дополнительная информация A d d i t i o n a l I n f o r m a t i o n Changing t he lit hiumbat t ery in t he cam corder Your camcorder is supplied with a lithiumbattery installed. When the lithium batterybecomes weak or dead, the I indicator flashes in the viewfinder for ...
Страница 50 - Ch a n g i n g t h e l i t h i u m b a t t e r y
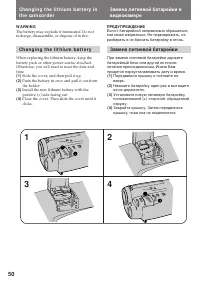
50 Ch a n g i n g t h e l i t h i u m b a t t e r y i nt h e ca m co r d e r Замена литиевой батарейки ввидеокамере ПРЕДУПРЕЖДЕНИЕ Если с батарейкой неправильно обращаться,она може взорваться. Не перезаряжать, неразбирать и не бросать батарейку в огонь. W A RN I N G The battery may explode if mistre...
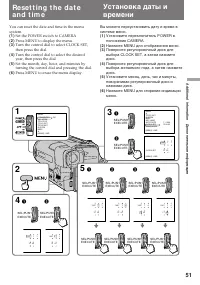
Страница 52 - To co r r e ct t h e d a t e a n d t i m e se t t i n g; Repeat steps 4 and 5.; To ch e ck t h e d a t e a n d t i m e; N o t e o n t h e t i m e i n d i ca t o r; • You record the tape on an AFM HiFi monaural; Fo r e i g n 8 m m v i d e o; Pl a y b a ck m o d e s; Re se t t i n g t h e d a t e a n d t i m e; Повторите пункты 4 и 5.; Год изменяется следующим образом:; Примечания по стереозвучанию AFM HiFi
52 To co r r e ct t h e d a t e a n d t i m e se t t i n g Repeat steps 4 and 5. To ch e ck t h e d a t e a n d t i m e Press DATE to display the date indicator. PressTIME to display the time indicator. When youpress the same button again, the indicator goesout. Th e y e a r i n d i ca t o r ch a n ...
Страница 53 - Pr e p a r i n g t h e b a t t e r y p a ck; A l w a y s ca r r y a d d i t i o n a l b a t t e r i e s; Подготовка батарейного блока; Для сохранения заряда батарейного блока
53 Addit ional inf ormat ion Дополнительная информация Ti p s f o r u si n g t h eb a t t e r y p a ck This section shows you how you can get the mostout of your battery pack. Pr e p a r i n g t h e b a t t e r y p a ck A l w a y s ca r r y a d d i t i o n a l b a t t e r i e s Have sufficient batte...
Страница 54 - W h e n t o r e p l a ce t h e b a t t e r y; indicator appears and starts; N o t e o n t h e r e m a i n i n g b a t t e r y i n d i ca t o r; CA UTI ON; Ti p s f o r u si n g t h e b a t t e r y p a ck; Если во время записи индикатор; ПРЕДОСТЕРЕЖЕНИЕ
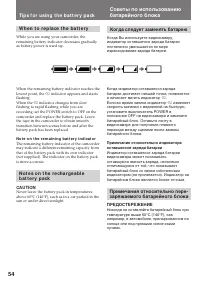
54 W h e n t o r e p l a ce t h e b a t t e r y While you are using your camcorder, theremaining battery indicator decreases graduallyas battery power is used up. When the remaining battery indicator reaches thelowest point, the i indicator appears and starts flashing.When the i indicator changes fr...
Страница 55 - Th e b a t t e r y h e a t s u p; and keep it in a cool; Th e l i f e o f t h e b a t t e r y p a ck; Батарейный блок нагревается
55 Addit ional inf ormat ion Дополнительная информация Th e b a t t e r y h e a t s u p During charging or recording, the battery packheats up. This is caused by energy that has beengenerated and a chemical change that hasoccurred inside the battery pack. This is notcause for concern and is normal. ...
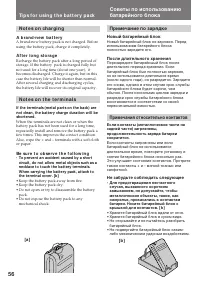
Страница 56 - N o t e s o n ch a r g i n g; A b r a n d -n e w b a t t e r y; N o t e s o n t h e t e r m i n a l s; Be su r e t o o b se r v e t h e f o l l o w i n g; • To prevent an accident caused by a short; • Do not expose the battery pack to any; Новый батарейный блок; Примечания относительно контактов; Не забудьте соблюдать следующее; Храните батарейный блок вдали от огня.
56 N o t e s o n ch a r g i n g A b r a n d -n e w b a t t e r y A brand-new battery pack is not charged. Beforeusing the battery pack, charge it completely. A f t e r l o n g st o r a g e Recharge the battery pack after a long period ofstorage. If the battery pack is charged fully butnot used for a...
Страница 57 - M o i st u r e co n d e n sa t i o n; I n si d e t h e ca m co r d e r; Конденсация влаги; Внутри видеокамеры; Если индикаторы; На объективе
57 Addit ional inf ormat ion Дополнительная информация M ai n t en an ce i n f o rm at i o nan d p recau t i o n s M o i st u r e co n d e n sa t i o n If the camcorder is brought directly from a coldplace to a warm place, moisture may condenseinside the camcorder, on the surface of the tape,or on t...
Страница 58 - Ca u t i o n; V i d e o h e a d cl e a n i n g; indicator and; Предостережение; Очистка головок; и сообщение “
58 [a] Slightly dirty [b] Dirty If this happens, clean the video heads with theSony V8-25CLH cleaning cassette (not supplied).After checking the picture, if it is still “noisy”,repeat the cleaning. (Do not repeat cleaning morethan 5 times in one session.) Ca u t i o n Do not use a commercially avail...
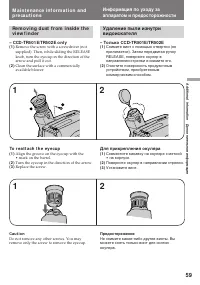
Страница 59 - To r e a t t a ch t h e e y e cu p; Turn the eyecup in the direction of the arrow.; Для прикрепления окуляра; Совместите канавку на окуляре с меткой
59 Addit ional inf ormat ion Дополнительная информация Re m o v i n g d u st f r o m i n si d e t h ev i e w f i n d e r – CCD -TR5 0 1 E/TR5 0 2 E o n l y ( 1 ) Remove the screw with a screwdriver (notsupplied). Then, while sliding the RELEASEknob, turn the eyecup in the direction of thearrow and p...
Страница 60 - Pr e ca u t i o n s; Ca m co r d e r o p e r a t i o n; Предосторожности; Работа с видеокамерой
60 M a i n t e n a n ce i n f o r m a t i o n a n dp r e ca u t i o n s Pr e ca u t i o n s Ca m co r d e r o p e r a t i o n • Operate the camcorder using 6.0 V (battery pack), or 7.5 V (AC power adaptor). • For DC or AC operation, use only the recommended accessories. • Should any solid object or ...
Страница 61 - A C p o w e r a d a p t o r; Ch a r g i n g; Сетевой адаптер перем. тока; Зарядка
61 Addit ional inf ormat ion Дополнительная информация • Clean the camcorder body with a soft dry cloth, or a soft cloth lightly moistened with a milddetergent solution. Do not use any type ofsolvent which may damage the finish. • Do not let sand get into the camcorder. When you use the camcorder on...
Страница 62 - N o t e s o n d r y b a t t e r i e s; I f b a t t e r y l e a k a g e o ccu r r e d
62 • Do not apply mechanical shock or drop the unit. • While the unit is in use, particularly during charging, keep it away from AM receivers andvideo equipment because it will disturb AMreception and video operation. • The unit becomes warm while in use. This is normal. • Do not place the unit in l...
Страница 63 - Po w e r so u r ce s; PA L sy st e m; Brazil; PA L N sy st e m; Источники питания; Система PAL; Бразилия; Система NTSC
63 Addit ional inf ormat ion Дополнительная информация Usi n g y o u rca m co rd e r a b ro a d Each country or area has its own electricity andTV colour systems. Before using your camcorderabroad, check the following points. Po w e r so u r ce s You can use your camcorder in any country orarea with...
Страница 68 - Проверка неисправностей; Видеокамера; Питание; Работа; Признак
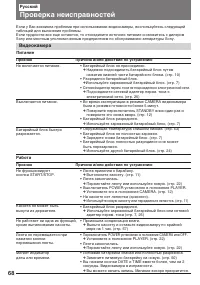
68 Русский Проверка неисправностей Не включается питание. Выключается питание. Батарейный блок быстроразряжается. Не функционируеткнопка START/STOP. Кассета не может бытьвынута из держателя. Не работает ни одна из функций,кроме выталкивания кассеты. Если у Вас возникла проблема при использовании вид...
Страница 69 - Изображение
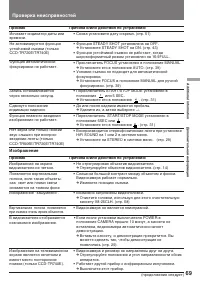
69 Addit ional inf ormat ion Дополнительная информация Признак Причина и/или действия по устранению • Снова установите дату и время. (стр. 51) • Функция STEADY SHOT установлена на OFF. m Установите STEADY SHOT на ON. (стр. 43) • Функция устойчивой съемки не работает, когдаширокоформатный режим устан...
Страница 70 - Прочее
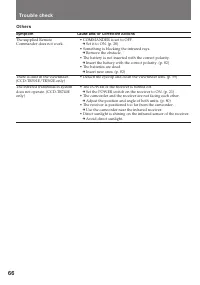
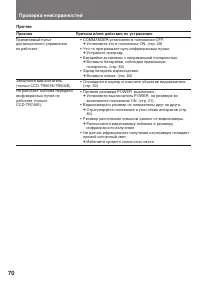
70 Прочее Признак Причина и/или действия по устранению • COMMANDER установлен в положение OFF. m Установите его в положение ON. (стр. 28) • Что-то преграждает путь инфракрасным лучам. m Устраните преграду. • Батарейки вставлены с неправильной полярностью. m Вставьте батарейки, соблюдая правильнуюпол...
Страница 71 - Когда мигает лампочка CHARGE; Проверить по следующей таблице.; Смотрите следующую таблицу.
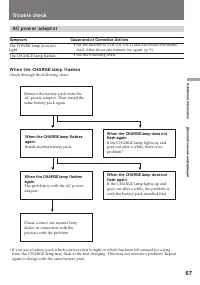
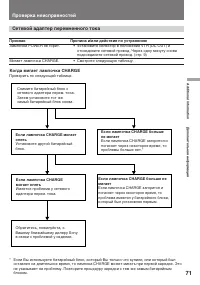
71 Addit ional inf ormat ion Дополнительная информация Проверка неисправностей Сетевой адаптер перемненного тока Когда мигает лампочка CHARGE Проверить по следующей таблице. * Если Вы используете батарейный блок, который Вы только что купили, или который былоставлен на длительное время, то лампока C...
Страница 74 - Система; Технические характеристики; Авто; Видеовыход; Общее
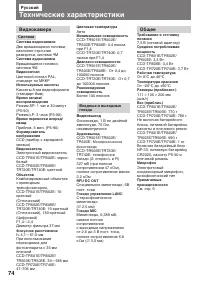
74 Видеокамера Система Система видеозаписи Две вращающиеся головки,наклонно-строчнаяразвертка, система ЧМ Система аудиозаписи Вращающиеся головки,система ЧМ Видеосигнал Цветовой сигнал PAL,стандарт по МККР Используемые кассеты Кассеты 8-мм видеоформата(стандарт 8мм) Время записи/воспроизведения Режи...
Страница 75 - Потребляемая мощность
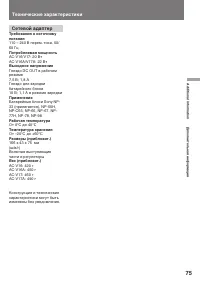
75 Addit ional inf ormat ion Дополнительная информация Технические характеристики Сетевой адаптер Требования к источникупитания 110 – 240 В перем. тока, 50/60 Гц Потребляемая мощность AC-V16/V17: 20 ВтAC-V16A/V17A: 22 Вт Выходное напряжение Гнездо DC OUT в рабочемрежиме7,5 В; 1,8 АГнездо для зарядки...
Страница 76 - STOP; Lens cover
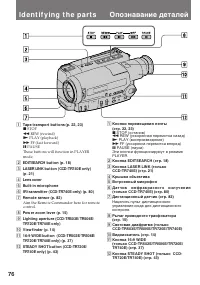
76 I d e n t i f y i n g t h e p a r t s Опознавание деталей 1 Tape t ransport but t ons (p. 22, 23) p STOP 0 REW (rewind) ( PLAY (playback) ) FF (fast forward) P PAUSE These buttons will function in PLAYERmode. 2 EDITSEARCH but t on (p. 18) 3 LASER LINK but t on (CCD-TR740E only)(p. 21) 4 Lens cove...
Страница 77 - I d e n t i f y i n g t h e p a r t s; Accessory shoe; Опознавание деталей; Лампочка записи
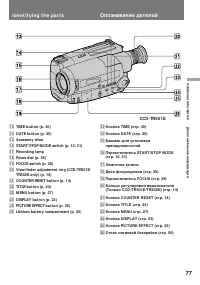
77 Addit ional inf ormat ion Дополнительная информация I d e n t i f y i n g t h e p a r t s !£ TIM E but t on (p. 30) !¢ DATE but t on (p. 30) !∞ Accessory shoe !§ START/ STOP M ODE sw it ch (p. 12, 31) !¶ Recording lamp !• Focus dial (p. 39) !ª FOCUS sw it ch (p. 39) @º View f inder adjust ment ri...
Страница 78 - stands for Local Application Control Bus; Окуляр; означает систему канала местного
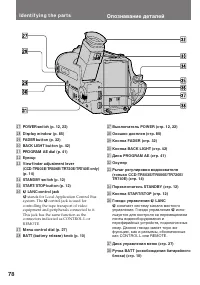
78 @¶ POW ER sw it ch (p. 12, 22) @• Display w indow (p. 85) @ª FADER but t on (p. 32) #º BACK LIGHT but t on (p. 42) #¡ PROGRAM AE dial (p. 41) #™ Eyecup #£ View f inder adjust ment lever(CCD-TR503E/ TR506E/ TR720E/ TR740E only)(p. 14) #¢ STANDBY sw it ch (p. 12) #∞ START/ STOP but t on (p. 12) #§ ...
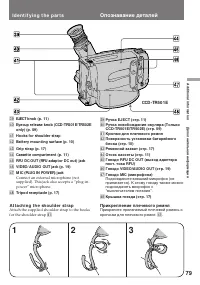
Страница 79 - Hooks f or shoulder st rap; Крючки для плечевого ремня; Прикрепление плечевого ремня
79 Addit ional inf ormat ion Дополнительная информация 1 2 3 #ª EJECT knob (p. 11) $º Eyecup release knob (CCD-TR501E/ TR502Eonly) (p. 59) $¡ Hooks f or shoulder st rap $™ Bat t ery mount ing surf ace (p. 10) $£ Grip st rap (p. 17) $¢ Casset t e compart ment (p. 11) $∞ RFU DC OUT (RFU adapt or DC ou...
Страница 80 - A V co r d l e ss I R r e ce i v e r
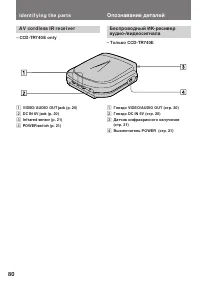
80 A V co r d l e ss I R r e ce i v e r – CCD -TR7 4 0 E o n l y I d e n t i f y i n g t h e p a r t s Опознавание деталей Беспроводный ИК-ресивераудио-/видеосигнала – Только CCD-TR740E 1 VIDEO/ AUDIO OUT jack (p. 20) 2 DC IN 6V jack (p. 20) 3 Inf rared sensor (p. 21) 4 POW ER sw it ch (p. 21) 1 Гне...
Страница 81 - Transmit t er; Пульт дистанционного управления; Передатчик
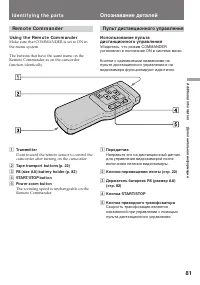
81 Addit ional inf ormat ion Дополнительная информация I d e n t i f y i n g t h e p a r t s Re m o t e Co m m a n d e r Usi n g t h e Re m o t e Co m m a n d e r Make sure that COMMANDER is set to ON inthe menu system. The buttons that have the same name on theRemote Commander as on the camcorderfu...
Страница 82 - To p r e p a r e t h e Re m o t e Co m m a n d e r; N o t e o n b a t t e r y l i f e; Re m o t e co n t r o l d i r e ct i o n; Примечание к сроку службы батареек
82 To p r e p a r e t h e Re m o t e Co m m a n d e r Insert two R6 (size AA) batteries by matchingthe+ and – on the batteries to the diagram inside thebattery compartment. N o t e o n b a t t e r y l i f e The batteries for the Remote Commander lastabout 6 months under normal operation. Whenthe bat...
Страница 83 - N o t e s o n t h e Re m o t e Co m m a n d e r; To w a t ch t h e d e m o n st r a t i o n; Для просмотра демонстрации
83 Addit ional inf ormat ion Дополнительная информация I d e n t i f y i n g t h e p a r t s N o t e s o n t h e Re m o t e Co m m a n d e r • Keep the remote sensor away from strong light sources such as direct sunlight or illumination.Otherwise, the remote control may not beeffective. • Be sure th...
Страница 84 - Op e r a t i o n i n d i ca t o r s; I n t h e v i e w f i n d e r; Индикаторы работы; В видоискателе
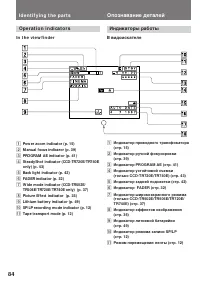
84 Op e r a t i o n i n d i ca t o r s I n t h e v i e w f i n d e r 1 Pow er zoom indicat or (p. 15) 2 M anual f ocus indicaror (p. 39) 3 PROGRAM AE indicat or (p. 41) 4 St eadyShot indicat or (CCD-TR720E/ TR740Eonly) (p. 43) 5 Back light indicat or (p. 42) 6 FADER indicat or (p. 32) 7 W ide mode i...
Страница 85 - I n t h e d i sp l a y w i n d o w; В окошке дисплея
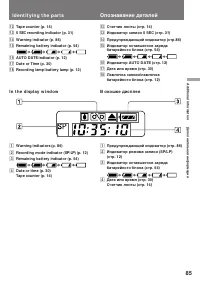
85 Addit ional inf ormat ion Дополнительная информация !™ Tape count er (p. 14) !£ 5 SEC recording indicat or (p. 31) !¢ W arning indicat or (p. 86) !∞ Remaining bat t ery indicat or (p. 54) !§ AUTO DATE indicat or (p. 12) !¶ Dat e or Time (p. 30) !• Recording lamp/ bat t ery lamp (p. 12) I n t h e ...
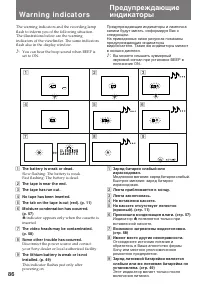
Страница 86 - Wa r n i n g i n d i ca t o r s; : You can hear the beep sound when BEEP is; Лента приближается к концу.; Индикатор; Имеют место другие неисправности.; indicator appears only when the cassette is; Some ot her t rouble has occurred.
86 Wa r n i n g i n d i ca t o r s The warning indicators and the recording lampflash to inform you of the following situation.The illustrations below are the warningindicators of the viewfinder. The same indicatorsflash also in the display window. ≥ : You can hear the beep sound when BEEP is set to...
Страница 88 - Sony Corporation; Автомобильный; В–З; Воспроизведение на; И–М; Цифровой; Указатель
Sony Corporation Printed in Japan А, Б Автомобильный аккумулятор .................... 26 В–З Введение/выведение изображения .................... 32 Воспроизведение на телевизоре ....................... 22 Гнездо дистанционного управления (LANC) ......... 78 Демонстрация .................... 29Запись...


 Sony CCD-TR311E Инструкция по эксплуатации
 Sony CCD-TR315E Инструкция по эксплуатации
 Sony CCD-TR411E / CCD-TR412E Инструкция по эксплуатации
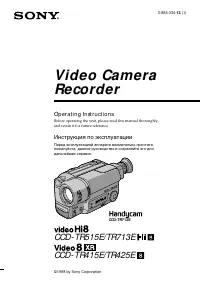 Sony CCD-TR415E Инструкция по эксплуатации
 Sony CCD-TR417E Инструкция по эксплуатации
 Sony CCD-TR427E Инструкция по эксплуатации
 Sony CCD-TR511E / CCD-TR512E Инструкция по эксплуатации
 Sony CCD-TR640E Инструкция по эксплуатации
 Sony CCD-TR718E Инструкция по эксплуатации
 Sony CCD-TR730E Инструкция по эксплуатации
 Sony CCD-TR3200E Инструкция по эксплуатации
 Sony CCD-TR3400E Инструкция по эксплуатации
 Sony CCD-TRV13E / CCD-TRV15E Инструкция по эксплуатации
 Sony CCD-TRV27E Инструкция по эксплуатации
 Sony CCD-TRV35E Инструкция по эксплуатации