
Пылесос Bosch BGL252101 MoveOn Mini - инструкция пользователя по применению, эксплуатации и установке на русском языке. Мы надеемся, она поможет вам решить возникшие у вас вопросы при эксплуатации техники.
Если остались вопросы, задайте их в комментариях после инструкции.
"Загружаем инструкцию", означает, что нужно подождать пока файл загрузится и можно будет его читать онлайн. Некоторые инструкции очень большие и время их появления зависит от вашей скорости интернета.


42
Cle
a
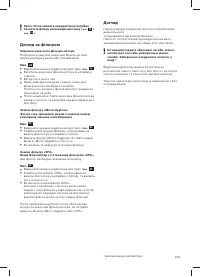
ning the filter fleece (
a
)
a
nd the fo
am
filter (b) in
the du
s
t cont
a
iner
Th
e
filt
e
r
m
ust b
e
cl
e
an
e
d:
Aft
e
r any
m
alfunctions
,
i.
e
. aft
e
r a blockag
e
is cl
e
ar
e
d
If th
e
r
e
is visibl
e
dirt on th
e
filt
e
r
At l
e
ast
e
v
e
ry thr
ee
m
onths
Figure
25
Unlock th
e
locking tab on th
e
r
e
ar sid
e
of th
e
contain
e
r and op
e
n th
e
bas
e
plat
e
on th
e
botto
m
of
th
e
contain
e
r.
Rem
ov
e
both filt
e
rs (a + b) fro
m
th
e
bas
e
plat
e
.
Figure
26
Wash out both filt
e
rs (a + b) and l
e
av
e
th
em
to dr y
for at l
e
ast 24 hours.
Aft
e
r cl
e
aning th
em,
ins
e
r t both filt
e
rs into th
e
bas
e
plat
e
.
C
los
e
th
e
bas
e
plat
e
and push in th
e
locking tab
until you h
e
ar it click into plac
e
.
!
Note: When in
s
erting the filter
s,
you
m
u
s
t follow
the correct
s
equence. The fo
am
filter (b)
m
u
s
t lie
on top of the filter fleece (
a
).
M
a
lfunction
s
Rem
oving a blockag
e
in th
e
dust contain
e
r
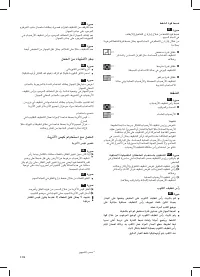
Figure
27
E
m
pty th
e
contain
e
r.
Figure
21
Loos
e
n th
e
blockag
e,
e
.g. with a scr
e
wdriv
e
r
,
and
tap or suck it out.
If sucking out
,
a dust bag
m
ust b
e
ins
e
r t
e
d in th
e
applianc
e
.
Figure
19
Fit th
e
contain
e
r cov
e
r
,
fold up th
e
carr ying handl
e
and lock it in plac
e
on th
e
cov
e
r.
!
Note: After
a
ny
ma
lfunction
s,
you
m
u
s
t cle
a
n the
filter
s
on the du
s
t cont
a
iner
(
figure
25
+
figure
26
).
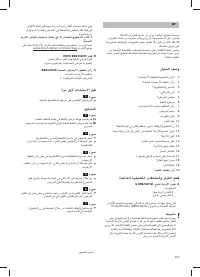
Filter c
a
re
Cle
a
ning the
m
otor protection filter
Th
e
m
otor prot
e
ction filt
e
r should b
e
cl
e
an
e
d r
e
gular-
ly by tapping out th
e
dir t and rinsing.
Figure
28
Op
e
n th
e
dust bag co
m
par t
me
nt lid.
Figure
21
Rem
ov
e
th
e
m
otor prot
e
ction filt
e
r in th
e
dir
e
ction
of th
e
arrow.
C
l
e
an th
e
m
otor prot
e
ction filt
e
r by tapping out
th
e
dir t.
If it is v
e
r y dir ty
,
th
e
m
otor prot
e
ction filt
e
r should
b
e
rins
e
d.
Th
e
n allow th
e
filt
e
r to dr y for at l
e
ast 24 hours.
Aft
e
r cl
e
aning
,
ins
e
r t th
e
m
otor prot
e
ction filt
e
r
into th
e
applianc
e
and clos
e
th
e
dust bag co
m
par t-
me
nt lid.
R
epl
a
cing the
m
icro
-
hygiene filter
This should b
e
r
e
plac
e
d with
e
v
e
r y r
e
plac
eme
nt filt
e
r
pack
Figure
29*
Op
e
n th
e
dust bag co
m
par t
me
nt lid.
Figure
21
Re
l
e
as
e
th
e
filt
e
r hold
e
r by
m
oving th
e
locking l
e
v
e
r
in th
e
dir
e
ction of th
e
arrow.
Rem
ov
e
th
e
m
icro-hygi
e
n
e
filt
e
r. Ins
e
r t a n
e
w
m
icro-hygi
e
n
e
filt
e
r into th
e
applianc
e
.
Ins
e
r t th
e
filt
e
r hold
e
r into th
e
applianc
e
and lock
it in plac
e
.
R
epl
a
cing the EPA filter
If your applianc
e
is fitt
e
d with a E
P
A filt
e
r
,
it
m
ust b
e
r
e
plac
e
d
e
v
e
r y y
e
ar.
Figure
30*
Op
e
n th
e
dust bag co
m
par t
me
nt lid.
Figure
21
Unlock th
e
E
P
A filt
e
r by
m
oving th
e
locking l
e
v
e
r
in th
e
dir
e
ction of th
e
arrow and r
em
ov
e
th
e
filt
e
r
fro
m
th
e
applianc
e
.
Ins
e
r t th
e
n
e
w E
P
A filt
e
r.
Wh
e
n doing so
,
first slid
e
th
e
r
e
ar par t of th
e
filt
e
r
into th
e
int
e
nd
e
d r
e
c
e
ss and th
e
n push it into th
e
front
,
ov
e
r th
e
locking l
e
v
e
r until it audibly locks in
plac
e
.
Aft
e
r vacuu
m
ing fin
e
dust par ticl
e
s
,
cl
e
an th
e
m
otor
prot
e
ction filt
e
r and
,
if n
e
c
e
ssar y
,
r
e
plac
e
th
e
m
icro-
hygi
e
n
e
filt
e
r or E
P
A filt
e
r.
C
a
re
Always switch off th
e
vacuu
m
cl
e
an
e
r and disconn
e
ct
th
e
pow
e
r cord fro
m
th
e
m
ains b
e
for
e
cl
e
aning th
e
vacuu
m
cl
e
an
e
r.
Th
e
vacuu
m
cl
e
an
e
r and plastic acc
e
ssori
e
s can b
e
cl
e
an
e
d with a co
mme
rcial plastic cl
e
an
e
r.
!
Do not u
s
e
a
s
courer
,
gl
ass-
cle
a
ning
a
gent or
m
ulti
-
purpo
s
e cle
a
ning product
s
. Never i
mm
er
s
e
the v
a
cuu
m
cle
a
ner in w
a
ter.
Th
e
dust co
m
par t
me
nt can
,
if n
e
c
e
ssar y
,
b
e
cl
e
an
e
d
with a s
e
cond vacuu
m
cl
e
an
e
r or si
m
ply wip
e
d with a
dr y cloth or dusting brush.
S
ubj
e
ct to t
e
chnical
m
odifications.
* D
e
p
e
nding on
m
od
e
l


