Пылесос Bosch BGL 252000 - инструкция пользователя по применению, эксплуатации и установке на русском языке. Мы надеемся, она поможет вам решить возникшие у вас вопросы при эксплуатации техники.
Если остались вопросы, задайте их в комментариях после инструкции.
"Загружаем инструкцию", означает, что нужно подождать пока файл загрузится и можно будет его читать онлайн. Некоторые инструкции очень большие и время их появления зависит от вашей скорости интернета.


43
Cle
a
ning the filter fleece (
a
)
a
nd the fo
am
filter (b) in
the du
s
t cont
a
iner
The filter must be cleaned:
After any malfunctions, i.e. after a blockage is cleared
If there is visible dirt on the filter
At least every three months
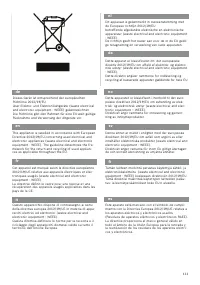
Figure
25
Unlock the locking tab on the rear side of the
container and open the base plate on the bottom of
the container.
Remove both filters (a + b) from the base plate.
Figure
26
Wash out both filters (a + b) and leave them to dr y
for at least 24 hours.
After cleaning them, inser t both filters into the base
plate.
Close the base plate and push in the locking tab
until you hear it click into place.
!
Note: When in
s
erting the filter
s,
you
m
u
s
t follow
the correct
s
equence. The fo
am
filter (b)
m
u
s
t lie
on top of the filter fleece (
a
).
M
a
lfunction
s
Removing a blockage in the dust container
Figure
27
Empty the container.
Figure
21
Loosen the blockage, e.g. with a screwdriver, and
tap or suck it out.
If sucking out, a dust bag must be inser ted in the
appliance.
Figure
19
Fit the container cover, fold up the carr ying handle
and lock it in place on the cover.
!
Note: After
a
ny
ma
lfunction
s,
you
m
u
s
t cle
a
n the
filter
s
on the du
s
t cont
a
iner
(
figure
25
+
figure
26
).
Filter c
a
re
Cle
a
ning the
m
otor protection filter
The motor protection filter should be cleaned regular-
ly by tapping out the dir t and rinsing.
Figure
28
Open the dust bag compar tment lid.
Figure
21
Remove the motor protection filter in the direction
of the arrow.
Clean the motor protection filter by tapping out
the dir t.
If it is ver y dir ty, the motor protection filter should
be rinsed.
Then allow the filter to dr y for at least 24 hours.
After cleaning, inser t the motor protection filter
into the appliance and close the dust bag compar t-
ment lid.
R
epl
a
cing the
m
icro
-
hygiene filter
This should be replaced with ever y replacement filter
pack
Figure
29*
Open the dust bag compar tment lid.
Figure
21
Release the filter holder by moving the locking lever
in the direction of the arrow.
Remove the micro-hygiene filter. Inser t a new
micro-hygiene filter into the appliance.
Inser t the filter holder into the appliance and lock
it in place.
Cle
a
ning the (H)EPA* exh
a
u
s
t filter
The (H)EPA* filter is designed so that it does not need
to be replaced, provided the appliance is used as
intended in the household.
To ensure that the vacuum cleaner is working at its
optimum power level, the (H)EPA* filter should be
rinsed out after one year. The filtering action of the
filter remains intact, even if the filter sur face becomes
discoloured.
Fig.
30*
Open the rear flap.
Unlock the (H)EPA* filter by moving the locking tab
in the direction of the arrow, and remove it from the
appliance.
Tap out the filter unit and rinse it under running
water.
Alternatively, the unit can be cleaned in a washing
machine at max. 30 °C using a gentle programme
and the lowest spin speed.
TIP:
To protect other laundr y items, put the filter
unit into a laundr y bag.
Once the (H)EPA* filter has dried completely (at
least 24 hours), inser t it back into the appliance
and lock it in place.
Close the rear flap.
After vacuuming fine dust par ticles (e.g. g ypsum,
cement, etc.), clean the motor protection filter by
tapping it out or, if necessar y, replace the motor pro-
tection filter and exhaust filter.
C
a
re
Always switch off the vacuum cleaner and disconnect
the power cord from the mains before cleaning the
vacuum cleaner.
The vacuum cleaner and plastic accessories can be
cleaned with a commercial plastic cleaner.
!
Do not u
s
e
a
s
courer
,
gl
ass-
cle
a
ning
a
gent or
m
ulti
-
purpo
s
e cle
a
ning product
s
. Never i
mm
er
s
e
the v
a
cuu
m
cle
a
ner in w
a
ter.
The dust compar tment can, if necessar y, be cleaned
with a second vacuum cleaner or simply wiped with a
dr y cloth or dusting brush.
Subject to technical modifications.
* Depending on model


