Пылесос Bosch BGL 252000 - инструкция пользователя по применению, эксплуатации и установке на русском языке. Мы надеемся, она поможет вам решить возникшие у вас вопросы при эксплуатации техники.
Если остались вопросы, задайте их в комментариях после инструкции.
"Загружаем инструкцию", означает, что нужно подождать пока файл загрузится и можно будет его читать онлайн. Некоторые инструкции очень большие и время их появления зависит от вашей скорости интернета.


42
Figure
18
a
)
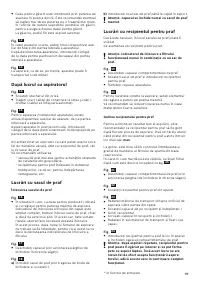
Close the dust bag by pulling on the locking tab and
then remove it.
b)
Inser t a new dust bag by pushing it fully into the
holder.
!
Ple
as
e note: The lid will only clo
s
e if
a
du
s
t b
a
g
h
as
been in
s
erted.
U
s
ing the du
s
t cont
a
iner
If necessar y, a dust container can be used in place of
a dust bag.
!
Ple
as
e note: The du
s
t b
a
g ch
a
nge indic
a
tor only
work
s
in conjunction with
a
du
s
t b
a
g.
Figure
19
Open the dust bag compar tment lid.
Remove the dust bag and inser t the dust container.
Close the appliance lid.
Figure
20
Set the power setting to ma ximum for best results
when vacuuming.
We recommend that you reduce the setting only when
vacuuming ver y delicate materials.
E
m
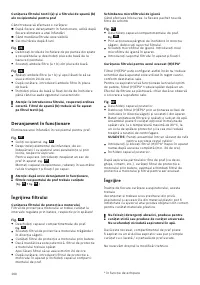
ptying the du
s
t cont
a
iner
In order to achieve the best possible vacuuming
results, the dust container should be emptied after
ever y use or, at the latest, when dust at one point in
the container has reached the
ma
x
marking.
When emptying the dust container, always check the
soiling level of the foam filter in the bottom of the
container.
When it is visibly soiled, clean the filter as described
from
figure
25
onwards.
Figure
21
Open the dust bag compar tment lid by moving the
locking lever in the direction of the arrow.
Figure
22
Remove the dust container from the appliance.
Figure
23
Fold the carr ying handle backwards, away from the
air intake opening.
Remove the cover from the container and put it to
one side.
Empty the container.
Hook the cover into the container and the close it.
Fold up the carr ying handle and lock it in place on
the cover.
Figure
24
Reinser t the dust container into the appliance and
close the dust bag compar tment lid.
!
Ple
as
e note: The in
s
ide of the du
s
t cont
a
iner
ma
y beco
m
e
s
cr
a
tched with u
s
e
a
nd
s
t
a
rt to look
op
a
que. Thi
s
doe
s
not
,
however
,
a
ffect the perfor
-
ma
nce of the v
a
cuu
m
cle
a
ner in
a
ny w
a
y
,
i.e. it will
continue to function
as
nor
ma
l.
The drill dust nozzle is held in the required position
by suction. Depending on the condition of the wall to
be drilled, you may need to adjust to a higher power
setting to ensure that the drill dust nozzle remains
in place.
During drilling, the fine dust is automatically vacu-
umed up.
Figure
12
You can use the parking aid on the side of the appli-
ance if you wish to stop vacuuming for a shor t time.
After switching off the appliance, slide the hook
on the floor tool into the recess on the side of the
appliance.
Figure
13
When vacuuming on stairs for example, the appliance
can also be carried by the handle.
After u
s
ing the
a
ppli
a
nce
Figure
14
Pull out the mains plug.
Briefly pull on the power cord and then release it
(the power cord retracts automatically).
Figure
15
To store/transpor t the appliance, you can use the
storage aid on the underside of the appliance.
Stand the appliance up on its end. Slide the hook on
the floor tool into the recess on the underside of the
appliance.
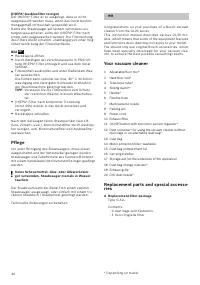
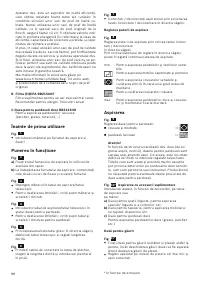
You have purchased a floor vacuum cleaner which can
vacuum up any type of dr y dir t using the dust contai-
ner or dust bag.
We recommend that you use:
− The dust bag principally for everyday household
cleaning.
− The dust container for DIY-related cleaning in parti-
cular, e.g. to vacuum up wood shavings, etc.
U
s
ing du
s
t b
a
g
s
R
epl
a
cing the du
s
t b
a
g
Figure
16
If the dust bag change indicator in the lid is filled
completely when the floor tool is lifted from the
floor with the highest suction level selected, the
dust bag must be changed, even though it may not
yet be full. Even if the dust bag is not full, it may
still need changing, due to the type of dust which
has been vacuumed.
First check that the nozzle, suction pipe and flexib -
le hose are not blocked, as this would also lead to
the dust bag change indicator being triggered.
Figure
17
Unlock the lid by releasing the locking lever in the
direction of the arrow.
* Depending on model


