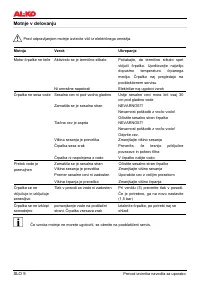
Насосы AL-KO HWF 1004 - инструкция пользователя по применению, эксплуатации и установке на русском языке. Мы надеемся, она поможет вам решить возникшие у вас вопросы при эксплуатации техники.
Если остались вопросы, задайте их в комментариях после инструкции.
"Загружаем инструкцию", означает, что нужно подождать пока файл загрузится и можно будет его читать онлайн. Некоторые инструкции очень большие и время их появления зависит от вашей скорости интернета.


•
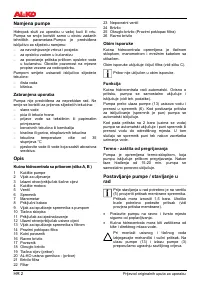
Make sure that the device is protected from
rain and any direct exposure to water.
When attaching the suction and pressure
hoses, make sure that they do not exert a
tension on the device. We recommend the
use of flexible hoses at the pump inlet (13)
and outlet (3). If you have any questions,
ask your retailer.
When operating the system (
automatic
operation
), take appropriate measures to
ensure that damage due to flooding can-
not occur if the system should malfunction.
This can be ensured, for instance, by
installing an alarm system or a reserve
pump.
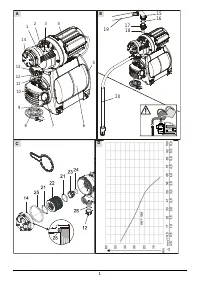
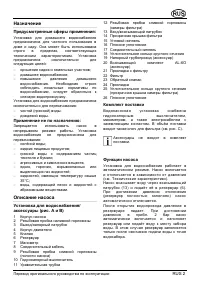
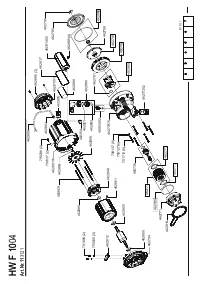
Attaching the suction hose
Choose a hose which is long enough so
that the device will not suck in air and run
dry. The hose should be at least 30cm
under the surface of the liquid to be
pumped while the pump is in operation.
•
Attach the suction hose. Make sure to screw
it in tightly, but take care not to damage the
threads.
If the liquid to be pumped is deeper than
4 m, you should use a suction hose which
is larger than 1“ in diameter for the best
performance. We recommend our AL-KO
suction set (14), which consists of a
suction hose, strainer and non-return
valve. The suction set is available at your
local retailer’s.
GB 3
Translation of original user instructions
•
When laying the suction hose, make sure
that it is lower than the system.
If the suction hose is laid so that it is higher
than the device, bubbles will be- come
trapped in the line and the pump will suck
air.
Attaching the pressure hose
•
Screw the connection nipple (17) with the
round seal ring (18) in the pump outlet (3).
•
Screw the angular nipple (15) with the flat
seal (16) on the connection nipple (17) and
rotate the angular nipple in the desired direc-
tion.
•
Attach the pressure hose. Make sure to
screw it in tightly, but take care not to dam-
age the threads.
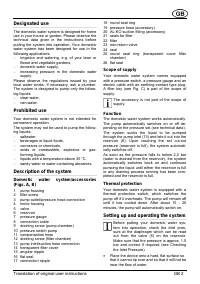
Filling the pump
Before putting your domestic water sys-
tem into operation, you must fill the pump
chamber with water until it overflows to
achieve full suction power. Do not operate
the pump while it is dry because this will
cause serious damage to the pump.
•
Remove the filler screw (2).
•
Pour water into the opening until the cham-
ber of the pump (12) is full.
•
Replace the filler screw (2) and tighten it.
Switching on the system
•
Open the pressure line (open valve, sprayer,
tap, etc.).
•
Plug the electric cable into the socket. The
pump will automatically begin to run.
•
As soon as the flow of water is cleared of air
bubbles trapped in the line, close the pres-
sure line. When the pressure has fallen and
the reservoir is full, the pump will automati-
cally switch off. Your domestic water system
is now ready for operation.
Switching
off the system
•
Switch the system off by unplugging the
electric cable from the socket.
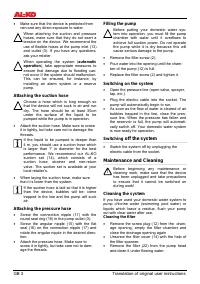
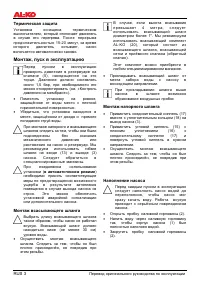
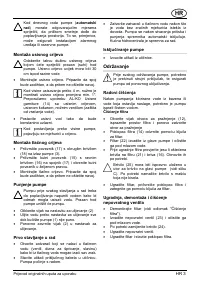
Maintenance and Cleaning
!
Before beginning any maintenance or
cleaning work, make sure that the device
has been unplugged and take precautions
to ensure that it cannot be switched on
during work!
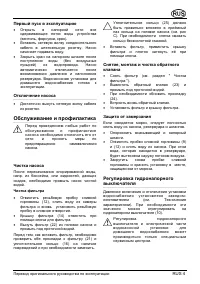
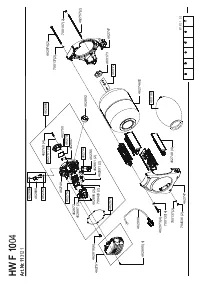
Cleaning the system
If you have used your domestic water system to
pump chlorine water (swimming pool water) or
liquids which leave a residue, flush your pump
out with clear water after use.
Cleaning the filter
•
Remove the screw plug (12) from the drain-
age opening, empty the filter chamber and
close the drainage opening again
•
Unscrew the filter cover (14) with the help of
the filter spanner.
•
Remove the filter (22) from the pump head
and clean it under flowing water.


