
Холодильник Liebherr CBNPgw 3956 - инструкция пользователя по применению, эксплуатации и установке на русском языке. Мы надеемся, она поможет вам решить возникшие у вас вопросы при эксплуатации техники.
Если остались вопросы, задайте их в комментариях после инструкции.
"Загружаем инструкцию", означает, что нужно подождать пока файл загрузится и можно будет его читать онлайн. Некоторые инструкции очень большие и время их появления зависит от вашей скорости интернета.
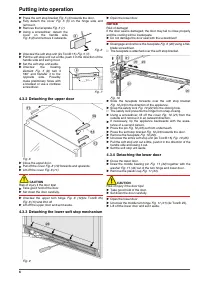

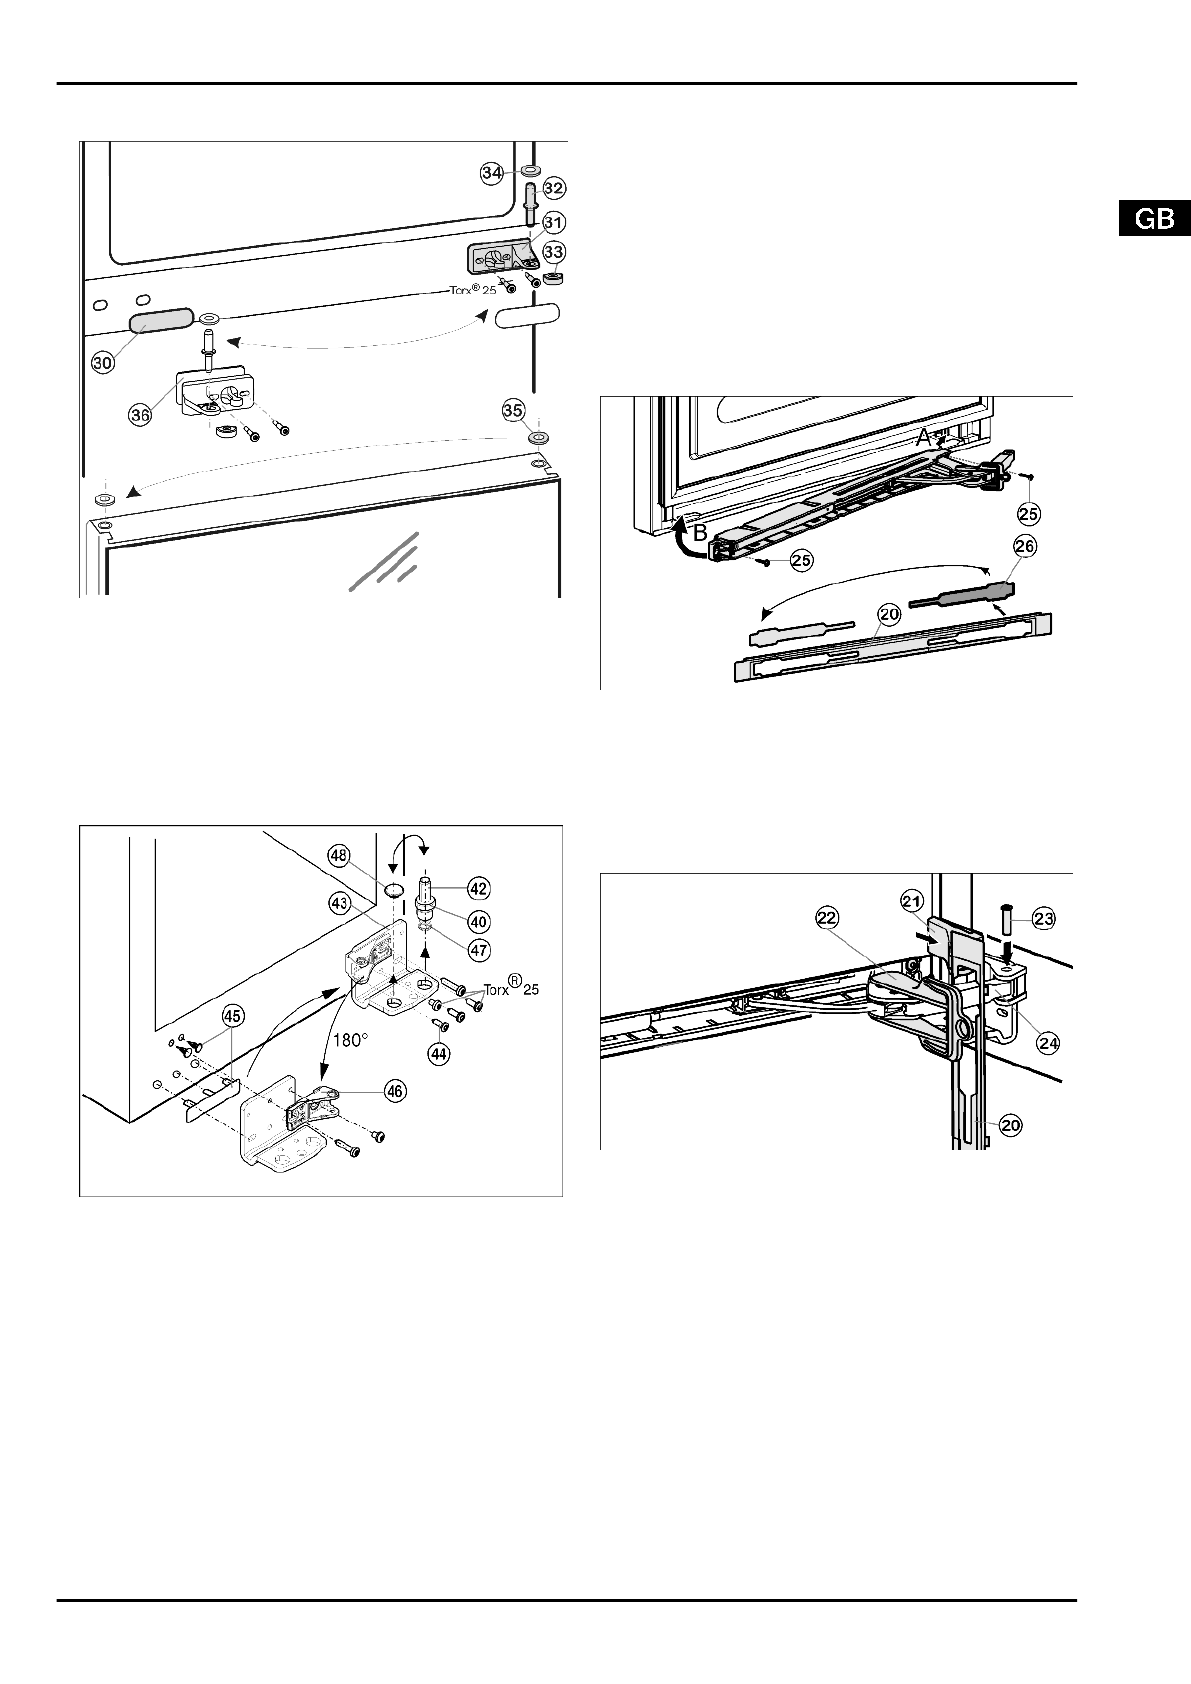
4.3.5 Transferring the middle bearing elements
Fig. 11
u
Carefully detach the cover panel
Fig. 11 (30).
u
Turn the middle turn hinge
Fig. 11 (31) with the washer
Fig. 11 (36) through 180° and screw it firmly into place on
the new hinge side (with 4 Nm).
u
Turn the cover panel
Fig. 11 (30) through 180° and snap it
into place again on the new handle side.
u
Transfer the washer
Fig. 11 (35) on the door.
4.3.6 Transferring the lower bearing elements
Fig. 12
u
Lift out the bearing pin
Fig. 12 (42) together with washer
Fig. 12 (40) and adjustable-height foot Fig. 12 (47).
u
Lift off the stopper
Fig. 12 (48).
u
Unscrew the turn hinge
Fig. 12 (43) .
u
Carefully lift off the cover on the handle side and stopper
Fig. 12 (45) and transfer them to the opposite side.
u
Screw the bottom turn hinge
Fig. 12 (43) firmly into place
(with 4 Nm) on the new hinge side, possibly using a cord-
less screwdriver.
u
Unscrew the bearing element
Fig. 12 (46), turn it through
180° and screw it back firmly into place, always screw the
long screw into the oblong hole!
u
Re-insert the stopper
Fig. 12 (48) into the other hole.
u
Re-insert the bearing pin
Fig. 12 (42) together with the
washer and adjustable-height foot. In so doing, pay attention
that the locating lug points backwards
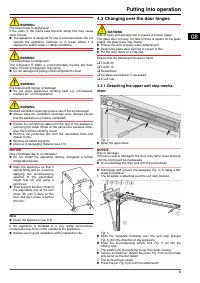
4.3.7 Fitting the lower door
u
Place the door from above onto the lower bearing pin
Fig. 12 (42).
u
Close the door.
u
Place the plastic cap
Fig. 11 (33) back onto the middle turn
hinge
Fig. 11 (31).
u
Place the middle bearing pin
Fig. 11 (32) in the lower door,
on the new hinge side, through the middle turn hinge
Fig. 11 (31).
u
Attach the washer
Fig. 11 (34) to the middle bearing pin
Fig. 11 (32).
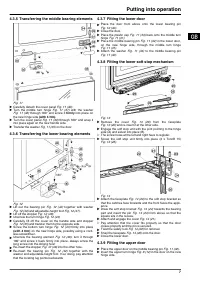
4.3.8 Fitting the lower soft stop mechanism
Fig. 13
u
Remove the cover
Fig. 13 (26) from the faceplate
Fig. 13 (20) and re-insert it at the other side.
u
Engage the soft stop unit with the joint pointing to the hinge
side (A) and swivel into place (B).
w
The screw holes at the left and right have to register.
u
Screw the soft stop unit firmly into place (2 x Torx® 15)
Fig. 13 (25).
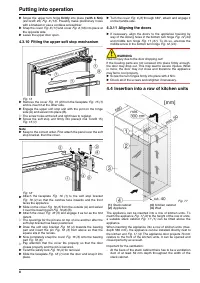
Fig. 14
u
Attach the faceplate
Fig. 14 (20) to the soft stop bracket so
that the catches face forwards and the front faces the appli-
ance.
u
Draw the soft stop bracket
Fig. 14 (24) towards the bearing
part and insert the pin
Fig. 14 (23) from above so that the
square sits in the recess.
u
Attach and engage the cover
Fig. 14 (21).
w
Pay attention that the cover fits properly so that the door
closes properly and the pin is secured.
u
Twist the safety lock
Fig. 14 (22) for removal.
u
Snap the faceplate
Fig. 14 (20) onto the door.
u
Close the lower door.
4.3.9 Fitting the upper door
u
Place the upper door on the middle bearing pin
Fig. 11 (32).
u
Insert the upper turn hinge
Fig. 8 (12) in the door on the new
hinge side.
Putting into operation
7
Характеристики

Остались вопросы?Не нашли свой ответ в руководстве или возникли другие проблемы? Задайте свой вопрос в форме ниже с подробным описанием вашей ситуации, чтобы другие люди и специалисты смогли дать на него ответ. Если вы знаете как решить проблему другого человека, пожалуйста, подскажите ему :)


