Страница 2 - Русский; ПРЕДУПРЕЖДЕНИЕ; En g l i sh; W ARNING
2 N OTI CE ON THE SUPPLI ED A C POW ERA D A PTOR FOR CUSTOM ERS I N THEUN I TED KI N GD OM A moulded plug complying with BS1363 is fittedto this equipment for your safety andconvenience. Should the fuse in the plug supplied need tobe replaced, a 5 AMP fuse approved by ASTAor BSI to BS1362 (i.e., mar...
Страница 4 - Оглавление
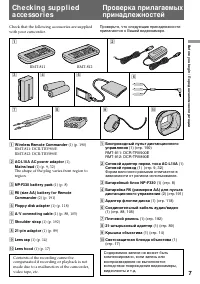
4 Русский Оглавление Перед началом эксплуатации Использование данного руководства ................ 5Проверка прилагаемых принадлежностей ....... 7 Подготовка к эксплуатации Уcтaнoвка и зарядка батарейного блока .......... 8Вставка кассеты ................................................ 13 Основные ...
Страница 5 - Be f o r e y o u b e g i n; Usi n g t h i s m a n u a l; Types of dif f erences; N o t e o n Ca sse t t e M e m o r y; Типы различий; Примечание к кассете с памятью
5 B efore you begin / Перед началом эксплуатации Be f o r e y o u b e g i n Usi n g t h i s m a n u a l The instructions in this manual are for the twomodels listed below. Before you start reading thismanual and operating the unit, check your modelnumber by looking at the bottom of yourcamcorder. Th...
Страница 6 - Pr e ca u t i o n o n co p y r i g h t; • Do not let the camcorder get wet. Keep the
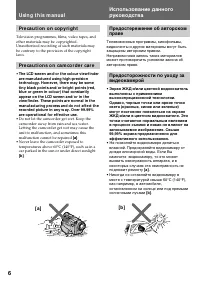
6 Usi n g t h i s m a n u a l Pr e ca u t i o n o n co p y r i g h t Television programmes, films, video tapes, andother materials may be copyrighted.Unauthorized recording of such materials maybe contrary to the provision of the copyrightlaws. Pr e ca u t i o n s o n ca m co r d e r ca r e • The LC...
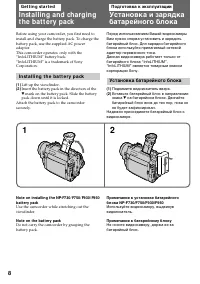
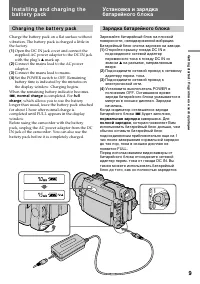
Страница 8 - Ge t t i n g st a r t e d; I n st a l l i n g t h e b a t t e r y p a ck; Lift up the viewfinder.; Not e on t he bat t ery pack; Подготовка к эксплуатации; Установка батарейного блока; Поднимите видоискатель вверх.; Примечание к батарейному блоку
8 Ge t t i n g st a r t e d Inst alling and chargingt he bat t ery pack Before using your camcorder, you first need toinstall and charge the battery pack. To charge thebattery pack, use the supplied AC poweradaptor.This comcorder operates only with the“InfoLITHIUM” battery back.“InfoLITHIUM” is a tr...
Страница 9 - Ch a r g i n g t h e b a t t e r y p a ck; Connect the mains lead to mains.; normal charge; , which allows you to use the battery; Зарядка батарейного блока; на разъеме, направленным; нормальная зарядка; , которая позволяет Вам
9 G etting s tarted / Подготовка к эксплуатации I n st a l l i n g a n d ch a r g i n g t h eb a t t e r y p a ck Ch a r g i n g t h e b a t t e r y p a ck Charge the battery pack on a flat surface withoutvibration. The battery pack is charged a little inthe factory. (1) Open the DC IN jack cover an...
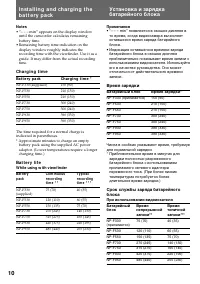
Страница 10 - Not es; • “– – – min” appears on the display window; Ch a r g i n g t i m e; Ba t t e r y p a ck; Ba t t e r y l i f e; W hile using w it h view f inder; • “– – – min” появляется в окошке дисплея в; Время зарядки
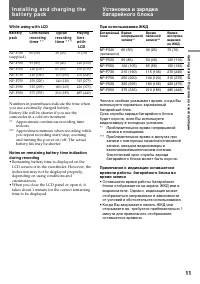
10 Not es • “– – – min” appears on the display window until the camcorder calculates remainingbattery time. • Remaining battery time indication on the display window roughly indicates therecording time with the viewfinder. Use it as aguide. It may differ from the actual recordingtime. Ch a r g i n g...
Страница 11 - W hile using w it h LCD; • Remaining battery time is displayed on the; При использовании ЖКД; • Оставшееся время работы батарейного
11 G etting s tarted / Подготовка к эксплуатации W hile using w it h LCD Bat t er y Co n t in u o u s Ty p ical Play in g p ack r eco r d in g r eco r d in g t im e t i m e * * t i m e * * * w i t h LCD NP-F330 60 (50) 30 (25) 75 (70) (supplied) NP-F530 95 (85) 50 (45) 120 (110) NP-F550 120 (105) 65...
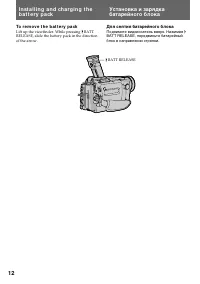
Страница 12 - To r e m o v e t h e b a t t e r y p a ck; BATT RELEASE; Для снятия батарейного блока
12 To r e m o v e t h e b a t t e r y p a ck Lift up the viewfinder. While pressing BATTRELEASE, slide the battery pack in the directionof the arrow. BATT RELEASE I n st a l l i n g a n d ch a r g i n g t h eb a t t e r y p a ck Для снятия батарейного блока Поднимите видоискатель вверх. Нажимая BATT...
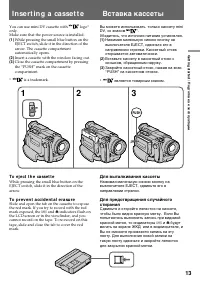
Страница 13 - I n se r t i n g a ca sse t t e; You can use mini DV cassette with; To e j e ct t h e ca sse t t e; and; Вставка кассеты; Убедитесь, что источник питания установлен.; Для выталкивания кассеты; будут
13 G etting s tarted / Подготовка к эксплуатации I n se r t i n g a ca sse t t e You can use mini DV cassette with logo* only.Make sure that the power source is installed. (1) While pressing the small blue button on theEJECT switch, slide it in the direction of thearrow. The cassette compartmentauto...
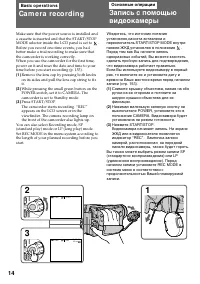
Страница 14 - Ba si c o p e r a t i o n s; Ca m e r a re co rd i n g; Основные операции
14 Ba si c o p e r a t i o n s Ca m e r a re co rd i n g Make sure that the power source is installed anda cassette is inserted and that the START/STOPMODE selector inside the LCD panel is set to . Before you record one-time events, you hadbetter make a trial recording to make sure thatthe camcorder...
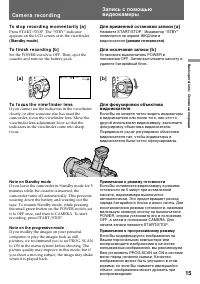
Страница 15 - To st o p r e co r d i n g m o m e n t a r i l y [ a ]; Not e on St andby mode; Ca m e r a r e co r d i n g; Для временной остановки записи; Примечание к режиму готовности
15 B asic operat ions / Основные операции To st o p r e co r d i n g m o m e n t a r i l y [ a ] Press START/STOP. The “STBY” indicatorappears on the LCD screen or in the viewfinder (St andby mode) . To f i n i sh r e co r d i n g [ b ] Set the POWER switch to OFF. Then, eject thecassette and remove...
Страница 16 - Примечание к фиксирующей ручке
16 Not e on t he lock knob When you set the lock knob to the left position,the POWER switch will not be set to MEMORYaccidentally. Not e on Recording mode This camcorder records and plays back in SP(standard play) mode and in LP (long play)mode. Select SP or LP in the menu system. In LPmode, you can...
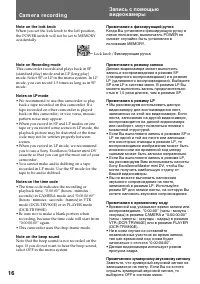
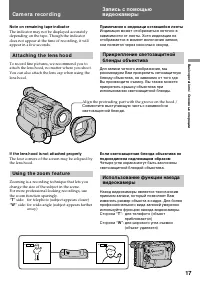
Страница 17 - Not e on remaining t ape indicat or; A t t a ch i n g t h e l e n s h o o d; If t he lens hood is not at t ached properly; Usi n g t h e zo o m f e a t u r e; Примечание к индикаци оставшейся ленты; Сторона “
17 B asic operat ions / Основные операции Not e on remaining t ape indicat or The indicator may not be displayed accuratelydepending on the tape. Though the indicatordoes not appear at the time of recording, it willappear in a few seconds. A t t a ch i n g t h e l e n s h o o d To record fine pictur...
Страница 18 - • Если Вы установите функцию D ZOOM на
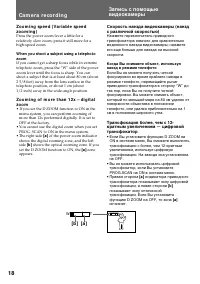
18 Ca m e r a r e co r d i n g Zo o m i n g sp e e d ( V a r i a b l e sp e e dzo o m i n g ) Press the power zoom lever a little for arelatively slow zoom; press it still more for ahigh-speed zoom. W hen you shoot a subject using a t elephot ozoom If you cannot get a sharp focus while in extremetel...
Страница 19 - Se l e ct i n g t h e st a r t /st o p m o d e; Recording starts when you press; The; Выбор режима запуска/остановки; Запись начинается когда Вы; ANTI GROUND SHOOTING :; Если Вы выбрали
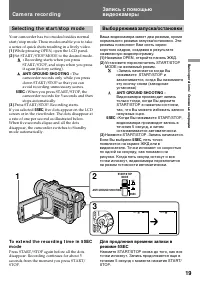
19 B asic operat ions / Основные операции Se l e ct i n g t h e st a r t /st o p m o d e Your camcorder has two modes besides normalstart/stop mode. These modes enable you to takea series of quick shots resulting in a lively video. (1 ) While pressing OPEN, open the LCD panel. (2 ) Set START/STOP MO...
Страница 20 - Not es on 5SEC recording; • If you have turned off the indicators on the; Sh o o t i n g w i t h t h e LCD scr e e n; Ba ck l i g h t i n g t h e LCD scr e e n; OPEN; Примечания к записи 5SEC; • Если Вы выключили индикаторы на экране; Подсветка экрана ЖКД
20 Not es on 5SEC recording • If you have turned off the indicators on the LCD screen, the dots do not appear. • When selecting “ ANTI GROUND SHOOTING” or “5SEC,” the fader functiondoes not work. • When selecting “5SEC,” the time code is not displayed. Sh o o t i n g w i t h t h e LCD scr e e n You ...
Страница 21 - Not es on t he LCD panel; Примечания к панели ЖКД
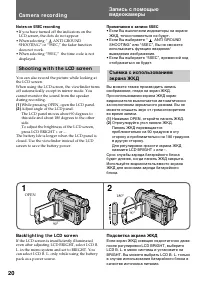
21 B asic operat ions / Основные операции Not es on t he LCD panel • When closing the LCD panel, turn it vertically until it clicks [ a ] . • When turning the LCD panel, turn it always vertically; otherwise, the camcorder body maybe damaged or the LCD panel may not closeproperly [ b ] . • Close the ...
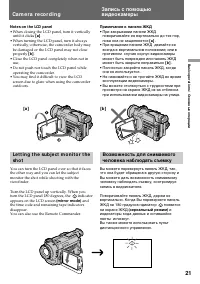
Страница 22 - Pr; Для отмены зеркального режима; • Когда Вы поворачиваете панель ЖКД на
22 To cancel mirror mode Turn the LCD panel down toward the camcorderbody. Not es on mirror mode • When you turn the LCD panel about 135 degrees to 180 degrees, the camcorder entersmirror mode. • Using the mirror mode, you can record yourself while watching yourself on the LCD screen. • The picture ...
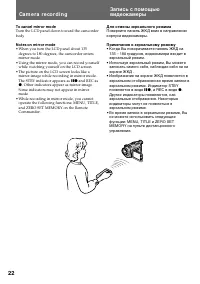
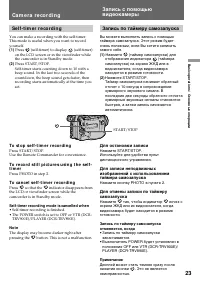
Страница 23 - Se l f -t i m e r r e co r d i n g; To st o p se l f -t i m e r r e co r d i n g; Press PHOTO in step 2.; To ca n ce l se l f -t i m e r r e co r d i n g; Press; Self -t imer recording mode is cancelled w hen; Запись по таймеру самозапуска; Для остановки записи; Примечание
23 B asic operat ions / Основные операции Se l f -t i m e r r e co r d i n g You can make a recording with the self-timer.This mode is useful when you want to recordyourself. (1 ) Press (self-timer) to display (self-timer) on the LCD screen or in the viewfinder whilethe camcorder is in Standby mode....
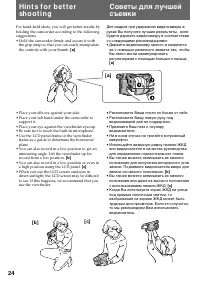
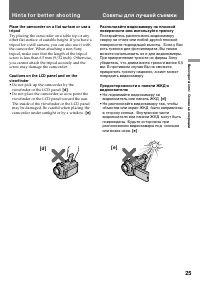
Страница 25 - • Do not pick up the camcorder by the; Hi n t s f o r b e t t e r sh o o t i n g; • Не поднимайте видеокамеру за; Советы для лучшей съемки
25 B asic operat ions / Основные операции Place t he camcorder on a f lat surf ace or use at ripod Try placing the camcorder on a table top or anyother flat surface of suitable height. If you have atripod for a still camera, you can also use it withthe camcorder. When attaching a non-Sonytripod, mak...
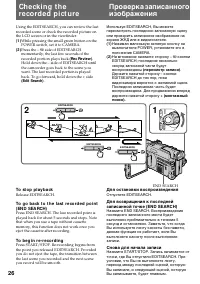
Страница 26 - To st o p p l a y b a ck; END SEARCH; На мгновение нажмите сторону; Для остановки воспроизведения; Отпустите EDITSEARCH.; Снова для начала записи
26 Using the EDITSEARCH, you can review the lastrecorded scene or check the recorded picture onthe LCD screen or in the viewfinder. ( 1 ) While pressing the small green button on thePOWER switch, set it to CAMERA. ( 2 ) Press the РΠside of EDITSEARCH momentarily; the last few seconds of therecorde...
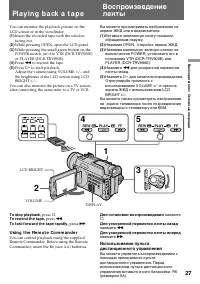
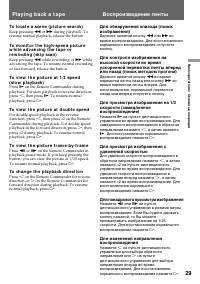
Страница 27 - Pl a y i n g b a ck a t a p e; To rew ind t he t ape,; Usi n g t h e Re m o t e Co m m a n d e r
27 B asic operat ions / Основные операции Pl a y i n g b a ck a t a p e LCD BRIGHT You can monitor the playback picture on theLCD screen or in the viewfinder. (1 ) Insert the recorded tape with the windowfacing out. (2 ) While pressing OPEN, open the LCD panel. (3 ) While pressing the small green bu...
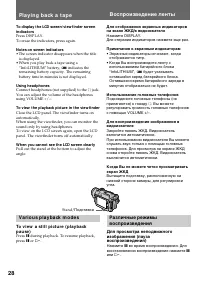
Страница 28 - V a r i o u s p l a y b a ck m o d e s; Примечания к экранным индикаторам; Воспроизведение ленты
28 To display t he LCD screen/ view f inder screenindicat ors Press DISPLAY.To erase the indicators, press again. Not es on screen indicat ors • The screen indicator disappears when the title is displayed. • When you play back a tape using a “InfoLITHIUM” battery, B indicates the remaining battery c...
Страница 29 - To l o ca t e a sce n e ( p i ct u r e se a r ch ); Для покадрового просмотра изображения
29 B asic operat ions / Основные операции To l o ca t e a sce n e ( p i ct u r e se a r ch ) Keep pressing 0 or ) during playback. To resume normal playback, release the button. To m o n i t o r t h e h i g h -sp e e d p i ct u r ew h i l e a d v a n ci n g t h e t a p e o rr e w i n d i n g ( sk i ...
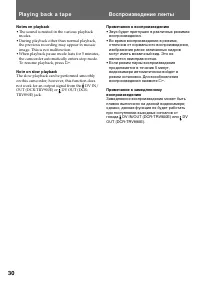
Страница 30 - Not es on playback; • The sound is muted in the various playback; Not e on slow playback; Примечания к воспроизведению; • Звук будет приглушен в различных режимах
30 Not es on playback • The sound is muted in the various playback modes. • During playback other than normal playback, the previous recording may appear in mosaicimage. This is not malfunction. • When playback pause mode lasts for 5 minutes, the camcorder automatically enters stop mode.To resume pl...
Страница 31 - Not es on End Search; • When you use a tape without cassette memory,; Примечания к поиску конца изображения; • Когда Вы используете ленту кассеты без
31 B asic operat ions / Основные операции Se a rch i n g f o r t h ee n d o f t h e p i ct u re You can go to the end of the recorded portionafter you record and play back the tape. The tapestarts rewinding or fast-forwarding and the lastabout 5 seconds of the recorded portion playsback. Then the ta...
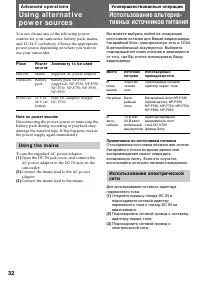
Страница 32 - Usi n g t h e m a i n s; To use the supplied AC power adaptor:; A d v a n ce d o p e r a t i o n s; Место; Примечание по источникам питания; Усовершенствованные операции
32 You can choose any of the following powersources for your camcorder: battery pack, mains,and 12/24 V car battery. Choose the appropriatepower source depending on where you want touse your camcorder. Pl a ce Po w e r A cce sso r y t o b e u se d so u r ce Indoors Mains Supplied AC power adaptor Ou...
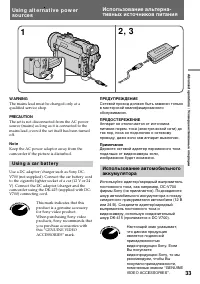
Страница 33 - Usi n g a ca r b a t t e r y
33 Advanc ed operat ions / Усовершенствованные операции 2 , 3 1 W ARNING The mains lead must be changed only at aqualified service shop. PRECAUTION The set is not disconnected from the AC powersource (mains) as long as it is connected to themains lead, even if the set itself has been turnedoff. Not ...
Страница 34 - CAMERA
34 You can change some of the mode settingsprogrammed at the factory to further enjoy thefeatures and functions of the camcorder. Just turnthe control dial to select the menu itemsdisplayed on the LCD screen. You can makeselections in the following order: the menudisplay n icons n items n mode setti...
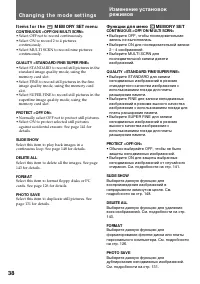
Страница 35 - Not es on changing t he mode set t ings; I t e m s f o r t h e; Ch a n g i n g t h e m o d e se t t i n g s; Функции для меню
35 Advanc ed operat ions / Усовершенствованные операции Not es on changing t he mode set t ings • Menu items differ depending on the setting of the POWER switch to VTR (DCR-TRV900E)/PLAYER (DCR-TRV890E), CAMERA orMEMORY. • While recording in mirror mode, you cannot operate the menu system. Se l e ct...
Страница 36 - AE SHIFT
36 STEADYSHOT <ON/ OFF> • Normally select ON.• Select OFF when you do not have to worry about camera-shake. AE SHIFT Adjust the setting level of AE (AutomaticExposure). See page 68 for details. GAIN SHIFT <0dB/ –3dB> • Set the gain value to 0dB.• Set the gain value to –3dB. FRAM E REC &l...
Страница 37 - LCD COLOUR
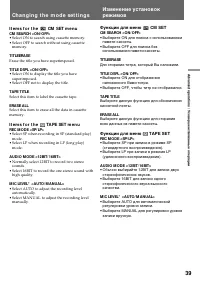
37 Advanc ed operat ions / Усовершенствованные операции AUDIO M IX* Select this item to adjust the balance between thestereo 1 and stereo 2 by turning the control dial. NTSC PB <ON PAL TV/ NTSC 4.43> • Normally select ON PAL TV.• Select NTSC 4.43 when playing back a tape recorded in the NTSC c...
Страница 38 - • Select MULTI SCRN to record nine pictures
38 Ch a n g i n g t h e m o d e se t t i n g s I t e m s f o r t h e M EM ORY SET m e n u CONTINUOUS <OFF/ ON/ M ULTI SCRN> • Select OFF not to record continuously.• Select ON to record 2 to 4 pictures continuously. • Select MULTI SCRN to record nine pictures continuously. QUALITY <STANDARD...
Страница 40 - или; CLOCK SET
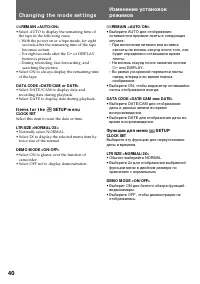
40 Ò REM AIN <AUTO/ ON> • Select AUTO to display the remaining time of the tape in the following cases:– With the power on or a tape inside, for eight seconds after the remaining time of the tapebecomes certain. – For eight seconds after the · or DISPLAY button is pressed. – During rewinding, ...
Страница 41 - Not es on DEM O M ODE; Примечания к DEMO MODE; W ORLD TIM E
41 Advanc ed operat ions / Усовершенствованные операции Not es on DEM O M ODE • DEMO MODE is set to STBY (Standby) at the factory. The demonstration starts about 10minutes after you set the POWER switch toCAMERA without inserting a cassette.You can cancel the demonstration by inserting acassette, se...
Страница 42 - DV EDITING
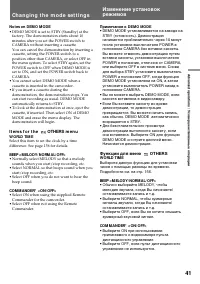
42 Ch a n g i n g t h e m o d e se t t i n g s DISPLAY <LCD or V-OUT/ LCD > • Normally select LCD.• Select V-OUT/LCD to display indicators both on the LCD screen and TV screen. REC LAM P <ON/ OFF> • Normally select ON.• Select OFF when you do not want the camera recording lamp on the fro...
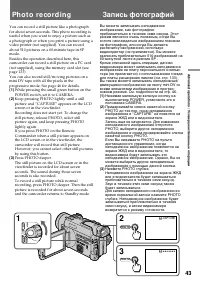
Страница 43 - Ph o t o re co rd i n g; Запись фотографий
43 Advanc ed operat ions / Усовершенствованные операции You can record a still picture like a photographfor about seven seconds. This photo recording isuseful when you want to enjoy a picture such asa photograph or when you print a picture using avideo printer (not supplied). You can recordabout 510...
Страница 44 - Ph o t o r e co r d i n g; При съемке в темных условиях
44 W hen shoot ing in t he dark Install the HVL-FDH2 video flash light (notsupplied) to the accessory shoe. If the exposure isin manual exposure mode, set it to automaticexposure mode.When appears next to the “CAPTURE”indicator on the LCD screen or in the viewfinder,the video flash is ready to be us...
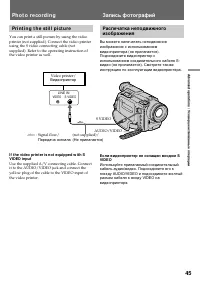
Страница 45 - Pr i n t i n g t h e st i l l p i ct u r e; S VIDEO
45 Advanc ed operat ions / Усовершенствованные операции LINE IN VIDEO S VIDEO Pr i n t i n g t h e st i l l p i ct u r e You can print a still picture by using the videoprinter (not supplied). Connect the video printerusing the S video connecting cable (notsupplied). Refer to the operating instructi...
Страница 46 - Turn the control dial to select; To r e t u r n t o n o r m a l m o d e; Select OFF in step 4, then press the control dial.; Для возврата к нормальному режиму
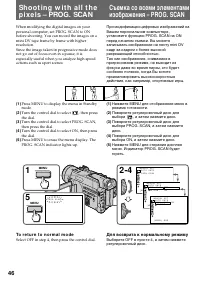
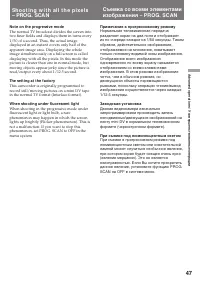
46 Sh o o t i n g w i t h a l l t h ep i x e l s – PROG. SCA N When modifying the digital images on yourpersonal computer, set PROG. SCAN to ONbefore shooting. You can record the images on amini DV tape frame by frame with higherresolution.Since the image taken in progressive mode doesnot go out of ...
Страница 47 - Not e on t he progressive mode
47 Advanc ed operat ions / Усовершенствованные операции Not e on t he progressive mode The normal TV broadcast divides the screen intotwo finer fields and displays them in turns every1/50 of a second. Thus, the actual imagedisplayed in an instant covers only half of theapparent image area. Displayin...
Страница 48 - REC; Для введения изображения
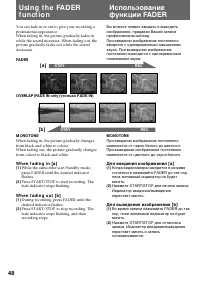
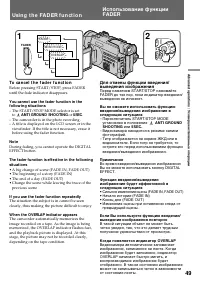
48 You can fade in or out to give your recording aprofessional appearance.When fading in, the picture gradually fades inwhile the sound increases. When fading out, thepicture gradually fades out while the sounddecreases. FADER OVERLAP (FADE IN only)/ (только FADE IN) M ONOTONE When fading in, the pi...
Страница 49 - To ca n ce l t h e f a d e r f u n ct i o n; – The START/STOP MODE selector is set; or; Not e; previous scene; If you use t he f ader f unct ion repeat edly; Usi n g t h e FA D ER f u n ct i o n; Для отмены функции введения/; – Переключатель START/STOP MODE; ANTI GROUND
49 Advanc ed operat ions / Усовершенствованные операции To ca n ce l t h e f a d e r f u n ct i o n Before pressing START/STOP, press FADERuntil the fade indicator disappears. You cannot use t he f ader f unct ion in t hef ollow ing sit uat ions – The START/STOP MODE selector is set to ANTI GROUND S...
Страница 50 - A f t e r sh o o t i n g; Not e on t he BACK LIGHT f unct ion; Нажмите BACK LIGHT. Индикатор; После съемки; исчезнет. В противном; Примечание к функции BACKLIGHT
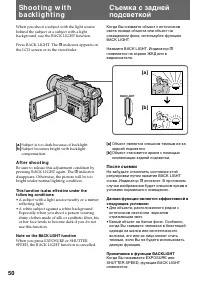
50 When you shoot a subject with the light sourcebehind the subject or a subject with a lightbackground, use the BACK LIGHT function. Press BACK LIGHT. The c indicator appears on the LCD screen or in the viewfinder. [a] Subject is too dark because of backlight. [b ] Subject becomes bright with backl...
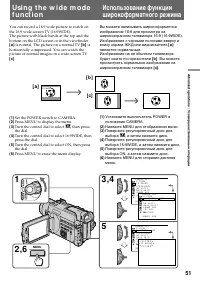
Страница 51 - Нажмите MENU для отображения меню.
51 Advanc ed operat ions / Усовершенствованные операции You can record a 16:9 wide picture to watch onthe 16:9 wide-screen TV (16:9WIDE).The picture with black bands at the top and thebottom on the LCD screen or in the viewfinder [ a ] is normal. The picture on a normal TV [ b ] is horizontally comp...
Страница 52 - To ca n ce l w i d e m o d e; Select OFF in step 5, then press the control dial.; Not es on w ide mode; • In wide mode, you cannot select the old movie; Примечание к широкоформатному режиму; • В широкоформатном режиме Вы не
52 To ca n ce l w i d e m o d e Select OFF in step 5, then press the control dial. To w a t ch t h e t a p e r e co r d e d i n w i d em o d e To watch the tape recorded in 16:9WIDE mode,set it to full mode. For details, refer to theoperating instruction of your TV.Note that the picture recorded in ...
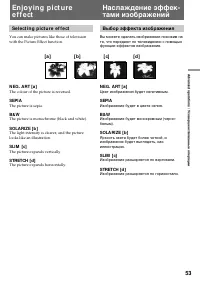
Страница 53 - Se l e ct i n g p i ct u r e e f f e ct; The colour of the picture is reversed.; The picture is sepia.; Выбор эффекта изображения; Цвет изображения будет негативным.; SEPI A; Изображение будет в цвете сепия.
53 Advanc ed operat ions / Усовершенствованные операции En j o y i n g p i ct u ree f f e ct Se l e ct i n g p i ct u r e e f f e ct You can make pictures like those of televisionwith the Picture Effect function. N EG. A RT [ a ] The colour of the picture is reversed. SEPI A The picture is sepia. B&...
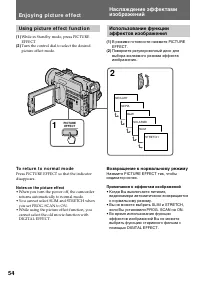
Страница 54 - Usi n g p i ct u r e e f f e ct f u n ct i o n; Not es on t he pict ure ef f ect; • When you turn the power off, the camcorder; En j o y i n g p i ct u r e e f f e ct; Возвращение к нормальному режиму; Примечания к эффектам изображений; • Когда Вы выключаете питание,
54 Usi n g p i ct u r e e f f e ct f u n ct i o n (1) While in Standby mode, press PICTUREEFFECT. (2) Turn the control dial to select the desiredpicture effect mode. To r e t u r n t o n o r m a l m o d e Press PICTURE EFFECT so that the indicatordisappears. Not es on t he pict ure ef f ect • When y...
Страница 56 - Длительность интервалов.
56 (1) While in Standby mode or Recording mode,press DIGITAL EFFECT.The digital effect indicator flashes. (2) Turn the control dial to select the desireddigital effect mode. (3) Press the control dial. The digital effectindicator lights up and the bars appear. Thebar does not appear in the OLD MOVIE...
Страница 57 - To ca n ce l d i g i t a l e f f e ct s; Not es on digit al ef f ect; • You cannot use the following functions while; Not es on t he OLD M OVIE mode; • Вы не можете использовать следующие; Примечания к режиму OLD MOVIE; – Функции с использованием кнопки
57 Advanc ed operat ions / Усовершенствованные операции To ca n ce l d i g i t a l e f f e ct s Press DIGITAL EFFECT so that the indicatordisappears. Not es on digit al ef f ect • You cannot use the following functions while using the digital effect.– Functions using the FADER button– Functions usin...
Страница 58 - Фильтр ND, фокусировка; Селектор AUTO LOCK
58 Sh o o t i n g w i t hm a n u a l a d j u st m e n t Under normal conditions, this unit automaticallymakes various adjustments as it shoots.However, you can adjust manually the followingfunctions to your preference. Funct ions you can adjust by set t ing t he AUTOLOCK select or t o t he cent re (...
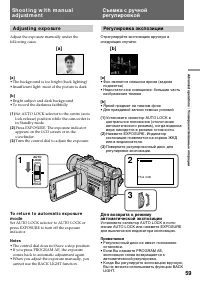
Страница 59 - A d j u st i n g e x p o su r e; Turn the control dial to adjust the exposure.; comes back to automatic adjustment again.; Регулировка экспозиции; Для возврата к режиму; Примечания
59 Advanc ed operat ions / Усовершенствованные операции [a ] [b ] A d j u st i n g e x p o su r e Adjust the exposure manually under thefollowing cases. [a ] • The background is too bright (back lighting)• Insufficient light: most of the picture is dark [b ] • Bright subject and dark background• To ...
Страница 60 - A d j u st i n g t h e sh u t t e r sp e e d; W hen shoot ing at slow shut t er speed; Регулировка скорости затвора; При съемке на низкой скорости затвора
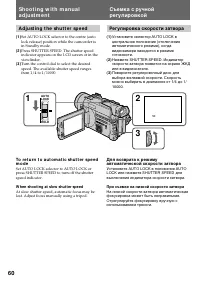
60 A d j u st i n g t h e sh u t t e r sp e e d ( 1 ) Set AUTO LOCK selector to the centre (autolock release) position while the camcorder isin Standby mode. ( 2 ) Press SHUTTER SPEED. The shutter speedindicator appears on the LCD screen or in theviewfinder. ( 3 ) Turn the control dial to select the...
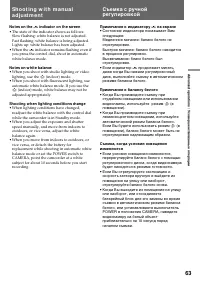
Страница 61 - A d j u st i n g t h e w h i t e b a l a n ce; Регулировка баланса белого
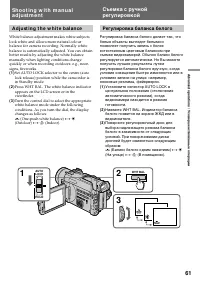
61 Advanc ed operat ions / Усовершенствованные операции A d j u st i n g t h e w h i t e b a l a n ce White balance adjustment makes white subjectslook white and allows more natural colourbalance for camera recording. Normally whitebalance is automatically adjusted. You can obtainbetter results by a...
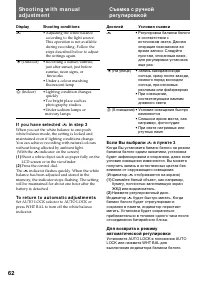
Страница 62 - I f y o u h a v e se l e ct e d; Дисплей
62 Display Shoot ing condit ions ∑ • Adjusting the white balance according to the light source.This operation is not availableduring recording. Follow thesteps described below to adjustthe settings again. w (Outdoor) • Recording a sunset/sunrise, just after sunset, just beforesunrise, neon signs, or...
Страница 63 - Not es on t he
63 Advanc ed operat ions / Усовершенствованные операции Not es on t he ∑ indicat or on t he screen • The state of the indicator shows as follows: Slow flashing: white balance is not adjusted.Fast flashing: white balance is being adjusted.Lights up: white balance has been adjusted. • When the ∑ indic...
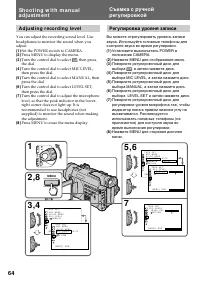
Страница 64 - A d j u st i n g r e co r d i n g l e v e l; Set the POWER switch to CAMERA.; Регулировка уровня записи
64 A d j u st i n g r e co r d i n g l e v e l You can adjust the recording sound level. Useheadphones to monitor the sound when youadjust. (1 ) Set the POWER switch to CAMERA. (2 ) Press MENU to display the menu. (3 ) Turn the control dial to select , then press the dial. (4 ) Turn the control dial...
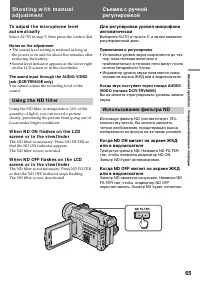
Страница 65 - Select AUTO in step 5, then press the control dial.; Not es on t he adjust ment; • The sound level setting is retained as long as; Usi n g t h e N D f i l t e r; Примечания к регулировке; • Установка уровня звука сохраняется до тех; Использование фильтра ND
65 Advanc ed operat ions / Усовершенствованные операции To a d j u st t h e m i cr o p h o n e l e v e la u t o m a t i ca l l y Select AUTO in step 5, then press the control dial. Not es on t he adjust ment • The sound level setting is retained as long as the power is on and for about five minutes ...
Страница 66 - Съемка с зебротаблицей
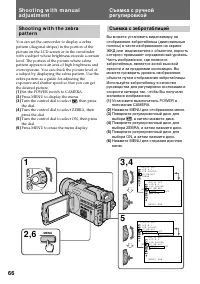
66 Sh o o t i n g w i t h t h e ze b r ap a t t e r n You can set the camcorder to display a zebrapattern (diagonal stripes) in the portion of thepicture on the LCD screen or in the viewfinderwith a subject whose brightness exceeds a certainlevel. The portion of the picture where zebrapattern appear...
Страница 67 - To e r a se t h e ze b r a p a t t e r n; Not es on shoot ing w it h t he zebra pat t ern; Для стирания зебротаблицы; Примечания к съемке с зебротаблицей; • Зебротаблица появляется при более, чем
67 Advanc ed operat ions / Усовершенствованные операции To e r a se t h e ze b r a p a t t e r n Select OFF in step 5, then press the control dial. Not es on shoot ing w it h t he zebra pat t ern • A zebra pattern appears at more than 100 IRE.• Even though you see the zebra pattern on the LCD screen...
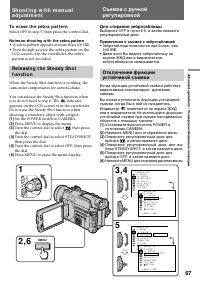
Страница 68 - Not es on t he St eady Shot f unct ion; A d j u st i n g A E sh i f t; Примечания к функции устойчивой съемки; • Функция устойчивой съемки не; Регулировка смещения AE
68 To a ct i v a t e t h e St e a d y Sh o t f u n ct i o na g a i n Select ON in step 5, then press the control dial. Not es on t he St eady Shot f unct ion • The Steady Shot function will not correct excessive camera-shake. • If you use a tele conversion lens (not supplied) or a wide conversion le...
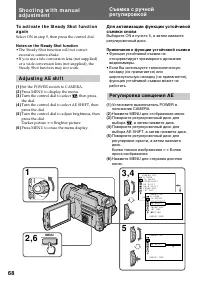
Страница 69 - To d e a ct i v a t e A E sh i f t; W hen you adjust AE shif t; A d j u st i n g g a i n sh i f t; Для отключения смещения АЕ; Когда Вы регулируете смещение АЕ; Иникатор от; Регулировка смещения усиления
69 Advanc ed operat ions / Усовершенствованные операции To d e a ct i v a t e A E sh i f t Set the bar indicator at the centre in step 5, thenpress the control dial. W hen you adjust AE shif t The –4 to +4 indicator is displayed on theLCD screen or in the viewfinder. The numbervaries corresponding t...
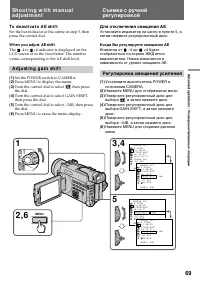
Страница 70 - To d e a ct i v a t e g a i n sh i f t; Select 0dB in step 5, then press the control dial.; W hat is gain shif t; Для отключения смещения усиления; Что такое смещение усиления; Индикатор
70 To d e a ct i v a t e g a i n sh i f t Select 0dB in step 5, then press the control dial. W hat is gain shif t When shooting in bright conditions, the gainshift function automatically adjusts the automaticexposure control’s gain value to –3dB as much aspossible. This helps you shoot pictures with...
Страница 71 - Se l e ct i n g t h e b e st m o d e; A: Apert ure priorit y mode; • In the Sports lesson mode, you cannot take; Выбор наилучшего режима; • В режиме спортивных занятий Вы не
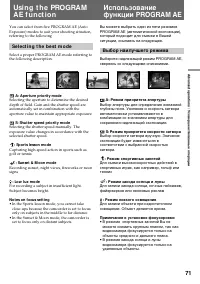
71 Advanc ed operat ions / Усовершенствованные операции Usi n g t h e PROGRA MA E f u n ct i o n You can select from five PROGRAM AE (AutoExposure) modes to suit your shooting situation,referring to the following. Se l e ct i n g t h e b e st m o d e Select a proper PROGRAM AE mode referring tothe f...
Страница 72 - Apert ure priorit y mode:; AE; Режим приоритета апертуры:
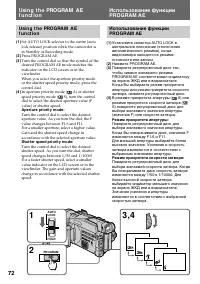
72 Usi n g t h e PROGRA M A Ef u n ct i o n ( 1 ) Set AUTO LOCK selector to the centre (autolock release) position while the camcorder isin Standby or Recording mode. (2) Press PROGRAM AE. (3) Turn the control dial so that the symbol of thedesired PROGRAM AE mode matches theindicator on the LCD scre...
Страница 73 - W hen you f ocus in t elephot o; Iris; Shallow
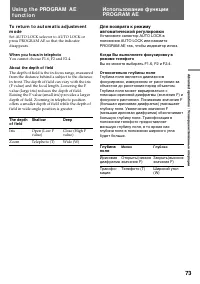
73 Advanc ed operat ions / Усовершенствованные операции To r e t u r n t o a u t o m a t i c a d j u st m e n tm o d e Set AUTO LOCK selector to AUTO LOCK orpress PROGRAM AE so that the indicatordisappears. W hen you f ocus in t elephot o You cannot choose F1.6, F2 and F2.4. About t he dept h of f i...
Страница 74 - Fo cu si n g m a n u a l l y; W h e n t o u se m a n u a l f o cu s; • Insufficient light; Ручная фокусировка; • Недостаточное освещение
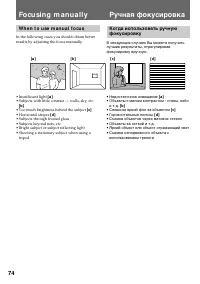
74 Fo cu si n g m a n u a l l y W h e n t o u se m a n u a l f o cu s In the following cases you should obtain betterresults by adjusting the focus manually. • Insufficient light [ a ] • Subjects with little contrast — walls, sky, etc. [ b ] • Too much brightness behind the subject [ c] • Horizontal...
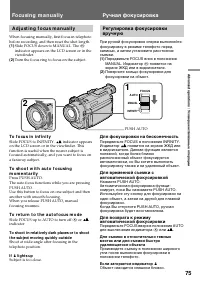
Страница 75 - A d j u st i n g f o cu s m a n u a l l y; To f o cu s i n i n f i n i t y; If light s up; появится на; Для фокусировки на бесконечность; появится на экране ЖКД или; Если загорается индикатор; Объект находится слишком близко.
75 Advanc ed operat ions / Усовершенствованные операции A d j u st i n g f o cu s m a n u a l l y When focusing manually, first focus in telephotobefore recording, and then reset the shot length. (1 ) Slide FOCUS down to MANUAL. The f indicator appears on the LCD screen or in theviewfinder. (2 ) Tur...
Страница 76 - I n t e r v a l re co rd i n g; Запись с интервалами
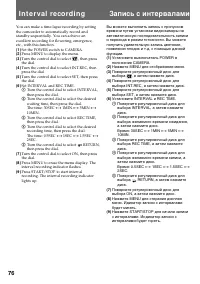
76 You can make a time-lapse recording by settingthe camcorder to automatically record andstandby sequentially. You can achieve anexcellent recording for flowering, emergence,etc., with this function. (1) Set the POWER switch to CAMERA. (2) Press MENU to display the menu. (3) Turn the control dial t...
Страница 77 - To ca n ce l t h e i n t e r v a l r e co r d i n g; I n t e r v a l r e co r d i n g; Для отмены записи с интервалами; • Установите INT.REC на OFF в системе
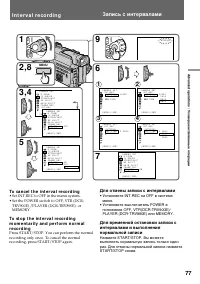
77 Advanc ed operat ions / Усовершенствованные операции To ca n ce l t h e i n t e r v a l r e co r d i n g • Set INT.REC to OFF in the menu system.• Set the POWER switch to OFF, VTR (DCR- TRV900E) /PLAYER (DCR-TRV890E) orMEMORY. To st o p t h e i n t e r v a l r e co r d i n gm o m e n t a r i l y ...
Страница 78 - During t he int erval recording mode; The INTERVAL indicator appears.; Not es on int erval recording; • You cannot do interval recording with photo; В режиме записи с интервалами
78 During t he int erval recording mode The INTERVAL indicator appears. Not es on int erval recording • You cannot do interval recording with photo recording. • You cannot perform interval recording in the MEMORY mode. • There may be a discrepancy in recording time of up to +/– 6 frames from the sel...
Страница 79 - Cu t re co rd i n g; а затем нажмите диск.; Запись с прерыванием
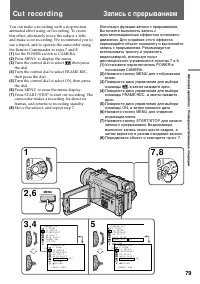
79 Advanc ed operat ions / Усовершенствованные операции C A M E R A S E T D Z O O M 1 6 : 9 W I D ES T E A D Y S H O TA E S H I F T G A I N S H I F T F R A M E R E C O F F I N T . R E C O N R E T U R N [ M E N U ] : E N D C A M E R A S E T D Z O O M 1 6 : 9 W I D ES T E A D Y S H O TA E S H I F T G ...
Страница 80 - To ca n ce l t h e cu t r e co r d i n g; Not es on cut recording; if you use this function continuously.; Cu t r e co r d i n g; Для отмены записи с прерыванием; Примечания по записи с прерыванием
80 To ca n ce l t h e cu t r e co r d i n g • Set FRAME REC to OFF in the menu system.• Set the POWER switch to OFF, VTR, or MEMORY. Not es on cut recording • The last recorded cut is longer than other cuts.• The proper remaining tape time is not indicated if you use this function continuously. Cu t...
Страница 81 - Su p e r i m p o si n g a t i t l e; Su p e r i m p o si n g t i t l e s; Press TITLE to display the title menu.; Наложение титра; Наложение титров
81 Advanc ed operat ions / Усовершенствованные операции Su p e r i m p o si n g a t i t l e If you use a tape with cassette memory, you cansuperimpose the titles while recording or afterrecording. When you play back the tape, the titleis displayed for five seconds from the pointwhere you superimpose...
Страница 82 - To u se t h e cu st o m t i t l e; Not es on superimposing a t it le; Для наложения титра от начала; Примечания к наложению титра
82 To su p e r i m p o se t h e t i t l e f r o mb e g i n n i n g After step 7, press START/STOP to startrecording. To su p e r i m p o se t h e t i t l e w h i l e y o ua r e r e co r d i n g After pressing START/STOP to start recording,start from step 1. In this case, beep or melody isnot heard. ...
Страница 83 - Er a si n g a t i t l e; Press MENU to display the menu.; Стирание титра
83 Advanc ed operat ions / Усовершенствованные операции Er a si n g a t i t l e (1 ) Press MENU to display the menu. (2 ) Turn the control dial to select , then press the dial. (3 ) Turn the control dial to select TITLEERASE,then press the dial. (4 ) Turn the control dial to select the title youwant...
Страница 84 - Нажмите TITLЕ для отображения меню титров.
84 If you use a tape with cassette memory, you canmake up to two titles and store them in thecamcorder. We recommend you to set thePOWER switch to VTR (DCR-TRV900E) orPLAYER (DCR-TRV890E) or eject the cassettebefore you begin.Your title can have up to 20 characters. (1) Press TITLE to display the ti...
Страница 85 - To e d i t a t i t l e y o u h a v e st o r e d; In step 4, turn the control dial to select [; M a k i n g a cu st o m t i t l e; Для стирания знака; Создание собственного титра
85 Advanc ed operat ions / Усовершенствованные операции To e d i t a t i t l e y o u h a v e st o r e d In step 3, select CUSTOM1 or CUSTOM2,depending on which title you want to edit, thenchange the title. If you t ake 5 minut es or longer t o ent ercharact ers w hile a casset t e is in t he camcord...
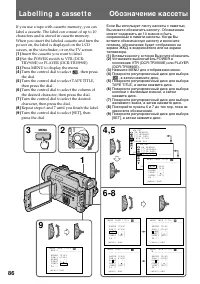
Страница 86 - La b e l l i n g a ca sse t t e; Insert the cassette you want to label.; Обозначение кассеты
86 La b e l l i n g a ca sse t t e If you use a tape with cassette memory, you canlabel a cassette. The label can consist of up to 10characters and is stored in cassette memory.When you insert the labeled cassette and turn thepower on, the label is displayed on the LCDscreen, in the viewfinder, or o...
Страница 87 - To e r a se a ch a r a ct e r; In step 6 turn the control dial to select [; To ch a n g e t h e l a b e l y o u h a v e m a d e; If t he; Если в пункте 5 появляется знак
87 Advanc ed operat ions / Усовершенствованные операции To e r a se a ch a r a ct e r In step 6 turn the control dial to select [ M ], then press the dial. The last character is erased. To ch a n g e t h e l a b e l y o u h a v e m a d e Insert the cassette to change the label, andoperate in the sam...
Страница 88 - , Вам не нужно подсоединять
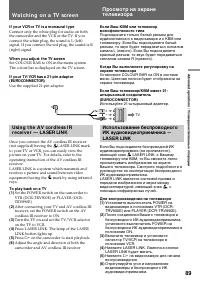
88 Connect the camcorder to your TV or VCR towatch the playback picture on the TV screen.When monitoring the playback picture byconnecting the camcorder to your TV, werecommend you to use mains for the powersource. Co n n e ct i n g d i r e ct l y t o a TV o rV CR w i t h A u d i o /V i d e o i n p ...
Страница 89 - If your VCR or TV is a monaural t ype; Use the supplied 21-pin adaptor; W a t ch i n g o n a TV scr e e n; LASER LINK, к Вашему; Для воспроизведения на телевизоре; Нажмите
89 Advanc ed operat ions / Усовершенствованные операции If your VCR or TV is a monaural t ype Connect only the white plug for audio on boththe camcorder and the VCR or the TV. If youconnect the white plug, the sound is L (left)signal. If you connect the red plug, the sound is R(right) signal. W hen ...
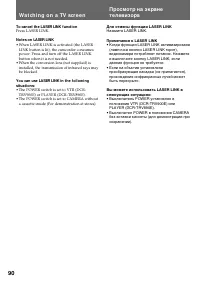
Страница 90 - • When LASER LINK is activated (the LASER; Для отмены функции LASER LINK; • Когда функция LASER
90 To cancel t he LASER LINK f unct ion Press LASER LINK. Not es on LASER LINK • When LASER LINK is activated (the LASER LINK button is lit), the camcorder consumespower. Press and turn off the LASER LINKbutton when it is not needed. • When the conversion lens (not supplied) is installed, the transm...
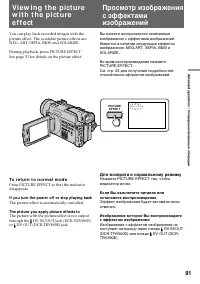
Страница 91 - If you t urn t he pow er of f or st op playing back; The picture effect is automatically cancelled.; The pict ure you apply pict ure ef f ect s t o
91 Advanc ed operat ions / Усовершенствованные операции You can play back recorded images with thepicture effect. The available picture effects areNEG. ART, SEPIA, B&W and SOLARIZE. During playback, press PICTURE EFFECT.See page 53 for details on the picture effect. To r e t u r n t o n o r m a ...
Страница 92 - Turn the control dial to select the desired; The digital effect is automatically cancelled.; The pict ure you apply digit al ef f ect s t o; Поверните регулировчный диск для
92 1 2 ,3 S T I L L DIGITAL EFFECT 4 You can play back the recorded images with thedigital effect.The available digital effects are STILL, FLASH,LUMI. and TRAIL. (1 ) During playback, press DIGITAL EFFECT. (2 ) Turn the control dial to select the desired digital effect mode. (3 ) Press the control d...
Страница 93 - displayed on the LCD screen.
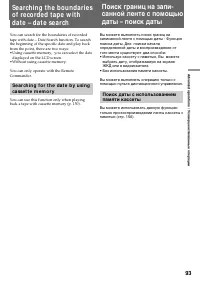
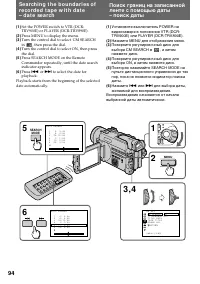
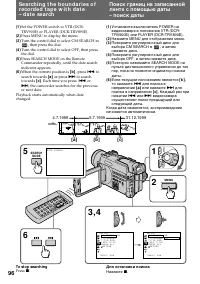
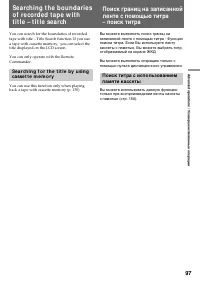
93 Advanc ed operat ions / Усовершенствованные операции Se a rch i n g t h e b o u n d a r i e so f re co rd e d t a p e w i t hd a t e – d a t e se a rch You can search for the boundaries of recordedtape with date – Date Search function. To searchthe beginning of the specific date and play backfrom...
Страница 95 - To st op searching
95 Advanc ed operat ions / Усовершенствованные операции Se a r ch i n g t h e b o u n d a r i e s o fr e co r d e d t a p e w i t h d a t e– d a t e se a r ch To st op searching Press p . Not es • The interval of the boundaries between the dates needs to be more than two minutes. Thecamcorder may no...
Страница 98 - Для остановки поиска
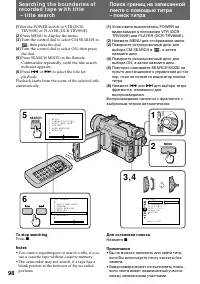
98 (1 ) Set the POWER switch to VTR (DCR-TRV900E) or PLAYER (DCR-TRV890E). (2 ) Press MENU to display the menu. (3 ) Turn the control dial to select CM SEARCH in , then press the dial. (4 ) Turn the control dial to select ON, then pressthe dial. (5 ) Press SEARCH MODE on the RemoteCommander repeated...
Страница 99 - • Without using cassette memory.
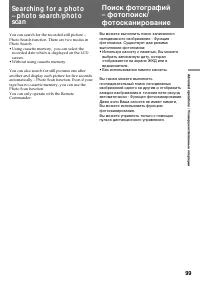
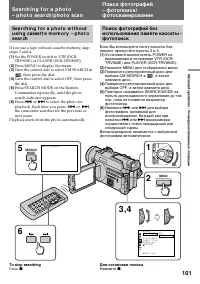
99 Advanc ed operat ions / Усовершенствованные операции Se a rch i n g f o r a p h o t o– p h o t o se a rch /p h o t osca n You can search for the recorded still picture –Photo Search function. There are two modes inPhoto Search:• Using cassette memory, you can select the recorded date which is dis...
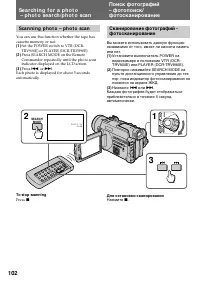
Страница 102 - Sca n n i n g p h o t o – p h o t o sca n; To st op scanning; Для остановки сканирования
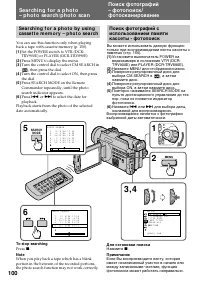
102 1 2 3 SEARCH MODE P H O T O 0 0 S C A N POWER OFF CAMERA MEMORY VTR Sca n n i n g p h o t o – p h o t o sca n You can use this function whether the tape hascassette memory or not. (1) Set the POWER switch to VTR (DCR-TRV900E) or PLAYER (DCR-TRV890E). (2) Press SEARCH MODE on the RemoteCommander ...
Страница 103 - Not e on t he t ape count er; Примечание к счетчику ленты
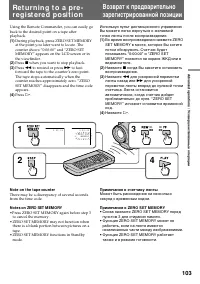
103 Advanc ed operat ions / Усовершенствованные операции Using the Remote Commander, you can easily goback to the desired point on a tape afterplayback. (1 ) During playback, press ZERO SET MEMORYat the point you later want to locate. Thecounter shows “0:00:00” and “ZERO SETMEMORY” appears on the LC...
Страница 104 - To se l e ct t h e i t e m s t o b e d i sp l a y e d; Для выбора элементов отображения
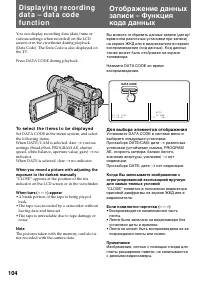
104 You can display recording data (date/time orvarious settings when recorded) on the LCDscreen or in the viewfinder during playback(Data Code). The Data Code is also displayed onthe TV. Press DATA CODE during playback. To se l e ct t h e i t e m s t o b e d i sp l a y e d Set DATA CODE in the menu...
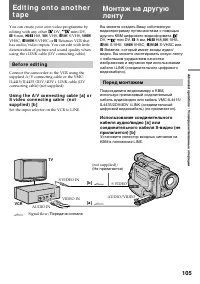
Страница 105 - Betamax VCR that; Be f o r e e d i t i n g; Set the input selector on the VCR to LINE.; Перед монтажем
105 Advanc ed operat ions / Усовершенствованные операции Ed i t i n g o n t o a n o t h e rt a p e You can create your own video programme byediting with any other DV, mini DV, h 8 mm, H Hi8, j VHS, k S-VHS, VHSC, K S-VHSC or l Betamax VCR that has audio/video inputs. You can edit with littledeter...
Страница 106 - Ed i t i n g o n t o a n o t h e r t a p e; • Press DATA CODE, SEARCH MODE on the; Монтаж на другую ленту; • Нажмите DATA CODE, SEARCH MODE на
106 Ed i t i n g o n t o a n o t h e r t a p e Not es on edit ing w hen using t he A/ Vconnect ing cable • Press DATA CODE, SEARCH MODE on the Remote Commander, or DISPLAY to turn offthe display indicators. Otherwise, the indicatorswill be recorded on the tape. • If your TV or VCR is a monaural type...
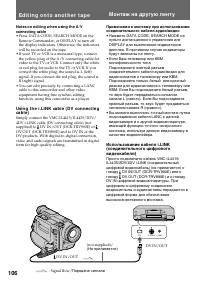
Страница 107 - To perf orm a more precise edit ing; St a r t i n g e d i t i n g; To e d i t m o r e sce n e s; Для выполнения более точного монтажа; Начните монтаж; Для монтажа других сцен
107 Advanc ed operat ions / Усовершенствованные операции Not es on edit ing w hen using t he i.LINK cable(DV connect ing cable) • You can connect one VCR only.• You can record picture, sound and system data at the same time on the DV products by usingthe i.LINK cable (DV connecting cable) only. • Yo...
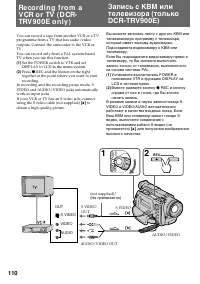
Страница 110 - Вместе нажмите кнопку
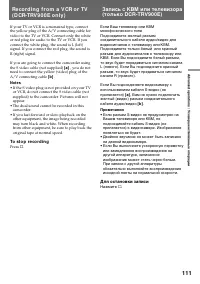
110 You can record a tape from another VCR or a TVprogramme from a TV that has audio/videooutputs. Connect the camcorder to the VCR orTV.You can record only from a PAL system-basedTV when you use this function. (1) Set the POWER switch to VTR and setDISPLAY to LCD in the menu system. (2) Press r REC...
Страница 111 - • If the S video plug is not provided on your TV; To st o p r e co r d i n g
111 Advanc ed operat ions / Усовершенствованные операции If your TV or VCR is a monaural type, connectthe yellow plug of the A/V connecting cable forvideo to the TV or VCR. Connect only the whiteor red plug for audio to the TV or VCR. If youconnect the white plug, the sound is L (left)signal. If you...
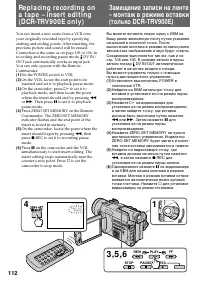
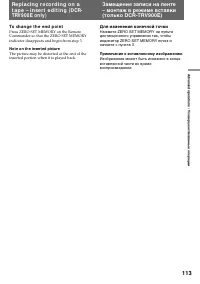
Страница 113 - To ch a n g e t h e e n d p o i n t; Not e on t he insert ed pict ure; Для изменения конечной точки; Примечание к вставленному изображению
113 Advanc ed operat ions / Усовершенствованные операции To ch a n g e t h e e n d p o i n t Press ZERO SET MEMORY on the RemoteCommander so that the ZERO SET MEMORYindicator disappears and begin from step 3. Not e on t he insert ed pict ure The picture may be distorted at the end of theinserted por...
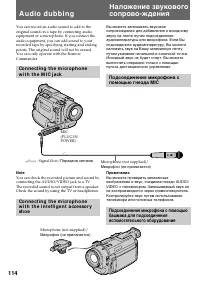
Страница 114 - A u d i o d u b b i n g; Передача сигнала
114 You can record an audio sound to add to theoriginal sound on a tape by connecting audioequipment or a microphone. If you connect theaudio equipment, you can add sound to yourrecorded tape by specifying starting and endingpoints. The original sound will not be erased.You can only operate with the...
Страница 115 - No connection is necessary.; AUDIO L; Никакие соединения не требуются.
115 Advanc ed operat ions / Усовершенствованные операции D u b b i n g w i t h t h e A UD I O/V I D EOj a ck ( D CR-TRV 9 0 0 E o n l y ) Not e The picture is not output from the AUDIO/VIDEO jack. Check the recorded picture on theLCD screen or in the viewfinder, as well as checkthe recorded sound by...
Страница 116 - To p l a y b a ck t h e n e w r e co r d e d so u n d; To end audio more precisely
116 A d d i n g a n a u d i o so u n d o n ar e co r d e d t a p e (1) Insert your recorded tape into the camcorder. (2) Set the POWER switch to VTR. (3) On the camcorder, locate the point where therecording should begin by pressing 0 or ) . Then press P to set it to playback pause mode. (4) Press A...
Страница 117 - If you make all t he connect ions
117 Advanc ed operat ions / Усовершенствованные операции A u d i o d u b b i n g If you make all t he connect ions The audio input to be recorded will takeprecedence over others in the following order.• MIC (PLUG IN POWER) jack• Intelligent accessory shoe• AUDIO/VIDEO jack *• Built-in microphone * D...
Страница 118 - Image; I n st r u ct i o n o f f u n ct i o n s; Изображение; Объяснение функций
118 This camcorder is equipped with a memory cardslot that conforms to ATA specification of PCCard standard.You can record still images to floppy disks usingthe supplied floppy disk adapter, Memory Sticks(not supplied) or PC cards (not supplied). Youcan exchange image data with other equipmentsuch a...
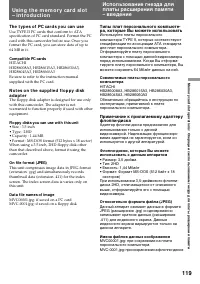
Страница 119 - Th e t y p e s o f PC ca r d s y o u ca n u se; Compat ible PC cards
119 Memory c ard s lot operat ions / Операции с использованием гнезда для платы расширения памяти Usi n g t h e m e m o r y ca r d sl o t– i n t r o d u ct i o n Th e t y p e s o f PC ca r d s y o u ca n u se Use TYPE II PC cards that conform to ATAspecification of PC card standard. Format the PCcar...
Страница 120 - N o t e s o n t h e f l o p p y d i sk; Не допускайте, чтобы адаптер стал мокрым; Примечания к флоппи-диску; • Избегайт хранения флоппи-дисков в местах,
120 Usi n g t h e m e m o r y ca r d sl o t– i n t r o d u ct i o n Be sure t o place t he adapt er on a st ablesurf ace Placing the floppy disk adapter on an unstable orslanting surface or holding the adapter by handduring operation may result not only inmalfunction of the unit but also in injury. ...
Страница 121 - A b o u t t h e p o w e r so u r ce; About t he remaining bat t ery indicat or; N o t e o n p l a y b a ck co m p a t i b i l i t y; CAUTION; Относительно источника питания; Электропитание
121 Memory c ard s lot operat ions / Операции с использованием гнезда для платы расширения памяти Usi n g t h e m e m o r y ca r d sl o t– i n t r o d u ct i o n A b o u t t h e p o w e r so u r ce When you use the memory card slot, getting thepower from a mains is recommended, using theAC power ada...
Страница 122 - MEMORY RELEASE; W hen t he access lamp is f lashing; Лампочка доступа
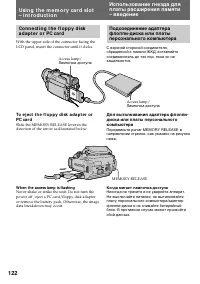
122 MEMORY RELEASE Usi n g t h e m e m o r y ca r d sl o t– i n t r o d u ct i o n Co n n e ct i n g t h e f l o p p y d i ska d a p t e r o r PC ca r d With the upper side of the connector facing theLCD panel, insert the connector until it clicks. To e j e ct t h e f l o p p y d i sk a d a p t e r ...
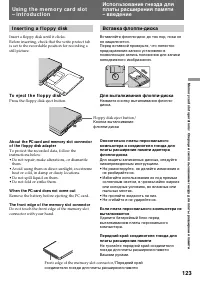
Страница 123 - I n se r t i n g a f l o p p y d i sk; To e j e ct t h e f l o p p y d i sk; W hen t he PC card does not come out; Для выталкивания флоппи-диска; • Избегайте использования их под прямым
123 Memory c ard s lot operat ions / Операции с использованием гнезда для платы расширения памяти I n se r t i n g a f l o p p y d i sk Insert a floppy disk until it clicks.Before inserting, check that the write protect tabis set to the recordable position for recording astill picture. To e j e ct t...
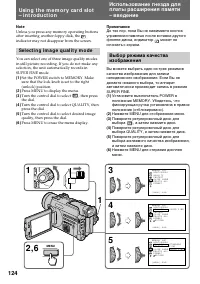
Страница 124 - Se l e ct i n g i m a g e q u a l i t y m o d e; может не
124 Not e Unless you press any memory operating buttonsafter inserting another foppy disk, the indicator may not disappear from the screen. Se l e ct i n g i m a g e q u a l i t y m o d e You can select one of three image quality modesin still picture recording. If you do not make anyselection, the ...
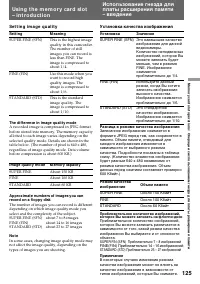
Страница 125 - Se t t i n g i m a g e q u a l i t y; Установка качества изображения; Установка; SUPER FINE
125 Memory c ard s lot operat ions / Операции с использованием гнезда для платы расширения памяти Se t t i n g i m a g e q u a l i t y Set t ing M eaning SUPER FINE (SFN) This is the highest imagequality in this camcorder.The number of stillimages you can record isless than FINE. Theimage is compres...
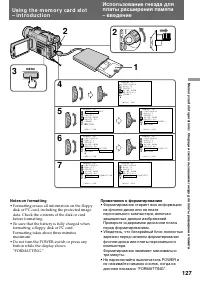
Страница 127 - Not es on f ormat t ing; • Formatting erases all information on the floppy; Примечания к форматированию; • Форматирование стирает всю информацию
127 Memory c ard s lot operat ions / Операции с использованием гнезда для платы расширения памяти 2 3 POWER OFF CAMERA MEMORY VTR MENU 2 1 4 5 7 6 M E M O R Y S E T C O N T I N U O U SQ U A L I T YP R O T E C TS L I D E S H O W D E L E T E A L L F O R M A T [ M E N U ] : E N D M E M O R Y S E T C O ...
Страница 128 - Bef ore operat ion; Перед началом операции
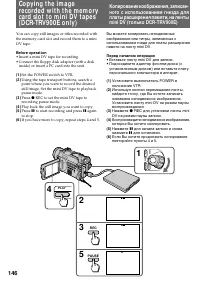
128 Re co rd i n g a n i m a g ef ro m a m i n i D V t a p ea s a st i l l i m a g e This camcorder can read moving picture datarecorded on a mini DV tape and record it as astill image on a floppy disk or a PC card. The unitcan also take in moving picture data through theinput connector and record i...
Страница 129 - The memory of the PC card or floppy disk is full.; Sound recorded on a mini DV t ape
129 Memory c ard s lot operat ions / Операции с использованием гнезда для платы расширения памяти W hen t he access lamp is f lashing Never shake or strike the unit. As well do notturn the power off , eject a PC card/floppy diskadapter or remove the battery pack. Otherwise,the image data breakdown m...
Страница 130 - Follow the steps 3 and 4 on page 128.; Соединительный
130 W hen recording t he image t hrough t heAUDIO/ VIDEO jack You can record only from a PAL system-basedTV when you use this function. (1) Turn the POWER switch to VTR and setDISPLAY to LCD in the menu system. (2) Play back the recorded tape, or turn the TV onto see the desired programme. (3) Follo...
Страница 131 - • Insert a recorded mini DV tape and rewind the; • Вставьте ленту mini DV и перемотайте ленту
131 Memory c ard s lot operat ions / Операции с использованием гнезда для платы расширения памяти Co p y i n g st i l l i m a g e sf ro m a m i n i D V t a p e– p h o t o sa v e Using the search function, you can automaticallytake in only the still images from mini DV tapesand record them on a flopp...
Страница 132 - To ca n ce l co p y i n g; Press MENU to stop copying.; Rewind the tape all the way and start copying.; Для отмены копирования; Нажмите MENU для остановки копирования.; Когда мигает лампочка доступа
132 To ca n ce l co p y i n g Press MENU to stop copying. W h e n t h e m e m o r y o f t h e f l o p p y d i sko r PC ca r d i s f u l l “MEMORY FULL” appears on the LCD screen,and the copying stops. Insert another floppy diskor PC card and repeat the procedure from step 1. W hen t he access lamp i...
Страница 133 - Insert a PC card into the unit.; W hen t he POW ER sw it ch is set t o M EM ORY
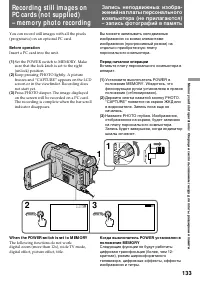
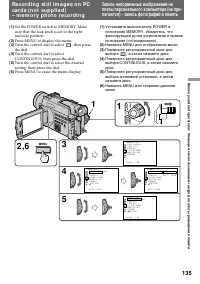
133 Memory c ard s lot operat ions / Операции с использованием гнезда для платы расширения памяти Recording st ill im ages onPC cards (not supplied)– m em ory phot o recording You can record still images with all the pixels(progressive) on an optional PC card. Bef ore operat ion Insert a PC card int...
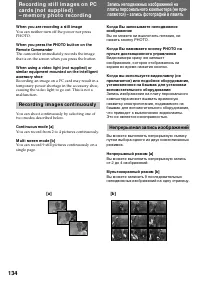
Страница 134 - W hen you are recording a st ill image; Re co r d i n g i m a g e s co n t i n u o u sl y; You can record from 2 to 4 pictures continuously.; Непрерывная запись изображений; Непрерывный режим
134 W hen you are recording a st ill image You can neither turn off the power nor pressPHOTO. W hen you press t he PHOTO but t on on t heRemot e Commander The camcorder immediately records the imagethat is on the screen when you press the button. W hen using a video light (not supplied) orsimilar eq...
Страница 136 - Se t t i n g s o f co n t i n u o u s sh o o t i n g; Set t ing; Установки непрерывной съемки; OFF
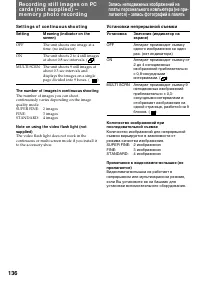
136 Se t t i n g s o f co n t i n u o u s sh o o t i n g Set t ing M eaning (indicat or on t hescreen) OFF The unit shoots one image at atime. (no indicator) ON The unit shoots 2 to 4 still imagesat about 0.8 sec intervals. ( ) MULTI SCRN The unit shoots 9 still images at about 0.3 sec intervals and...
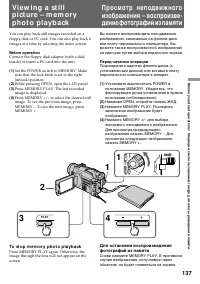
Страница 137 - To st o p m e m o r y p h o t o p l a y b a ck
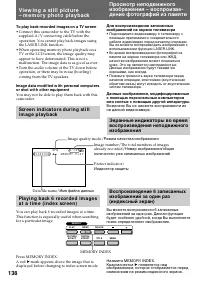
137 Memory c ard s lot operat ions / Операции с использованием гнезда для платы расширения памяти Vi e w i n g a st i l lp i ct u re – m e m o r yp h o t o p l a y b a ck You can play back still images recorded on afloppy disk or PC card. You can also play back 6images at a time by selecting the ind...
Страница 138 - To play back recorded images on a TV screen
138 To play back recorded images on a TV screen • Connect this camcorder to the TV with the supplied A/V connecting cable before theoperation. You cannot play back images usingthe LASER LINK function. • When operating memory photo playback on a TV or the LCD screen, the image quality mayappear to ha...
Страница 139 - • To display the following 6 images, keep; • Для отображения 6 следующих; Метка
139 Memory c ard s lot operat ions / Операции с использованием гнезда для платы расширения памяти • To display the following 6 images, keep pressing MEMORY +. • To display the previous 6 images, keep pressing MEMORY –. To r e t u r n t o t h e n o r m a l p l a y b a ckscr e e n ( si n g l e scr e e...
Страница 140 - Double-click on the file of the desired image.; Applicat ion; • For Macintosh, you can use the floppy disk; Прикладная программа; • Для Macintosh Вы можете использовать
140 V i e w i n g a st i l l p i ct u r e– m e m o r y p h o t o p l a y b a ck V i e w i n g t h e r e co r d e d i m a g e su si n g a p e r so n a l co m p u t e r The image data recorded with this camcorder iscompressed in the JPEG format. If your personalcomputer has an application software tha...
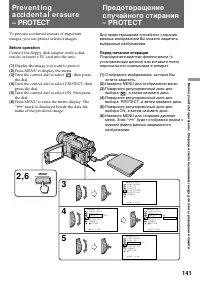
Страница 141 - Display the image you want to protect.
141 Memory c ard s lot operat ions / Операции с использованием гнезда для платы расширения памяти Pre v e n t i n ga cci d e n t a l e r a su re– PROTECT To prevent accidental erasure of importantimages, you can protect selected images. Bef ore operat ion Connect the floppy disk adapter (with a disk...
Страница 142 - To ca n ce l p r o t e ct i o n o f t h e i m a g e; Для отмены защиты изображения
142 To ca n ce l p r o t e ct i o n o f t h e i m a g e Select OFF in step 5, then press the control dial. Not e Formatting erases all information on the floppydisk, including the protected image data. Checkthe contents of the disk before formatting. Pr e v e n t i n g a cci d e n t a le r a su r e ...
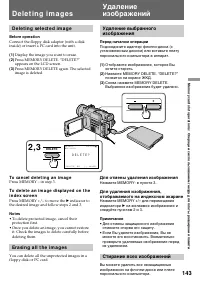
Страница 143 - D e l e t i n g se l e ct e d i m a g e; To ca n ce l d e l e t i n g a n i m a g e; Er a si n g a l l t h e i m a g e s; D e l e t i n g i m a g e s; Для отмены удаления изображения; на желаемое изображение и; • Для отмены защищенного изображения; Стирание всех изображений
143 Memory c ard s lot operat ions / Операции с использованием гнезда для платы расширения памяти D e l e t i n g se l e ct e d i m a g e Bef ore operat ion Connect the floppy disk adapter (with a diskinside) or insert a PC card into the unit. (1) Display the image you want to erase. (2) Press MEMOR...
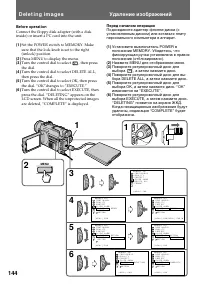
Страница 144 - Удаление изображений
144 Bef ore operat ion Connect the floppy disk adapter (with a diskinside) or insert a PC card into the unit. (1) Set the POWER switch to MEMORY. Makesure that the lock knob is set to the right(unlock) position. (2) Press MENU to display the menu. (3) Turn the control dial to select , then press the...
Страница 145 - Select; W hile “DELETING” appears; Выберите; При появлении “DELETING”
145 Memory c ard s lot operat ions / Операции с использованием гнезда для платы расширения памяти To ca n ce l d e l e t i n g a l l t h e i m a g e s o nt h e d i sk Select RETURN in step 4, then press the control dial. W hile “DELETING” appears Do not turn the POWER switch or press anybuttons. D e...
Страница 147 - To st o p co p y i n g i n t h e m i d d l e; During copying; You cannot record the index screen.; Во время копирования; Вы не можете записывать индексный экран.
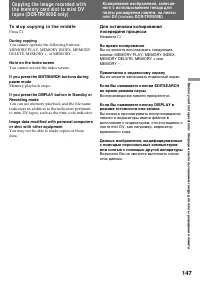
147 Memory c ard s lot operat ions / Операции с использованием гнезда для платы расширения памяти To st o p co p y i n g i n t h e m i d d l e Press π . During copying You cannot operate the following buttons :MEMORY PLAY, MEMORY INDEX, MEMORYDELETE, MEMORY +, or MEMORY –. Not e on t he index screen...
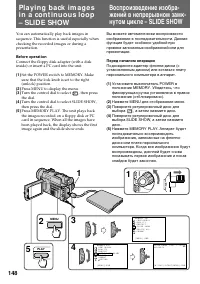
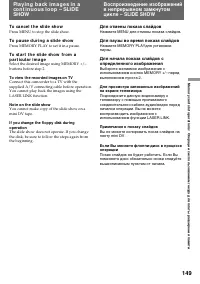
Страница 149 - To ca n ce l t h e sl i d e sh o w; Press MENU to stop the slide show.; To p a u se d u r i n g a sl i d e sh o w; Press MEMORY PLAY to set it in a pause.; To view t he recorded images on TV; Для отмены показа слайдов; Нажмите MENU для отмены показа слайдов.; Для паузы во время показа слайдов; Примечание к показу слайдов
149 Memory c ard s lot operat ions / Операции с использованием гнезда для платы расширения памяти To ca n ce l t h e sl i d e sh o w Press MENU to stop the slide show. To p a u se d u r i n g a sl i d e sh o w Press MEMORY PLAY to set it in a pause. To st a r t t h e sl i d e sh o w f r o m ap a r t...
Страница 150 - A d d i t i o n a l i n f o r m a t i o n; Usa b l e ca sse t t e s a n d; Se l e ct i n g ca sse t t e t y p e s; You can use the; Выбор типов кассет; Дополнительная информация; Используемые кассеты и
150 A d d i t i o n a l i n f o r m a t i o n Usa b l e ca sse t t e s a n d p l a y b a ck m o d e s Se l e ct i n g ca sse t t e t y p e s You can use the mini DV cassette only. You cannot use any other DV, h 8 mm, H Hi8, j VHS, k S-VHS, VHSC, K S- VHSCor l Betamax cassette. W e recommend mini D...
Страница 151 - W h e n y o u p l a y b a ck; Co p y r i g h t si g n a l; W hen playing back; A u d i o m o d e; Во время воспроизведения; Сигнал авторского права; При воспроизведении; Звуковой режим
151 Addit ional inf ormat ion / Дополнительная информация W h e n y o u p l a y b a ck Co p y r i g h t si g n a l W hen playing back Using any other video camera recorder, youcannot record on a tape that has recorded acopyright control signals for copyright protectionof software which is played bac...
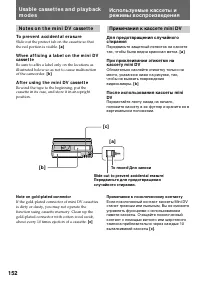
Страница 152 - N o t e s o n t h e m i n i D V ca sse t t e; To p r e v e n t a cci d e n t a l e r a su r e; Not e on gold-plat ed connect or; Примечания к кассете mini DV; Примечание к позолоченному контакту
152 N o t e s o n t h e m i n i D V ca sse t t e To p r e v e n t a cci d e n t a l e r a su r e Slide out the protect tab on the cassette so thatthe red portion is visible. [ a ] W h e n a f f i x i n g a l a b e l o n t h e m i n i D Vca sse t t e Be sure to affix a label only on the locations asi...
Страница 153 - • Or install the fully charged battery pack in the
153 Addit ional inf ormat ion / Дополнительная информация Ch a r g i n g t h e v a n a d i u m -l i t h i u m b a t t e r y i n t h eca m co rd e r Your camcorder is supplied with a vanadium-lithium battery installed so as to retain the dateand time, etc., regardless of the setting of thePOWER switc...
Страница 154 - Re se t t i n g t h e d a t e a n d t i m e; Установка даты и времени
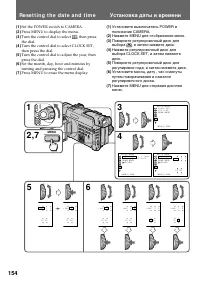
154 Re se t t i n g t h e d a t e a n d t i m e (1) Set the POWER switch to CAMERA. (2) Press MENU to display the menu. (3) Turn the control dial to select , then press the dial. (4) Turn the control dial to select CLOCK SET,then press the dial. (5) Turn the control dial to adjust the year, thenpres...
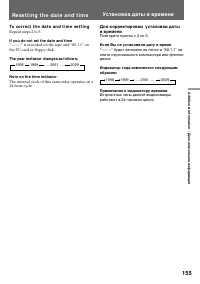
Страница 155 - To co r r e ct t h e d a t e a n d t i m e se t t i n g; If you do not set t he dat e and t ime; Повторите пункты с 2 по 5.; Если Вы не установили дату и время
155 Addit ional inf ormat ion / Дополнительная информация To co r r e ct t h e d a t e a n d t i m e se t t i n g Repeat steps 2 to 5. If you do not set t he dat e and t ime “--.--.--” is recorded on the tape and “80.1.1” onthe PC card or floppy disk. The year indicat or changes as f ollow s: Not e ...
Страница 156 - Not e on W ORLD TIM E; Примечание к WORLD TIME
156 You can easily set the clock for a local time by atime difference in the menu system. You can alsoreset the clock simply by setting the timedifference to zero. ( 1 ) While the camcorder is in Standby mode,press MENU to display the menu. ( 2 ) Turn the control dial to select , then press the dial...
Страница 157 - Pr e p a r i n g t h e b a t t e r y p a ck; A l w a y s ca r r y a d d i t i o n a l b a t t e r i e s; Подготовка батарейного блока
157 Addit ional inf ormat ion / Дополнительная информация Ti p s f o r u si n g t h eb a t t e r y p a ck This section shows you how you can get the mostout of your battery pack. Pr e p a r i n g t h e b a t t e r y p a ck A l w a y s ca r r y a d d i t i o n a l b a t t e r i e s Have sufficient ba...
Страница 158 - Ca u t i o n; появляется и начинает; Предостережение
158 W h e n t o r e p l a ce t h e b a t t e r yp a ck While you are using your camcorder, theremaining battery indicator on the LCD screen orin the viewfinder decreases gradually as batterypower is used up.The remaining time in minutes also appears. When the remaining battery indicator reaches thel...
Страница 159 - Ba t t e r y p a ck ca r e; , and keep it in a cool; Th e l i f e o f t h e b a t t e r y p a ck; • Батарейный блок всегда разряжается, даже; Срок службы батарейного блока; , видеоаппаратура будет
159 Addit ional inf ormat ion / Дополнительная информация Ba t t e r y p a ck ca r e • Remove t he bat t ery pack f rom t hecamcorder af t er using it , and keep it in a cool place. When the battery pack is installed to thecamcorder, a small amount of current flows tothe camcorder even if the POWER ...
Страница 161 - ) battery pack in 25; N o t e s o n ch a r g i n g; A b r a n d -n e w b a t t e r y p a ck; Примечания к зарядке; Совершенно новый батарейный блок
161 Addit ional inf ormat ion / Дополнительная информация W h y t h e r e m a i n i n g b a t t e r yi n d i ca t i o n d o e s n o t m a t ch t h eco n t i n u o u s r e co r d i n g t i m e i n t h eo p e r a t i n g i n st r u ct i o n The recording time is affected by theenvironmental temperatur...
Страница 162 - N o t e s o n t h e t e r m i n a l s; Be su r e t o o b se r v e t h e f o l l o w i n g; • Do not expose the battery pack to any; Примечания к контактам; Обязательно соблюдайте следующее; • Храните батарейный блок подальше от
162 N o t e s o n t h e t e r m i n a l s I f t h e t e r m i n a l s ( m e t a l p a r t s o n t h e b a ck )a r e n o t cl e a n , t h e b a t t e r y ch a r g e d u r a t i o nw i l l b e sh o r t e n e d When the terminals are not clean or when thebattery pack has not been used for a long time,r...
Страница 163 - M o i st u r e co n d e n sa t i o n; I n si d e t h e ca m co r d e r; indicator flashes. Eject; On t h e l e n s; Конденсация влаги; Внутри видеокамеры; будет; На объективе; Информация по
163 Addit ional inf ormat ion / Дополнительная информация M o i st u r e co n d e n sa t i o n If the camcorder is brought directly from a coldplace to a warm place, moisture may condenseinside the camcorder, on the surface of the tape,on the lens, on the head, or on the floppy disk. Inthis conditio...
Страница 164 - V i d e o h e a d cl e a n i n g; Очистка видеоголовок
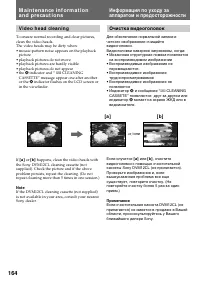
164 V i d e o h e a d cl e a n i n g To ensure normal recording and clear pictures,clean the video heads.The video heads may be dirty when:• mosaic-pattern noise appears on the playback picture • playback pictures do not move• playback pictures are hardly visible• playback pictures do not appear• th...
Страница 165 - Pr e ca u t i o n s; Ca m co r d e r o p e r a t i o n; Предосторожности; Эксплуатация видеокамеры
165 Addit ional inf ormat ion / Дополнительная информация Pr e ca u t i o n s Ca m co r d e r o p e r a t i o n • Operate the camcorder on 7.2 V (battery pack) or 8.4 V (AC power adaptor). • Should any solid object or liquid get inside the casing, unplug the camcorder and have itchecked by Sony deal...
Страница 166 - A C p o w e r a d a p t o r; Charging; Сетевой адаптер переменного тока; Зарядка
166 A C p o w e r a d a p t o r Charging • Use only an “InfoLITHIUM” type battery pack. • Place the battery pack on a flat surface without vibration during charging. • The battery pack will get hot during charging. This is normal. Ot hers • Unplug the unit from the mains when not in use for a long t...
Страница 167 - N o t e o n d r y b a t t e r i e s; If bat t ery leakage occurred; • Wipe off the liquid in the battery case carefully; Примечания к сухим батарейкам; Если случится протечка батареек
167 Addit ional inf ormat ion / Дополнительная информация N o t e o n d r y b a t t e r i e s To avoid possible damage from battery leakageor corrosion, observe the following.• Be sure to insert the batteries in the correct direction. • Dry batteries are not rechargeable.• Do not use a combination o...
Страница 168 - PAL syst em; Brazil; NTSC syst em; Источники питания; Система PAL; Бразилия; Система NTSC
168 Usi n g y o u r ca m co rd e ra b ro a d Each country or area has its own electric and TVcolour systems. Before using your camcorderabroad, check the following points. Po w e r so u r ce s You can use your camcorder in any country orarea with the supplied AC power adaptor within100 V to 240 V AC...
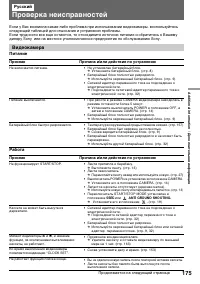
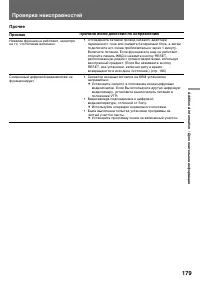
Страница 175 - Причина и/или действия по устранению; Проверка неисправностей; Продолжается на следующей странице; Видеокамера; Питание; Признак; Признак
175 Addit ional inf ormat ion / Дополнительная информация Причина и/или действия по устранению • Лента прилипла к барабану. m Вытолкните ленту. (стр. 13) • Лента закончилась. m Перемотайте ленту назад или используйте новую. (стр. 27) • Выключатель POWER не установлен в положение CAMERA. m Установите...
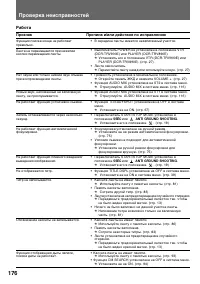
Страница 176 - Причина и/или действия по исправлению
176 Причина и/или действия по исправлению • В середине ленты имеется незаписанный участок. • Выключатель POWER не установлен в положение VTR(DCR-TRV900E) или PLAYER (DCR-TRV890E). m Установить его в положение VTR (DCR-TRV900E) илиPLAYER (DCR-TRV890E). (стр. 27) • Лента закончилась. m Перемотайте лен...
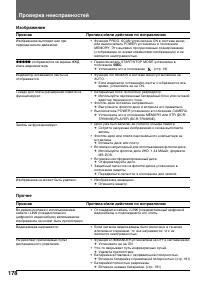
Страница 178 - Прочее
178 Причина и/или действия по исправлению • Функция PROG. SCAN установлена ON в системе меню,или выключатель POWER установлен в положениеMEMORY. Это вызвано прогрессивным сканированием(отображение со всеми элементами изображения) и неявляется неисправностью. • Переключатель START/STOP MODE установле...
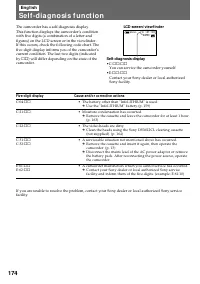
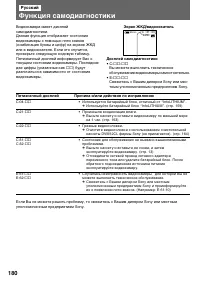
Страница 180 - Функция самодиагностики; Экран ЖКД/видоискатель; Пятизначный дисплей
180 Причина и/или действия по исправлению • Используется батарейный блок, отличный от “InfoLITHIUM”. m Используйте батарейный блок “InfoLITHIUM”. (стр. 159) • Произошла конденсация влаги. m Выньте кассету и оставьте видеокамеру по меньшей мерена 1 час. (стр. 163) • Грязные видеоголовки. m Очистите в...
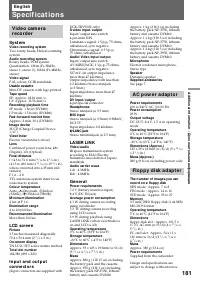
Страница 182 - Технические характеристики; Система; Экран ЖКД; LASER LINK
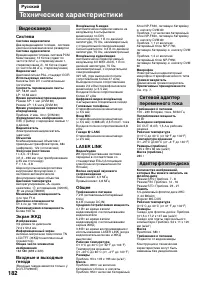
182 Русский Технические характеристики Видеокамера Система Система видеозаписи Две вращающиеся головки, системанаклонной механической развертки Система аудиозаписи Вращающиеся головки, система РСМКвантование: 12 битов (сдвиг почастоте 32 кГц, стереозвучание 1,стереозвучание 2), 16 битов (сдвигпо час...
Страница 183 - I d e n t i f y i n g t h e p a r t s
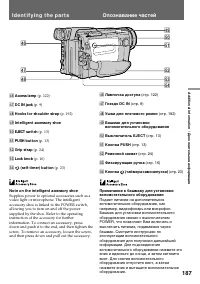
183 Addit ional inf ormat ion / Дополнительная информация I d e n t i f y i n g t h e p a r t s 1 EDITSEARCH but t ons (p. 26) 2 BACK LIGHT but t on (p. 50) 3 FADER but t on (p. 48) 4 ND FILTER but t on (p. 65) 5 AUTO LOCK select or (p. 58) 6 OPEN sw it ch (p. 27) 7 Cont rol dial (p. 34) 8 View f in...
Страница 188 - означает систему канала местного; Опознавание частей
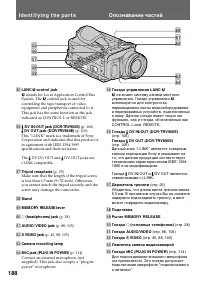
188 %§ %• %¶ %ª %∞ ^™ ^£^¢ ^¡ ^º %∞ LANC l cont rol jack l stands for Local Application Control Bus System. The l control jack is used for controlling the tape transport of videoequipment and peripherals connected to it.This jack has the same function as the jackindicated as CONTROL L or REMOTE. %§ ...
Страница 189 - Fl o p p y d i sk a d a p t e r; M emory slot connect or; Кнопка выталкивания флоппи-диска
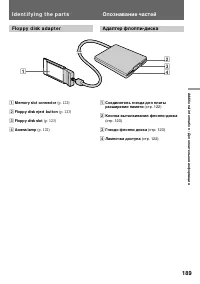
189 Addit ional inf ormat ion / Дополнительная информация 34 2 1 Fl o p p y d i sk a d a p t e r 1 M emory slot connect or (p. 122) 2 Floppy disk eject but t on (p. 123) 3 Floppy disk slot (p. 123) 4 Access lamp (p. 122) I d e n t i f y i n g t h e p a r t s 1 Соединитель гнезда для платырасширения ...
Страница 190 - Re m o t e Co m m a n d e r
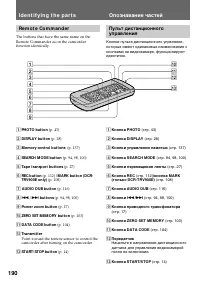
190 I d e n t i f y i n g t h e p a r t s 6789 5 4 3 2 1 !£ !™ !¡ !º Re m o t e Co m m a n d e r The buttons that have the same name on theRemote Commander as on the camcorderfunction identically. 1 PHOTO but t on (p. 43) 2 DISPLAY but t on (p. 28) 3 M emory cont rol but t ons (p. 137) 4 SEARCH M OD...
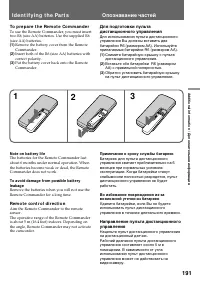
Страница 191 - I d e n t i f y i n g t h e Pa r t s; To p r e p a r e t h e Re m o t e Co m m a n d e r; Not e on bat t ery lif e; Re m o t e co n t r o l d i r e ct i o n; Примечание к сроку службы батареек
191 Addit ional inf ormat ion / Дополнительная информация I d e n t i f y i n g t h e Pa r t s To p r e p a r e t h e Re m o t e Co m m a n d e r To use the Remote Commander, you must inserttwo R6 (size AA) batteries. Use the supplied R6(size AA) batteries. (1 ) Remove the battery cover from the Rem...
Страница 192 - Not es on t he Remot e Commander; • Keep the remote sensor away from strong light; A t t a ch i n g t h e sh o u l d e r st r a p; Прикрепление плечевого ремня
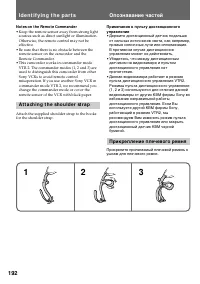
192 Not es on t he Remot e Commander • Keep the remote sensor away from strong light sources such as direct sunlight or illumination.Otherwise, the remote control may not beeffective. • Be sure that there is no obstacle between the remote sensor on the camcorder and theRemote Commander. • This camco...
Страница 193 - Op e r a t i o n i n d i ca t o r s; Рабочие индикаторы
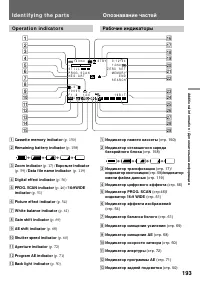
193 Addit ional inf ormat ion / Дополнительная информация Op e r a t i o n i n d i ca t o r s 1 Casset t e memory indicat or (p. 150) 2 Remaining bat t ery indicat or (p. 158) 3 Zoom indicat or (p. 17) / Exposure indicat or (p. 59) / Dat a f ile name indicat or (p. 119) 4 Digit al ef f ect indicat o...
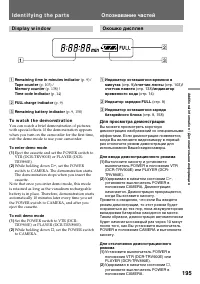
Страница 195 - To w a t ch t h e d e m o n st r a t i o n; While holding down; D i sp l a y w i n d o w; счетчик памяти; Для просмотра демонстрации; Для ввода демонстрационного режима; Удерживая в нажатом состоянии; Окошко дисплея
195 Addit ional inf ormat ion / Дополнительная информация 1 Remaining t ime in minut es indicat or (p. 9) / Tape count er (p. 103) / M emory count er (p. 138) / Time code indicat or (p. 14) 2 FULL charge indicat or (p. 9) 3 Remaining bat t ery indicat or (p. 9, 158) To w a t ch t h e d e m o n st r ...
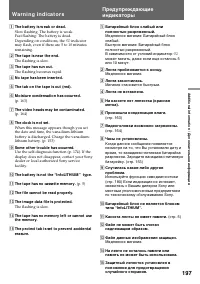
Страница 196 - : You can hear the beep sound when BEEP is; Wa r n i n g i n d i ca t o r s; : Вы можете слышать зуммерный звуковой
196 !¢ If indicators flash on the LCD screen or in theviewfinder or warning messages appear on thescreen, check the following: : You can hear the beep sound when BEEP is set to MELODY or NORMAL in the menusystem. Wa r n i n g i n d i ca t o r s 1 3 0 min 4 5 6 7 8 !º 9 C : 21: 10 40min 40min !¡ !™ M...
Страница 197 - indicator; W a r n i n g i n d i ca t o r s; Лента приближается к концу.; Мигание становится быстрым.; Произошла конденсация влаги.
197 Addit ional inf ormat ion / Дополнительная информация 1 The bat t ery is w eak or dead. Slow flashing: The battery is weak.Fast flashing: The battery is dead.Depending on conditions, the i indicator may flash, even if there are 5 to 10 minutesremaining. 2 The t ape is near t he end. The flashing...
Страница 198 - Алфавитный указатель; I n d e x
198 А, Б, В Автомобильный аккумулятор ....... 33Адаптер флоппи-диска .......... 119Введение/выведение изображения .......................... 48 Воспроизведение на телевизоре .. 88Временной код. ......................... 16 Г, Д, Е, Ж,З Гнездо для платы расширения памяти ................................


 Sony CCD-TR2300E
Инструкция по эксплуатации
Sony CCD-TR2300E
Инструкция по эксплуатации
 Sony CCD-TR3100E
Инструкция по эксплуатации
Sony CCD-TR3100E
Инструкция по эксплуатации
 Sony CCD-TR311E
Инструкция по эксплуатации
Sony CCD-TR311E
Инструкция по эксплуатации
 Sony CCD-TR315E
Инструкция по эксплуатации
Sony CCD-TR315E
Инструкция по эксплуатации
 Sony CCD-TR317E
Инструкция по эксплуатации
Sony CCD-TR317E
Инструкция по эксплуатации
 Sony CCD-TR3300E
Инструкция по эксплуатации
Sony CCD-TR3300E
Инструкция по эксплуатации
 Sony CCD-TR3400E
Инструкция по эксплуатации
Sony CCD-TR3400E
Инструкция по эксплуатации
 Sony CCD-TR411E / CCD-TR412E
Инструкция по эксплуатации
Sony CCD-TR411E / CCD-TR412E
Инструкция по эксплуатации
 Sony CCD-TR415E
Инструкция по эксплуатации
Sony CCD-TR415E
Инструкция по эксплуатации
 Sony CCD-TR417E
Инструкция по эксплуатации
Sony CCD-TR417E
Инструкция по эксплуатации
 Sony CCD-TR425E
Инструкция по эксплуатации
Sony CCD-TR425E
Инструкция по эксплуатации
 Sony CCD-TR427E
Инструкция по эксплуатации
Sony CCD-TR427E
Инструкция по эксплуатации
 Sony CCD-TR501E / CCD-TR502E
Инструкция по эксплуатации
Sony CCD-TR501E / CCD-TR502E
Инструкция по эксплуатации
 Sony CCD-TR503E / CCD-TR506E
Инструкция по эксплуатации
Sony CCD-TR503E / CCD-TR506E
Инструкция по эксплуатации
 Sony CCD-TR511E / CCD-TR512E
Инструкция по эксплуатации
Sony CCD-TR511E / CCD-TR512E
Инструкция по эксплуатации
 Sony CCD-TR515E
Инструкция по эксплуатации
Sony CCD-TR515E
Инструкция по эксплуатации
 Sony CCD-TR516E
Инструкция по эксплуатации
Sony CCD-TR516E
Инструкция по эксплуатации
 Sony CCD-TR617E
Инструкция по эксплуатации
Sony CCD-TR617E
Инструкция по эксплуатации
 Sony CCD-TR618E
Инструкция по эксплуатации
Sony CCD-TR618E
Инструкция по эксплуатации