Страница 2 - En g l i sh; camcorder. With your Digital; W ARNING; M e m o r y St i ck; ПРЕДУПРЕЖДЕНИЕ
2 En g l i sh We l co m e ! Congratulations on your purchase of this SonyDigital Handycam camcorder. With your Digital Handycam, you can capture life’s preciousmoments with superior picture and soundquality.Your Digital Handycam is loaded with advancedfeatures, but at the same time it is very easy t...
Страница 4 - Русский; Основные функции; Запись изображений на Вашем компьютере; • Цифровой вариообъектив (стр. 33) Установкой по умолчанию является
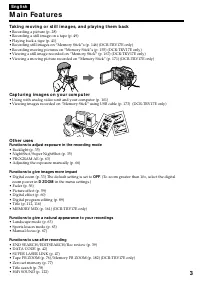
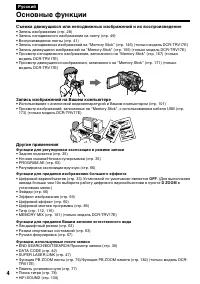
4 Русский Основные функции Съемка движущихся или неподвижных изображений и их воспроизведение • Запись изображения (стр. 28)• Запись неподвижного изображения на ленту (стр. 49)• Воспроизведение ленты (стр. 41)• Запись неподвижных изображений на “Memory Stick” (стр. 146) (только модель DCR-TRV17E)• З...
Страница 5 - Только модель DCR-TRV17E
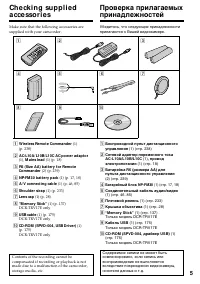
5 G etting s tarted Подготовка к эксплуатации Ch e ck i n g su p p l i e da cce sso r i e s Make sure that the following accessories aresupplied with your camcorder. Contents of the recording cannot becompensated if recording or playback is notmade due to a malfunction of the camcorder,storage media...
Страница 8 - Оглавление
8 Русский Оглавление Основные функции ................................... 4Проверка прилагаемых принадлежностей ............................... 5 Руководство по быстромузапуску ..................................................... 12 Подготовка к эксплуатации Использование данного руководства .. 14П...
Страница 9 - Дополнительная информация
9 Оглавление Запись изображения с ленты как движущегося изображения ........... 157 Наложение неподвижного изображения из “Memory Stick” на движущеесяизображение – MEMORY MIX ....... 161 Копирование неподвижных изображений с ленты – Сохранение фотоснимков впамяти .......................................
Страница 12 - Руководство по быстрому запуску; получения более подробной информации.; Установка кассеты; EJECT в
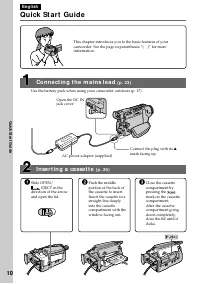
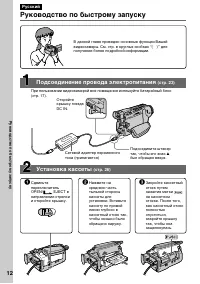
12 Руководство по быстрому запуску Русский Руководство по быстрому запуску В данной главе приведен основные функции Вашейвидеокамеры. См. стр. в круглых скобках “( )” для получения более подробной информации. Установка кассеты (стр. 26) Подсоединение провода электропитания (стр. 23) При пользовании ...
Страница 13 - Запись изображения; ПРИМЕЧАНИЕ
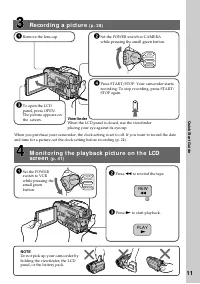
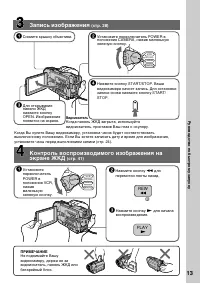
13 REW PLAY VCR CAMERA MEMORY OFF(CHG) POWER VCR CAMERA MEMORY OFF(CHG) POWER Руководство по быстрому запуску Запись изображения (стр. 28) Контроль воспроизводимого изображения на экране ЖКД (стр. 41) ПРИМЕЧАНИЕ Не поднимайте Вашувидеокамеру, держа ее завидоискатель, панель ЖКД илибатарейный блок. 1...
Страница 14 - — Ge t t i n g st a r t e d —; Usi n g t h i s m a n u a l; — Подготовка к эксплуатации —; Intelligent accessory shoe/
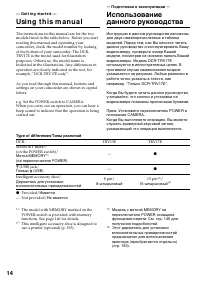
14 The instructions in this manual are for the twomodels listed in the table below. Before you startreading this manual and operating yourcamcorder, check the model number by lookingat the bottom of your camcorder. The DCR-TRV17E is the model used for illustrationpurposes. Otherwise, the model name ...
Страница 15 - N o t e o n Ca sse t t e M e m o r y
15 G etting s tarted Подготовка к эксплуатации N o t e o n Ca sse t t e M e m o r y Your camcorder is based on the DV format. Youcan only use mini DV cassettes with yourcamcorder. We recommend that you use a tapewith cassette memory . The functions which require different operationsdepending on whet...
Страница 16 - • Do not let your camcorder get wet. Keep your
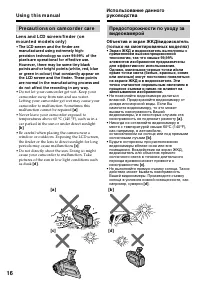
16 Usi n g t h i s m a n u a l Pr e ca u t i o n s o n ca m co r d e r ca r e Le n s a n d LCD scr e e n /f i n d e r ( o nm o u n t e d m o d e l s o n l y ) • The LCD screen and t he f inder aremanuf act ured using ext remely high-precision t echnology so over 99.99% of t hepixels are operat ional...
Страница 17 - I n st a l l i n g t h e b a t t e r y p a ck; To r e m o v e t h e b a t t e r y p a ck; Lift up the viewfinder.; If you use t he large capacit y bat t ery pack; Уcтaнoвка батарейного блока; Поднимите видоискатель вверх.; Поднимите видоискатель вверх.
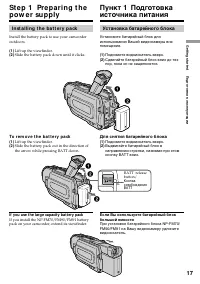
17 G etting s tarted Подготовка к эксплуатации St e p 1 Pre p a r i n g t h ep o w e r su p p l y I n st a l l i n g t h e b a t t e r y p a ck Install the battery pack to use your camcorderoutdoors. (1 ) Lift up the viewfinder. (2 ) Slide the battery pack down until it clicks. To r e m o v e t h e ...
Страница 18 - Ch a r g i n g t h e b a t t e r y p a ck; Connect the mains lead to the wall socket.; normal charge; is completed. To fully charge; St e p 1 Pr e p a r i n g t h e p o w e r; Пункт 1 Подготовка источника; нормальная зарядка; завершена. Для полной
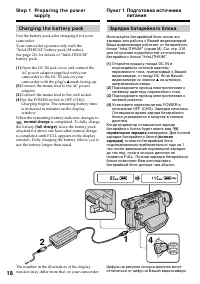
18 Ch a r g i n g t h e b a t t e r y p a ck Use the battery pack after charging it for yourcamcorder.Your camcorder operates only with the“InfoLITHIUM” battery pack (M series).See page 216 for details of “InfoLITHIUM”battery pack. (1 ) Open the DC IN jack cover and connect theAC power adaptor suppl...
Страница 19 - A f t e r ch a r g i n g t h e b a t t e r y p a ck; Not e; “FULL” appears in the display window.; Remaining bat t ery t ime indicat or; “– – – min” appears in the display window.; После зарядки батарейного блока; Примечание; Ch a r g i n g t i m e /; Батарейный блок
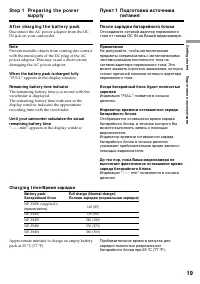
19 G etting s tarted Подготовка к эксплуатации A f t e r ch a r g i n g t h e b a t t e r y p a ck Disconnect the AC power adaptor from the DCIN jack on your camcorder. Not e Prevent metallic objects from coming into contactwith the metal parts of the DC plug of the ACpower adaptor. This may cause a...
Страница 20 - St e p 1; Re co r d i n g t i m e /; Recording w it h; * Приблизительное время непрерывной
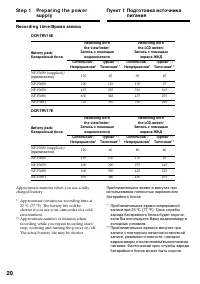
20 St e p 1 Pr e p a r i n g t h e p o w e rsu p p l y Re co r d i n g t i m e / Время записи DCR-TRV15E Recording w it h Recording w it h t he view f inder/ t he LCD screen/ Bat t ery pack/ Запись с помощью Запись с помощью Батарейный блок видоискателя экрана ЖКД Cont inuous* / Typical* * / Cont in...
Страница 21 - Pl a y i n g t i m e /; Playing t ime
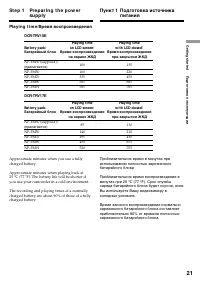
21 G etting s tarted Подготовка к эксплуатации St e p 1 Pr e p a r i n g t h e p o w e rsu p p l y Pl a y i n g t i m e / Время воспроизведения DCR-TRV15E Playing t ime Playing t ime Bat t ery pack/ on LCD screen/ w it h LCD closed/ Батарейный блок Время воспроизведения Время воспроизведения на экра...
Страница 22 - W hat is ”Inf oLITHIUM ”?
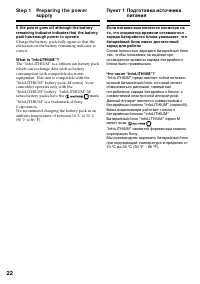
22 St e p 1 Pr e p a r i n g t h e p o w e rsu p p l y If t he pow er goes of f alt hough t he bat t eryremaining indicat or indicat es t hat t he bat t erypack has enough pow er t o operat e Charge the battery pack fully again so that theindication on the battery remaining indicator iscorrect. W ha...
Страница 23 - Co n n e ct i n g t o a w a l l so ck e t; Connect the mains lead to a wall socket.; PRECAUTION; • Place the AC power adaptor near a wall socket.; Using a car bat t ery; ПРЕДОСТЕРЕЖЕНИЕ; • Расположите сетевой адаптер переменного
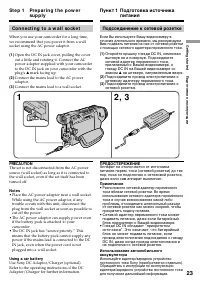
23 G etting s tarted Подготовка к эксплуатации Co n n e ct i n g t o a w a l l so ck e t When you use your camcorder for a long time,we recommend that you power it from a wallsocket using the AC power adaptor. (1 ) Open the DC IN jack cover, pulling the coverout a little and rotating it. Connect the...
Страница 24 - Turn the SEL/PUSH EXEC dial to select; Пункт 2 Установка даты
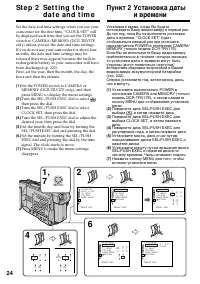
24 St e p 2 Se t t i n g t h e d a t e a n d t i m e Set the date and time settings when you use yourcamcorder for the first time. “CLOCK SET” willbe displayed each time that you set the POWERswitch to CAMERA/MEMORY (DCR-TRV17Eonly) unless you set the date and time settings.If you do not use your ca...
Страница 25 - St e p 2 Se t t i n g t h e d a t e a n d t i m e; The year changes as f ollow s:; Пункт 2 Установка даты и; Если Вы не установите дату и время
25 G etting s tarted Подготовка к эксплуатации St e p 2 Se t t i n g t h e d a t e a n d t i m e The year changes as f ollow s: If you do not set t he dat e and t ime “– –:– –:– –” is recorded on the data code of thetape and the “Memory Stick” (DCR-TRV17Eonly). Not e on t he t ime indicat or The int...
Страница 26 - Install the power source.; To e j e ct a ca sse t t e; Пункт 3 Установка; Установите источник питания.; Для извлечения кассеты
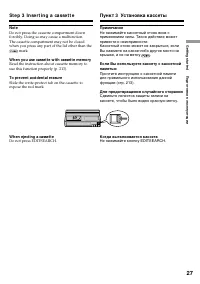
26 St e p 3 I n se r t i n g a ca sse t t e (1 ) Install the power source. (2 ) Slide OPEN/ EJECT in the direction of the arrow and open the lid. The cassettecompartment automatically lifts up andopens. (3 ) Push the middle portion of the back of thecassette to insert.Insert the cassette in a straig...
Страница 27 - St e p 3 I n se r t i n g a ca sse t t e; Do not press EDITSEARCH.; Пункт 3 Установка кассеты; Не нажимайте кнопку EDITSEARCH.
27 G etting s tarted Подготовка к эксплуатации St e p 3 I n se r t i n g a ca sse t t e Not e Do not press the cassette compartment downforcibly. Doing so may cause a malfunction.The cassette compartment may not be closedwhen you press any part of the lid other than the mark. W hen you use casset t ...
Страница 28 - — Re co r d i n g – Ba si cs —; Re co rd i n g a p i ct u re; Your camcorder automatically focuses for you.; — Запись – Основные положения —; Микрофон
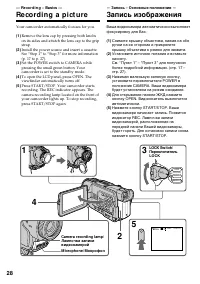
28 — Re co r d i n g – Ba si cs — Re co rd i n g a p i ct u re Your camcorder automatically focuses for you. (1 ) Remove the lens cap by pressing both knobson its sides and attatch the lens cap to the gripstrap. (2 ) Install the power source and insert a cassette.See “Step 1” to “Step 3” for more in...
Страница 29 - Not es; in the LP mode on one tape.; Примечания
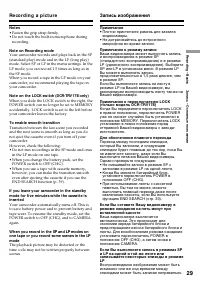
29 R ecording – B asic s Запись – Основные положения Re co r d i n g a p i ct u r e Not es • Fasten the grip strap firmly.• Do not touch the built-in microphone during recording. Not e on Recording mode Your camcorder records and plays back in the SP(standard play) mode and in the LP (long play)mode...
Страница 30 - Recording dat a; A d j u st i n g t h e LCD scr e e n; Xz; Данные записи; Регулировка экрана ЖКД; Индикатор STBY появляется в виде
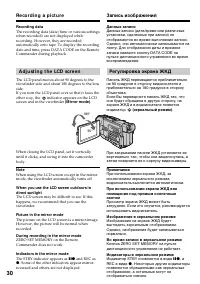
30 Re co r d i n g a p i ct u r e Recording dat a The recording data (date/time or various settingswhen recorded) are not displayed whilerecording. However, they are recordedautomatically onto tape. To display the recordingdate and time, press DATA CODE on the RemoteCommander during playback. A d j ...
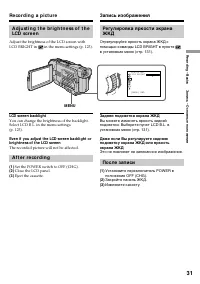
Страница 31 - LCD screen backlight; The recorded picture will not be affected.; A f t e r r e co r d i n g; M ENU; Задняя подсветка экрана ЖКД; Это не повлияет на записанное изображение.; После записи
31 R ecording – B asic s Запись – Основные положения Re co r d i n g a p i ct u r e A d j u st i n g t h e b r i g h t n e ss o f t h eLCD scr e e n Adjust the brightness of the LCD screen withLCD BRIGHT in in the menu settings (p. 123). LCD screen backlight You can change the brightness of the back...
Страница 32 - View f inder backlight; Задняя подсветка видоискателя
32 Re co r d i n g a p i ct u r e A d j u st i n g t h e v i e w f i n d e r If you record pictures with the LCD panel closed,check the picture with the viewfinder. Adjust theviewfinder lens to your eyesight so that theindicators in the viewfinder come into sharpfocus. Lift up the viewfinder and mov...
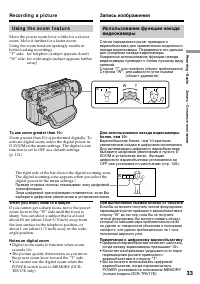
Страница 33 - При выполнении съемки близко от объекта; • Цифровой вариообъектив начинает работать,; Usi n g t h e zo o m f e a t u r e; To use zoom great er t han 10
33 R ecording – B asic s Запись – Основные положения Использование функции наездавидеокамеры Слегка передвиньте рычаг приводноговариообъектива для сравнительно медленногонаезда видеокамеры. Передвиньте его дальшедля ускорения наезда видеокамеры.Умеренное использование функции наездавидеокамеры приво...
Страница 34 - The indicators are not recorded on tapes.; Индикаторы не записываются на ленту.
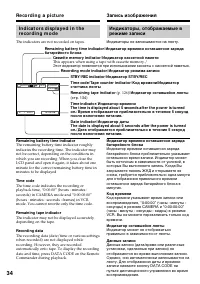
34 Re co r d i n g a p i ct u r e I n d i ca t o r s d i sp l a y e d i n t h er e co r d i n g m o d e The indicators are not recorded on tapes. Remaining bat t ery t ime indicat or The remaining battery time indicator roughlyindicates the recording time. The indicator maynot be correct, depending ...
Страница 35 - indicator appears on the screen.; Night Shot Light emit t er/; появится на экране. Для; BACK LIGHT
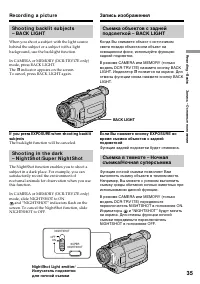
35 R ecording – B asic s Запись – Основные положения Re co r d i n g a p i ct u r e Sh o o t i n g b a ck l i t su b j e ct s– BA CK LI GHT When you shoot a subject with the light sourcebehind the subject or a subject with a lightbackground, use the backlight function. In CAMERA or MEMORY (DCR-TRV17...
Страница 36 - Usi n g Su p e r N i g h t Sh o t; и “NIGHTSHOT” будут; • Не используйте функцию ночной съемки в; Подсветка для ночной съемки
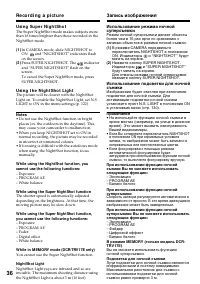
36 Re co r d i n g a p i ct u r e Usi n g Su p e r N i g h t Sh o t The Super NightShot mode makes subjects morethan 16 times brighter than those recorded in theNightShot mode. (1 ) In CAMERA mode, slide NIGHTSHOT toON. and “NIGHTSHOT” indicators flash on the screen. (2 ) Press SUPER NIGHTSHOT. The ...
Страница 37 - Se l f -t i m e r r e co r d i n g; To st o p t h e co u n t d o w n; Для остановки обратного отсчета
37 R ecording – B asic s Запись – Основные положения Se l f -t i m e r r e co r d i n g Recording with the self-timer starts in 10 secondsautomatically. You can also use the RemoteCommander for this operation. (1 ) Press MENU to display the menu settings inthe standby mode. (2 ) Turn the SEL/PUSH EX...
Страница 39 - Ch e ck i n g t h e re co rd i n g; EN D SEA RCH; You can search for the next recording start point.; END; Проверка записи; END SEARCH; кнопки
39 R ecording – B asic s Запись – Основные положения Ch e ck i n g t h e re co rd i n g – EN D SEA RCH / ED I TSEA RCH / Re cRe v i e w You can use these buttons to check the recordedpicture or shoot so that the transition between thelast recorded scene and the next scene you recordis smooth. EN D S...
Страница 40 - Re c Re v i e w; You can check the last recorded section.; End search f unct ion; The end search function may not work correctly.; Просмотр записи; Нажмите на мгновение сторону –; Функция поиска конца
40 Ch e ck i n g t h e r e co r d i n g– EN D SEA RCH / ED I TSEA RCH / Re cRe v i e w Re c Re v i e w You can check the last recorded section. Press the – 7 side of EDITSEARCH momentarily in the standby mode.The section you have stopped most recently willbe played back for a few seconds, and then y...
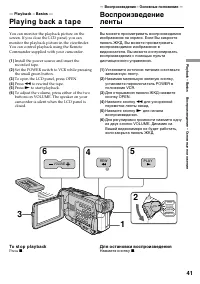
Страница 41 - — Pl a y b a ck – Ba si cs —; Pl a y i n g b a ck a t a p e; To st o p p l a y b a ck; — Воспроизведение – Основные положения —; Для остановки воспроизведения
41 P laybac k – B asic s Воспроизведение – Основные положения — Pl a y b a ck – Ba si cs — Pl a y i n g b a ck a t a p e You can monitor the playback picture on thescreen. If you close the LCD panel, you canmonitor the playback picture in the viewfinder.You can control playback using the RemoteComma...
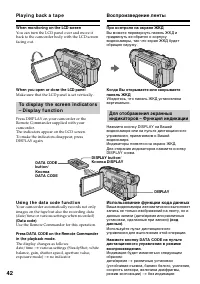
Страница 42 - W hen monit oring on t he LCD screen; Make sure that the LCD panel is set vertically.; Usi n g t h e d a t a co d e f u n ct i o n; Use the Remote Commander for this operation.; Воспроизведение ленты; При контроле на экране ЖКД; Использование функции кода данных; различные установки; DISPLAY
42 Pl a y i n g b a ck a t a p e W hen monit oring on t he LCD screen You can turn the LCD panel over and move itback to the camcorder body with the LCD screenfacing out. W hen you open or close t he LCD panel Make sure that the LCD panel is set vertically. To d i sp l a y t h e scr e e n i n d i ca...
Страница 43 - Различные установки; Not t o display various set t ings
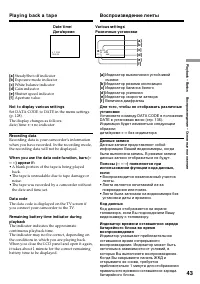
43 P laybac k – B asic s Воспроизведение – Основные положения Pl a y i n g b a ck a t a p e Dat e/ t ime/ Дата/время Various set t ings/ Различные установки [f ] [a ] [c][d ][e ] [b ] 50 AWBF1.7 9dB AUTO 4 7 200112:05:56 [a ] SteadyShot off indicator [b ] Exposure mode indicator [c] White balance in...
Страница 44 - To a d v a n ce t h e t a p e; Для ускоренной перемотки ленты вперед
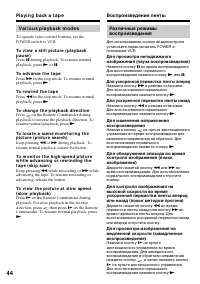
44 Pl a y i n g b a ck a t a p e V a r i o u s p l a y b a ck m o d e s To operate video control buttons, set thePOWER switch to VCR. To v i e w a st i l l p i ct u r e ( p l a y b a ckp a u se ) Press X during playback. To resume normal playback, press N or X . To a d v a n ce t h e t a p e Press M...
Страница 45 - To v i e w t h e p i ct u r e a t d o u b l e sp e e d; In t he various playback modes; В различных режимах воспроизведения
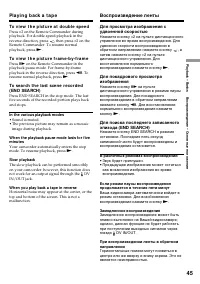
45 P laybac k – B asic s Воспроизведение – Основные положения Pl a y i n g b a ck a t a p e To v i e w t h e p i ct u r e a t d o u b l e sp e e d Press × 2 on the Remote Commander during playback. For double speed playback in thereverse direction, press , then press × 2 on the Remote Commander. To ...
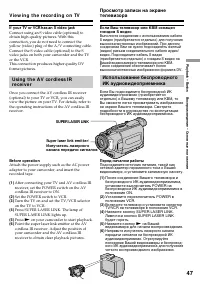
Страница 47 - If your TV or VCR has an S video jack; Set the POWER switch to VCR.; V i e w i n g t h e r e co r d i n g o n TV; Перед началом работы; Нажмите кнопку; SUPER LASER LINK
47 P laybac k – B asic s Воспроизведение – Основные положения If your TV or VCR has an S video jack Connect using an S video cable (optional) toobtain high-quality pictures. With thisconnection, you do not need to connect theyellow (video) plug of the A/V connecting cable.Connect the S video cable (...
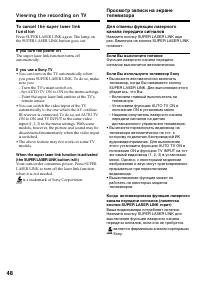
Страница 48 - If you t urn t he pow er of f; • You can turn on the TV automatically when; Если Вы выключите питание
48 V i e w i n g t h e r e co r d i n g o n TV To ca n ce l t h e su p e r l a se r l i n kf u n ct i o n Press SUPER LASER LINK again. The lamp onthe SUPER LASER LINK button goes out. If you t urn t he pow er of f The super laser link function turns offautomatically. If you use a Sony TV • You can ...
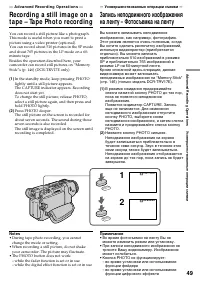
Страница 49 - — A d v a n ce d Re co r d i n g Op e r a t i o n s —; • During tape photo recording, you cannot; — Усовершенствованные операции съемки —
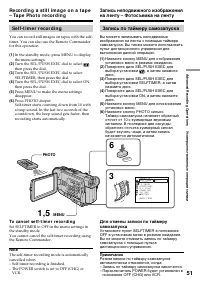
49 Advanc ed R ecording Operat ions Усовершенствованные операции съемки — A d v a n ce d Re co r d i n g Op e r a t i o n s — Recording a st ill im age on at ape – Tape Phot o recording You can record a still picture like a photograph.This mode is useful when you want to print apicture using a video...
Страница 51 - To ca n ce l se l f -t i m e r r e co r d i n g; Запись по таймеру самозапуска
51 Advanc ed R ecording Operat ions Усовершенствованные операции съемки Se l f -t i m e r r e co r d i n g You can record still images on tapes with the self-timer. You can also use the Remote Commanderfor this operation. (1 ) In the standby mode, press MENU to displaythe menu settings. (2 ) Turn th...
Страница 52 - Pr i n t i n g t h e st i l l p i ct u r e; LINE IN; Передача сигнала
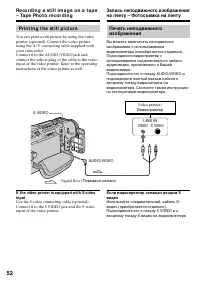
52 Re co r d i n g a st i l l i m a g e o n a t a p e– Ta p e Ph o t o r e co r d i n g Pr i n t i n g t h e st i l l p i ct u r e You can print a still picture by using the videoprinter (optional). Connect the video printerusing the A/V connecting cable supplied withyour camcorder.Connect it to the...
Страница 53 - in the; фотостудия
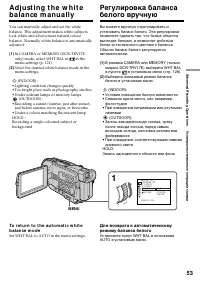
53 Advanc ed R ecording Operat ions Усовершенствованные операции съемки A d j u st i n g t h e w h i t eb a l a n ce m a n u a l l y You can manually adjust and set the whitebalance. This adjustment makes white subjectslook white and allows more natural colourbalance. Normally white balance is autom...
Страница 54 - W hen you record under f luorescent light ing; • Вы вынесли Вашу видеокамеру на улицу из; В режиме фиксации баланса белого; дамашнего помещения или наоборот.
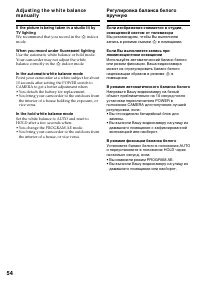
54 If t he pict ure is being t aken in a st udio lit byTV light ing We recommend that you record in the n indoor mode. W hen you record under f luorescent light ing Use the automatic white balance or hold mode.Your camcorder may not adjust the whitebalance correctly in the n indoor mode. In t he aut...
Страница 55 - Usi n g t h e w i d e m o d e; The picture; To ca n ce l t h e w i d e m o d e; Set 16:9WIDE to OFF in the menu settings.; During recording; или на; Во время записи
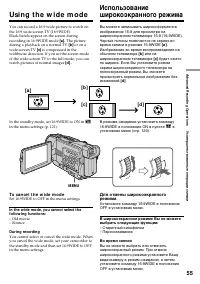
55 Advanc ed R ecording Operat ions Усовершенствованные операции съемки Usi n g t h e w i d e m o d e You can record a 16:9 wide picture to watch onthe 16:9 wide-screen TV (16:9WIDE).Black bands appear on the screen duringrecording in 16:9WIDE mode [a ]. The picture during a playback on a normal TV ...
Страница 56 - M ONOTONE; Fade in only; Usi n g t h e f a d e r f u n ct i o n; FADER; Только введение изображения
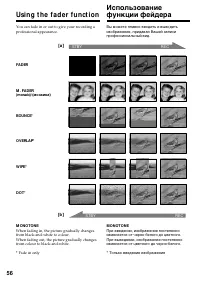
56 You can fade in or out to give your recording aprofessional appearance. M ONOTONE When fading in, the picture gradually changesfrom black-and-white to colour.When fading out, the picture gradually changesfrom colour to black-and-white. * Fade in only Usi n g t h e f a d e r f u n ct i o n FADER O...
Страница 57 - To ca n ce l t h e f a d e r f u n ct i o n; Использование функции фейдера; При введении изображения; Для отмены функции фейдера
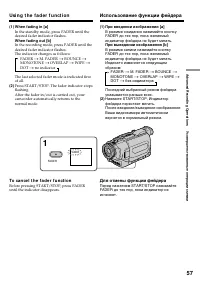
57 Advanc ed R ecording Operat ions Усовершенствованные операции съемки Usi n g t h e f a d e r f u n ct i o n (1 ) W hen f ading in [a ] In the standby mode, press FADER until thedesired fader indicator flashes. W hen f ading out [b] In the recording mode, press FADER until thedesired fader indicat...
Страница 58 - You cannot use the fader function.; установках меню
58 Usi n g t h e f a d e r f u n ct i o n Not e You cannot use the following functions whileusing the fader function. Also, you cannot usethe fader function while using the followingfunctions:– Digital effect– Low lux mode of PROGRAM AE (Overlap, Wipe, or Dot function only)(The low luxindicator flas...
Страница 59 - To ca n ce l t h e p i ct u r e e f f e ct f u n ct i o n; W hen you t urn t he pow er of f; : Цвет и яркость изображения; SEPIA; : Яркость света будет более
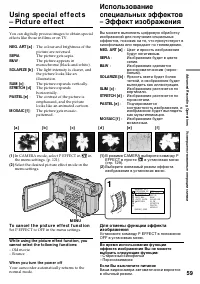
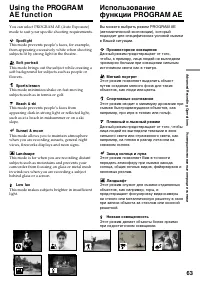
59 Advanc ed R ecording Operat ions Усовершенствованные операции съемки Usi n g sp e ci a l e f f e ct s– Pi ct u re e f f e ct You can digitally process images to obtain specialeffects like those in films or on TV. NEG. ART [a ] : The colour and brightness of the picture are reversed. SEPIA : The p...
Страница 61 - It ems t o be adjust ed
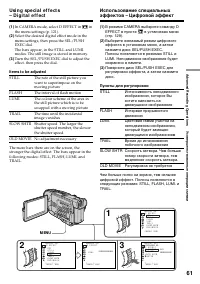
61 Advanc ed R ecording Operat ions Усовершенствованные операции съемки Usi n g sp e ci a l e f f e ct s– D i g i t a l e f f e ct (1 ) In CAMERA mode, select D EFFECT in in the menu settings (p. 121). (2 ) Select the desired digital effect mode in themenu settings, then press the SEL/PUSHEXEC dial....
Страница 62 - To ca n ce l t h e d i g i t a l e f f e ct f u n ct i o n
62 Usi n g sp e ci a l e f f e ct s– D i g i t a l e f f e ct To ca n ce l t h e d i g i t a l e f f e ct f u n ct i o n Set D EFFECT to OFF in the menu settings. Not es • The following functions do not work during digital effect:– Fader– Low lux mode of PROGRAM AE (The low lux indicator flashes.) –...
Страница 63 - Spot light
63 Advanc ed R ecording Operat ions Усовершенствованные операции съемки Usi n g t h e PROGRA MA E f u n ct i o n You can select PROGRAM AE (Auto Exposure)mode to suit your specific shooting requirements. Spot light This mode prevents people’s faces, for example,from appearing excessively white when ...
Страница 64 - Usi n g t h e PROGRA M A E f u n ct i o n; • Так как Ваша видеокамера настроена для
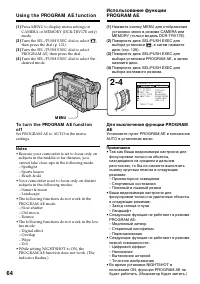
64 Usi n g t h e PROGRA M A E f u n ct i o n (1 ) Press MENU to display menu settings inCAMERA or MEMORY (DCR-TRV17E only)mode. (2 ) Turn the SEL/PUSH EXEC dial to select , then press the dial (p. 121). (3 ) Turn the SEL/PUSH EXEC dial to selectPROGRAM AE, then press the dial. (4 ) Turn the SEL/PUSH...
Страница 65 - Even if t he PROGRAM AE f unct ion is select ed; You can adjust the exposure.; Даже если выбрана функция PROGRAM AE; Вы можете отрегулировать экспозицию.
65 Advanc ed R ecording Operat ions Усовершенствованные операции съемки Usi n g t h e PROGRA M A E f u n ct i o n • While shooting in MEMORY mode (DCR- TRV17E only), the following modes do notwork (The indicator flashes.) :– Low lux– Sports lesson W hile W HT BAL is set t o AUTO in t he menuset t in...
Страница 66 - EXPOSURE; ночные сцены) с большей достоверностью; NIGHTSHOT в положение ON.
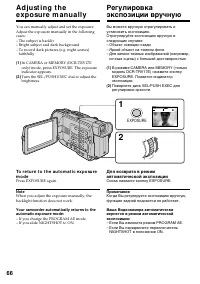
66 A d j u st i n g t h ee x p o su re m a n u a l l y You can manually adjust and set the exposure.Adjust the exposure manually in the followingcases:– The subject is backlit– Bright subject and dark background– To record dark pictures (e.g. night scenes) faithfully (1 ) In CAMERA or MEMORY (DCR-TR...
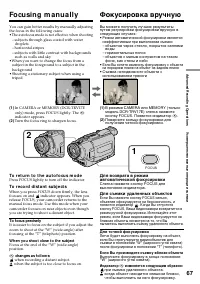
Страница 67 - Fo cu si n g m a n u a l l y; To r e t u r n t o t h e a u t o f o cu s m o d e; To f ocus precisely; Фокусировка вручную; Для съемки удаленных объектов; Для точной фокусировки
67 Advanc ed R ecording Operat ions Усовершенствованные операции съемки Fo cu si n g m a n u a l l y You can gain better results by manually adjustingthe focus in the following cases:•The autofocus mode is not effective when shooting – subjects through glass coated with water droplets – horizontal s...
Страница 68 - Время записи; Пример
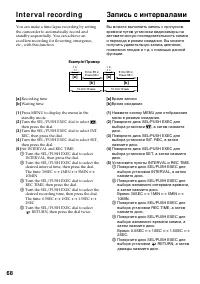
68 I n t e r v a l re co rd i n g You can make a time-lapse recording by settingthe camcorder to automatically record andstandby sequentially. You can achieve anexcellent recording for flowering, emergence,etc., with this function. [a ] Recording time [b ] Waiting time (1 ) Press MENU to display the...
Страница 69 - I n t e r v a l r e co r d i n g; Запись с интервалами
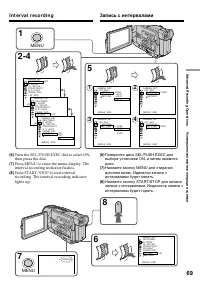
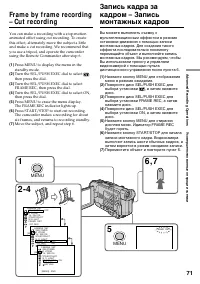
69 Advanc ed R ecording Operat ions Усовершенствованные операции съемки I n t e r v a l r e co r d i n g 1 5 2 -4 1 2 3 4 CAMERA SET SELFTIMER OFFD ZOOM16 : 9W I DESTEADYSHOTN. S. LIGHTFRAME REC I NT. REC [MENU] : END CAMERA SET SELFTIMERD ZOOM16 : 9W I DESTEADYSHOTN. S. LIGHTFRAME REC I NT. REC RET...
Страница 70 - To ca n ce l t h e i n t e r v a l r e co r d i n g; On recording t ime; Для отмены записи с интервалами; • Установите пункт INT. REC в положение; Относительно времени записи
70 I n t e r v a l r e co r d i n g To ca n ce l t h e i n t e r v a l r e co r d i n g • Set INT. REC to OFF in the menu settings.• Set the POWER switch to OFF (CHG), VCR or MEMORY (DCR-TRV17E only). To st o p t h e i n t e r v a l r e co r d i n gm o m e n t a r i l y a n d p e r f o r m n o r m a...
Страница 71 - Переместите объект и повторите пункт 6.
71 Advanc ed R ecording Operat ions Усовершенствованные операции съемки Fr a m e b y f r a m e re co rd i n g– Cu t re co rd i n g You can make a recording with a stop-motionanimated effect using cut recording. To createthis effect, alternately move the subject a littleand make a cut recording. We r...
Страница 72 - To ca n ce l t h e cu t r e co r d i n g; Not es on cut recording; if you use this function continuously.; Примечания к записи монтажных кадров
72 Fr a m e b y f r a m e r e co r d i n g– Cu t r e co r d i n g To ca n ce l t h e cu t r e co r d i n g • Set FRAME REC to OFF in the menu settings.• Set the POWER switch to OFF (CHG), VCR or MEMORY (DCR-TRV17E only). Not es on cut recording • The last recorded cut is longer than other cuts.• The...
Страница 73 - — A d v a n ce d Pl a y b a ck Op e r a t i o n s —; in the menu settings; Set P EFFECT to OFF in the menu settings.; • You cannot process the picture that is input; — Усовершенствованные операции воспроизведения —; в установках меню; • Вы не можете обработать изображение,
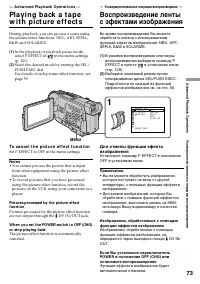
73 Advanc ed P laybac k Operat ions Усовершенствованные операции воспроизведения — A d v a n ce d Pl a y b a ck Op e r a t i o n s — Pl a y i n g b a ck a t a p ew i t h p i ct u re e f f e ct s During playback, you can process a scene usingthe picture effect functions: NEG. ART, SEPIA,B&W and S...
Страница 74 - Set D EFFECT to OFF in the menu settings.; Для отмены функции цифрового эфекта
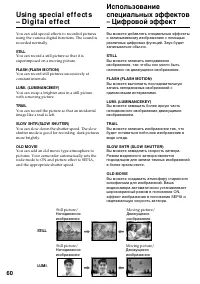
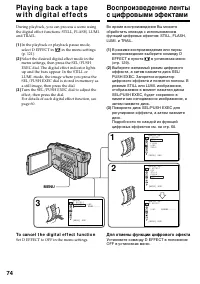
74 During playback, you can process a scene usingthe digital effect functions: STILL, FLASH, LUMI.and TRAIL. (1 ) In the playback or playback pause mode,select D EFFECT in in the menu settings (p. 121). (2 ) Select the desired digital effect mode in themenu settings, then press the SEL/PUSHEXEC dial...
Страница 75 - • Вы не можете обрабатывать эпизоды,
75 Advanc ed P laybac k Operat ions Усовершенствованные операции воспроизведения Pl a y i n g b a ck a t a p e w i t h d i g i t a le f f e ct s Not es • You cannot process externally input scenes using the digital effect function. • To record pictures that you have processed using the digital effec...
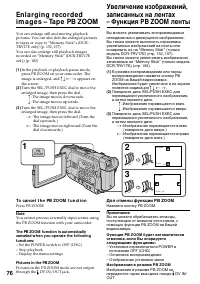
Страница 76 - appears on; To ca n ce l t h e PB ZOOM f u n ct i o n; :Изображение перемещается влево; Для отмены функции PB ZOOM; Нажмите кнопку PB ZOOM.; – Установка переключателя POWER в; Изображения в режиме PB ZOOM
76 En l a r g i n g re co rd e di m a g e s – Ta p e PB ZOOM You can enlarge still and moving playbackpictures. You can also dub the enlarged picturesto tapes or copy to “Memory Stick”s (DCR-TRV17E only) (p. 152, 157).You can also enlarge still playback imagesrecorded on “Memory Stick” (DCR-TRV17Eon...
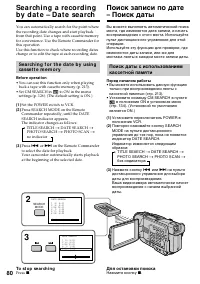
Страница 78 - Bef ore operat ion; To st o p se a r ch i n g; Для остановки поиска
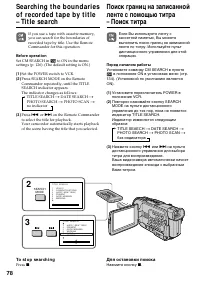
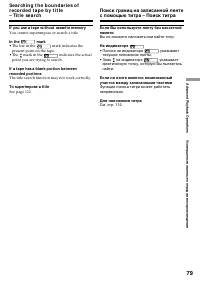
78 If you use a tape with cassette memory,you can search for the boundaries ofrecorded tape by title. Use the RemoteCommander for this operation. Bef ore operat ion Set CM SEARCH in to ON in the menu settings (p. 126). (The default setting is ON.) (1 ) Set the POWER switch to VCR. (2 ) Press SEARCH ...
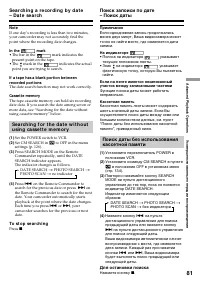
Страница 79 - If you use a t ape w it hout casset t e memory
79 Advanc ed P laybac k Operat ions Усовершенствованные операции воспроизведения If you use a t ape w it hout casset t e memory You cannot superimpose or search a title. In t he mark • The bar in the mark indicates the present point on the tape. • The mark in the indicates the actual point you are t...
Страница 83 - In t he; На индикаторе
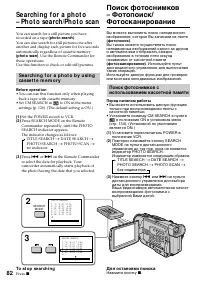
83 Advanc ed P laybac k Operat ions Усовершенствованные операции воспроизведения Se a r ch i n g f o r a p h o t o– Ph o t o se a r ch /Ph o t o sca n In t he mark • The bar in the mark indicates the present point on the tape. • The mark in the indicates the actual point you are trying to search. If...
Страница 84 - Sca n n i n g p h o t o; To st o p sca n n i n g; Фотосканирование; Для остановки сканирования
84 Se a r ch i n g f o r a p h o t o– Ph o t o se a r ch /Ph o t o sca n Sca n n i n g p h o t o (1 ) Set the POWER switch to VCR. (2 ) Press SEARCH MODE on the RemoteCommander repeatedly, until the PHOTOSCAN indicator appears.The indicator changes as follows: DATE SEARCH t PHOTO SEARCH t PHOTO SCAN...
Страница 85 - — Ed i t i n g —; D u b b i n g a t a p e; Usi n g t h e A /V co n n e ct i n g ca b l e; • Set DISPLAY to LCD in the menu settings. (The; — Монтаж —; Перезапись ленты
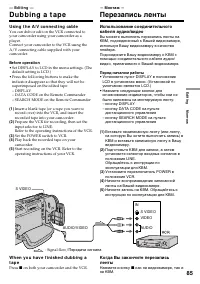
85 E diting Монтаж — Ed i t i n g — D u b b i n g a t a p e Usi n g t h e A /V co n n e ct i n g ca b l e You can dub or edit on the VCR connected toyour camcorder using your camcorder as aplayer.Connect your camcorder to the VCR using theA/V connecting cable supplied with yourcamcorder. Bef ore ope...
Страница 86 - If your VCR is a monaural t ype; Digital8; Если Ваш КВМ монофонического типа
86 D u b b i n g a t a p e You can edit on VCRs t hat support t hef ollow ing syst ems 8 mm, Hi8, VHS, S-VHS, VHSC, S-VHSC, Betamax, mini DV, DV, Digital8 If your VCR is a monaural t ype Connect the yellow plug of the A/V connectingcable to the video input jack and the white or thered plug to the au...
Страница 88 - See page 218 for more information about i.LINK.
88 D u b b i n g a t a p e You can connect one VCR only using t he i.LINKcable (DV connect ing cable) See page 218 for more information about i.LINK. The f ollow ing f unct ions do not w ork duringdigit al edit ing: – Digital effect– PB ZOOM– Picture effect If you record a playback pause pict ure w ...
Страница 89 - St ep; St e p 1 : Co n n e ct i n g t h e V CR; Пункт 1; Пункт 1: Подсоединение КВМ; Поменять порядок
89 E diting Монтаж D u b b i n g o n l y d e si re dsce n e s – D i g i t a lp ro g r a m e d i t i n g You can duplicate selected scenes (programmes)for editing onto a tape without operating theVCR.Scenes can be selected by frame. You can set upto 20 programmes. Be f o r e o p e r a t i n g t h e D...
Страница 90 - • Вы не можете перезаписывать титры,; Установка кода IR SETUP
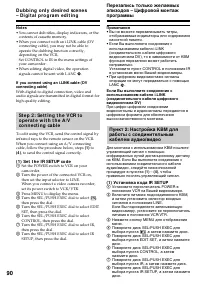
90 D u b b i n g o n l y d e si r e d sce n e s– D i g i t a l p r o g r a m e d i t i n g Not es • You cannot dub titles, display indicators, or the contents of cassette memory. • When you connect with an i.LINK cable (DV connecting cable), you may not be able tooperate the dubbing function correct...
Страница 92 - Компонент телевизор/КВМ; Not e on IR SETUP code
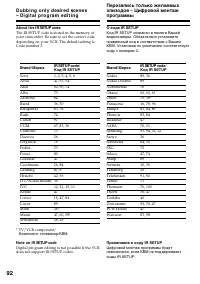
92 D u b b i n g o n l y d e si r e d sce n e s– D i g i t a l p r o g r a m e d i t i n g * TV/VCR component/ Компонент телевизор/КВМ Not e on IR SETUP code Digital program editing is not possible if the VCRdoes not support IR SETUP codes. About t he IR SETUP code The IR SETUP code is stored in the...
Страница 93 - ( 2 ) Se t t i n g t h e m o d e s t o ca n ce l; Кнопки для отмены паузы записи на КВМ
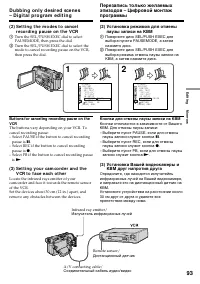
93 E diting Монтаж D u b b i n g o n l y d e si r e d sce n e s– D i g i t a l p r o g r a m e d i t i n g ( 2 ) Se t t i n g t h e m o d e s t o ca n ce l r e co r d i n g p a u se o n t h e V CR 1 Turn the SEL/PUSH EXEC dial to selectPAUSEMODE, then press the dial. 2 Turn the SEL/PUSH EXEC dial to...
Страница 94 - ( 4 ) Co n f i r m i n g V CR o p e r a t i o n; W hen t he VCR does not operat e correct ly; • After checking the code in “About the IR; Подтверждение работы КВМ; • После проверки кода в пункте “О коде IR
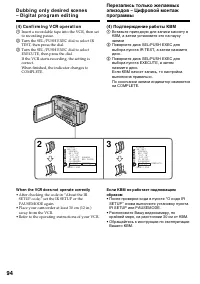
94 D u b b i n g o n l y d e si r e d sce n e s– D i g i t a l p r o g r a m e d i t i n g ( 4 ) Co n f i r m i n g V CR o p e r a t i o n 1 Insert a recordable tape into the VCR, then setto recording pause. 2 Turn the SEL/PUSH EXEC dial to select IRTEST, then press the dial. 3 Turn the SEL/PUSH EXE...
Страница 95 - Press MENU to display the menu.
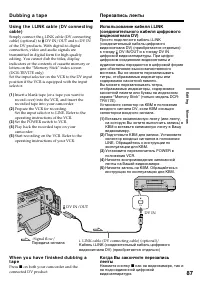
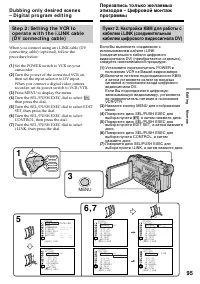
95 E diting Монтаж D u b b i n g o n l y d e si r e d sce n e s– D i g i t a l p r o g r a m e d i t i n g St e p 2 : Se t t i n g t h e V CR t oo p e r a t e w i t h t h e i .LI N K ca b l e( D V co n n e ct i n g ca b l e ) When you connect using an i.LINK cable (DVconnecting cable) (optional), fo...
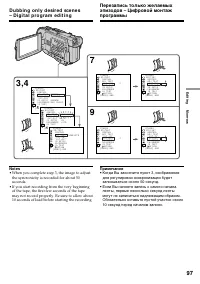
Страница 97 - • When you complete step 3, the image to adjust; • Когда Вы закончите пункт 3, изображение
97 E diting Монтаж D u b b i n g o n l y d e si r e d sce n e s– D i g i t a l p r o g r a m e d i t i n g 3 ,4 7 9 O T H E R S E D I T S E T C O N T R O LA D J T E S T ” C U T - I N ”” C U T - O U T ” I R S E T U P P A U S E MO D E I R T E S T R E T U R NE X E C U T E [ M E R E C P A U S E E N G A ...
Страница 98 - Действие 1: Создание программы
98 D u b b i n g o n l y d e si r e d sce n e s– D i g i t a l p r o g r a m e d i t i n g Op e r a t i o n 1 : M a k i n g t h ep r o g r a m m e (1 ) Insert the tape for playback into yourcamcorder, and insert a tape for recordinginto the VCR. (2 ) Press MENU to display the menu. (3 ) Turn the SEL...
Страница 99 - Er a si n g t h e p r o g r a m m e y o u h a v e se t; To cancel erasing; Er a si n g a l l p r o g r a m m e s; To cancel erasing all programmes; Select RETURN in step 2.; To cancel a programme you have set; Выберите команду RETURN в пункте 2.; Для отмены стирания всех программ; Выберите команду RETURN в пункте 2.
99 E diting Монтаж D u b b i n g o n l y d e si r e d sce n e s– D i g i t a l p r o g r a m e d i t i n g Er a si n g t h e p r o g r a m m e y o u h a v e se t Erase OUT first and then IN from the last setprogramme. (1 ) Turn the SEL/PUSH EXEC dial to selectUNDO, then press the dial. (2 ) Turn the...
Страница 101 - Af t er capt uring images and sound; Использование с аналоговой; Установите функцию A/V; После записи изображений и звука
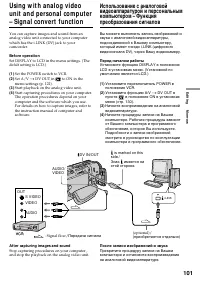
101 E diting Монтаж You can capture images and sound from ananalog video unit connected to your computerwhich has the i.LINK (DV) jack to yourcamcorder. Bef ore operat ion Set DISPLAY to LCD in the menu settings. (Thedefalt setting is LCD.) (1 ) Set the POWER switch to VCR. (2 ) Set A/V t DV OUT in ...
Страница 102 - • You need to install software which can; • Вам необходимо установить программное
102 Usi n g w i t h a n a l o g v i d e o u n i t a n dp e r so n a l co m p u t e r– Si g n a l co n v e r t f u n ct i o n Not es • You need to install software which can exchange video signals. • Depending on the condition of the analog video signals, the computer may not be able to outputthe ima...
Страница 103 - TV
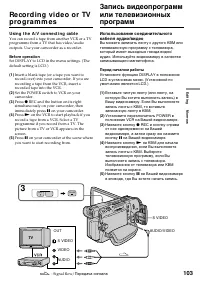
103 E diting Монтаж Re co rd i n g v i d e o o r TVp ro g r a m m e s Usi n g t h e A /V co n n e ct i n g ca b l e You can record a tape from another VCR or a TVprogramme from a TV that has video/audiooutputs. Use your camcorder as a recorder. Bef ore operat ion Set DISPLAY to LCD in the menu setti...
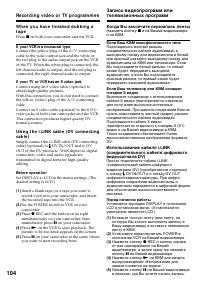
Страница 104 - Re co r d i n g v i d e o o r TV p r o g r a m m e s; Когда Вы закончите перезапись ленты
104 W h e n y o u h a v e f i n i sh e d d u b b i n g at a p e Press x on both your camcorder and the VCR. If your VCR is a monaural t ype Connect the yellow plug of the A/V connectingcable to the video output jack and the white orthe red plug to the audio output jack on the VCRor the TV. When the ...
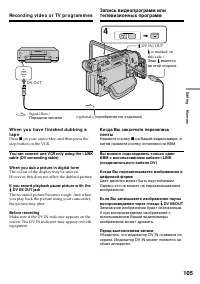
Страница 105 - W hen you dub a pict ure in digit al f orm; DV OUT; Перед выполнением записи
105 E diting Монтаж W h e n y o u h a v e f i n i sh e d d u b b i n g at a p e Press x on your camcorder, and then press the stop button on the VCR. You can connect one VCR only using t he i.LINKcable (DV connect ing cable) W hen you dub a pict ure in digit al f orm The colour of the display may be...
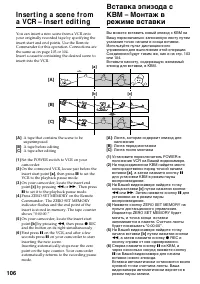
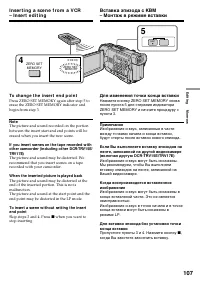
Страница 107 - To ch a n g e t h e i n se r t e n d p o i n t; Skip steps 3 and 4. Press; Для изменения точки конца вставки; Пропустите пункты 3 и 4. Нажмите кнопку
107 E diting Монтаж To ch a n g e t h e i n se r t e n d p o i n t Press ZERO SET MEMORY again after step 5 toerase the ZERO SET MEMORY indicator andbegin from step 3. Not e The picture and sound recorded on the portionbetween the insert start and end points will beerased when you insert the new sce...
Страница 108 - A u d i o d u b b i n g; Intelligent Accessory Shoe/; Аудиоперезапись
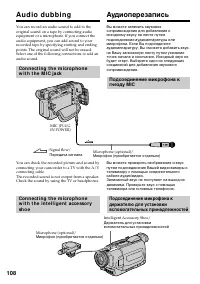
108 You can record an audio sound to add to theoriginal sound on a tape by connecting audioequipment or a microphone. If you connect theaudio equipment, you can add sound to yourrecorded tape by specifying starting and endingpoints. The original sound will not be erased.Select one of the following c...
Страница 109 - No connection is necessary.; AUDIO L
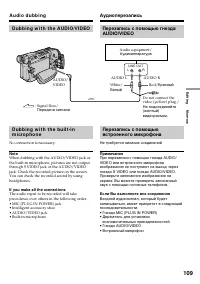
109 E diting Монтаж A u d i o d u b b i n g D u b b i n g w i t h t h e A UD I O/V I D EO D u b b i n g w i t h t h e b u i l t -i nm i cr o p h o n e No connection is necessary. Not e When dubbing with the AUDIO/VIDEO jack orthe built-in microphone, pictures are not outputthrough S VIDEO jack or th...
Страница 110 - To p l a y b a ck t h e so u n d; AUDIO DUB; Для воспроизведения звука
110 A u d i o d u b b i n g A d d i n g a n a u d i o so u n d o n ar e co r d e d t a p e (1 ) Insert the recorded tape into your camcorder. (2 ) Set the POWER switch to VCR on yourcamcorder. (3 ) Locate the recording start point by pressing N on the Remote Commander. Then press X at the point wher...
Страница 111 - • New sound cannot be recorded on a tape; To add new sound more precisely; • Новый звук не может быть записан на
111 E diting Монтаж A u d i o d u b b i n g Not es • New sound cannot be recorded on a tape already recorded in the 16-bit mode (32 kHz,44.1 kHz or 48 kHz) (p. 126). • New sound cannot be recorded on a tape already recorded in the LP mode (p. 126). • You cannot add audio with the DV IN/OUT jack. • Y...
Страница 112 - Su p e r i m p o si n g a t i t l e; VACATION; Наложение титра; в установках меню, а
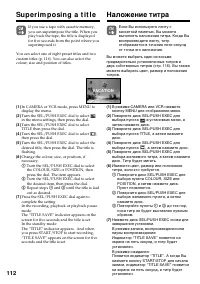
112 If you use a tape with cassette memory,you can superimpose the title. When youplay back the tape, the title is displayedfor five seconds from the point where yousuperimposed it. You can select one of eight preset titles and twocustom titles (p. 116). You can also select thecolour, size and posit...
Страница 113 - Для использования собственного титра
113 E diting Монтаж Su p e r i m p o si n g a t i t l e 4 PRESET TITLE HELLO!HAPPY BIRTHDAYHAPPY HOLIDAYSCONGRATULATIONS!OUR SWEET BABYWEDDINGVACATIONTHE END [MENU] : END PRESET TITLE HELLO!HAPPY BIRTHDAYHAPPY HOLIDAYSCONGRATULATIONS!OUR SWEET BABYWEDDINGVACATIONTHE END RETURN [MENU] : END PRESET TI...
Страница 114 - Tit le set t ing; Установка титра; • Цвета титра изменяются следующим; Если появится знак “
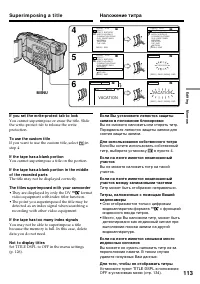
114 Su p e r i m p o si n g a t i t l e Tit le set t ing • The title colour changes as follows: WHITE y YELLOW y VIOLET y RED y CYAN y GREEN y BLUE • The title size changes as follows: SMALL y LARGE You cannot input 13 characters or more for aLARGE size. • If you select the title size “SMALL,” you h...
Страница 115 - Er a si n g a t i t l e; To ca n ce l e r a si n g a t i t l e; Select RETURN in step 6.; Для отмены стирания титра; Выберите установку RETURN в пункте 6.
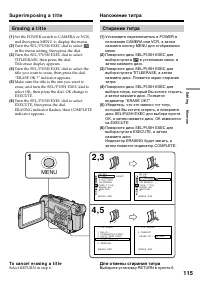
115 E diting Монтаж Er a si n g a t i t l e (1 ) Set the POWER switch to CAMERA or VCR,and then press MENU to display the menu. (2 ) Turn the SEL/PUSH EXEC dial to select in the menu setting, then press the dial. (3 ) Turn the SEL/PUSH EXEC dial to selectTITLEERASE, then press the dial.Title erase d...
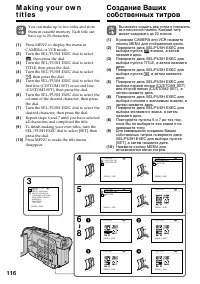
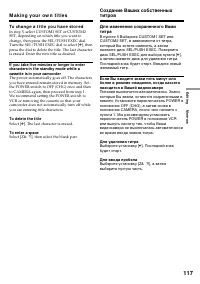
Страница 117 - To ch a n g e a t i t l e y o u h a v e st o r e d; To delet e t he t it le; M a k i n g y o u r o w n t i t l e s; Для удаления титра
117 E diting Монтаж To ch a n g e a t i t l e y o u h a v e st o r e d In step 5, select CUSTOM1 SET or CUSTOM2SET, depending on which title you want tochange, then press the SEL/PUSH EXEC dial.Turn the SEL/PUSH EXEC dial to select [ C ], then press the dial to delete the title. The last characteris...
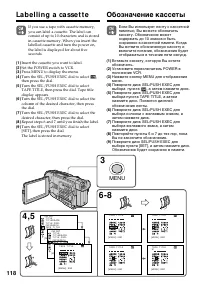
Страница 118 - La b e l l i n g a ca sse t t e; Insert the cassette you want to label.; Обозначение кассеты
118 La b e l l i n g a ca sse t t e If you use a tape with cassette memory,you can label a cassette. The label canconsist of up to 10 characters and is storedin cassette memory. When you insert thelabelled cassette and turn the power on,the label is displayed for about fiveseconds. (1) Insert the ca...
Страница 119 - To e r a se a ch a r a ct e r; If t he; Для стирания знака; Последний знак будет стерт.; Если в пункте 5 появляется знак
119 E diting Монтаж To e r a se a ch a r a ct e r In step 6 turn the SEL/PUSH EXEC dial to select[ C ], then press the dial. The last character is erased. To ch a n g e t h e l a b e l y o u h a v e m a d e Insert the cassette to change the label, andoperate in the same way to make a new label. If y...
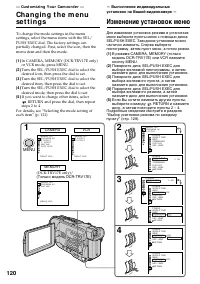
Страница 120 - — Cu st o m i zi n g Y o u r Ca m co r d e r —; If you want to change other items, select; Изменение установок меню; RETURN и нажмите
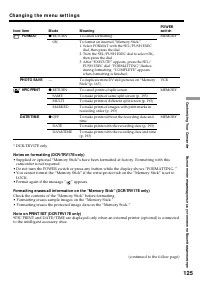
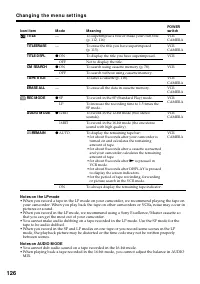
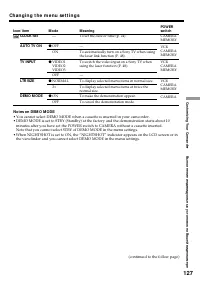
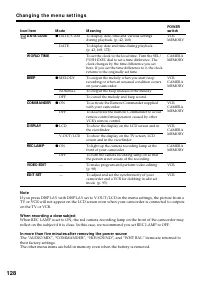
120 — Cu st o m i zi n g Y o u r Ca m co r d e r — Ch a n g i n g t h e m e n use t t i n g s To change the mode settings in the menusettings, select the menu items with the SEL/PUSH EXEC dial. The factory settings canpartially changed. First, select the icon, then themenu item and then the mode. (1...
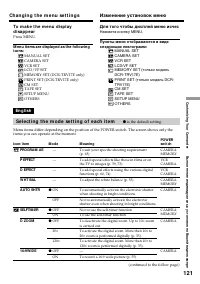
Страница 129 - Выбор установки режима по каждому пункту; означает установку по умолчанию
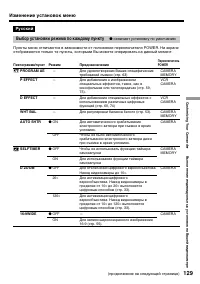
129 C ustomizing Your C amc order Выполнение индивидуальных установок на Вашей видеокамере Изменение установок меню Русский Выбор установки режима по каждому пункту z означает установку по умолчанию Пункты меню отличаются в зависимости от положения переключателя POWER. На экранеотображаются только т...
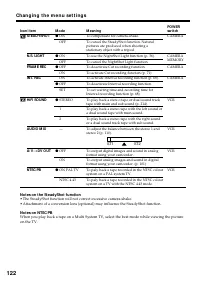
Страница 130 - Примечания к функции устойчивой съекмки; функцию устойчивой съемки.; Примечание к режиму NTSC PB
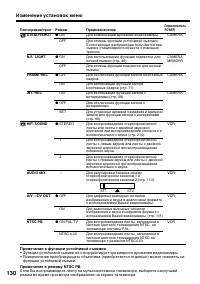
130 Изменение установок меню Пиктограмма/пункт STEADYSHOT N.S. LIGHT FRAME REC INT. REC HiFi SOUND AUDIO MIX A/V t DV OUT NTSC PB Режим z ON OFF z ON OFF z OFF ON ON z OFF SET z STEREO 1 2 — z OFF ON z ON PAL TV NTSC 4.43 Предназначение Для компенсации дрожания видеокамеры. Для отмены функции устойч...
Страница 134 - Примечания к режиму LP; регулировать баланс в установке AUDIO MIX.
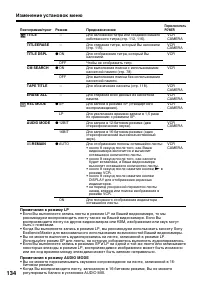
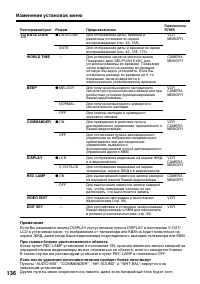
134 Изменение установок меню Пиктограмма/пункт TITLE TITLEERASE TITLE DSPL CM SEARCH TAPE TITLE ERASE ALL REC MODE AUDIO MODE q REMAIN Режим — — z ON OFF z ON OFF — — z SP LP z 12BIT 16BIT z AUTO ON Предназначение Для наложения титра или создания Вашегособственного титра (стр. 112, 116). Для стирани...
Страница 135 - Примечания к режиму DEMO MODE
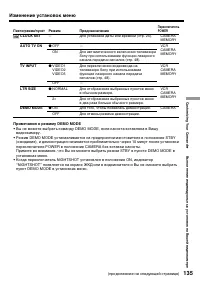
135 C ustomizing Your C amc order Выполнение индивидуальных установок на Вашей видеокамере Изменение установок меню Пиктограмма/пункт CLOCK SET AUTO TV ON TV INPUT LTR SIZE DEMO MODE Примечания к режиму DEMO MODE • Вы не можете выбрать команду DEMO MODE, если кассета вставлена в Вашу видеокамеру. • ...
Страница 137 - — “ M e m o r y St i ck ” o p e r a t i o n s —; – D CR-TRV 1 7 E o n l y; Typical image dat a f ile name; Usi n g a “ M e m o r y St i ck ”; — Операции с “Memory Stick” —; О формате файлов; Типичное имя файла данных изображения; Использование “Memory Stick”
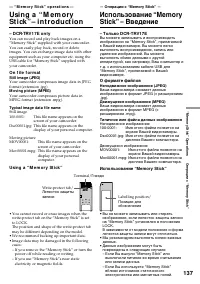
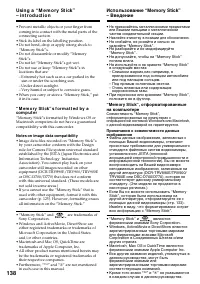
137 “ Memory S tic k” Operat ions Операции с “Memory Stick” — “ M e m o r y St i ck ” o p e r a t i o n s — Usi n g a “ M e m o r ySt i ck ” – i n t ro d u ct i o n – D CR-TRV 1 7 E o n l y You can record and play back images on a“Memory Stick” supplied with your camcorder.You can easily play back, ...
Страница 138 - Not es on image dat a compat ibilit y
138 • Prevent metallic objects or your finger from coming into contact with the metal parts of theconnecting section. • Stick its label on the labelling position.• Do not bend, drop or apply strong shock to “Memory Stick”s. • Do not disassemble or modify “Memory Stick”s. • Do not let “Memory Stick”s...
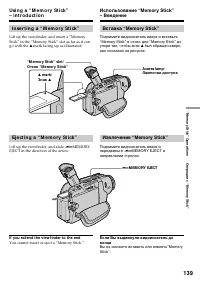
Страница 139 - I n se r t i n g a “ M e m o r y St i ck ”; mark facing up as illustrated.; Ej e ct i n g a “ M e m o r y St i ck ”; Lift up the viewfinder, and slide; If you ext end t he view f inder t o t he end; You cannot insert or eject a “Memory Stick.”; Вставка “Memory Stick”; как показано на рисунке.; Извлечение “Memory Stick”; MEMORY EJECT в; Лампочка доступа
139 “ Memory S tic k” Operat ions Операции с “Memory Stick” I n se r t i n g a “ M e m o r y St i ck ” Lift up the viewfinder, and insert a “MemoryStick” in the “Memory Stick” slot as far as it cango with the v mark facing up as illustrated. Ej e ct i n g a “ M e m o r y St i ck ” Lift up the viewfi...
Страница 140 - Когда лампочка доступа горит или мигает
140 Usi n g a “ M e m o r y St i ck ”– i n t r o d u ct i o n W hile t he access lamp is lit or f lashing Do not shake or strike your camcorder becauseyour camcorder is reading the data from the“Memory Stick” or recording the data on the“Memory Stick.” Do not turn the power off , ejecta “Memory Stic...
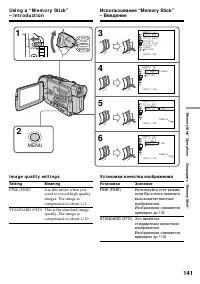
Страница 141 - I m a g e q u a l i t y se t t i n g s; Set t ing; STANDARD (STD) This is the standard image; Установки качества изображения; Установка
141 “ Memory S tic k” Operat ions Операции с “Memory Stick” Usi n g a “ M e m o r y St i ck ”– i n t r o d u ct i o n 1 2 3 5 6 4 MENU LOCK POWER VCR CAMERA MEMORY OFF(CHG) M E MO R Y S E T S T I L L S E T MO V I E S E T P R I N T M A R KP R O T E C TS L I D E S H OWD E L E T E A L LF O R M A T R E ...
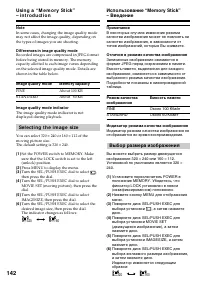
Страница 142 - FINE; Image qualit y mode indicat or; Se l e ct i n g t h e i m a g e si ze; Выбор размера изображения; Установкой по умолчанию является 320
142 Usi n g a “ M e m o r y St i ck ”– i n t r o d u ct i o n Not e In some cases, changing the image quality modemay not affect the image quality, depending onthe types of images you are shooting. Dif f erences in image qualit y mode Recorded images are compressed in JPEG formatbefore being stored ...
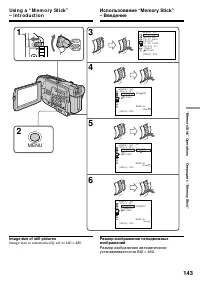
Страница 143 - Image size of st ill pict ures; Image size is automatically set to 640
143 “ Memory S tic k” Operat ions Операции с “Memory Stick” Usi n g a “ M e m o r y St i ck ”– i n t r o d u ct i o n 4 3 5 6 1 2 MENU LOCK VCR CAMERA MEMORY OFF(CHG) POWER M E MO R Y S E T MO V I E S E T P R I N T M A R KP R O T E C TS L I D E S H OWD E L E T E A L LF O R M A T R E T U R N [ M E N ...
Страница 144 - M aximum recording t ime/; 0 изображений
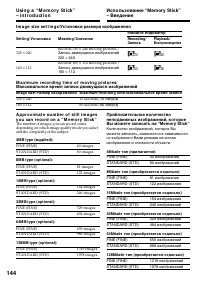
144 Usi n g a “ M e m o r y St i ck ”– i n t r o d u ct i o n I m a g e si ze se t t i n g s/ Установки размера изображения Indicat or/ Индикатор Set t ing/ Установка M eaning/ Значение Recording/ Playback/ Запись Воспроизведение Records 320 × 240 moving pictures./ 320 320 320 × 240 Запись движущихс...
Страница 146 - You can record still pictures on “Memory Stick”s.; Insert a “Memory Stick” into your camcorder.; Number of recorded images/; – Только модель DCR-TRV17E; Вставьте “Memory Stick” в Вашу видеокамеру.
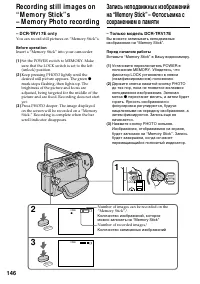
146 Re co rd i n g st i l l i m a g e s o n“ M e m o r y St i ck ” s– M e m o r y Ph o t o re co rd i n g – D CR-TRV 1 7 E o n l y You can record still pictures on “Memory Stick”s. Bef ore operat ion Insert a “Memory Stick” into your camcorder. (1 ) Set the POWER switch to MEMORY. Makesure that the ...
Страница 147 - W hen t he POW ER sw it ch is set t o M EM ORY; – Режим спортивных состязаний (Индикатор
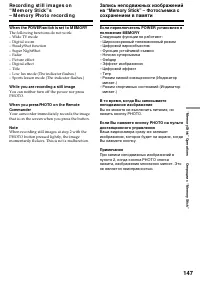
147 “ Memory S tic k” Operat ions Операции с “Memory Stick” Re co r d i n g st i l l i m a g e s o n“ M e m o r y St i ck ” s– M e m o r y Ph o t o r e co r d i n g W hen t he POW ER sw it ch is set t o M EM ORY The following functions do not work:– Wide TV mode– Digital zoom– SteadyShot function– S...
Страница 148 - Re co r d i n g i m a g e s co n t i n u o u sl y
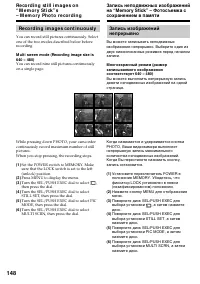
148 Re co r d i n g st i l l i m a g e s o n“ M e m o r y St i ck ” s– M e m o r y Ph o t o r e co r d i n g Re co r d i n g i m a g e s co n t i n u o u sl y You can record still pictures continuously. Selectone of the two modes described below beforerecording. M ult i screen mode (Recording image ...
Страница 149 - FULL” appears on the screen, and you; Co n t i n u o u s sh o o t i n g se t t i n g s; Установки непрерывной съемки; SINGLE
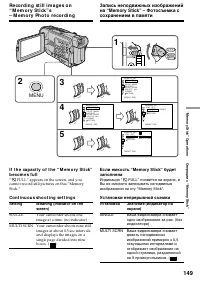
149 “ Memory S tic k” Operat ions Операции с “Memory Stick” Re co r d i n g st i l l i m a g e s o n“ M e m o r y St i ck ” s– M e m o r y Ph o t o r e co r d i n g 3 4 5 1 LOCK 2 MENU VCR CAMERA MEMORY OFF(CHG) POWER MEMORY SET STILL SETMOVIE SETPR I NT MARKPROTECTSL I DE SHOWD E L E T E A L LFORMA...
Страница 152 - • Вставьте записанную ленту в Вашу
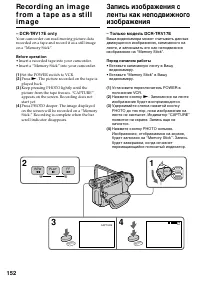
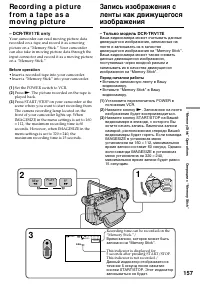
152 – D CR-TRV 1 7 E o n l y Your camcorder can read moving picture datarecorded on a tape and record it as a still imageon a “Memory Stick”. Bef ore operat ion • Insert a recorded tape into your camcorder.• Insert a “Memory Stick” into your camcorder. (1 ) Set the POWER switch to VCR. (2 ) Press N ...
Страница 153 - Your camcorder stops momentarily.; Ваша видеокамера на мгновение остановится.
153 “ Memory S tic k” Operat ions Операции с “Memory Stick” W hen t he access lamp is lit or f lashing Never shake or strike the unit. As well do notturn the power off , eject a “Memory Stick” orremove the battery pack. Otherwise, the imagedata breakdown may occur. If “ ” appears on t he screen The ...
Страница 155 - To st o p r e co r d i n g; Для остановки записи
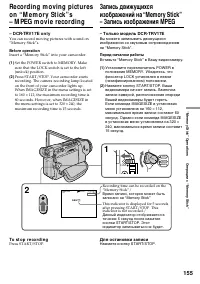
155 “ Memory S tic k” Operat ions Операции с “Memory Stick” – D CR-TRV 1 7 E o n l y You can record moving pictures with sound on“Memory Stick”s. Bef ore operat ion Insert a “Memory Stick” into your camcorder. (1 ) Set the POWER switch to MEMORY. Makesure that the LOCK switch is set to the left(unlo...
Страница 156 - Sound is recorded in monaural.; Записанный звук будет монофоническим.
156 Re co r d i n g m o v i n g p i ct u r e s o n“ M e m o r y St i ck ” s– M PEG m o v i e r e co r d i n g Not e Sound is recorded in monaural. W hen t he POW ER sw it ch is set t o M EM ORY The following functions do not work:– Wide TV– Digital zoom– SteadyShot function– Super NightShot– Fader– ...
Страница 158 - • Sound recorded in 48 kHz is converted to one; • Вы не можете использовать функцию PB
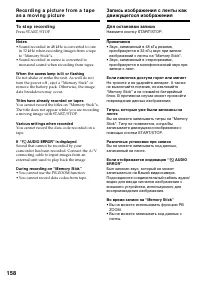
158 Re co r d i n g a p i ct u r e f r o m a t a p ea s a m o v i n g p i ct u r e To st o p r e co r d i n g Press START/STOP. Not es • Sound recorded in 48 kHz is converted to one in 32 kHz when recording images from a tapeto “Memory Stick”s. • Sound recorded in stereo is converted to monaural sou...
Страница 159 - AUDIO
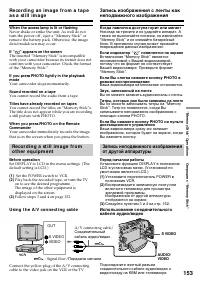
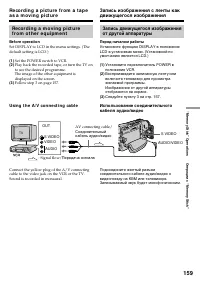
159 “ Memory S tic k” Operat ions Операции с “Memory Stick” Re co r d i n g a m o v i n g p i ct u r ef r o m o t h e r e q u i p m e n t Bef ore operat ion Set DISPLAY to LCD in the menu settings. (Thedefault setting is LCD.) (1 ) Set the POWER switch to VCR. (2 ) Play back the recorded tape, or tu...
Страница 160 - The “; Индикатор “; is marked on
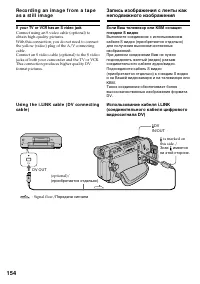
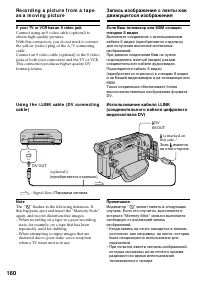
160 If your TV or VCR has an S video jack Connect using an S video cable (optional) toobtain high-quality pictures.With this connection, you do not need to connectthe yellow (video) plug of the A/V connectingcable.Connect an S video cable (optional) to the S videojacks of both your camcorder and the...
Страница 161 - Голубой фон
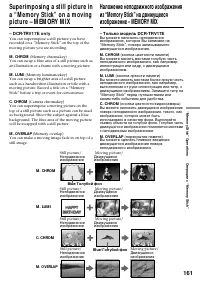
161 “ Memory S tic k” Operat ions Операции с “Memory Stick” Superim posing a st ill pict ure ina “ M em ory St ick” on a m ovingpict ure – M EM ORY M IX – D CR-TRV 1 7 E o n l y You can superimpose a still picture you haverecorded on a “Memory Stick” on the top of themoving picture you are recording...
Страница 163 - M. OVERLAP No adjustment necessary; To ch a n g e t h e m o d e se t t i n g; • You can not use MEMORY MIX function for; W hen you set t he POW ER sw it ch t o M EM ORY; Для изменения установки режима
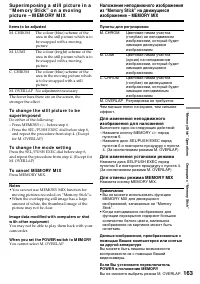
163 “ Memory S tic k” Operat ions Операции с “Memory Stick” Su p e r i m p o si n g a st i l l p i ct u r e i n a“ M e m o r y St i ck ” o n a m o v i n gp i ct u r e – M EM ORY M I X It ems t o be adjust ed M. CHROM The colour (blue) scheme of the area in the still picture which is tobe swapped wit...
Страница 164 - You cannot change the mode setting.; Образцы изображений; Вы не можете изменить установку режима.
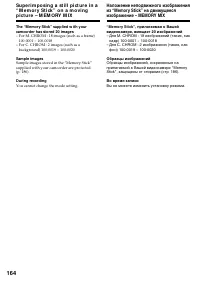
164 Su p e r i m p o si n g a st i l l p i ct u r e i n a“ M e m o r y St i ck ” o n a m o v i n gp i ct u r e – M EM ORY M I X The “M emory St ick” supplied w it h yourcamcorder has st ored 20 images – For M. CHROM : 18 images (such as a frame) 100-0001 ~ 100-0018 – For C. CHROM : 2 images (such as...
Страница 165 - • Insert a recorded tape into your camcorder and; • Установите записанную ленту в Вашу
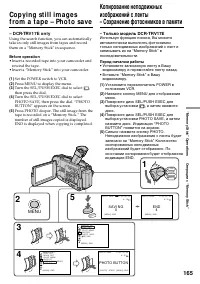
165 “ Memory S tic k” Operat ions Операции с “Memory Stick” Co p y i n g st i l l i m a g e sf ro m a t a p e – Ph o t o sa v e – D CR-TRV 1 7 E o n l y Using the search function, you can automaticallytake in only still images from tapes and recordthem on a “Memory Stick” in sequence. Bef ore operat...
Страница 166 - To st o p o r e n d co p y i n g; W hen t he access lamp is lit or f lashing
166 Co p y i n g st i l l i m a g e s f r o m a t a p e– Ph o t o sa v e To st o p o r e n d co p y i n g Press MENU. W h e n t h e m e m o r y o f t h e “ M e m o r ySt i ck ” i s f u l l “MEMORY FULL” appears on the screen, andthe copying stops. Insert another “Memory Stick”and repeat the procedur...
Страница 167 - To st o p m e m o r y p h o t o p l a y b a ck; Press MEMORY PLAY again.; data modified with computer; – при воспроизведении данных изображения
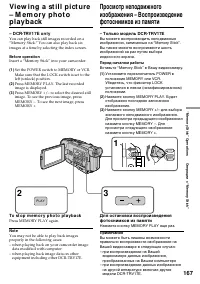
167 “ Memory S tic k” Operat ions Операции с “Memory Stick” – D CR-TRV 1 7 E o n l y You can play back still images recorded on a“Memory Stick.” You can also play back siximages at a time by selecting the index screen. Bef ore operat ion Insert a “Memory Stick” into your camcorder. (1 ) Set the POWE...
Страница 168 - Примечания к имени файла
168 V i e w i n g a st i l l p i ct u r e– M e m o r y p h o t o p l a y b a ck Not es on t he f ile name • The directory is not displayed if the structure of the directory does not conform to the DCF98standard. • “ - DIRECTORY ERROR” may appear on the LCD screen or in the viewfinder if thestructure...
Страница 169 - A red
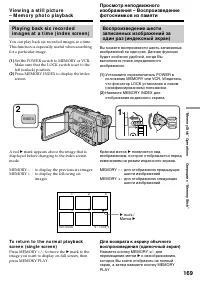
169 “ Memory S tic k” Operat ions Операции с “Memory Stick” Pl a y i n g b a ck si x r e co r d e di m a g e s a t a t i m e ( i n d e x scr e e n ) You can play back six recorded images at a time.This function is especially useful when searchingfor a particular image. (1 ) Set the POWER switch to M...
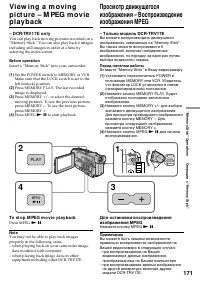
Страница 171 - To st o p M PEG m o v i e p l a y b a ck; Press MPEG
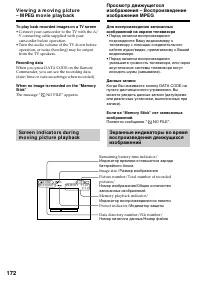
171 “ Memory S tic k” Operat ions Операции с “Memory Stick” – D CR-TRV 1 7 E o n l y You can play back moving pictures recorded on a“Memory Stick.” You can also play back 6 imagesincluding still images in order at a time byselecting the index screen. Bef ore operat ion Insert a “Memory Stick” into y...
Страница 172 - To play back recorded images on a TV screen; • Connect your camcorder to the TV with the A/; The message “; Remaining battery time indicator/
172 To play back recorded images on a TV screen • Connect your camcorder to the TV with the A/ V connecting cable supplied with yourcamcorder before operation. • Turn the audio volume of the TV down before operation, or noise (howling) may be outputfrom the TV speakers. Recording dat a When you pres...
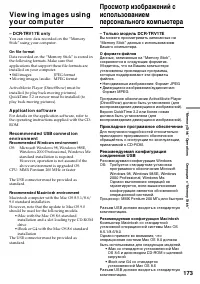
Страница 173 - On f ile f ormat; JPEG format; A p p l i ca t i o n so f t w a r e; Recommended W indow s environment; CPU: MMX Pentium 200 MHz or faster; Recommended M acint osh environment; • iMac with the Mac OS 8.6 standard; Формат MPEG; Прикладное программное обеспечение; Процессор: MMX Pentium 200 MГц или быстрее; Рекомендуемая конфигурация Macintosh; • iMac со стандартно установленной Mac
173 “ Memory S tic k” Operat ions Операции с “Memory Stick” Vi e w i n g i m a g e s u si n gy o u r co m p u t e r – D CR-TRV 1 7 E o n l y You can view data recorded on the “MemoryStick” using your computer. On f ile f ormat Data recorded on the “Memory Stick” is stored inthe following formats. Ma...
Страница 175 - I n st a l l i n g t h e USB d r i v e r; Разъем USB; Установка драйвера USB
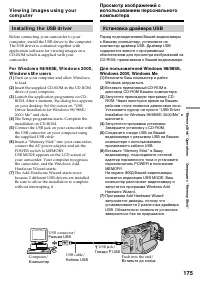
175 “ Memory S tic k” Operat ions Операции с “Memory Stick” V i e w i n g i m a g e s u si n g y o u rco m p u t e r I n st a l l i n g t h e USB d r i v e r Before connecting your camcorder to yourcomputer, install the USB driver to the computer.The USB driver is contained together withapplication ...
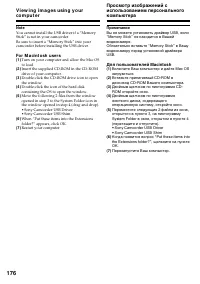
Страница 176 - Fo r M a ci n t o sh u se r s; Restart your computer.; Для пользователей Macintosh; Перезапустите Ваш компьютер.
176 V i e w i n g i m a g e s u si n g y o u rco m p u t e r Not e You cannot install the USB driver if a “MemoryStick” is not in your camcorder.Be sure to insert a “Memory Stick” into yourcamcorder before installing the USB driver. Fo r M a ci n t o sh u se r s (1 ) Turn on your computer and allow ...
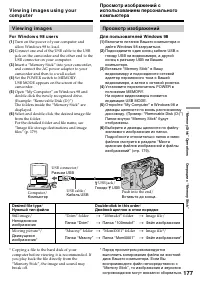
Страница 177 - V i e w i n g i m a g e s; Fo r W i n d o w s 9 8 u se r s; * Copying a file to the hard disk of your; Просмотр изображений; Для пользователей Windows 98; Нужный тип файла; “Dcim” folder
177 “ Memory S tic k” Operat ions Операции с “Memory Stick” V i e w i n g i m a g e s Fo r W i n d o w s 9 8 u se r s (1 ) Turn on the power of your computer andallow Windows 98 to load. (2 ) Connect one end of the USB cable to the USBjack on the camcorder and the other end to theUSB connector on yo...
Страница 178 - N o t e s o n u si n g y o u r co m p u t e r; “ M e m o r y St i ck ”
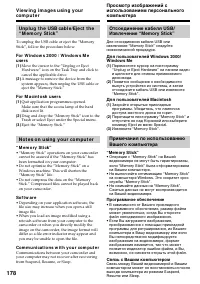
178 V i e w i n g i m a g e s u si n g y o u rco m p u t e r Un p l u g t h e USB ca b l e /Ej e ct t h e“ M e m o r y St i ck ” To unplug the USB cable or eject the “MemoryStick”, follow the procedure below. Fo r W i n d o w s 2 0 0 0 / W i n d o w s M eu se r s (1 ) Move the cursor to the “Unplug ...
Страница 179 - Folder cont aining moving pict ure dat a/; ssss; Папка; ssss
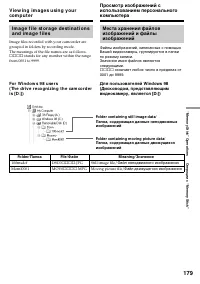
179 “ Memory S tic k” Operat ions Операции с “Memory Stick” V i e w i n g i m a g e s u si n g y o u rco m p u t e r I m a g e f i l e st o r a g e d e st i n a t i o n sa n d i m a g e f i l e s Image files recorded with your camcorder aregrouped in folders by recording mode.The meanings of the fil...
Страница 180 - To st o p co p y i n g i n t h e m i d d l e
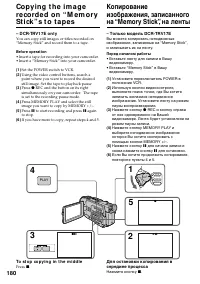
180 Co p y i n g t h e i m a g ere co rd e d o n “ M e m o r ySt i ck ” s t o t a p e s – D CR-TRV 1 7 E o n l y You can copy still images or titles recorded on“Memory Stick” and record them to a tape. Bef ore operat ion • Insert a tape for recording into your camcorder.• Insert a “Memory Stick” int...
Страница 181 - During copying; You cannot record the index screen.; If you press EDITSEARCH during pause mode; Memory playback stops.; Во время копирования; Вы не можете записать индексный экран.
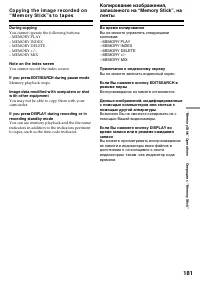
181 “ Memory S tic k” Operat ions Операции с “Memory Stick” Co p y i n g t h e i m a g e r e co r d e d o n“ M e m o r y St i ck ” s t o t a p e s During copying You cannot operate the following buttons:– MEMORY PLAY– MEMORY INDEX– MEMORY DELETE– MEMORY +/–– MEMORY MIX Not e on t he index screen You...
Страница 183 - The digital effect function does not work.; Pict ures in t he PB ZOOM mode
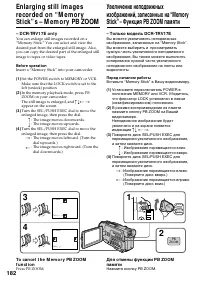
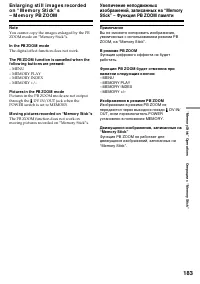
183 “ Memory S tic k” Operat ions Операции с “Memory Stick” En l a r g i n g st i l l i m a g e s r e co r d e do n “ M e m o r y St i ck ” s– M e m o r y PB ZOOM Not e You cannot copy the images enlarged by the PBZOOM mode on “Memory Stick”s. In t he PB ZOOM mode The digital effect function does no...
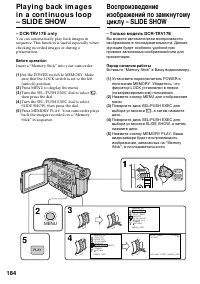
Страница 185 - To st o p t h e sl i d e sh o w; To view t he recorded images on TV; Для остановки показа слайдов; Нажмите кнопку MEMORY PLAY.
185 “ Memory S tic k” Operat ions Операции с “Memory Stick” Pl a y i n g b a ck i m a g e s i n aco n t i n u o u s l o o p – SLI D E SHOW To st o p t h e sl i d e sh o w Press MENU. To p a u se d u r i n g a sl i d e sh o w Press MEMORY PLAY. To st a r t t h e sl i d e sh o w f r o m ap a r t i cu ...
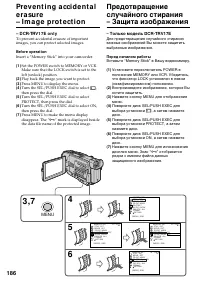
Страница 187 - To ca n ce l i m a g e p r o t e ct i o n; You cannot carry out image protection.; Для отмены защиты изображения
187 “ Memory S tic k” Operat ions Операции с “Memory Stick” Pr e v e n t i n g a cci d e n t a l e r a su r e– I m a g e p r o t e ct i o n To ca n ce l i m a g e p r o t e ct i o n Select OFF in step 6, then press the SEL/PUSHEXEC dial. Not e Formatting erases all information on the“Memory Stick,” ...
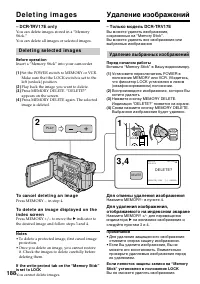
Страница 188 - D e l e t i n g i m a g e s; D e l e t i n g se l e ct e d i m a g e s; To ca n ce l d e l e t i n g a n i m a g e; Удаление изображений; Удаление выбранных изображений; Для отмены удаления изображения
188 D e l e t i n g i m a g e s – D CR-TRV 1 7 E o n l y You can delete images stored in a “MemoryStick.”You can delete all images or selected images. D e l e t i n g se l e ct e d i m a g e s Bef ore operat ion Insert a “Memory Stick” into your camcorder. (1 ) Set the POWER switch to MEMORY or VCR....
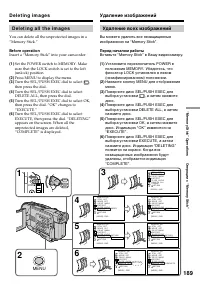
Страница 190 - W hile “DELETING” appears
190 D e l e t i n g i m a g e s To ca n ce l d e l e t i n g a l l t h e i m a g e s i nt h e “ M e m o r y St i ck ” Select RETURN in step 5, then press the SEL/PUSH EXEC dial. W hile “DELETING” appears Do not turn the POWER switch or press anybuttons. Удаление изображений Для отмены удаления всехи...
Страница 192 - To ca n ce l w r i t i n g p r i n t m a r k s; You cannot write print marks on still images.; M oving pict ures; You cannot write print marks on images.; Для отмены записи знаков печати; Движущиеся изображения
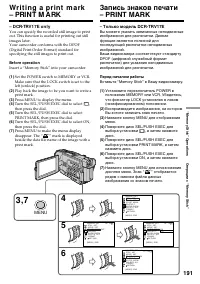
192 W r i t i n g a p r i n t m a r k– PRI N T M A RK To ca n ce l w r i t i n g p r i n t m a r k s Select OFF in step 6, then press the SEL/PUSHEXEC dial. If t he w rit e-prot ect t ab on t he “M emory St ick”is set t o LOCK You cannot write print marks on still images. M oving pict ures You canno...
Страница 193 - in the menu on your camcorder.; • Insert a recorded “Memory Stick” into your; в меню Вашей; Перед началом эксплуатации; • Вставьте записанную “Memory Stick” в Вашу
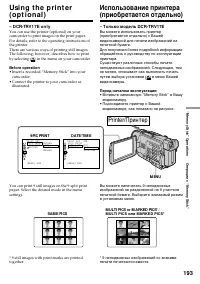
193 “ Memory S tic k” Operat ions Операции с “Memory Stick” – D CR-TRV 1 7 E o n l y You can use the printer (optional) on yourcamcorder to print images on the print paper.For details, refer to the operating instructions ofthe printer.There are various ways of printing still images.The following, ho...
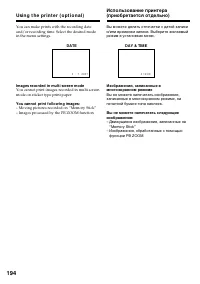
Страница 194 - Usi n g t h e p r i n t e r ( o p t i o n a l ); – Движущиеся изображения, записанные на
194 You can make prints with the recording dateand/or recording time. Select the desired modein the menu settings. Images recorded in mult i screen mode You cannot print images recorded in multi screenmode on sticker type print paper. You cannot print f ollow ing images: – Moving pictures recorded o...
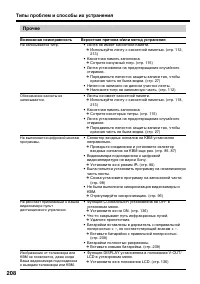
Страница 204 - — Поиск и устранение неисправностей —; Типы проблем и способы их устранения; В режиме записи; Возможная неисправность
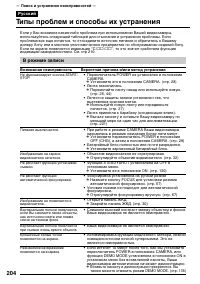
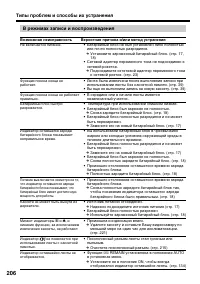
204 — Поиск и устранение неисправностей — Русский Типы проблем и способы их устранения Если у Вас возникла какая-либо проблема при использовании Вашей видеокамеры,воспользуйтесь следующей таблицей для отыскания и устранения проблемы. Еслипроблема все еще остается, то отсоедините источник питания и о...
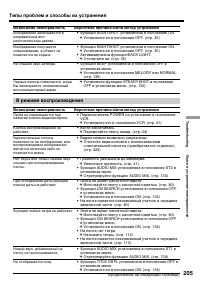
Страница 205 - В режиме воспроизведения
205 T roubles hoot ing Поиск и устранение неисправностей Типы проблем и способы их устранения Возможная неисправность Вероятная причина и/или метод устранения • Функция NIGHTSHOT установлена в положение ON. c Установите ее в положение OFF. (стр. 35) • Функция NIGHTSHOT установлена в положение ON. c ...
Страница 210 - Пятизначная индикация
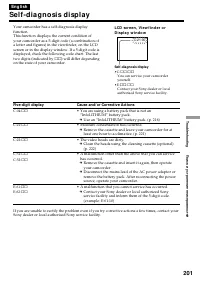
210 Русский Индикация самодиагностики C:21:00 Пятизначная индикация Вероятная причина и/или метод устранения • Вы используете батарейный блок, который не является батарейным блоком “InfoLITHIUM”. c Используйте батарейный блок “InfoLITHIUM”. (стр.216) • Произошла конденсация влаги. c Выньте кассету и...
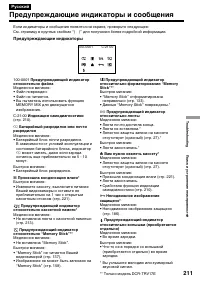
Страница 211 - Предупреждающие индикаторы и сообщения; может мигать, даже если заряда; Предупреждающие индикаторы; * Вы услышите мелодию или зуммерный
211 T roubles hoot ing Поиск и устранение неисправностей Русский Предупреждающие индикаторы и сообщения 100-0001 Предупреждающий индикатор относительно файла Медленное мигание:• Файл поврежден.• Файл не читается.• Вы пытаетесь использовать функцию MEMORY MIX для движущегосяизображения. С:21:00 Индик...
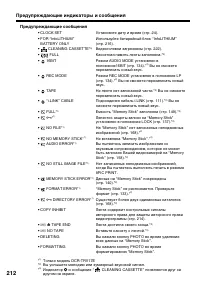
Страница 212 - Предупреждающие сообщения
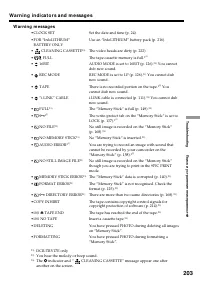
212 Предупреждающие индикаторы и сообщения Предупреждающие сообщения • CLOCK SET Установите дату и время (стр. 24). • FOR “InfoLITHIUM” Используйте батарейный блок “InfoLITHIUM” BATTERY ONLY (стр. 216). • CLEANING CASSETTE* 3) Видеоголовки загрязнены (стр. 222). • FULL Кассетная память ленты заполне...
Страница 213 - — A d d i t i o n a l I n f o r m a t i o n —; Usa b l e ca sse t t e s; Se l e ct i n g ca sse t t e t y p e s; mark on t he casset t e; Используемые кассеты; Выбор типов кассет; Знак
213 Addit ional Inf ormat ion Дополнительная информация — A d d i t i o n a l I n f o r m a t i o n — Usa b l e ca sse t t e s Se l e ct i n g ca sse t t e t y p e s You can use the mini DV cassette only*. You cannot use any other 8 mm, Hi8, Digital8, VHS, VHSC, S-VHS, S-VHSC, Betamax or DV cassette...
Страница 214 - W hen you play back; A u d i o m o d e; Sound f rom speaker
214 Usa b l e ca sse t t e s Co p y r i g h t si g n a l W hen you play back Using any other video camera recorder, youcannot record on tape that has recorded acopyright control signals for copyright protectionof software which is played back on yourcamcorder. W hen you record You cannot record soft...
Страница 215 - N o t e s o n t h e ca sse t t e; W h e n a f f i x i n g a l a b e l o n t h e ca sse t t e; so as not to cause a; A f t e r u si n g t h e ca sse t t e; После использования кассеты
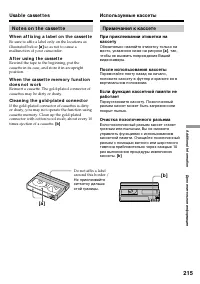
215 Addit ional Inf ormat ion Дополнительная информация N o t e s o n t h e ca sse t t e W h e n a f f i x i n g a l a b e l o n t h e ca sse t t e Be sure to affix a label only on the locations asillustrated below [a ] so as not to cause a malfunction of your camcorder. A f t e r u si n g t h e ca ...
Страница 217 - Re m a i n i n g b a t t e r y t i m e i n d i ca t o r; О батарейном блоке “InfoLITHIUM”; Как хранить батарейный блок
217 Addit ional Inf ormat ion Дополнительная информация A b o u t t h e “ I n f o LI THI UM ” b a t t e r yp a ck Re m a i n i n g b a t t e r y t i m e i n d i ca t o r • If the power may go off although the remaining battery time indicator indicates that the batterypack has enough power to operate...
Страница 218 - A b o u t t h e N a m e “ i .LI N K”; Относительно названия “i.LINK”
218 A b o u t i .LI N K The DV jack on this unit is an i.LINK-compliantDV input/output jack. This section describes thei.LINK standard and its features. W h a t i s i .LI N K? i.LINK is a digital serial interface for handlingdigital video, digital audio and other data in twodirections between equipm...
Страница 219 - i .LI N K Ba u d r a t e
219 Addit ional Inf ormat ion Дополнительная информация A b o u t i .LI N K i .LI N K Ba u d r a t e i.LINK’s maximum baud rate varies according tothe equipment. Three maximum baud rates aredefined: S100 (approx. 100Mbps*)S200 (approx. 200Mbps)S400 (approx. 400Mbps) The baud rate is listed under “Sp...
Страница 220 - Usi n g y o u r ca m co r d e r a b r o a d; PAL syst em; Brazil; NTSC syst em; Бразилия; Система NTSC
220 Usi n g y o u r ca m co rd e ra b ro a d Usi n g y o u r ca m co r d e r a b r o a d You can use your camcorder in any country orarea with the AC power adaptor supplied withyour camcorder within 100 V to 240 V AC, 50/60Hz. Your camcorder is a PAL system basedcamcorder. If you want to view the pl...
Страница 221 - M o i st u r e co n d e n sa t i o n; I f m o i st u r e co n d e n sa t i o n o ccu r r e d; Not e on moist ure condensat ion; Конденсация влаги; Если произошла конденсация влаги; Примечание к конденсации влаги
221 Addit ional Inf ormat ion Дополнительная информация M a i n t e n a n cei n f o r m a t i o n a n dp re ca u t i o n s M o i st u r e co n d e n sa t i o n If your camcorder is brought directly from a coldplace to a warm place, moisture may condenseinside your camcorder, on the surface of the ta...
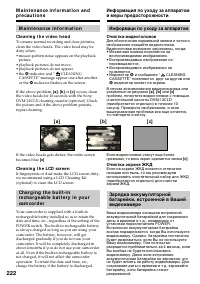
Страница 222 - M a i n t e n a n ce i n f o r m a t i o n; Cl e a n i n g t h e v i d e o h e a d; indicator and “; Cl e a n i n g t h e LCD scr e e n; Информаци по уходу за аппаратом; Очистка видеоголовок
222 M a i n t e n a n ce i n f o r m a t i o n a n dp r e ca u t i o n s M a i n t e n a n ce i n f o r m a t i o n Cl e a n i n g t h e v i d e o h e a d To ensure normal recording and clear pictures,clean the video heads. The video head may bedirty when:• mosaic-pattern noise appears on the playba...
Страница 223 - Charging t he built -in rechargeable bat t ery:; Pr e ca u t i o n s; Ca m co r d e r o p e r a t i o n; Меры предосторожности; Эксплуатация видеокамеры
223 Addit ional Inf ormat ion Дополнительная информация M a i n t e n a n ce i n f o r m a t i o n a n dp r e ca u t i o n s Charging t he built -in rechargeable bat t ery: • Connect your camcorder to wall socket using the AC power adaptor supplied with yourcamcorder, and leave your camcorder with t...
Страница 225 - A b o u t ca r e a n d st o r a g e o f t h e l e n s
225 Addit ional Inf ormat ion Дополнительная информация M a i n t e n a n ce i n f o r m a t i o n a n dp r e ca u t i o n s A b o u t ca r e a n d st o r a g e o f t h e l e n s • Wipe the surface of the lens clean with a soft cloth in the following instances:– When there are fingerprints on the le...
Страница 226 - If bat t eries are leaking; • Wipe off the liquid in the battery compartment; Если случится протечка батареек; • Тщательно вытрите жидкость в батарейном
226 M a i n t e n a n ce i n f o r m a t i o n a n dp r e ca u t i o n s If bat t eries are leaking • Wipe off the liquid in the battery compartment carefully before replacing the batteries. • If you touch the liquid, wash it off with water.• If the liquid get into your eyes, wash your eyes with a l...
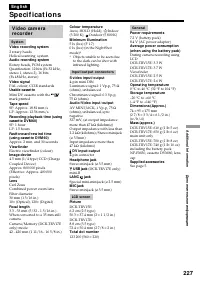
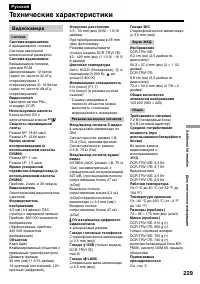
Страница 229 - Технические характеристики; Видеокамера
229 Addit ional Inf ormat ion Дополнительная информация Русский Технические характеристики Видеокамера Система Система видеозаписи 2 вращающиеся головкиСистема наклонноймеханической развертки Система аудиозаписи Вращающиеся головки,система РСМДискретизация: 12 битов(сдвиг по частоте 32 кГц,стереозву...
Страница 231 - Ca m co r d e r; * MTF is an abbreviation of Modulation; Примечание относительно объектива Карл Цейс
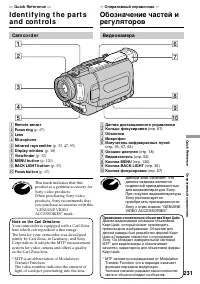
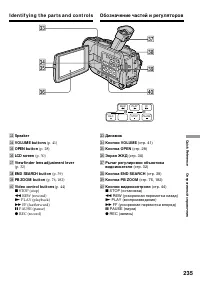
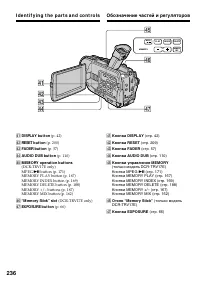
231 Quic k R eferenc e Оперативный справочник — Qu i ck Re f e r e n ce — I d e n t i f y i n g t h e p a r t sa n d co n t ro l s Ca m co r d e r 1 6 7 8 9 q; 2 3 4 5 1 Remot e sensor 2 Focus ring (p. 67) 3 Lens 4 M icrophone 5 Inf rared rays emit t er (p. 35, 47, 93) 6 Display w indow (p. 18) 7 Vi...
Страница 232 - I d e n t i f y i n g t h e p a r t s a n d co n t r o l s; • The intelligent accessory shoe supplies power; Обозначение частей и регуляторов; • Держатель для установки вспомогательных
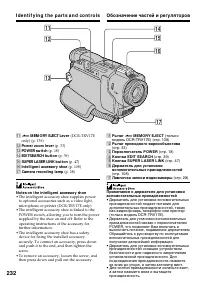
232 I d e n t i f y i n g t h e p a r t s a n d co n t r o l s qa > M EM ORY EJECT Lever (DCR-TRV17E only) (p. 139) qs Pow er zoom lever (p. 33) qd POW ER sw it ch (p. 18) qf EDITSEARCH but t on (p. 39) qg SUPER LASER LINK but t on (p. 47) qh Int elligent accessory shoe (p. 108) qj Camera recordi...
Страница 234 - START/ STOP but t on; Гнездо DC IN
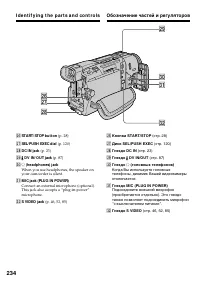
234 wh wl e;ea es wj wk wh START/ STOP but t on (p. 28) wj SEL/ PUSH EXEC dial (p. 120) wk DC IN jack (p. 23) wl DV IN/ OUT jack (p. 87) e; i (headphones) jack When you use headphones, the speaker onyour camcorder is silent. ea M IC jack (PLUG IN POW ER) Connect an external microphone (optional).Thi...
Страница 237 - Fasten the grip strap firmly.; rk; Плотно пристегните ремень для захвата.
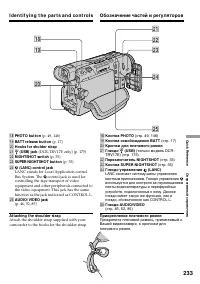
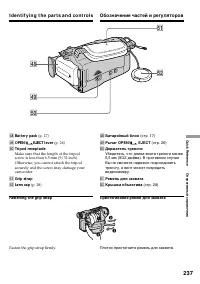
237 Quic k R eferenc e Оперативный справочник Fast ening t he grip st rap Fasten the grip strap firmly. 4 3 2 1 rk rl t; ts ta rk Bat t ery pack (p. 17) rl OPEN/ EJECT lever (p. 26) t; Tripod recept acle Make sure that the length of the tripodscrew is less than 6.5 mm (9/32 inch).Otherwise, you cann...
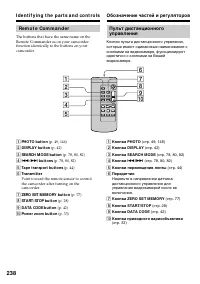
Страница 239 - To p r e p a r e t h e Re m o t e Co m m a n d e r; Not es on t he Remot e Commander; • Point the remote sensor away from strong light; • Направляйте датчик дистанционного
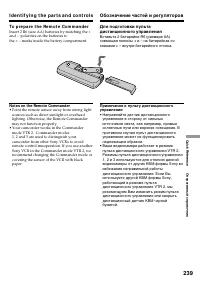
239 Quic k R eferenc e Оперативный справочник To p r e p a r e t h e Re m o t e Co m m a n d e r Insert 2 R6 (size AA) batteries by matching the +and – polarities on the batteries tothe + – marks inside the battery compartment. Not es on t he Remot e Commander • Point the remote sensor away from str...
Страница 241 - * Этот индикатор появляется при работе
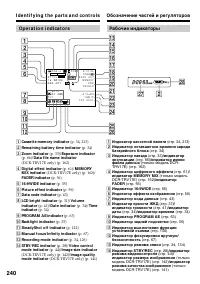
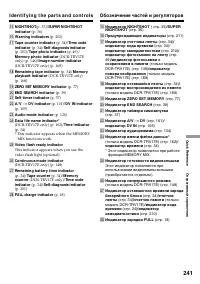
241 Quic k R eferenc e Оперативный справочник qg NIGHTSHOT (p. 35) / SUPER NIGHTSHOT indicat or (p. 36) qh W arning indicat ors (p. 202) qj Tape count er indicat or (p. 34) / Time code indicat or (p. 34) / Self -diagnosis indicat or (p. 201) / Tape phot o indicat or (p. 49)/ M emory phot o indicat o...
Страница 243 - Алфавитный указатель; Ф – Я
243 Quic k R eferenc e Оперативный справочник Русский Алфавитный указатель А, Б, В Аудиорежим ........................ 134Аудиоперезапись ................ 108Баланс белого ....................... 53Батарейный блок .................. 17Батарейный блок “InfoLITHIUM” .................... 216 Введение/в...


 Sony CCD-TR2300E
Инструкция по эксплуатации
Sony CCD-TR2300E
Инструкция по эксплуатации
 Sony CCD-TR3100E
Инструкция по эксплуатации
Sony CCD-TR3100E
Инструкция по эксплуатации
 Sony CCD-TR311E
Инструкция по эксплуатации
Sony CCD-TR311E
Инструкция по эксплуатации
 Sony CCD-TR315E
Инструкция по эксплуатации
Sony CCD-TR315E
Инструкция по эксплуатации
 Sony CCD-TR317E
Инструкция по эксплуатации
Sony CCD-TR317E
Инструкция по эксплуатации
 Sony CCD-TR3300E
Инструкция по эксплуатации
Sony CCD-TR3300E
Инструкция по эксплуатации
 Sony CCD-TR3400E
Инструкция по эксплуатации
Sony CCD-TR3400E
Инструкция по эксплуатации
 Sony CCD-TR411E / CCD-TR412E
Инструкция по эксплуатации
Sony CCD-TR411E / CCD-TR412E
Инструкция по эксплуатации
 Sony CCD-TR415E
Инструкция по эксплуатации
Sony CCD-TR415E
Инструкция по эксплуатации
 Sony CCD-TR417E
Инструкция по эксплуатации
Sony CCD-TR417E
Инструкция по эксплуатации
 Sony CCD-TR425E
Инструкция по эксплуатации
Sony CCD-TR425E
Инструкция по эксплуатации
 Sony CCD-TR427E
Инструкция по эксплуатации
Sony CCD-TR427E
Инструкция по эксплуатации
 Sony CCD-TR501E / CCD-TR502E
Инструкция по эксплуатации
Sony CCD-TR501E / CCD-TR502E
Инструкция по эксплуатации
 Sony CCD-TR503E / CCD-TR506E
Инструкция по эксплуатации
Sony CCD-TR503E / CCD-TR506E
Инструкция по эксплуатации
 Sony CCD-TR511E / CCD-TR512E
Инструкция по эксплуатации
Sony CCD-TR511E / CCD-TR512E
Инструкция по эксплуатации
 Sony CCD-TR515E
Инструкция по эксплуатации
Sony CCD-TR515E
Инструкция по эксплуатации
 Sony CCD-TR516E
Инструкция по эксплуатации
Sony CCD-TR516E
Инструкция по эксплуатации
 Sony CCD-TR617E
Инструкция по эксплуатации
Sony CCD-TR617E
Инструкция по эксплуатации
 Sony CCD-TR618E
Инструкция по эксплуатации
Sony CCD-TR618E
Инструкция по эксплуатации