
Триммеры Husqvarna 325R 9679084-02 - инструкция пользователя по применению, эксплуатации и установке на русском языке. Мы надеемся, она поможет вам решить возникшие у вас вопросы при эксплуатации техники.
Если остались вопросы, задайте их в комментариях после инструкции.
"Загружаем инструкцию", означает, что нужно подождать пока файл загрузится и можно будет его читать онлайн. Некоторые инструкции очень большие и время их появления зависит от вашей скорости интернета.


• Do not breathe in the fuel fumes, it can cause injury.
Make sure that there is a sufficient airflow.
• Do not smoke near the fuel or the engine.
• Do not put warm objects near the fuel or the engine.
• Do not add the fuel when the engine is on.
• Make sure that the engine is cool before you refuel.
• Before you refuel, open the fuel tank cap slowly and
release the pressure carefully.
• Do not add fuel to the engine in an indoor area. Not
sufficient airflow can cause injury or death because
of asphyxiation or carbon monoxide.
• Tighten the fuel tank cap carefully or a fire can
occur.
• Move the product at a minimum of 3 m (10 ft) from
the position where you filled the tank before a start.
• Do not put too much fuel in the fuel tank.
• Make sure that a leak cannot occur when you move
the product or fuel container.
• Do not put the product or a fuel container where
there is an open flame, spark or pilot light. Make
sure that the storage area does not contain an open
flame.
• Only use approved containers when you move the
fuel or put the fuel into storage.
• Empty the fuel tank before long-term storage. Obey
the local law on where to dispose fuel.
• Clean the product before long-term storage.
• Remove the spark plug cable before you put the
product into storage to make sure that the engine
does not start accidentally.
Safety instructions for maintenance
WARNING: Read the warning instructions
that follow before you do maintenance on
the product.
• Do only the maintenance and servicing given in this
operator's manual. Let professional servicing
personnel do all other servicing and repairs.
• Regularly do the safety checks, maintenance and
service instructions given in this manual. Regular
maintenance increases the life of the product and
decreases the risk of accidents. Refer to
Maintenance schedule on page 17 for instructions.
• If the safety checks in this operator's manual is not
approved after you do maintenance, speak to your
servicing dealer. We guarantee that there are
professional repairs and servicing available for your
product.
Assembly
Introduction
WARNING: Before you assemble the
product, you must read and understand the
safety chapter.
WARNING: Remove the spark plug cable
from the spark plug before you assemble the
product.
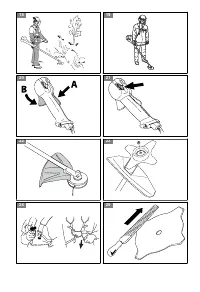
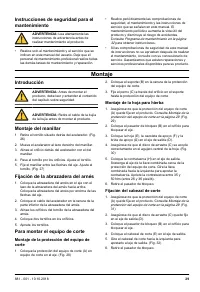
To assemble the handlebar
1. Remove the screw behind the throttle handle. (Fig.
26)
2. Move the throttle handle to the right side of the
handlebar.
3. Align the hole behind the throttle handle with the
hole in the handlebar.
4. Put the screw go through the holes. Tighten the
screw.
5. Attach the handlebar between the arrows on the
shaft. Tighten the screw. (Fig. 27)
To attach the harness clamp
1. Put the harness clamp on the shaft with the loop of
the harness clamp up. Put the harness clamp above
the arrows on the shaft.
2. Put the throttle wire in the groove of the harness
clamp at bottom.
3. Align the harness clamp screw holes.
4. Attach 2 screws into the screw holes.
5. Tighten the screws.
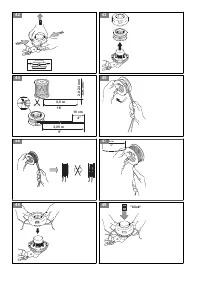
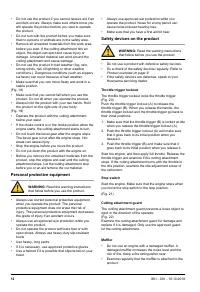
To assemble the cutting attachment
To assemble the cutting attachment guard
1. Put the cutting attachment guard (A) onto the shaft.
(Fig. 28)
2. Put the bracket (B) in the slot on the cutting
attachment guard.
3. Attach the bolt (C) through the hole on the bracket to
the cutting attachment guard.
To assemble the grass blade
1. Make sure that the cutting attachment guard (A) is
attached to the product. Refer to
cutting attachment guard on page 14. (Fig. 29)
2. Put the locking pin (B) in the hole to lock the shaft.
3. Put the blade (E), support cup (F) and support flange
(G) on the output shaft (D).
4. Make sure that the drive disc (C) engages correctly
in the center hole of the blade. (Fig. 30)
14
881 - 001 - 10.10.2018
Содержание
- 56 Безопасность
- 57 Инструкции по технике
- 58 Средства индивидуальной защиты; Защитные устройства на изделии
- 59 Режущее оборудование
- 61 Сборка; Сборка щитка режущего оборудования; Эксплуатация
- 64 Стрижка травы; Головка триммера; Замена режущей лески; Техническое обслуживание; Введение; График технического
- 65 Очистка воздушного фильтра
- 66 Поиск и устранение неисправностей; Двигатель не запускается
- 67 Двигатель запускается, но затем снова останавливается; Транспортировка, хранение и утилизация; Транспортировка и хранение; Технические данные
- 69 Принадлежности
- 70 Декларация соответствия ЕС; Содержание декларации о


