Телевизоры Samsung PS-63 A756T1M - инструкция пользователя по применению, эксплуатации и установке на русском языке. Мы надеемся, она поможет вам решить возникшие у вас вопросы при эксплуатации техники.
Если остались вопросы, задайте их в комментариях после инструкции.
"Загружаем инструкцию", означает, что нужно подождать пока файл загрузится и можно будет его читать онлайн. Некоторые инструкции очень большие и время их появления зависит от вашей скорости интернета.

English - 3
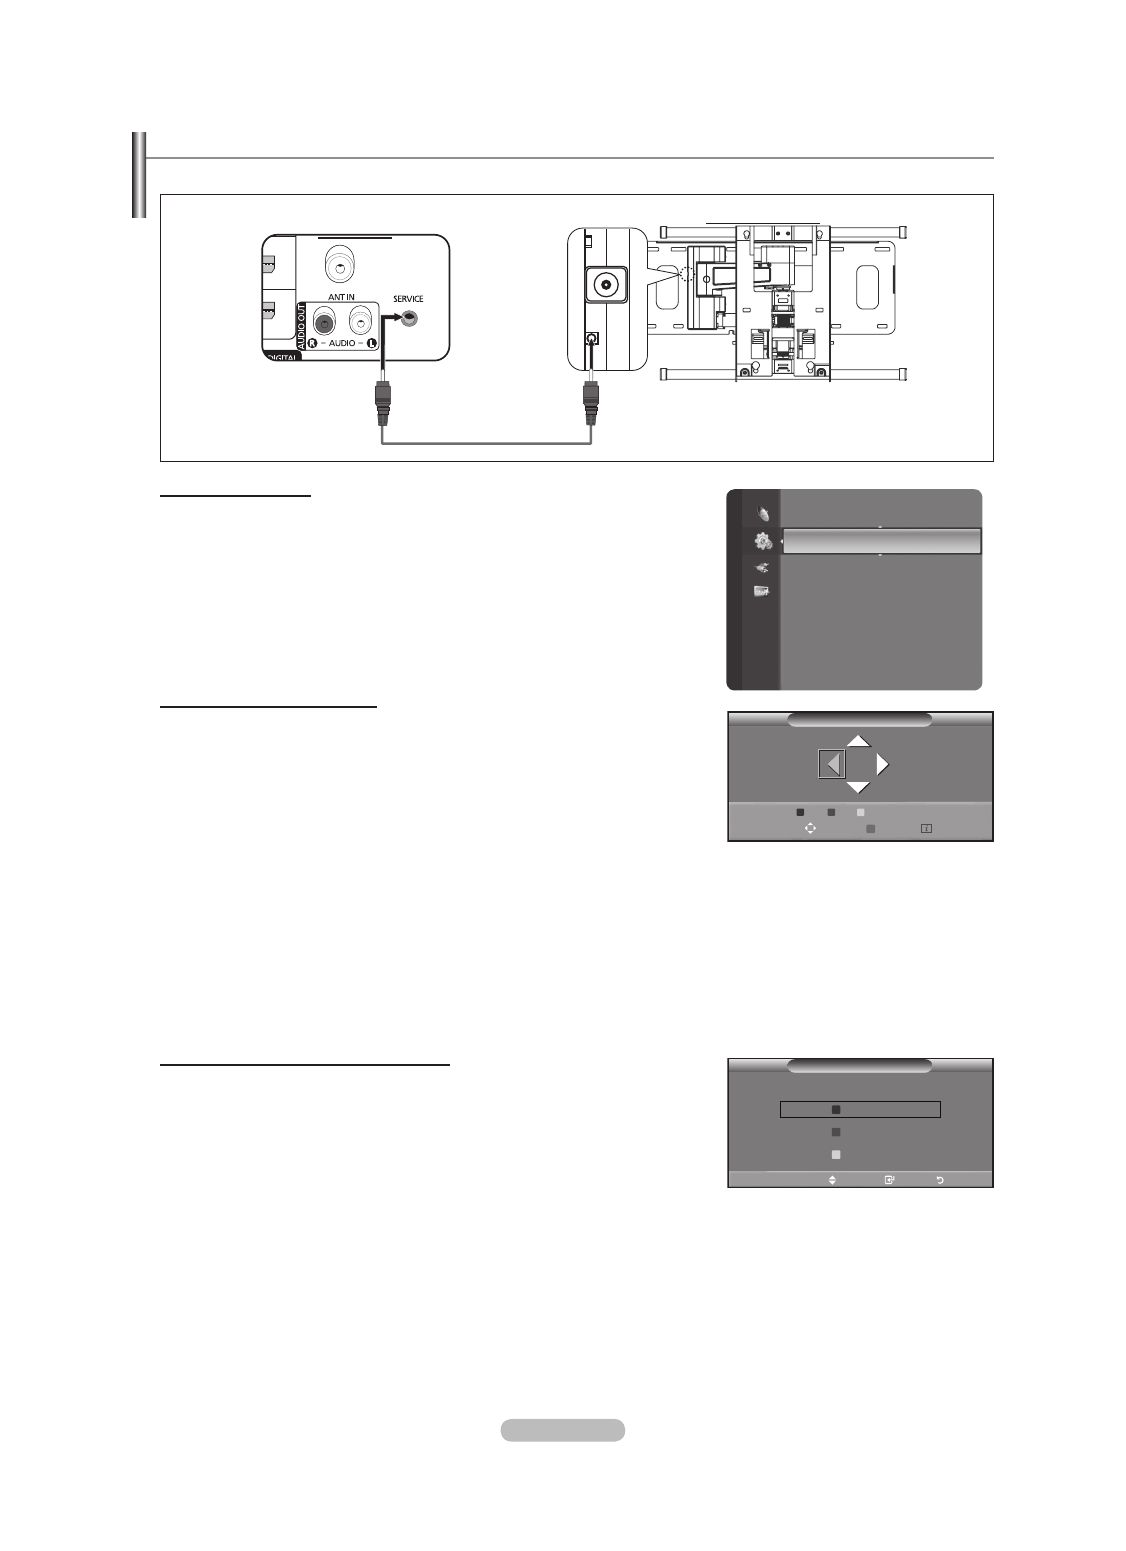
Auto Wall-Mount Adjustment (Sold separately) (Depending on the model)
Once the auto wall mount is installed, your TV’s position can be easily adjusted.
Entering the menu
1.
Press the ▲, ▼, ◄ or ► button on your remote control.
The Wall Mount Adjustment screen is displayed.
If the Auto Wall-Mount screen is not displayed when clicking on a direction
button while watching your TV, use the menu to display that screen.
Press the
MENU
button to display the menu. Press the ▲ or ▼ button to
select
Setup
, then press the
ENTER
E
button.
Press the ▲ or ▼ button to select
Wall-Mount Adjustment
, then press
the
ENTER
E
button.
Remembering the Position
.
Adjust to the desired position using the ▲,▼,◄,► buttons.
If you press an arrow button when no OSD is displayed on the TV screen,
the Adjustment screen appears.
Press the
INFO
button to reset. Press the ◄ or ► button to select
Yes
,
then press the
ENTER
E
button. The position is initialized to the default
setting.
3.
Press the blue button. Press the ▲ and ▼ buttons to select a save mode from
either Position 1, Position 2 or Position 3 in order to save the current position.
To not save the current position, press the
RETURN
button.
When selecting a save mode, you cannot use the Colour buttons.
4.
Press the
ENTER
E
button to save.
When Position1 is selected, the message
Current position saved as Position1
is displayed.
5.
Press the
ENTER
E
button.
The saved Position appears on the left side of the OSD.
Moving to the remembered position
1.
Complete Step 1 of
Entering the menu
.
.
Pressing a Colour (Red, Green, Yellow) button moves the auto wall mount to the
saved position.
You can move the wall mount to one of the 3 pre-set positions by pressing
the Red (Position 1), Green (Position 2) or Yellow (Position 3) buttons.
If you adjust the Position after moving to a pre-set position, the position
display will disappear.
For installation, refer to the Installation Manual provided with the wall mount.
For product installation and the installation and moving of the wall mount, make sure to consult a specialized installation
company.
This installation manual is to be used when attaching the wall mount to a wall. When attaching to other building materials,
please contact your nearest dealer.
The auto wall mount will not work when
Anynet+
or
WISELINK Pro
is operating.
N
N
-
-
N
N
N
O
N
N
N
N
N
N
N
N
Se
tu
p
Digital Text
: Enable
Light Effect
: Watching TV
Wall-Mount Adjustment
►
Melody
: Off
Entertainment
: Off
Energy Saving
: Off
PIP
Software Upgrade
Common Interface
Wall-Mount Adjustment
Position
1
3
Adjust Save Centre
Save
Select a mode to save.
Move
Enter
Return
Position1
Position
Position3
Serial Cable(1P to 1P)(Not supplied)
Rear Panel
Auto Wall-Mount
BN68-01757D-Eng-3.indd 63
2008-08-20 오후 7:30:35


