
Строительные пылесосы Makita DVC261ZX11 - инструкция пользователя по применению, эксплуатации и установке на русском языке. Мы надеемся, она поможет вам решить возникшие у вас вопросы при эксплуатации техники.
Если остались вопросы, задайте их в комментариях после инструкции.
"Загружаем инструкцию", означает, что нужно подождать пока файл загрузится и можно будет его читать онлайн. Некоторые инструкции очень большие и время их появления зависит от вашей скорости интернета.


14 ENGLISH
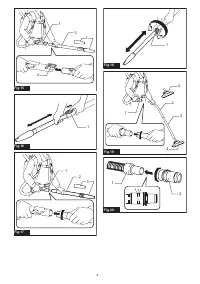
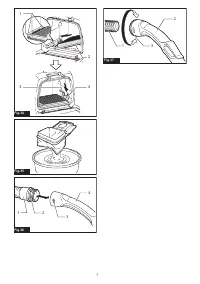
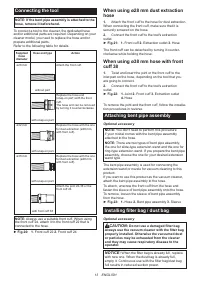
1.
Unlock the latch by lifting the bottom side. Push
the grooved area to lift the front latching side. Pull the
latch to open the lid.
►
Fig.24:
1.
Hook
2.
Lid
2.
Insert the filter bag into the slit on the upper side of
the room as illustrated.
►
Fig.25:
1.
Slit
2.
Filter bag
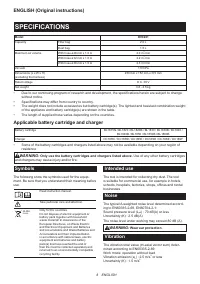
When using the dust bag, insert the brim of the dust bag
into the slit.
►
Fig.26:
1.
Slit
2.
Brim
3.
Dust bag
3.
Align the hole of the filter bag with the hose cuff and
push the cardboard portion to the end. Make sure that the
rubber ring on the filter bag goes over the rim on the hose cuff.
►
Fig.27:
1.
Rubber ring on the filter bag
2.
Rim on
the hose cuff
3.
Cardboard portion of the
filter bag
4.
Hose cuff
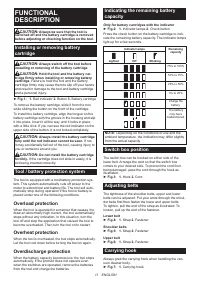
OPERATION
WARNING:
Operators shall be adequately
instructed on the use of the vacuum cleaner.
WARNING:
This vacuum cleaner is not suit-
able for picking up hazardous dust.
CAUTION:
This cleaner is for dry use only.
CAUTION:
This cleaner is for indoor use only.
CAUTION:
Always insert the battery cartridge
all the way until it locks in place.
If you can see the
red indicator on the upper side of the button, it is not
locked completely. Insert it fully until the red indicator
cannot be seen. If not, it may accidentally fall out of
the tool, causing injury to you or someone around
you.
CAUTION:
During operation, be conscious
of the vacuum cleaner on your back.
You may
lose your balance if the vacuum cleaner body bumps
against a wall or the hose is hooked by an obstacles.
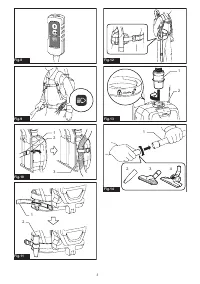
1.
Shoulder the vacuum cleaner body and fas-
ten upper and lower belts. Adjust the tightness as
necessary.
►
Fig.28
2.
Press button to start vacuuming. If you want
to change the suction power, press button until the
desired suction power is selected. Press button to
stop.
►
Fig.29
During the operation, hook the switch box on the D-ring
or the lower belt. The hook can be slanted for lighting
forward when hooked on the lower belt.
►
Fig.30:
1.
D-ring
2.
Lower belt
NOTE:
The vacuum cleaner will automatically switches
off and the LED light flashes when the vacuum cleaner
is overheated due to the reduced air-flow into the
machine caused by clogged hose, pipe, filter or other
reasons. In this case, remove the cause of the problem
and cool the vacuum cleaner before restarting.
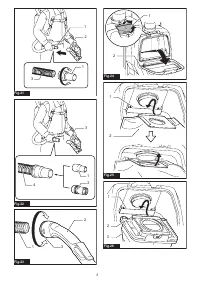
3.
Replace the filter bag when it becomes full. Open the lid
and take out the filter bag. Pull the strip on the side of the open
-
ing to shut the filter bag and dispose of the filter bag in whole.
►
Fig.31:
1.
Strip
When using a dust bag, take out the dust bag and dis-
pose of the dust by releasing the latch.
►
Fig.32:
1.
Latch
NOTICE:
Periodically check the filter bag if it is
full.
Continuous use with the filter bag full results in
reduced suction power.
NOTICE:
Do not use an used filter bag.
The filter
bag is designed for single use. Using filter bag repeat
-
edly may cause clogging of the filter and results in
damage to the cleaner. If you want to use the bag
repeatedly, use a dust bag.
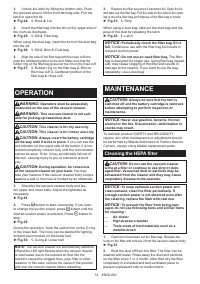
MAINTENANCE
CAUTION:
Always be sure that the tool is
switched off and the battery cartridge is removed
before attempting to perform inspection or
maintenance.
NOTICE:
Never use gasoline, benzine, thinner,
alcohol or the like. Discoloration, deformation or
cracks may result.
To maintain product SAFETY and RELIABILITY,
repairs, any other maintenance or adjustment should
be performed by Makita Authorized or Factory Service
Centers, always using Makita replacement parts.
Cleaning the HEPA filter
CAUTION:
Do not use the vacuum cleaner
without a filter or continue to use dirty or dam
-
aged filter. Vacuumed dust or particles may be
exhausted from the cleaner and they may cause
respiratory disease to the operator.
NOTICE:
To keep optimum suction power and
clean exhaust, clean the filter periodically. If
enough suction power is not obtained even after
the cleaning, replace the filter with new one.
NOTICE:
To prevent the filter from being dam
-
aged, do not use following tools and similar items
for cleaning :
—
Air duster
—
High pressure washer
—
Tools made of hard materials such as a
metallic brush
1.
Open the lid and take out the filter bag. Release the
hook on the filter and remove it from the vacuum cleaner body.
►
Fig.33
2.
Beat the dust off from the filter. The filter can be
washed with water. Rinse away the dust and particles
on the filter every 1 or 2 month. After that, dry the filter
completely in a shaded and well-ventilated place to
prevent unpleasant odor or malfunctions.
Содержание
- 64 ТЕХНИЧЕСКИЕ ХАРАКТЕРИСТИКИ; Подходящий блок аккумулятора и зарядное устройство
- 65 Вибрация; МЕРЫ БЕЗОПАСНОСТИ; Правила техники безопасности
- 66 Важные правила техники
- 67 СОХРАНИТЕ ДАННЫЕ; ОПИСАНИЕ РАБОТЫ; Установка или снятие блока
- 68 Защита от перегрева
- 69 Крюк на шланге; СБОРКА; Сборка шланга; Подсоединение инструмента
- 70 При использовании шланга для; Установка мешочного фильтра /
- 71 ЭКСПЛУАТАЦИЯ; Очистка фильтра HEPA
- 72 Очистка пылесборного мешка; ДОПОЛНИТЕЛЬНЫЕ
Характеристики

Остались вопросы?Не нашли свой ответ в руководстве или возникли другие проблемы? Задайте свой вопрос в форме ниже с подробным описанием вашей ситуации, чтобы другие люди и специалисты смогли дать на него ответ. Если вы знаете как решить проблему другого человека, пожалуйста, подскажите ему :)


