
Шуруповерты Hitachi WH12DMR - инструкция пользователя по применению, эксплуатации и установке на русском языке. Мы надеемся, она поможет вам решить возникшие у вас вопросы при эксплуатации техники.
Если остались вопросы, задайте их в комментариях после инструкции.
"Загружаем инструкцию", означает, что нужно подождать пока файл загрузится и можно будет его читать онлайн. Некоторые инструкции очень большие и время их появления зависит от вашей скорости интернета.


English
7
5. Installing a socket (Impact w rench)
Select the socket to be used.
䢇
Pin, O-ring type
(1) Align the hole in the socket w ith the hole in the anvil
and insert the anvil into the socket.
(2) Insert the pin into the socket.
(3) Attach the ring to the groove on the socket.
䢇
Plunger type (
Fig. 3
)
Align the plunger located in the square part of the
anvil
B
w ith the hole in the hex. socket
0
. Then push
the plunger, and m ount the hex. socket
0
on the anvil
B
. Check that the plunger is fully engaged in the hole.
When rem oving the socket
0
, reverse the sequence.
䢇
Retaining ring type
(1) Align the square portions of the socket and the anvil
w ith each other.
(2) M ake sure to firm ly install the socket by pushing it all
the w ay into the anvil.
(3) When rem oving the socket, pull it out of the anvil.
CAUTION
䡬
Please use the designated attachm ents w hich are
listed in the operations m anual and Hitachi’ s catalog.
Accidents or injuries could result from not doing so.
䡬
M ake sure to firm ly install the socket in the anvil. If
the socket is not firm ly installed it m ight com e out
and cause injuries.
HOW TO USE
CAUTION
䡬
When using the light equipped hook, pay sufficient
attention so that the m ain equipm ent does not fall. If
the tool falls, there is a risk of accident.
䡬
Do not attach the tip tool except phillips bit to the tool
m ain unit w hen carrying the tool m ain unit w ith the
light equipped hook suspended from a w aist belt.
In j u r y m ay r esu l t i f y o u car r y t h e eq u i p m en t
suspended from the w aist belt w ith sharp tipped
com ponents such as drill bit attached.
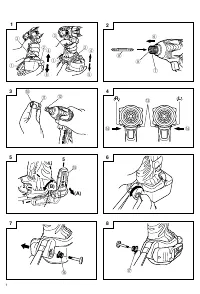
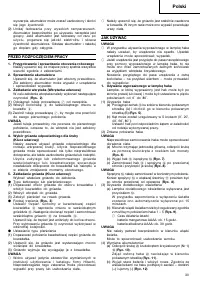
1. Using the light equipped hook
The light equipped hook can be installed on the right
or left side and the angle can be adjusted in 5 steps
betw een 0
°
and 80
°
.
(1) Operating the hook
(a) Pull out the hook
E
tow ard you in the direction of
arrow (A) and turn in the direction of arrow (B)
(
Fig. 5
).
(b) The angle can be adjusted in 5 steps (0°, 20°, 40°,
60°, 80°).
Adjust the angle of the hook to the desired position
for use.
(2) Sw itching the hook position
CAUTION
Incom plete installation of the hook m ay result in
bodily injury w hen used.
(a) Securely hold the m ain unit and rem ove the screw
using a slotted head screw driver or a coin (
Fig. 6
).
(b) Rem ove the hook
E
and spring
F
(Fig. 7
).
(c) Install the hook
E
and spring
F
on the other side
and securely fasten w ith screw (
Fig. 8
).
NOTE
Pay attention to the spring
F
orientation. Install the
spring
F
w ith larger diam eter
G
aw ay from you
(
Fig. 8
).
(3) Using as an auxiliary light
(a) Press the sw itch
H
to turn off the light.
If forgotten, the light w ill turn off autom atically
after 15 m inutes.
(b) The direction of the light can be adjusted w ithin
the range of hook positions 1 – 5 (
Fig. 9
).
䡬
Lighting tim e
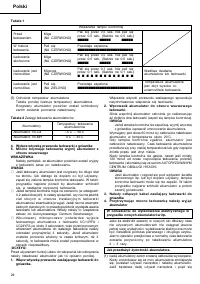
AAAA m anganese batteries: approx. 15 hrs.
AAAA alkali batteries: approx. 30 hrs.
CAUTION
Do not look directly into the light.
Such actions could result in eye injury.
(4) Replacing the batteries
(a) Loosen the hook screw
J
w ith a phillips-head
screw driver (No. 1)
I
(
Fig. 10
).
Rem ove the hook cover
L
by pushing in the
direction of the arrow (
Fig. 11
).
(b ) Rem o v e t h e o l d b at t er i es an d i n ser t t h e n ew
batteri es. Align w ith the hook indicati ons and
p o si t i o n t h e p l u s (+) an d m i n u s (–) t er m i n al s
correctly (
Fig. 12
).
(c) Align the indentation in the hook
E
m ain body
w ith the protuberance of the hook cover
L
, press
the hook cover
L
in the direction opposite to that
of the arrow
K
show n in
Fig. 11
and then tighten
the screw .
U se co m m er ci al l y av ai l ab l e A A A A b at t er i es
(1.5 V)
O
.
NOTE
Do not tighten the screw excessively. Such action
could strip the screw threads.
CAUTION
䡬
Failure to observe the follow ing can result in battery
leakage, rust or m alfunction.
Position the plus (+) and m inus (–) term inals correctly.
Replace both batteries at the sam e tim e. Do not m ix
old and new batteries.
Re m o v e e x h a u s t e d b a t t e r i e s f r o m t h e h o o k
im m ediately.
䡬
Do not discard batteries together w ith norm al trash
and do not throw batteries into fire.
䡬
Store batteries out of the reach of children.
䡬
Use batteries correctly in accordance w ith the battery
specifications and indications.
2. Check the rotational direction
The bit rotates clockw ise (view ed from the rear side)
by pushing the R-side of the push button
C
.
The L-side of the push button is pushed to turn the bit
counterclockw ise (See
Fig. 4
) (The
L
and
R
m arks
are provided on the body).
CAUTION
The push button cannot be sw itched w hile the im pact
driver is turning. To sw itch the push button, stop the
im pact driver, then set the push button.
3. Sw itch operation
䡬
When the trigger sw itch is depressed, the tool rotates.
When the trigger is released, the tool stops.
䡬
The rotational speed can be controlled by varying the
am ount that the trigger sw itch is pulled. Speed is low
w hen the trigger sw itch is pulled slightly and increases
as the trigger sw itch is pulled m ore.
4. Tightening and loosening screw s (Impact driver)
Install the bit that m atches the screw , line up the bit in
the grooves of the head of the screw , then tighten it.
Push the im pact driver just enough to keep the bit
fitting the head of the screw .


