
Шуруповерты Hitachi WH12DMR - инструкция пользователя по применению, эксплуатации и установке на русском языке. Мы надеемся, она поможет вам решить возникшие у вас вопросы при эксплуатации техники.
Если остались вопросы, задайте их в комментариях после инструкции.
"Загружаем инструкцию", означает, что нужно подождать пока файл загрузится и можно будет его читать онлайн. Некоторые инструкции очень большие и время их появления зависит от вашей скорости интернета.


English
5
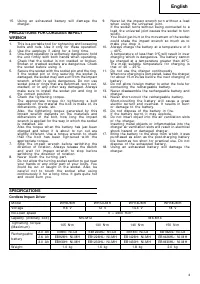
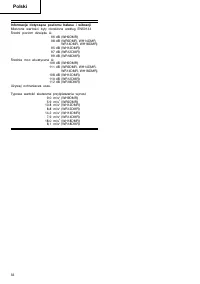
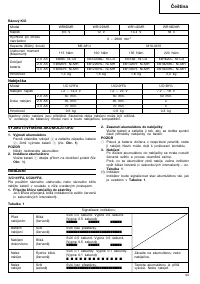
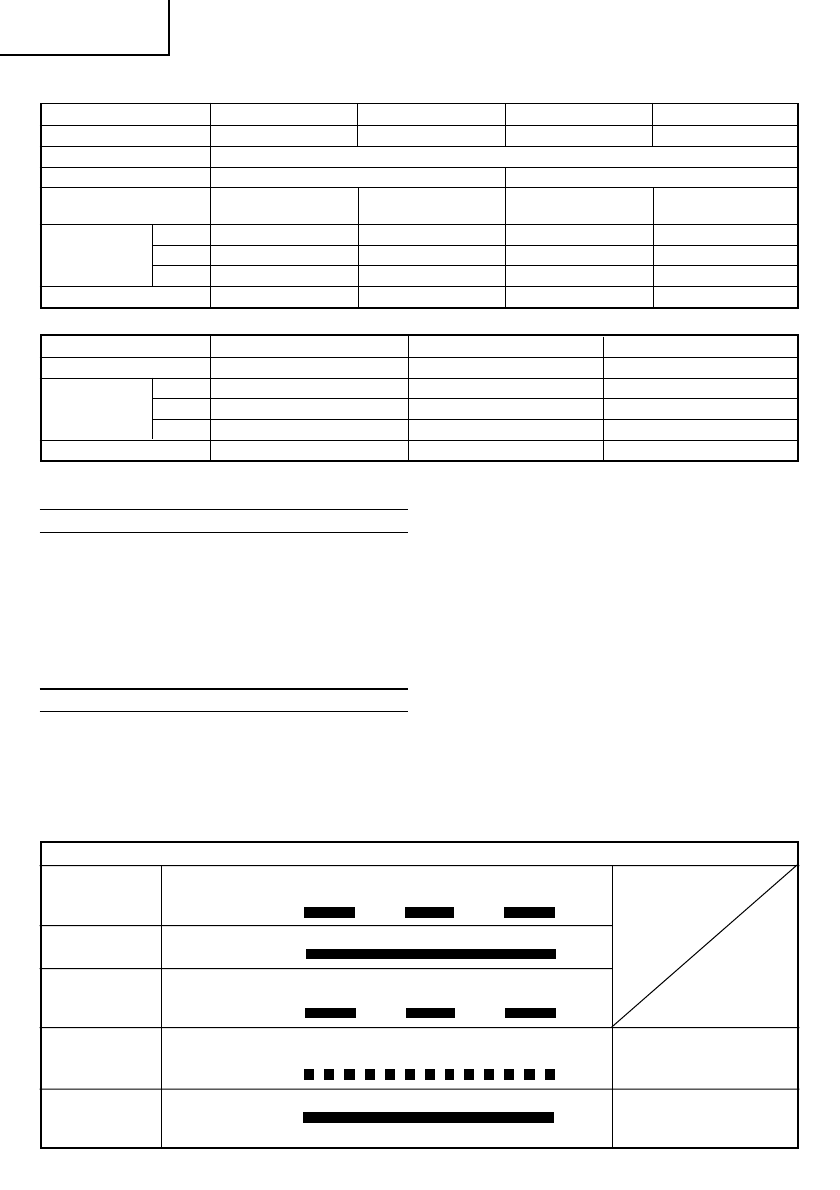
Charger
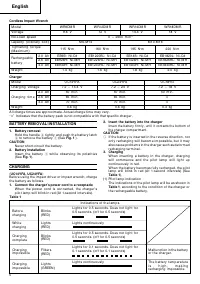
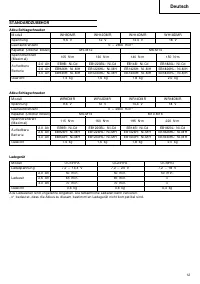
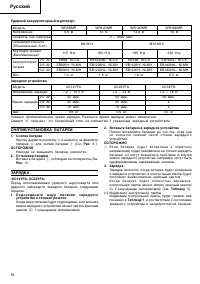
Cordless Impact Wrench
M odel
WR9DM R
WR12DM R
WR14DM R
WR18DM R
Voltage
9.6 V
12 V
14.4 V
18 V
No-Load speed
0 – 2600 m in
-1
Capacity (Ordinary bolt)
M 6-M 14
M 10-M 16
Tightening torque
(M axim um )
115 N·m
160 N·m
195 N·m
220 N·m
Rechargeable
2.0 Ah
EB9B: Ni-Cd
EB1220BL: Ni-Cd
EB14B: Ni-Cd
EB1820L: Ni-Cd
2.6 Ah
EB926H: Ni-M H
EB1226HL: Ni-M H
EB1426H: Ni-M H
EB1826HL: Ni-M H
battery
3.0 Ah
EB930H: Ni-M H
EB1230HL: Ni-M H
EB1430H: Ni-M H
EB1830HL: Ni-M H
Weight
1.4 kg
1.6 kg
1.8 kg
2.0 kg
M odel
UC14YFA
UC24YFA
UC18YG
Charging voltage
7.2 – 14.4 V
7.2 – 24 V
7.2 – 18 V
2.0 Ah
50 m in.
50 m in.
50 m in.
Charging tim e 2.6 Ah
65 m in.
65 m in.
x
3.0 Ah
70 m in.
70 m in.
x
Weight
0.6 kg
0.6 kg
0.3 kg
All charge tim es are approxim ate. Actual charge tim e m ay vary.
“ x” Indicates that the battery pack is not com patible w ith that specific charger.
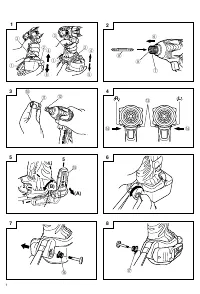
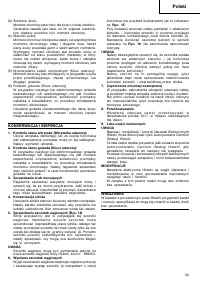
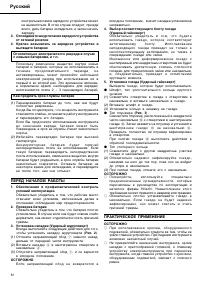
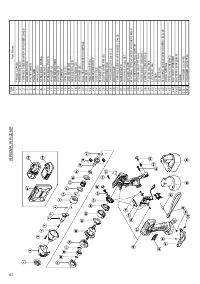
BATTERY REM OVAL/ INSTALLATION
1. Battery removal
Hold the handle
3
tightly and push the battery latch
2
to rem ove the battery
1
(See
Fig. 1
).
CAUTION
Never short-circuit the battery.
2. Battery installation
Insert the battery
1
w hile observing its polarities
(See
Fig.
1
).
CHARGING
〈
UC14YFA, UC24YFA
〉
Before using the im pact driver or im pact w rench, charge
the battery as follow s.
1. Connect the charger’s pow er cord to a receptacle
When the pow er cord is connected, the charger ’ s
pilot lam p w ill blink in red (At 1-second intervals).
2. Insert the battery into the charger
Insert the battery firm ly, until it contacts the bottom of
the charger com partm ent.
CAUTION
䡬
If the battery is inserted in the reverse direction, not
only recharging w ill becom e im possible, but it m ay
also cause problem s in the charger such as deform ed
recharging term inal.
3. Charging
When inserting a battery in the charger, charging
w i l l co m m en ce an d t h e p i l o t l am p w i l l l i g h t u p
continuously in red.
When the battery becom es fully recharged, the pilot
lam p w ill blink in red (At 1-second intervals) (See
Table 1
).
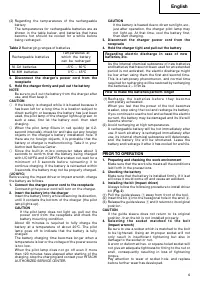
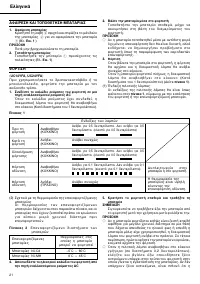
(1) Pilot lam p indication
The indications of the pilot lam p w ill be as show n in
Table 1
, according to the condition of the charger or
the rechargeable battery.
Li g h t s f o r 0.5 seco n d s. Do es n o t l i g h t f o r
0.5 seco n d s. (o f f f o r 0.5 seco n d s)
Li g h t s co n t i n u o u sl y
Li g h t s f o r 0.5 seco n d s. Do es n o t l i g h t f o r
0.5 seco n d s. (o f f f o r 0.5 seco n d s)
Li g h t s f o r 0.1 seco n d s. Do es n o t l i g h t f o r
0.1 seco n d s. (o f f f o r 0.1 seco n d s)
Li g h t s co n t i n u o u sl y
Bef o r e
ch ar g i n g
W h i l e
ch ar g i n g
Ch ar g i n g
co m p l et e
Ch ar g i n g
i m p o ssi b l e
Ch ar g i n g
i m p o ssi b l e
Bl i n ks
(RED)
Li g h t s
(RED)
Bl i n ks
(RED)
Fl i ker s
(RED)
Li g h t s
(GREEN )
M al f u n ct i o n i n t h e b at t er y
o r t h e ch ar g er .
Th e b at t er y t em p er at u r e
i s h i g h , m a k i n g
r ech ar g i n g i m p o ssi b l e.
Table 1
In d i cat i o n s o f t h e l am p s


