
Шуруповерты Dewalt 18 В XR FLEXVOLT ADVANTAGE XRP DCD999NT-XJ - инструкция пользователя по применению, эксплуатации и установке на русском языке. Мы надеемся, она поможет вам решить возникшие у вас вопросы при эксплуатации техники.
Если остались вопросы, задайте их в комментариях после инструкции.
"Загружаем инструкцию", означает, что нужно подождать пока файл загрузится и можно будет его читать онлайн. Некоторые инструкции очень большие и время их появления зависит от вашей скорости интернета.


11
English
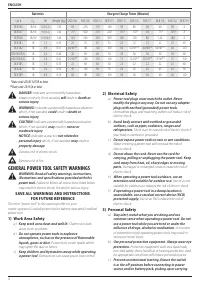
Keyless Single Sleeve Chuck (Fig. C)
WARNING:
Do not attempt to tighten drill bits (or
any other accessory) by gripping the front part of the
chuck and turning the tool on. Damage to the chuck
and personal injury may result. Always lock off trigger
switch and remove the battery from the tool when
changing acces sories.
WARNING:
Always ensure the bit is secure before starting
the tool. A loose bit may eject from tool causing possible
personal injury.
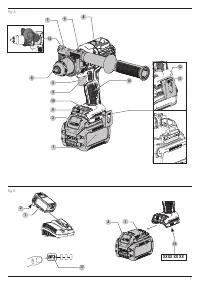
Your tool features a keyless chuck
6
with one rotating chuck
sleeve
7
for one‑handed operation of the chuck. To insert a drill
bit or other accessory, follow these steps.
LED Worklight (Fig. E)
The LED worklight
9
and its worklight switch
10
are located on
the foot of the tool. The worklight is activated when the trigger
switch is depressed. The low, medium, and spotlight modes can
be changed by moving the switch on the foot of the tool. If the
trigger switch remains depressed, the worklight will remain on
in all modes.
When on low and medium settings, the beam will automatically
turn off 20 seconds after the trigger switch is released.
Spotlight Mode
The high setting is the spotlight mode. The spotlight will run
for 20 minutes after the trigger switch is released. Two minutes
before the spotlight will shut off, it will flash twice and then dim.
To avoid the spotlight shutting off, lightly tap the trigger switch.
WARNING:
While using the worklight in medium or
spotlight mode, do not stare at the light or place the drill in
a position which may cause anyone to stare into the light.
Serious eye injury could result.
CAUTION:
When using the tool as a spotlight, be sure
it is secured on a stable surface where it will not cause a
tripping or falling hazard.
CAUTION:
Remove all accessories from the chuck before
using the drill as a spotlight. Personal injury or property
damage could result.
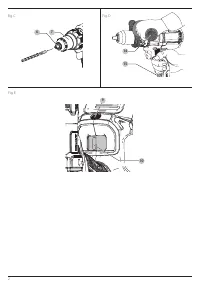
Low Battery Warning
When in spotlight mode and the battery is nearing complete
discharge, the spotlight will flash twice and then dim. After two
minutes, the battery will be completely discharged and the
drill will immediately shut down. At this point, replace with a
charged battery.
WARNING:
To reduce the risk of injury, always have a
back‑up battery or secondary lighting available if the
situation warrants it.
nOTE:
Do not change gears when the tool is running. Always
allow the drill to come to a complete stop before changing
gears. If you have trouble changing gears, make sure that the
gear shifter is engaged in one of the three speed settings.
If the speed shifter becomes stuck or is difficult to select the
desired gear, pull the variable speed trigger switch
3
to rotate
the motor, then select the gear.
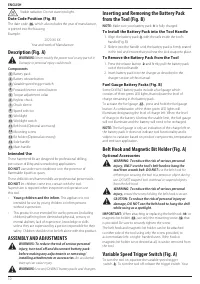
Three‑Speed Gearing (Fig. A)
The three‑speed feature of your tool allows you to shift gears
for greater versatility. To select speed 1 (highest torque setting),
turn the tool off and permit it to stop. Slide the gear shifter
8
all the way forward. Speed 2 (middle torque and speed setting)
is in the middle position. Speed 3 (highest speed setting) is to
the rear.
Torque Adjustment Collar/Electronic Clutch
(Fig. A)
Your tool has an electronic adjustable torque screwdriver
mechanism for driving and removing a wide array of fasteners.
Circling the torque adjustment collar
5
are numbers. These
numbers are used to set the clutch to deliver a torque range.
The higher the number on the collar, the higher the torque and
the larger the fastener which can be driven. To select any of the
numbers, rotate until the desired number aligns with the arrow.
WARNING:
When the torque adjustment collar is in the
drill or hammerdrill positions, the drill will not clutch. The
drill may stall if overloaded, causing a sudden twist.
Forward/Reverse Control Button (Fig. A)
A forward/reverse control button
4
determines the direction of
the tool and also serves as a lock‑off button.
To select forward rotation, release the trigger switch and
depress the for ward/re verse control button on the right side of
the tool.
To select reverse, release the trigger switch and depress the
forward/reverse control button on the left side of the tool.
The centre position of the control button locks the tool in the off
position. When changing the position of the control button, be
sure the trigger is released.
nOTE:
The first time the tool is run after changing the direction
of rotation, you may hear a click on start up. This is normal and
does not indicate a problem.
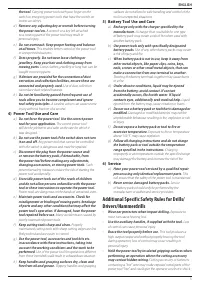
Side Handle (Fig. A, D)
WARNING:
To reduce the risk of personal injury,
ALWAYS
operate the tool with the side handle properly installed.
Failure to do so may result in the side handle slipping
during tool operation and subsequent loss of control. Hold
tool with both hands to maximize control.
The side handle
14
clamps to the front of the gear case and
may be rotated 360˚ to permit right‑ or left‑hand use. Side
handle must be tightened sufficiently to resist the twisting
action of the tool if the accessory binds or stalls. Be sure to grip
the side handle at the far end to control the tool during a stall.
If model is not equipped with side handle, grip drill with one
hand on the handle and one hand on the battery pack.
nOTE:
Side handle comes equipped on all models.
tool is equipped with a brake. The chuck will stop as soon as the
trigger switch is fully released.
nOTE:
Continuous use in variable speed range is not
recommended. It may damage the switch and should
be avoided.
Содержание
- 17 ОБЩИЕ ПРАВИЛА ТЕХНИКИ; СОХРАНИТЕ ВСЕ ИНСТРУКЦИИ ДЛЯ; Батареи
- 18 ) Эксплуатация электроинструмента и уход
- 19 ) Использование аккумуляторных
- 20 Зарядные устройства; Электробезопасность; Использование удлинительного кабеля; СОХРАНИТЕ НАСТОЯЩЕЕ РУКОВОДСТВО; Остаточные риски
- 21 Работа с зарядным устройством
- 22 Аккумуляторные батареи; ВНИМАТЕЛЬНО ПРОЧТИТЕ ВСЕ ИНСТРУКЦИИ; Инструкции по очистке зарядного устройства; Температурная задержка; Крепление на стену
- 23 Транспортировка батареи FlEXVOlT; эксплуатация; Режим транспортировки:; Транспортировка
- 24 Маркировка на инструменте; Тип батареи; Рекомендации по хранению
- 25 Дополнительные принадлежности; СБОРКА И РЕГ УЛИРОВКА; компоненты; Назначение; НЕ исПОЛЬЗуйТЕ
- 27 Режим фонаря
- 29 Защита окружающей среды; Чистка


