Пилы дисковые Einhell TC-TS 254 - инструкция пользователя по применению, эксплуатации и установке на русском языке. Мы надеемся, она поможет вам решить возникшие у вас вопросы при эксплуатации техники.
Если остались вопросы, задайте их в комментариях после инструкции.
"Загружаем инструкцию", означает, что нужно подождать пока файл загрузится и можно будет его читать онлайн. Некоторые инструкции очень большие и время их появления зависит от вашей скорости интернета.


GB
- 30 -
•
Retighten the two knurled screws (26) in or-
der to fix the stop rail (23).
•
The procedure for changing over to the high
guide face is the same.
•
Warning! When in use, the stop rail (23) must
always be screwed to the side of the parallel
stop (7) which faces the saw blade.
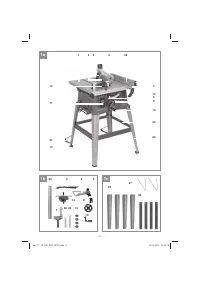
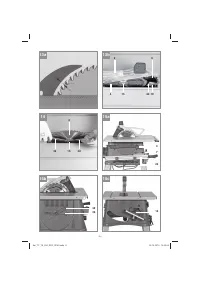
7.3.2. Cutting width (Fig. 17)
•
The parallel stop (7) can be mounted on eit-
her side of the saw table (1).
•
The parallel stop (7) has to be mounted in the
guide rail (28) of the saw table (1).
•
The parallel stop (7) can be set to the requi-
red dimension with the help of the scale (22)
on the guide rail (28).
•
You can clamp the parallel stop in the requi-
red position by pressing the eccentric lever
(12).
7.3.3. Setting the stop length (Fig. 17, 18)
•
The stop rail (23) can be moved in longitudi-
nal direction in order to prevent the workpiece
from becoming jammed.
•
Rule of thumb: The rear end of the stop co-
mes up against an imaginary line that begins
roughly at the center of the blade and runs at
an angle of 45° to the rear.
•
Set the required cutting width
- Slacken the knurled screws (26) and push
the stop rail (23) forward until it touches the
imaginary 45° line.
- Retighten the knurled screws (26).
Warning!
The gap between the saw table (1) and
the underside of the stop rail (23) must not be
too large in order to prevent the material getting
jammed. To adjust the distance, the parallel stop
(7) must be fastened
fi
rst using the eccentric lever
(12). Then slacken the knurled screws (26), lower
the stop rail (23) down to the saw table (1) and
secure the knurled screws (26) again afterwards.
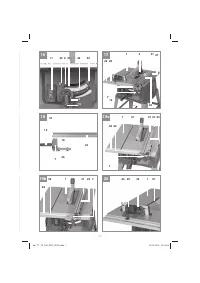
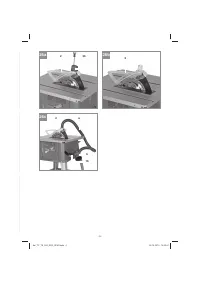
7.4 Cross stop (Fig. 20)
The cross stop (14) has to be used when making
cross cuts in wooden workpieces.
•
Slide the cross stop (14) into the slot (21) of
the saw table.
•
Undo the locking screw (20).
•
Turn the stop rail (24) until the arrow points to
the angle required.
•
Re-tighten the fastening screw (20).
•
Check the gap between the stop rail (24) and
the saw blade (4).
•
Warning! Do not push the stop rail (24) too
far toward the blade. The distance between
the stop rail (24) and the blade (4) should be
approx. 2 cm.
•
If necessary, slacken the two knurled screws
(34) and adjust the stop rail (24).
•
Retighten the knurled screws (34).
7.5 Setting the angle of the saw blade
(Fig. 16)
•
Undo the locking grip (9).
•
To adjust the angle of the saw blade, press
the hand wheel (8) towards the machine and
turn it at the same time until the pointer (41)
is aligned with the desired angular setting on
the scale (42).
•
Secure the locking grip (9) again.
•
If needed, the end stop for adjusting the ang-
le of the saw blade can be readjusted for 0°
and 45°. To do this, adjust the two adjustment
screws (32) and (33).
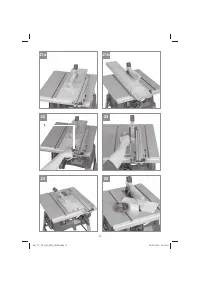
8. Operation
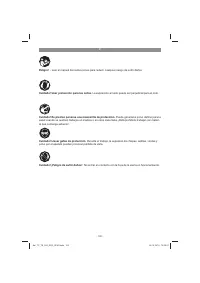
Warning!
•
After every new adjustment we recommend
you to make a trial cut in order to check the
new settings.
•
After switching on the saw, wait for the blade
to reach its maximum speed of rotation before
commencing with the cut.
•
Take extra care when starting the cut!
•
Never use the equipment without the suction
function.
•
Regularly check and clean the suction chan-
nels.
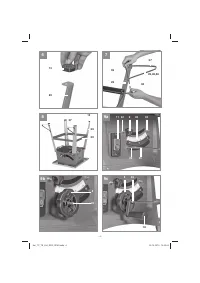
8.1 Making longitudinal cuts (Figure 21)
Longitudinal cutting (also known as slitting) is
when you use the saw to cut along the grain of the
wood. Press one edge of the workpiece against
the parallel stop (7) while the
fl
at side lies on the
saw table (1). The guard hood (2) must always be
lowered over the workpiece.
When you make a longitudinal cut, never adopt
a working position that is in line with the cutting
direction.
•
Set the parallel stop (7) in accordance with
the workpiece height and the desired width.
(See 7.3.)
•
Switch on the saw.
•
Place your hands (with fingers closed) flat on
the workpiece and push the workpiece along
the parallel stop (7) and into the blade (4).
Anl_TC_TS_254_ECO_SPK9.indb 30
Anl_TC_TS_254_ECO_SPK9.indb 30
25.10.2019 10:22:50
25.10.2019 10:22:50
Характеристики

Остались вопросы?Не нашли свой ответ в руководстве или возникли другие проблемы? Задайте свой вопрос в форме ниже с подробным описанием вашей ситуации, чтобы другие люди и специалисты смогли дать на него ответ. Если вы знаете как решить проблему другого человека, пожалуйста, подскажите ему :)


