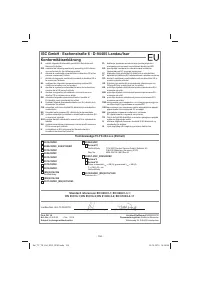
Пилы дисковые Einhell TC-TS 254 - инструкция пользователя по применению, эксплуатации и установке на русском языке. Мы надеемся, она поможет вам решить возникшие у вас вопросы при эксплуатации техники.
Если остались вопросы, задайте их в комментариях после инструкции.
"Загружаем инструкцию", означает, что нужно подождать пока файл загрузится и можно будет его читать онлайн. Некоторые инструкции очень большие и время их появления зависит от вашей скорости интернета.


GB
- 29 -
se order.
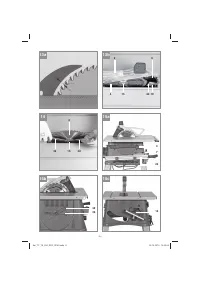
•
Important! Note the running direction. The
cutting angle of the teeth must point in run-
ning direction, i.e. forwards (see the arrow on
the blade guard).
•
Refit and set the splitter (5) and the saw blade
guard (2) (see 6.4.)
•
Check to make sure that all safety devices
are properly mounted and in good working
condition before you begin working with the
saw again.
•
Warning! Every time that you change the saw
blade, check that the saw blade guard (2)
opens and closes again in accordance with
requirements. Also check that the saw blade
(4) spins freely in the saw blade guard (2).
•
Warning! Every time that you change the saw
blade (4), check to see that it spins freely in
the table insert (6) in both perpendicular and
45° angle settings.
•
Warning! You should replace the table insert
(6) immediately whenever it is worn or dama-
ged (see 6.3).
•
Warning! The work to change and align the
saw blade (4) must be carried out correctly.
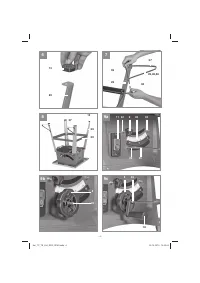
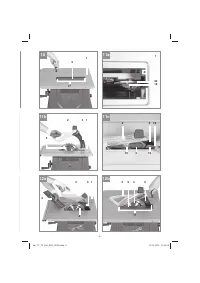
6.6 Putting away loose parts (Fig. 15)
•
When not in use, the parallel stop (7) and
push stick (3) can be secured as shown in
Fig. 15a.
•
The two wrenches (38+39) can be secured
as shown in Fig. 15b.
•
The cross stop (14) can be secured as shown
in Fig. 15c.
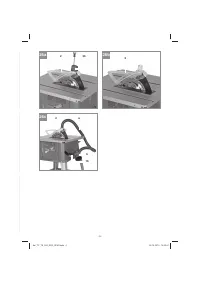
6.7 Connection for dust extractor (Fig. 2, 26)
A connection for a dust extractor is provided on
the extractor adapter on the housing (16) and on
the saw blade guard (2).
6.7.1 Dust extraction using a wet & dry vac
(Fig. 2):
•
A wet & dry vac is not supplied with the pro-
duct and is available as an accessory.
•
Connect the wet & dry vac to the extractor
adapter on the housing (16).
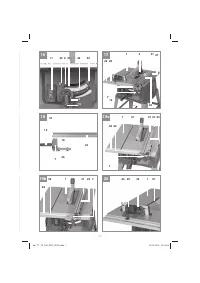
6.7.2 Dust extraction using a vacuum ext-
raction system and extractor adapter set
(Fig. 26):
•
The product is not supplied with an extractor
adapter set with suction hose (a) and adapter
(b) or a vacuum extraction system, which are
available as accessories.
•
Using a crosstip screwdriver, undo the screw
on the cap (36) on the saw blade guard (2).
•
The the cap (36) from the saw blade guard
(2).
•
Connect the adapter (b) to the extractor ad-
apter on the housing (16).
•
Connect the saw blade guard (2) and the ad-
apter (b) to the suction hose (a).
•
A vacuum extraction system can now be
connected to the 100 mm diameter of the
adapter (b).
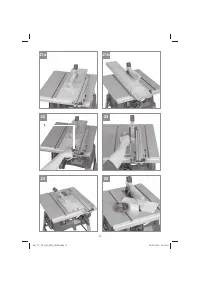
7. Using the saw
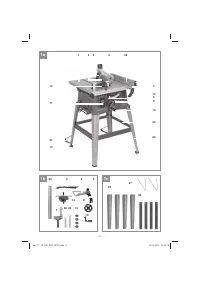
7.1. ON/OFF switch (Fig. 1, 16 / Item 11)
•
To turn the saw on, press the green button
„I“. Wait for the blade to reach its maximum
speed of rotation before commencing with
the cut.
•
To turn the equipment off again, press the red
button „0“.
7.2. Cutting depth (Fig. 1, 16)
Turn the crank (10) to set the blade (4) to the re-
quired cutting depth.
Turn anti-clockwise:
smaller cutting depth
Turn clockwise:
larger cutting depth
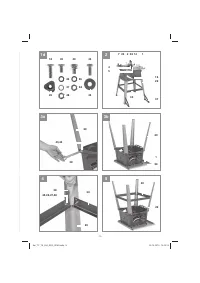
7.3 Parallel stop
The parallel stop (7) has to be used when making
longitudinal cuts in wooden workpieces.
7.3.1 Stop height (Fig. 18, 19)
•
The parallel stop (7) supplied with the bench-
type circular saw has two different guide
faces.
•
For thin material you must use the stop rail
(23) as shown in Fig. 19a, for thick material
you must use the stop rail as shown in Fig.
19b.
•
To change over the stop rail (23) to the lo-
wer guide face you have to slacken the two
knurled screws (26).
•
Remove the two screws (18) from the parallel
stop through the one slot (27) in the stop rail
(23).
•
Thread the two screws (18) into the other slot
(31) in the stop rail (23) and slide the stop rail
(23) back onto the parallel stop.
Anl_TC_TS_254_ECO_SPK9.indb 29
Anl_TC_TS_254_ECO_SPK9.indb 29
25.10.2019 10:22:50
25.10.2019 10:22:50
Характеристики

Остались вопросы?Не нашли свой ответ в руководстве или возникли другие проблемы? Задайте свой вопрос в форме ниже с подробным описанием вашей ситуации, чтобы другие люди и специалисты смогли дать на него ответ. Если вы знаете как решить проблему другого человека, пожалуйста, подскажите ему :)


