
Обогреватели Timberk THC WS2 3M AERO - инструкция пользователя по применению, эксплуатации и установке на русском языке. Мы надеемся, она поможет вам решить возникшие у вас вопросы при эксплуатации техники.
Если остались вопросы, задайте их в комментариях после инструкции.
"Загружаем инструкцию", означает, что нужно подождать пока файл загрузится и можно будет его читать онлайн. Некоторые инструкции очень большие и время их появления зависит от вашей скорости интернета.


IM2020
25
ATTENTION!
All work on connecting the air curtain should be done only with a complete removal of the supply
voltage.
4. The air curtain is designed to be connected to an alternating current electric network with a
single-phase voltage of 220V ~ (allowable voltage fluctuations from 198V~ to 242V~) and an
earth loop.
5. To connect to the electric network, the air curtain is equipped with a power cord with a plug.
6. To connect the air curtain to the electrical network, insert the plug of the power cord into a
socket with a grounding wire.
ATTENTION!
1. The electrical outlet must be enough for rated current of at least 16A, and the electrical wire
supplied to the outlet from the power board must have a core section of at least 1.5 mm
2
for
copper wire and at least 2.5 mm
2
for aluminum wires.
2. A circuit breaker designed for rated current of 16A must be installed in the power panel to
protect the wiring from overloads.
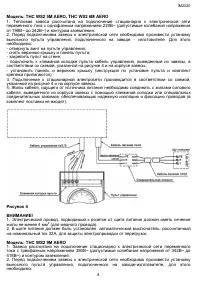
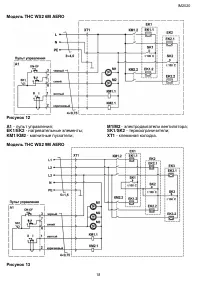
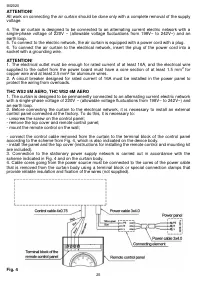
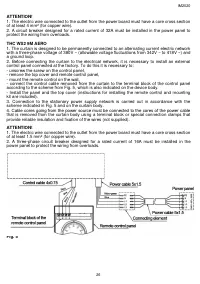
THC WS2 5M AERO, THC WS2 6M AERO
1. The curtain is designed to be permanently connected to an alternating current electric network
with a single-phase voltage of 220V ~ (allowable voltage fluctuations from 198V~ to 242V~) and
an earth loop.
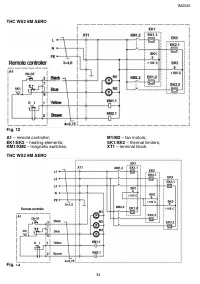
2. Before connecting the curtain to the electrical network, it is necessary to install an external
control panel connected at the factory. To do this, it is necessary to:
- unscrew the screw on the control panel;
- remove the top cover and remote control panel;
- mount the remote control on the wall;
- connect the control cable removed from the curtain to the terminal block of the control panel
according to the scheme from Fig. 4, which is also indicated on the device body.
- install the panel and the top cover (instructions for installing the remote control and mounting kit
are included).
3. Connection to the stationary power supply network is carried out in accordance with the
scheme indicated in Fig. 4 and on the curtain body.
4.
Сable cores going from the power source must be connected to the cores of the power cable
that is removed from the curtain body using a terminal block or special connection clamps that
provide reliable insulation and fixation of the wires (not supplied).
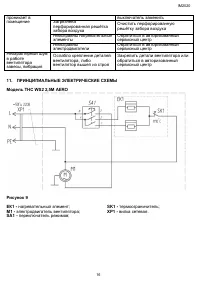
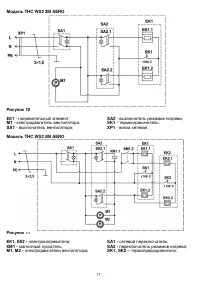
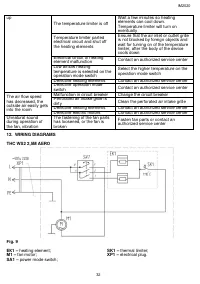
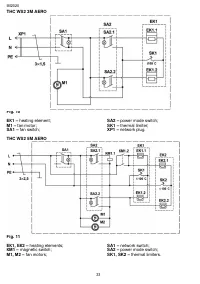
Fig. 4
Содержание
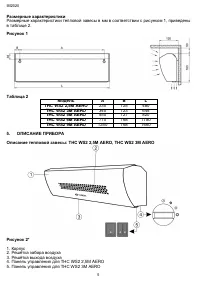
- 4 РАБОЧИЕ ХАРАКТЕРИСТИКИ
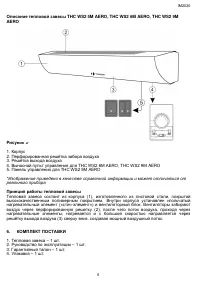
- 6 Принцип работы тепловой завесы; высококачественным полимерным покрытием.; КОМПЛЕКТ ПОСТАВКИ
- 8 Модель: THC WS2 5M AERO, THC WS2 6M AERO; отвернуть винт на пульте управления; Рисунок 4; жилы не менее 4 мм; Модель: THC WS2 9M AERO
- 9 ЭКСПЛУАТАЦИЯ ПРИБОРА
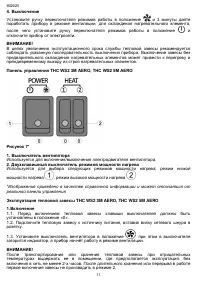
- 10 Ручка переключателя режимов работы; реальной панели управления; Выбор режима мощности нагрева
- 13 *Изображение приведено в качестве справочной; . Выбор режима мощности нагрева
- 18 Модель THC WS2 6M AERO; нагревательные элементы; Модель THC WS2 9M AERO


