Микроволновые печи Scarlett SC-2005 - инструкция пользователя по применению, эксплуатации и установке на русском языке. Мы надеемся, она поможет вам решить возникшие у вас вопросы при эксплуатации техники.
Если остались вопросы, задайте их в комментариях после инструкции.
"Загружаем инструкцию", означает, что нужно подождать пока файл загрузится и можно будет его читать онлайн. Некоторые инструкции очень большие и время их появления зависит от вашей скорости интернета.


–
Plug the microwave oven into a different outlet so that microwave oven and receiver are on different branch circuits.
INSTALLATION
•
Make sure that all the packing materials are removed from the unit.
•
Check the oven for any damage in transit:
–
Misaligned or bent door and sealing;
–
Housing and door window;
–
Inside surfaces.
•
If any damage occurs while using, switch off and unplug the oven and contact qualified service personnel.
•
Place the microwave oven on a flat, stable surface, able to hold its weight with a food to be cooked in the oven.
•
Do not place the oven where heat, moisture or high humidity are generated, or near flammable materials.
•
Do not place anything on the oven. Do not block any openings on the appliance.
•
For correct operation, the oven must have sufficient airflow. Allow 20 cm free space above the oven, 10 cm back and 5 cm from both sides.
MICROWAVE COOKING METHODS
•
Arrange food carefully. Place thickest areas towards outside of dish.
•
Watch cooking time. Cook for the shortest amount of time indicated and add more if needed. Food severely overcooked can smoke or ignite.
•
Cover foods while cooking. Cover prevents spattering and helps to cook food evenly.
•
Rearrange food such as meatballs halfway through cooking both from the top to the bottom and the center of the dish to the outside.
•
Round/oval dishes rather than square/oblong ones are recommended, as food in corners tends to overcook.
OPERATION
•
Plug oven to main.
•
Place food into the oven and close the door.
CURRENT TIME SETTING
•
The oven clock is of 24h size.
•
For example, to adjust clock to 11:30 press “CLOCK ” button.
•
Press numeric buttons in the following order: 1,1,3,0.
•
Press
“CLOCK”
button.
•
Display will show entered time.
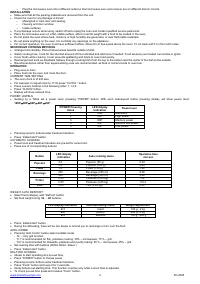
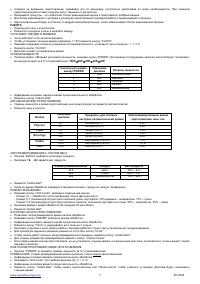
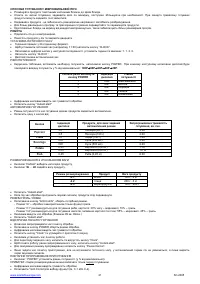
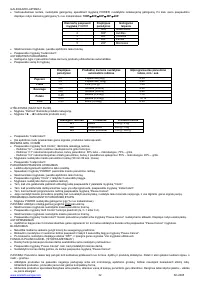
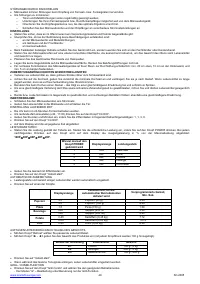
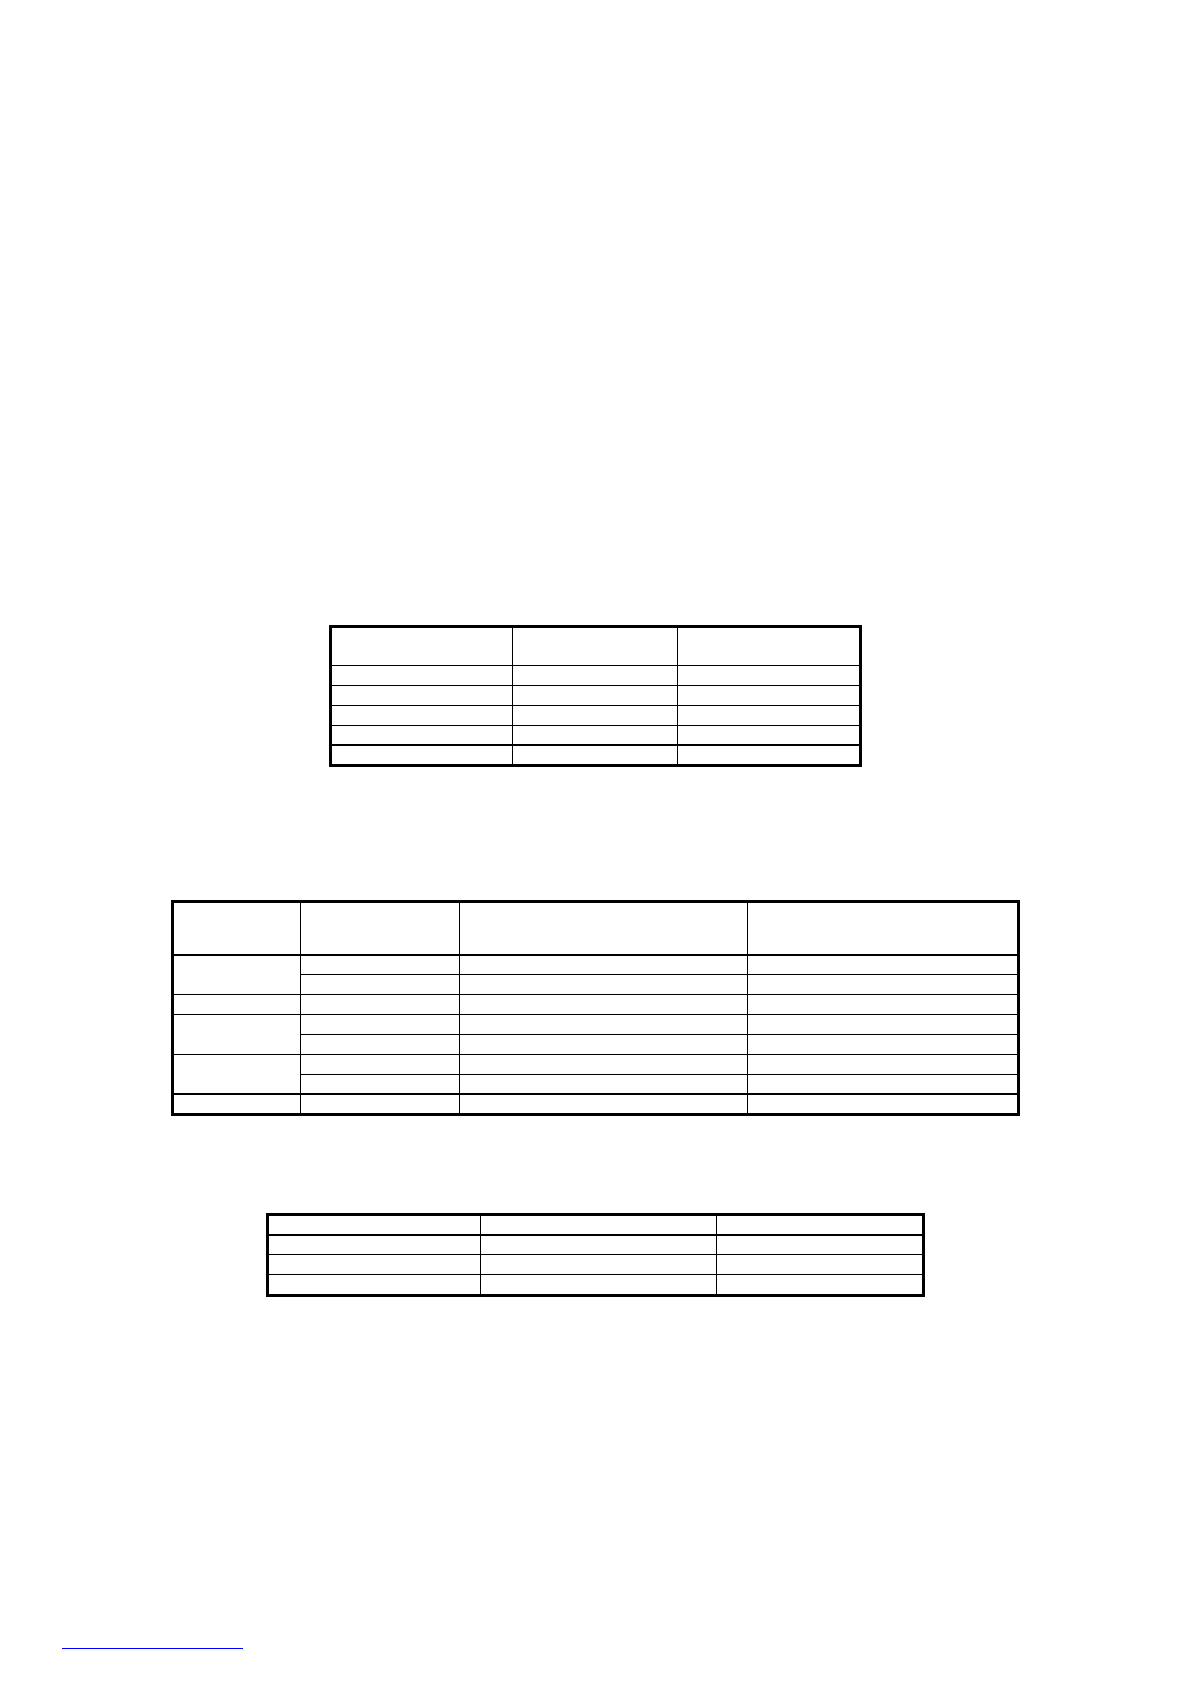
POWER
LEWELS
•
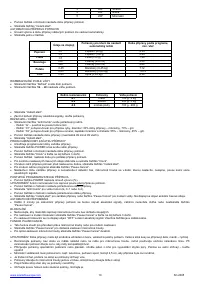
Guiding by a Table set a power level, pressing “POWER” button. With each subsequent button pressing display will show power level:
100
Р
⇨
80
Р
⇨
60
Р
⇨
40
Р
⇨
20
Р
.
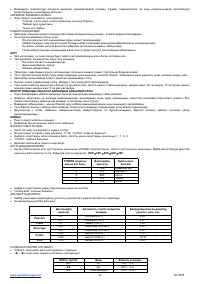
POWER
Pressing
times
LED display
Indication
Power level
1 100
Р
Maximum
2 80
Р
High
power
3 60
Р
Medium
power
4 40
Р
Medium low power
5 20
Р
Low
power
•
Pressing numeric buttons enter treatment duration.
•
Press “Instant.start” button.
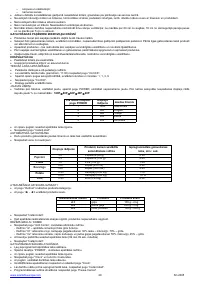
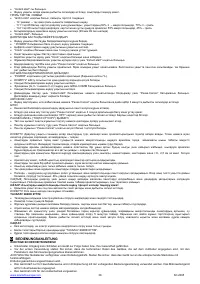
AUTOMATIC COOKING
•
Power level and treatment duration are pre-set for some food.
•
Press one of corresponding buttons:
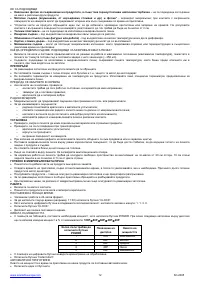
Button
LED display
Indication
Auto cooking menu
Operation time
min:sec
3.0
Popcorn (85 g)
2:30
Popcorn
3.5
Popcorn (100 g)
2:40
Pizza
1:0
Pizza (150 g)
1:00
250
Beverage (250 ml)
2:30
Beverage
500
Beverage (500 ml)
2:40
0.45
Potatoes (0,45 kg)
7:12
Potato
0.65
Potatoes (0,65 kg)
10:12
Fish
0.45
Fish (0,45 kg)
6:30
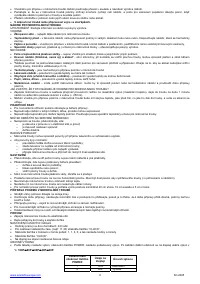
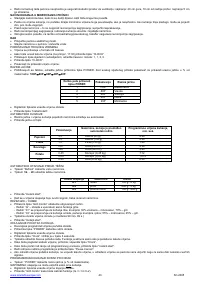
WEIGHT AUTO DEFROST
•
Select food category with “Defrost” button:
•
Set food weight using 1
►
-
◄
3 buttons.
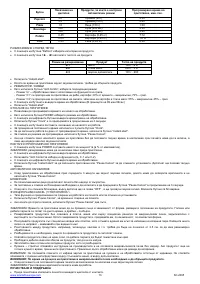
LED display Indication
Auto defrosting menu
Weight adjustment
d.1
meat
100 g...2 kg
d.2
poultry
200 g...3 kg
d.3
seafood
100 g...900 g
•
Press “Instant.start” button.
•
During the d frosting, there will be two beeps to remind you to rearrange or turn over the food.
e
GRILL/COMBI
•
Pressing ”Grill.Combi” button select suitable mode.
-
“G” – only grill function.
-
“C1” is recommended for fish, potatoes cooking: 30% – microwaves; 70 % – grill.
-
“C2” is recommended for Omelette, potatoes and poultry baking: 55 % – microwaves; 45% – grill.
•
Set cooking time with buttons (Within 99min. 99sec.)
•
Press “Instant.start” button.
DELAYED COOKING
•
Allows to start operating at a pre-set time.
•
Press “POWER” button to choose power.
•
Pressing numeric buttons enter treatment duration.
•
Press "Clock” button and keep it for 3 seconds.
•
Using buttons set starting time. This function is active only while current time is adjusted.
•
To check pre-set time press and release "Clock” button.
www.scarlett-europe.com
SC-2005
4


