Материнские платы GIGABYTE GA X58A UD5 rev 1 0 - инструкция пользователя по применению, эксплуатации и установке на русском языке. Мы надеемся, она поможет вам решить возникшие у вас вопросы при эксплуатации техники.
Если остались вопросы, задайте их в комментариях после инструкции.
"Загружаем инструкцию", означает, что нужно подождать пока файл загрузится и можно будет его читать онлайн. Некоторые инструкции очень большие и время их появления зависит от вашей скорости интернета.


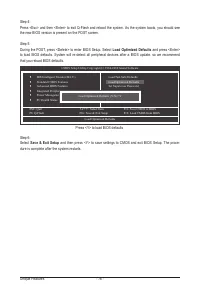


- 107 -
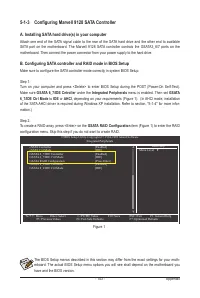
Appendix
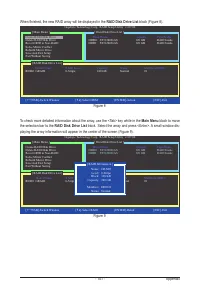
Now, you may proceed to create the SATA driver diskette (for AHCI mode) and the installation of the SATA
driver and operating system.
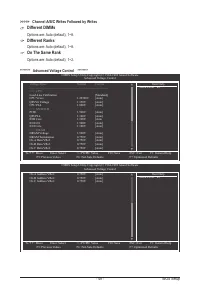
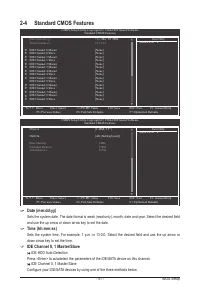
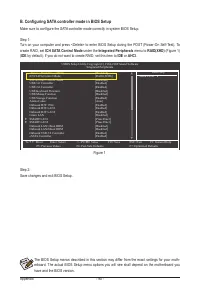
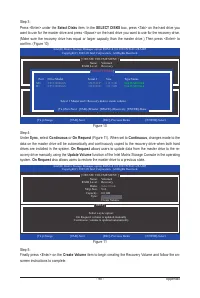
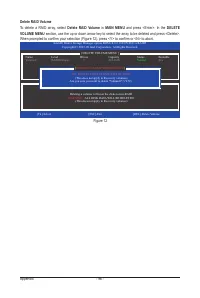
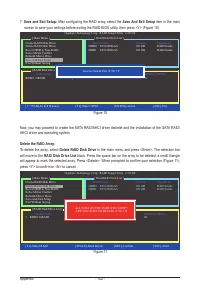
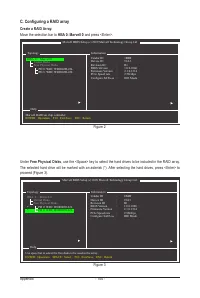
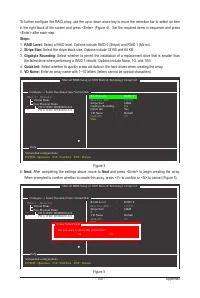
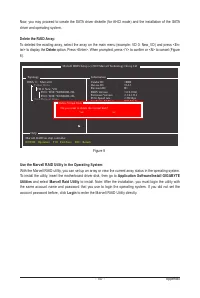
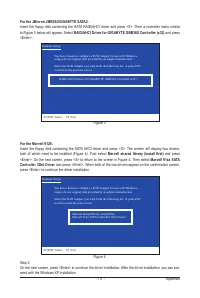
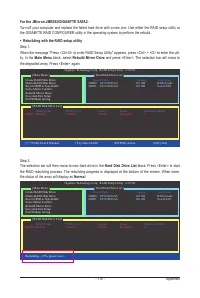
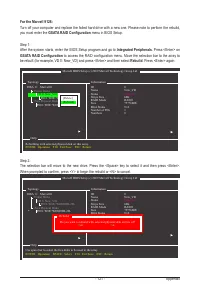
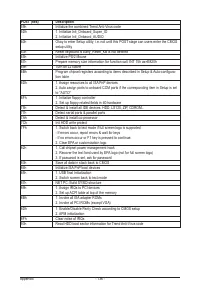
Delete the RAID Array:
To deleted the existing array, select the array on the main menu (example: VD 0: New_VD) and press <En-
ter> to display the
Delete
option. Press <Enter>. When prompted, press <Y> to confirm or <N> to cancel (Figure
8).
Figure 8
Marvell BIOS Setup (c) 2009 Marvell Technology Group Ltd.
Topology
Information
Help
Vendor ID
:
1B4B
Device ID
:
91A3
Revision ID
:
B1
BIOS Version
:
1.0.0.1006
Firmware Version :
2.1.0.1314
PCIe Speed rate
:
2.56Gbps
Configure SATA as :
IDE Mode
HBA 0 : Marvell 0
Virtual Disks
VD 0: New_VD
PD 0: WDC WD800JD-22L
PD 0: WDC WD800JD-22L
Free Physical Disks
Marvell RAID on chip controller.
ENTER: Operation F10: Exit/Save ESC: Return
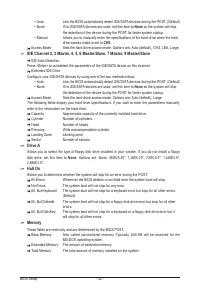
Do you want to delete this virtual disk?
Y
es
N
o
Delete Virtual Disk
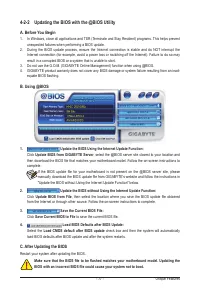
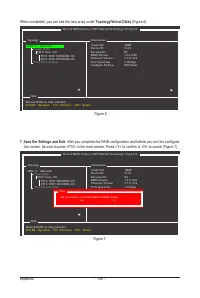
Use the Marvell RAID Utility in the Operating System:
With the Marvell RAID utility, you can set up an array or view the current array status in the operating system.
To install the utility, insert the motherboard driver disk, then go to
Application Software\Install GIGABYTE
Utilities
and select
Marvell Raid Utility
to install. Note: After the installation, you must login the utility with
the same account name and password that you use to login the operating system. If you did not set the
account password before, click
Login
to enter the Marvell RAID Utility directly.


