Магнитолы Hyundai Electronics H-CMD4021 - инструкция пользователя по применению, эксплуатации и установке на русском языке. Мы надеемся, она поможет вам решить возникшие у вас вопросы при эксплуатации техники.
Если остались вопросы, задайте их в комментариях после инструкции.
"Загружаем инструкцию", означает, что нужно подождать пока файл загрузится и можно будет его читать онлайн. Некоторые инструкции очень большие и время их появления зависит от вашей скорости интернета.


5
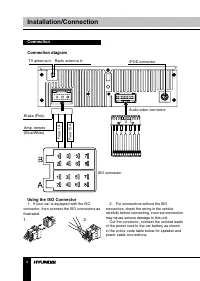
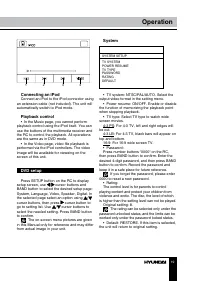
Installation/Connection
Installation
General notes
• Choose the mounting location where the
unit will not interfere with the normal driving
function of the driver.
• Before finally installing the unit, connect
the wiring and make sure that the unit works
properly.
• Consult with your nearest dealer if
installation requires the drilling of holes or other
modifications of the vehicle.
• Install the unit where it does not get in the
driver’s way and cannot injure the passenger if
there is a sudden stop, like an emergency stop.
• If installation angle exceeds 30° from
horizontal, the unit may not perform properly.
• Avoid installing the unit where it would
be subject to high temperature, such as from
direct sunlight, or from hot air, from the heater,
or where it would be subject to dust, dirt or
excessive vibration.
DIN Front/Rear-Mount
This unit can be properly installed either
from ‘Front’ (conventional DIN Front-mount) or
‘Rear’ (DIN Rear-mount installation, utilizing
threaded screw Holes at the sides of the unit
chassis). For details, refer to the following
illustrated installation methods.
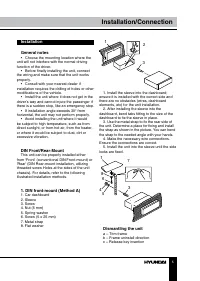
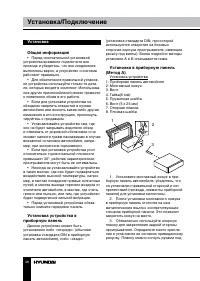
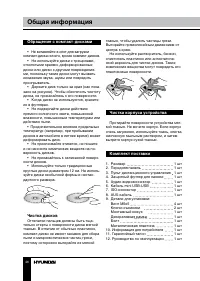
1. DIN front-mount (Method A)
1. Car dashboard
2. Sleeve
3. Screw
4. Nut (5 mm)
5. Spring washer
6. Screw (5 х 25 mm)
7. Metal strap
8. Flat washer
3
2
1
182
53
1. Install the sleeve into the dashboard;
ensure it is installed with the correct side and
there are no obstacles (wires, dashboard
elements, etc) for the unit installation.
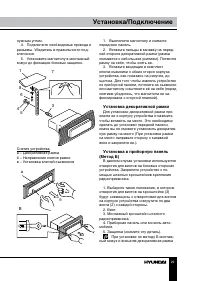
2. After installing the sleeve into the
dashboard, bend tabs fitting to the size of the
dashboard to fix the sleeve in place.
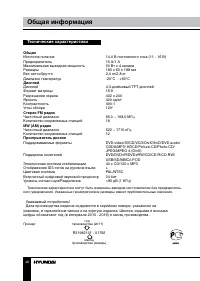
3. Use the metal strap to fix the rear side of
the unit. Determine a place for fixing and install
the strap as shown in the picture. You can bend
the strap to the needed angle with your hands.
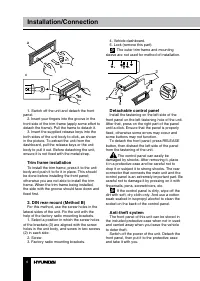
4. Make the necessary wire connections.
Ensure the connections are correct.
5. Install the unit into the sleeve until the side
locks are fixed.
3
5
4
6
8
1
7
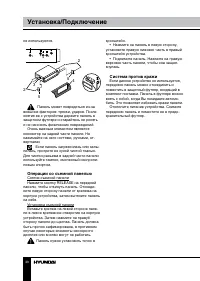
Dismantling the unit
a – Trim frame
b – Frame uninstall direction
c – Release key insertion
Содержание
- 24 Уважаемый покупатель!; Содержание
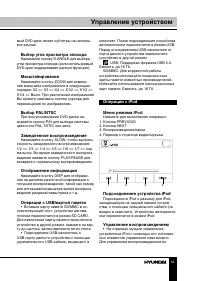
- 25 Операции с iPod; Общая информация; Обращение с компакт-дисками
- 26 Утилизация изделия
- 27 • Убедитесь, что источник питания и
- 28 Установка
- 29 Установка декоративной рамки
- 30 Операции со съемной панелью
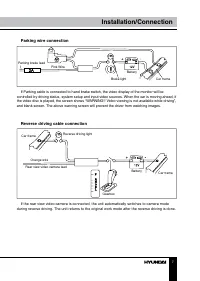
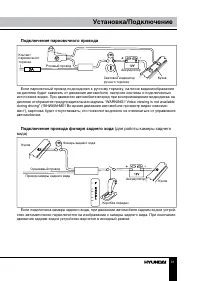
- 31 Подключение парковочного провода; (для работы камеры заднего
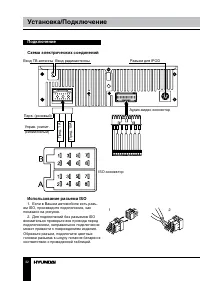
- 32 Подключение; Разъем для IPOD; Использование разъема ISO; Для подключений без разъемов ISO
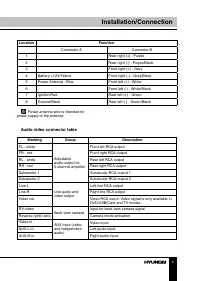
- 33 Номер; Таблица разъемов аудио-видео коннектора; Маркировка
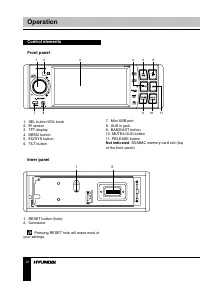
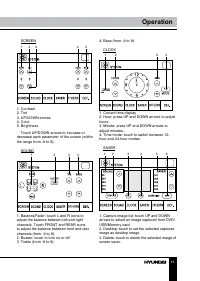
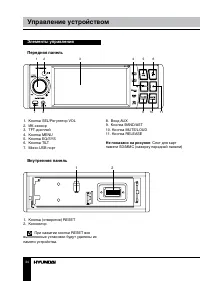
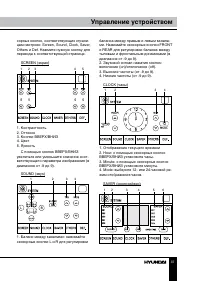
- 34 Элементы управления; Не показано на рисунке; Внутренняя панель; При нажатии кнопки RESET все
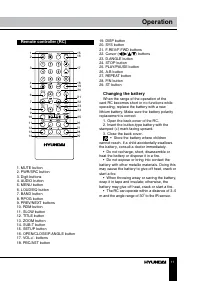
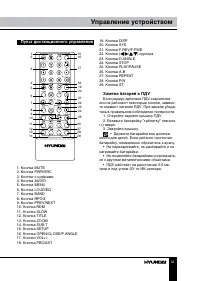
- 35 Пульт дистанционного управления
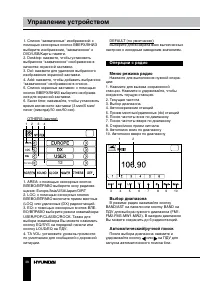
- 36 Основные операции
- 37 С помощью кнопок ВВЕРХ/ВНИЗ
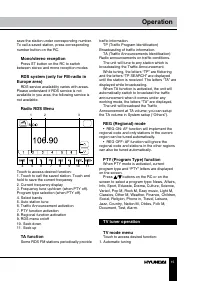
- 38 настроек к исходным заводским значениям.; Операции с радио; Нажмите для выполнения нужной опера-; Выбор диапазона; В режиме радио нажимайте кнопку; Автоматический/ручной поиск; После выбора диапазона нажмите и
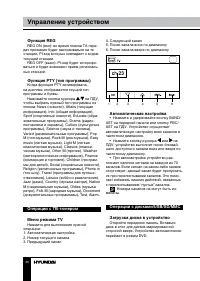
- 40 Функция REG
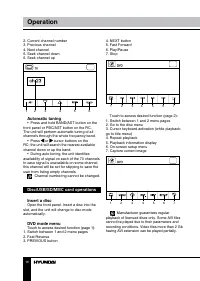
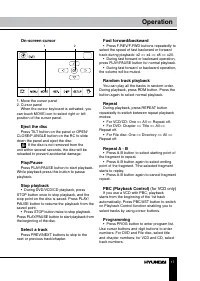
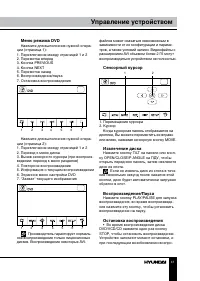
- 41 Меню режима DVD
- 44 Настройка DVD
- 45 Настройки изображения; На этой странице Вы можете отрегули-; Установки динамиков; динамиков; Цифровые установки; Низкий уровень громкости.
- 47 Руководство по устранению; Неисправность
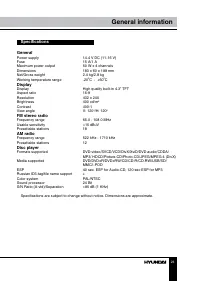
- 48 Технические характеристики; Общие

