Кондиционеры Ardesto ACM-09CRN7 - инструкция пользователя по применению, эксплуатации и установке на русском языке. Мы надеемся, она поможет вам решить возникшие у вас вопросы при эксплуатации техники.
Если остались вопросы, задайте их в комментариях после инструкции.
"Загружаем инструкцию", означает, что нужно подождать пока файл загрузится и можно будет его читать онлайн. Некоторые инструкции очень большие и время их появления зависит от вашей скорости интернета.


43
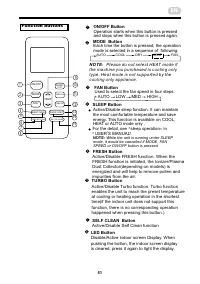
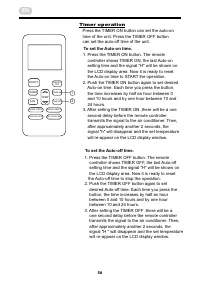
Operation
Other features
FOLLOW ME/TEMP SENSING feature(optional)
NOTE:This feature can be activated from the remote
control ONLY. The remote control serves as a remote
thermostat allowing for the precise temperature control
at its location. To activate the Follow Me/Temp Sensing
feature, point the remote control towards the unit and
press the Follow Me/Temp Sensing button. The remote
control will send this signal to the air conditioner until
press the Follow Me/Temp Sensing button again. If the
unit does not receive the Follow Me/Temp Sensing signal
during any 7 minutes interval, the unit will exit the
Follow Me/Temp Sensing mode.
NOTE: This feature is unavailabe under FAN or DRY
mode.
AUTO-RESTART(on some models)
If the unit breaks off unexpectedly due to the power cut,it
will restart with the previous function setting automatically
when the power resumes.
WAIT 3 MINUTES BEFORE RESUMING OPERATION
After the unit has stopped, it can not be restarted
operation in the first 3 minutes. This is to protect the unit.
Operation will automatically start after 3 minutes.
14
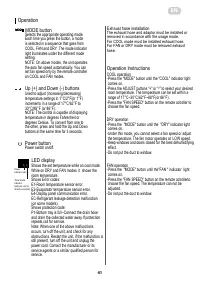
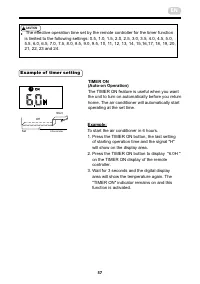
SLEEP/ECO operation
This feature can be activated from the remote control
ONLY. To activate SLEEP feature, the set temperature
will increase by 1°C/2°F(or 1°F) in 30 minutes. The set
temperature will then increase by another 1°C/2°F
(or 1°F) after an additional 30 minutes. This new
temperature will be maintained for 7 hours before it returns to
the originally selected temperature. This ends the Sleep mode
and the unit will continue to operate as originally programmed.
NOTE: This feature is unavailabe under FAN or DRY mode.
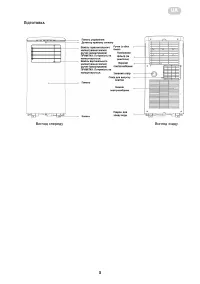
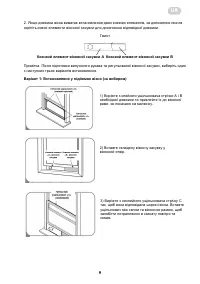
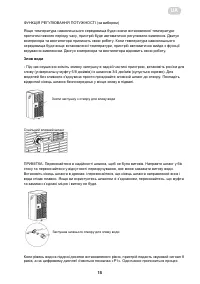
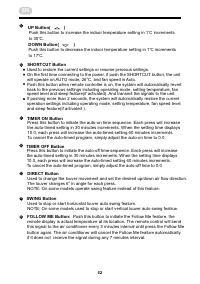
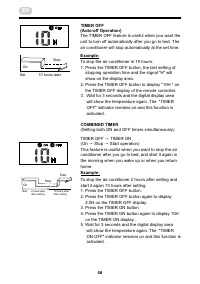
AIR FLOW DIRECTION ADJUSTMENT
Adjust the air flow direction manually:
-The louver can be set to the desired position manually.
-Do not place any heavy objects or other loads on the
louver, doing so will cause damage to the unit.
-Ensure the louver is fully opened under heating
operation.
-Keep the louver fully opened during operation.
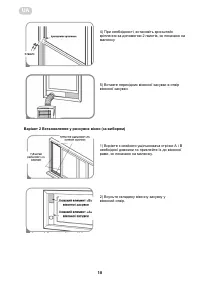
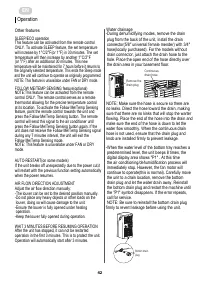
Water drainage
-During dehumidifying modes, remove the drain
plug from the back of the unit, install the drain
connector(5/8" universal female mender) with 3/4"
hose(locally purchased). For the models without
drain connector, just attach the drain hose to the
hole. Place the open end of the hose directly over
the drain area in your basement floor.
Remove the
drain plug
Continuous
drain hose
NOTE: Make sure the hose is secure so there are
no leaks. Direct the hose toward the drain, making
sure that there are no kinks that will stop the warter
flowing. Place the end of the hose into the drain and
make sure the end of the hose is down to let the
water flow smoothly. When the continuous drain
hose is not used, ensure that the drain plug and
knob are installed firmly to prevent leakage.
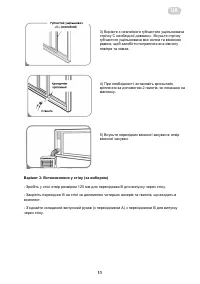
-When the water level of the bottom tray reaches a
predetermined level, the unit beeps 8 times, the
digital display area shows "P1" . At this time
the air conditioning/dehumidification process will
immediately stop. However, the fan motor will
continue to operate(this is normal). Carefully move
the unit to a drain location, remove the bottom
drain plug and let the water drain away. Reinstall
the bottom drain plug and restart the machine until
the "P1" symbol disappears. If the error repeats,
call for service.
NOTE: Be sure to reinstall the bottom drain plug
firmly to revent leakage before using the unit.
Bottom drain
plug
Maintenance
-Always unplug the unit before cleaning or servicing.
-DO NOT use flammable liquids or chemicals to clean the unit.
-DO NOT wash the unit under running water. Doing so
causes electrical danger.
-DO NOT operate the machine if the power supply was damaged
during cleaning. A damaged power cord must be replaced with a
new cord from the manufacturer.
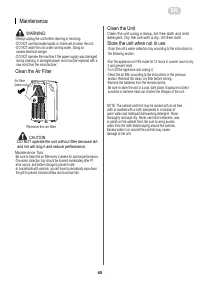
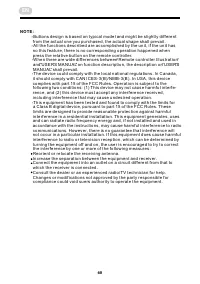
Clean the Air Filter
WARNING:
15
Maintenance Tips
Clean the Unit
Store the unit when not in use
-Be sure to clean the air filter every 2 weeks for optimal performance.
-The water collection tray should be drained immediately after P1
error occurs, and before storage to prevent mold.
-In households with animals, you will have to periodically wipe down
the grill to prevent blocked airflow due to animal hair.
Clean the unit using a damp, lint-free cloth and mild
detergent. Dry the unit with a dry, lint-free cloth.
-Run the appliance on FAN mode for 12 hours in a warm room to dry
it and prevent mold.
-Turn off the appliance and unplug it.
-Clean the air filter according to the instructions in the previous
section. Reinstall the clean, dry filter before storing.
-Remove the batteries from the remote control.
-Drain the unit’s water collection tray according to the instructions in
the following section.
Be sure to store the unit in a cool, dark place. Exposure to direct
sunshine or extreme heat can shorten the lifespan of the unit.
CAUTION
DO NOT operate the unit without filter because dirt
and lint will clog it and reduce performance.
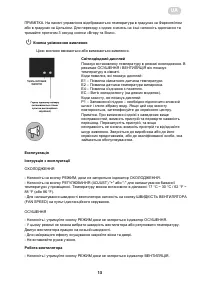
Remove the air filter
Air filter
(take out)
NOTE: The cabinet and front may be dusted with an oil-free
cloth or washed with a cloth dampened in a solution of
warm water and mildliquid dishwashing detergent. Rinse
thoroughly and wipe dry. Never use harsh cleansers, wax
or polish on the cabinet front. Be sure to wring excess
water from the cloth before wiping around the controls.
Excess water in or around the controls may cause
damage to the unit.
EN
Характеристики

Остались вопросы?Не нашли свой ответ в руководстве или возникли другие проблемы? Задайте свой вопрос в форме ниже с подробным описанием вашей ситуации, чтобы другие люди и специалисты смогли дать на него ответ. Если вы знаете как решить проблему другого человека, пожалуйста, подскажите ему :)
