Кондиционеры Ardesto ACM-09CRN7 - инструкция пользователя по применению, эксплуатации и установке на русском языке. Мы надеемся, она поможет вам решить возникшие у вас вопросы при эксплуатации техники.
Если остались вопросы, задайте их в комментариях после инструкции.
"Загружаем инструкцию", означает, что нужно подождать пока файл загрузится и можно будет его читать онлайн. Некоторые инструкции очень большие и время их появления зависит от вашей скорости интернета.


39
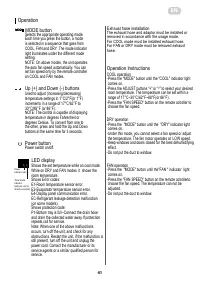
Installation
10
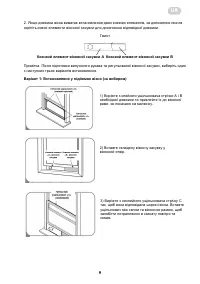
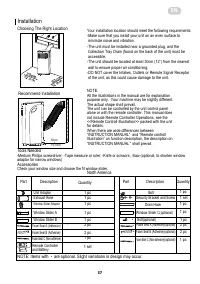
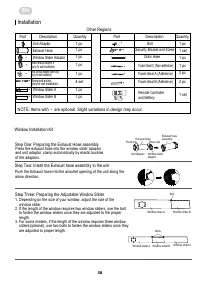
Window Installation Kit
Press the exhaust hose into the window slider adaptor
and unit adaptor, clamp automatically by elastic buckles
of the adaptors.
Step One: Preparing the Exhaust Hose assembly
Step Two: Install the Exhaust hose assembly to the unit
Press into
Press into
Step Three: Preparing the Adjustable Window Slider
1. Depending on the size of your window, adjust the size of the
window slider.
2. If the length of the window requires two window sliders, use the bolt
to fasten the window sliders once they are adjusted to the proper
length.
3. For some models, if the length of the window requires three window
sliders(optional), use two bolts to fasten the window sliders once they
are adjusted to proper length.
Window slider A
Window slider B
Bolt
Window slider A Window slider B Window slider C
Bolts
Other Regions
Part
Description
1 pc
1 pc
1 pc
1 pc
1 pc
1 pc
1 pc
1 pc
2 pc
1 pc
1 pc
2 pc
1 set
1 set
Unit Adaptor
Window Slider Adaptor
Window Slider A
Window Slider B
Exhaust Hose
Bolt
Foam Seal A (Adhesive)
Foam Seal B (Adhesive)
Foam Seal C (Non-adhesive)
Security Bracket and Screw
Drain Hose
Quantity
Part
Description
Quantity
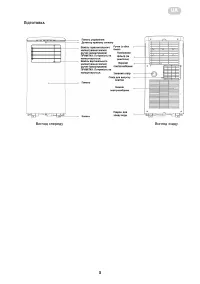
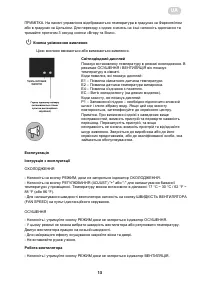
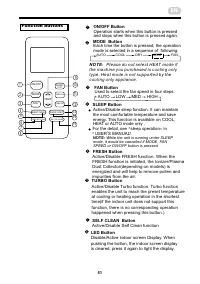
Remote Controller
and Battery
O
N
/O
FF
TE
M
P
SH
O
RT
CU
T
TI
M
ER
O
N
TI
M
ER
O
FF
M
O
DE
FA
N
SL
EE
P
SW
IN
G
LE
D
4 set
Wall Exhaust Adaptor A
(only for wall installation)
Wall Exhaust Adaptor B(with cap)
(only for wall installation)
Screw and anchor
(only for wall installation)
NOTE: Items with are optional. Slight variations in design may occur.
*
*
*
*
*
*
*
*
*
*
*
*
Unit adaptor Window slider
adaptor
Exhaust hose
Exhaust hose
assembly
Push the Exhaust hose into the airoutlet opening of the unit along the
arrow direction.
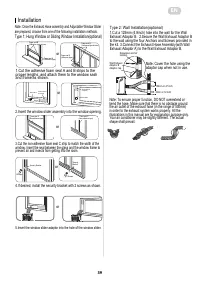
Installation
11
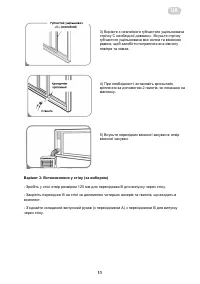
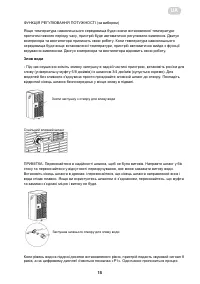
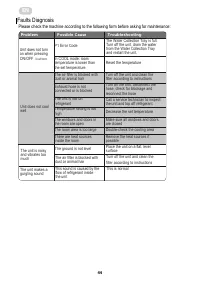
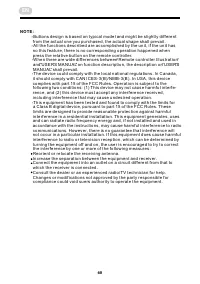
3.Cut the non-adhesive foam seal C strip to match the width of the
window. Insert the seal between the glass and the window frame to
prevent air and insects from getting into the room.
4.If desired, install the security bracket with 2 screws as shown.
2 Screws
Security Bracket
Foam seal B
(Adhesive type-shorter)
Foam seal A
(Adhesive type)
Window slider A
Window slider B
(if required)
Foam seal C
(Non-adhesive type)
Foam seal C
(Non-adhesive type)
2 Screws
Security
Bracket
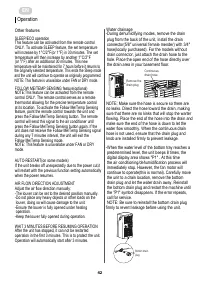
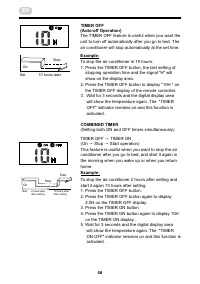
Type 2: Wall Installation(optional)
1.Cut a 125mm (4.9inch) hole into the wall for the Wall
Exhaust Adaptor B. 2.Secure the Wall Exhaust Adaptor B
to the wall using the four Anchors and Screws provided in
the kit. 3.Connect the Exhaust Hose Assembly(with Wall
Exhaust Adaptor A) to the Wall Exhaust Adaptor B.
Note: Cover the hole using the
adaptor cap when not in use.
Note: To ensure proper function, DO NOT overextend or
bend the hose. Make sure that there is no obstacle around
the air outlet of the exhaust hose (in the range of 500mm)
in order to the exhaust system works properly. All the
illustrations in this manual are for explanation purpose only.
Your air conditioner may be slightly different. The actual
shape shall prevail.
max 120cm or 47 inch
min 30cm or 12 inch
Expansion anchor
position
Adaptor cap
Wall Exhaust
Adaptor B
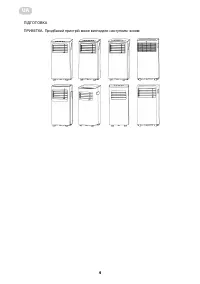
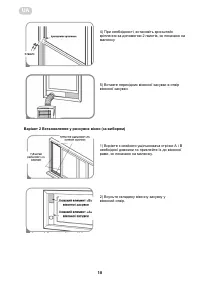
Note: Once the Exhaust Hose assembly and Adjustable Window Slider
are prepared, choose from one of the following installation methods.
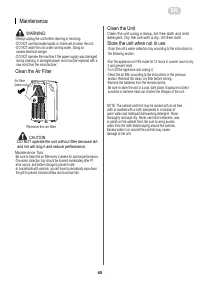
1.Cut the adhesive foam seal A and B strips to the
proper lengths, and attach them to the window sash
and frame as shown.
or
or
or
or
or
2.Insert the window slider assembly into the window opening.
Type 1: Hung Window or Sliding Window Installation(optional)
Foam seal B
(Adhesive type-shorter)
Foam seal A
(Adhesive type)
Window slider A Window slider B
(if required)
5.Insert the window slider adaptor into the hole of the window slider.
EN
Характеристики

Остались вопросы?Не нашли свой ответ в руководстве или возникли другие проблемы? Задайте свой вопрос в форме ниже с подробным описанием вашей ситуации, чтобы другие люди и специалисты смогли дать на него ответ. Если вы знаете как решить проблему другого человека, пожалуйста, подскажите ему :)
