
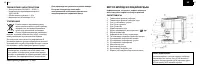
Кофеварка BRAYER BR1100 - инструкция пользователя по применению, эксплуатации и установке на русском языке. Мы надеемся, она поможет вам решить возникшие у вас вопросы при эксплуатации техники.
Если остались вопросы, задайте их в комментариях после инструкции.
"Загружаем инструкцию", означает, что нужно подождать пока файл загрузится и можно будет его читать онлайн. Некоторые инструкции очень большие и время их появления зависит от вашей скорости интернета.


10
11
en
en
•
Note:
repeated making of coffee should be
performed after at least 5 min interval.
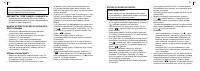
WARMING THE DRINKS
•
You can warm up your drinks by putting the
cappuccinator pipe (14) without the tip (15) into the
cup with the drink.
•
Set the operation mode switch knob (7) to the
position « », wait until the indicator (8) lights up
white.
•
Put the cappuccinator pipe (14) without the tip (15)
into the cup with the drink you want to warm up. Set
the operation mode switch knob (7) to the position
« ».
•
After warming up the drink set the operation mode
switch button (7) to the position « ».
•
Switch the coffee maker off by setting the power
switch (16) to the position «0», the indicator (9) will
go out.
REMOVING MINERAL SCALE
• The indicators (8, 9) flashing by rotation mean that
150 cycles of coffee making or milk frothing have
passed, and it is necessary to clean the coffee maker
from mineral scale.
• Remove the water tank (13) and fill it with water and
descaling agent up to the maximal level. You can use
«homemade descaling agent» — citric acid solution
in proportion 100 portions of water per 3 portions of
citric acid.
• Install the filter (6) in the filter holder (5), do not put
ground coffee in the filter (6). Install the filter holder
(5) into the coffee maker. The holder (5) ledges
should match the grooves on the boiler, after that
turn the filter holder (5) handle (3) to the right until
bumping «
». Place a suitable cup on the grid (2).
•
Set the operation mode switch knob (7) to the
position «
», the pump will be switched on and
operate for 90 seconds. After that set the operation
mode switch knob (7) to the position « », leave the
descaling agent in the coffee maker for at least 5-10
minutes.
•
Make sure that there is descaling agent in the water
tank (13).
•
Place a suitable cup under the cappuccinator tip
(15), set the operation mode switch knob (7) to the
position « », the pump will be switched on and
operate for 90 seconds. After that set the operation
mode switch knob (7) to the position « ».
• Then wash the coffee maker. To do this, fill the water
tank (13) with tap water and repeat the steps 3, 5
twice without 5-10 minutes break.
• After you finish cleaning the coffee maker, the
indicators (8, 9) will stop flashing. The cleaning is
finished.
•
If you don’t want to clean the coffee maker right now
and you are going to clean it as soon as possible,
quickly turn the operation mode switch knob (7) to
the position «
», then to the position « », to the
position « » and again to the position « ». If you
do this within 3 seconds, the cleaning notification (the
indicators (8, 9) flashing) will be cancelled.
•
Clean the coffee maker as soon as possible, do not
delay cleaning for later.
•
Note:
to remove the scale you can use special
descaling agents for coffee makers and coffee
machines, strictly following the instructions on their
usage.
CLEANING THE COFFEE MAKER
• If there is ground coffee scale remainin in the filter (6)
openings, clean the filter (6) with a small brush.
•
Wipe the coffee maker body with a soft, slightly damp
cloth and then wipe the coffee maker body dry. Do
not use abrasives and solvents to clean the coffee
maker body.
•
Do not immerse the coffee maker body, the power
cord and the power plug into water or any other
liquids.
•
Wash the removable parts of the coffee maker with
warm water and neutral detergent, then rinse them
and dry.
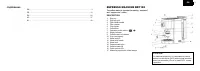
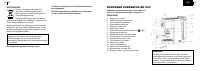
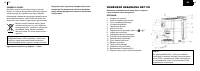
DRIP TRAY (1)
•
Remove the grid (2) from the tray (1), remove the
tray (1) and pour out water, wash the tray (1) and put
it back to its place, put the grid (2) on the tray (1).
STORAGE
•
Before taking the coffee maker away for long storage,
unplug it and let the unit cool down.
•
Clean the coffee maker.
•
Pack the coffee maker in the original package.
•
Use and store the coffee maker at the temperature
above 0 °C.
•
Keep the coffee maker in a dry cool place out of
reach of children and disabled persons.
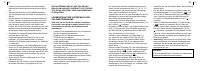
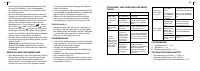
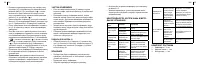
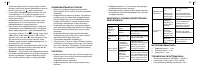
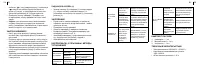
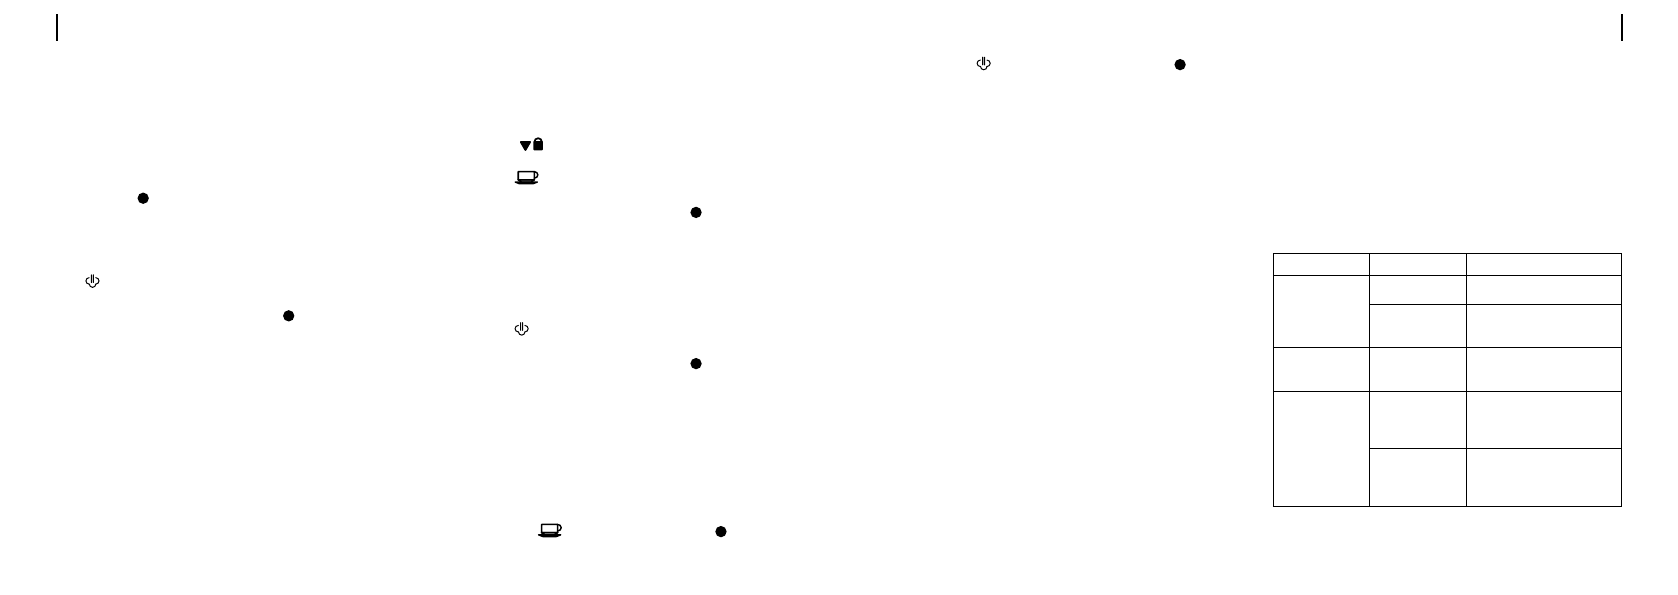
TROUBLESHOOTING
Problem
Cause
Solution
Water leaks from
the bottom of the
coffee maker
The tray is full of
water.
Please, clean the tray.
The coffee
maker is
damaged.
Please, apply to the service
center for repairing the
coffee maker.
Water leaks from
the filter holder.
There is ground
coffee on the
filter.
Clean the filter edges from
ground coffee.
Ready coffee
has unpleasant
taste.
The coffee
maker was not
washed after
descaling.
Clean the coffee maker
from mineral scale and
wash it from the remaining
descaling agent.
Ground coffee
was stored in a
humid place for
a long time.
Please, use fresh ground
coffee. Keep unused
ground coffee in a hermetic
package in a dry cool place.


