
Кофеварка BRAYER BR1100 - инструкция пользователя по применению, эксплуатации и установке на русском языке. Мы надеемся, она поможет вам решить возникшие у вас вопросы при эксплуатации техники.
Если остались вопросы, задайте их в комментариях после инструкции.
"Загружаем инструкцию", означает, что нужно подождать пока файл загрузится и можно будет его читать онлайн. Некоторые инструкции очень большие и время их появления зависит от вашей скорости интернета.


6
7
en
en
is detected, and after it was dropped, unplug the unit
and apply to the service center.
•
Transport the coffee maker in the original package.
•
Keep the unit out of reach of children and disabled
•
persons.
COFFEE MAKER IS INTENDED FOR HOUSEHOLD
USE ONLY, DO NOT USE THE COFFEE MAKER FOR
COMMERCIAL OR LABORATORY PURPOSES.
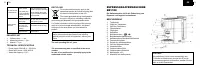
BEFORE USING THE COFFEE MAKER
After unit transportation or storage at low
temperature, it is necessary to keep it for at least
three hours at room temperature.
•
Unpack the coffee maker and remove all the
packaging materials.
•
Keep the original package.
•
Check the delivery set.
•
Read the safety measures and operating
recommendations.
•
Examine the coffee maker for damages, in case of
damage do not plug it into the mains.
• Make sure that the specifications of power supply
voltage specified on the lower panel of the unit
correspond to the specifications of your mains. When
the unit is used in the mains with 60 Hz frequency, it
does not need any additional settings.
•
Wipe the surface of the coffee maker body with a
clean, slightly damp cloth to remove dust.
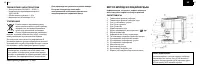
• Before using the coffee maker for the first time, wash
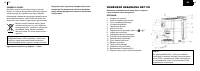
all removable parts (5, 6, 13, 15, 17) with warm water
and neutral detergent, rinse and dry them.
•
Before switching the unit on, make sure that the
mains voltage corresponds to the voltage specified
on the unit body.
•
Make sure that the power switch (16) is in position
«0», and the operation mode switch knob (7) is in
position « ».
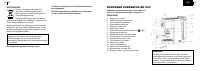
•
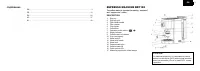
To remove the tank (13), take it by the handle (12)
and remove the tank upwards, fill it with cold water
up to the MAX mark and install it back to its place.
• Insert the coffee filter (6) into the holder (5), matching
the ledge on the filter (6) with the slot on the holder
(5) and turn the filter (6) clockwise/counterclockwise
(do not fill the filter with ground coffee).
• Install the filter holder (5) into the coffee maker. The
holder (5) ledges should match the grooves on the
boiler «
», after that turn the filter holder (5)
handle (3) to the right until bumping «
».
•
Place a suitable cup on the grid (2).
•
Insert the power plug into the mains socket.
•
Switch the coffee maker on by setting the power
switch (16) button to the position «I», the indicator (9)
will light up.
•
Wait until the boiler heats up, the indicator (8) will
glow white.
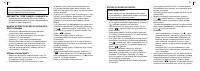
• To fill the boiler with water, set the operation mode
switch (7) knob to the position «
», wait for 15-20
seconds, or at the first signs of appearance of water
in the cup, switch the water supply off by setting the
operation mode switch knob (7) to the position « ».
•
Set the operation mode switch knob (7) to the
position «
» again, after the cup is filled with
water switch the water supply off by setting the
operation mode switch knob (7) to the position « »,
pour the water out of the cup. Depending on the cup
capacity repeat this procedure several times until the
boiler is clean.
•
Note:
at the first pumping of water into the boiler
some foreign noise can appear, this is normal, the
unit releases air from the boiler, approximately in 20
seconds foreign noise will stop.
•
Coffee strength depends on the quality and grinding
degree of coffee beans. If coffee is pouring out too
long, this means the coffee powder is too fine or it is
tamped too strongly.
PREHEATING
•
To make a cup of hot espresso, it is recommended to
preliminary heat up the coffee filter (6) and the filter
holder (5).
•
To remove the tank (13), take it by the handle (12)
and remove the tank (13) upwards, fill it with cold
water up to the MAX mark and install it back to its
place.
• Insert the coffee filter (6) into the holder (5), matching
the ledge on the filter (6) with the slot on the holder
(5) and turn the filter (6) clockwise/counterclockwise
(do not fill the filter with ground coffee).
• Install the filter holder (5) into the coffee maker. The
holder (5) ledges should match the grooves on the
boiler «
», after that turn the filter holder (5)
handle (3) to the right until bumping «
».
•
Place a suitable cup on the grid (2).
•
Insert the power plug into the mains socket.
•
Switch the coffee maker on by setting the power
switch (16) button to the position «I», the indicator (9)
will light up.
•
Wait until the boiler heats up, the indicator (8) will
glow white.
ATTENTION!
Do not remove the filter holder (5) during coffee
maker operation.
AUTO SWITCH OFF FUNCTION
•
If no actions were performed during 25 minutes
after switching on, the coffee maker will switch off
automatically.
HOW TO MAKE A GOOD ESPRESSO
•
Use ground coffee for espresso coffee makers.
• Slightly tamp the ground coffee in the filter (6), you
can do it with the back side of the measuring spoon
(17).


