
Фрезеры Bosch GKF 12V-8 - инструкция пользователя по применению, эксплуатации и установке на русском языке. Мы надеемся, она поможет вам решить возникшие у вас вопросы при эксплуатации техники.
Если остались вопросы, задайте их в комментариях после инструкции.
"Загружаем инструкцию", означает, что нужно подождать пока файл загрузится и можно будет его читать онлайн. Некоторые инструкции очень большие и время их появления зависит от вашей скорости интернета.


English |
15
Bosch Power Tools
1 609 92A 3WR | (10.8.17)
Vibration total values a
h
(triax vector sum) and uncertainty K
determined according to EN 60745-2-17 (no load):
a
h
< 2.5 m/s
2
, K = 1.5 m/s
2
.
The vibration level given in this information sheet has been
measured in accordance with a standardised test given in
EN 60745 and may be used to compare one tool with anoth-
er. It may be used for a preliminary assessment of exposure.
The declared vibration emission level represents the main ap-
plications of the tool. However if the tool is used for different
applications, with different accessories or insertion tools or is
poorly maintained, the vibration emission may differ. This
may significantly increase the exposure level over the total
working period.
An estimation of the level of exposure to vibration should also
take into account the times when the tool is switched off or
when it is running but not actually doing the job. This may sig-
nificantly reduce the exposure level over the total working
period.
Identify additional safety measures to protect the operator
from the effects of vibration such as: maintain the tool and the
accessories, keep the hands warm, organisation of work pat-
terns.
Assembly
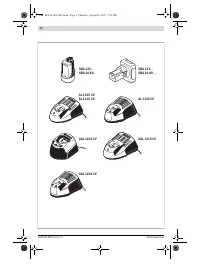
Battery Charging
Use only the chargers listed in the technical data.
Only
these chargers are matched to the lithium-ion battery of
your power tool.
Note:
The battery supplied is partially charged. To ensure full
capacity of the battery, completely charge the battery in the
battery charger before using your power tool for the first time.
The lithium-ion battery can be charged at any time without re-
ducing its service life. Interrupting the charging procedure
does not damage the battery.
The lithium-ion battery is protected against deep discharging
by the “Electronic Cell Protection (ECP)”. When the battery is
empty, the machine is switched off by means of a protective
circuit: The inserted tool no longer rotates.
Do not continue to press the On/Off switch after the
machine has been automatically switched off.
The bat-
tery can be damaged.
Removing the battery
To remove the battery
1
, press the battery unlocking button
2
and pull the battery upward out of the power tool.
Do not ex-
ert any force.
Battery Charge-control Indication
Changing the Tool
Before any work on the machine itself (e. g. mainte-
nance, tool change, etc.), remove the battery from the
power tool.
There is danger of injury when unintentionally
actuating the On/Off switch.
It is recommended to wear protective gloves when in-
serting or replacing router bits.
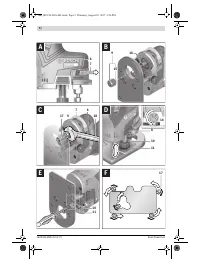
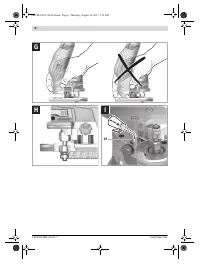
Replacing the Collet (see figures A – B)
Depending on the routing tool being used, the tightening nut
with the collet
9
may need to be replaced before inserting the
router bit.
When the right collet for your router bit is already mounted,
follow the work steps as described under “Inserting a Router
Bit”.
The collet
15
must have a slight amount of play when seated
in the tightening nut. The tightening nut
9
must assemble eas-
ily. Should the tightening nut or collet be damaged, replace
immediately.
Pull out the spindle locking lever
7
up to the marking arrow
6
on the housing. If necessary, turn the motor spindle manually
until it is locked in place. Six positions offset by 60 ° are pos-
sible.
Unscrew the tightening nut
9
with open-end spanner
18
turn-
ing in anticlockwise direction.
If required, clean all parts to be mounted prior to assembling,
using a soft brush or by blowing out with compressed air.
Start the new tightening nut on tool holder
16
.
Hand-tighten the tightening nut.
Slide the spindle locking lever
7
back into the housing.
Do not tighten the tightening nut of the collet without a
router bit inserted.
Otherwise the collet can be damaged.
Inserting a Router Bit (see figure C)
Depending on the application, router bits are available in the
most different designs and qualities.
Router bits made of high speed steel (HSS)
are suitable for
the machining of soft materials, e. g. softwood and plastic.
Milling cutters with carbide tips
are specially designed for
hard and abrasive materials, such as hardwood.
Original router bits from the extensive Bosch accessories pro-
gram are available at your specialist shop.
Only use clean router bits that are in perfect condition.
Pull out the spindle locking lever
7
up to the marking arrow
6
on the housing. If necessary, turn the motor spindle manually
until it is locked in place. Six positions offset by 60 ° are pos-
sible.
Loosen the tightening nut
9
with the open-end spanner by
turning in anticlockwise direction
18
.
Insert the router bit into the collet. The shank of the router bit
must be immersed at least 20 mm into the collet.
Retighten the tightening nut by turning in clockwise direction.
Slide the spindle locking lever
7
back into the housing.
Do not tighten the tightening nut of the collet without a
router bit inserted.
Otherwise the collet can be damaged.
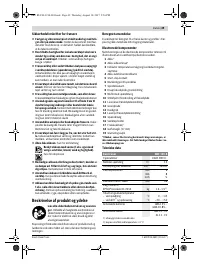
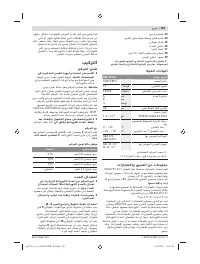
LED
Capacity
Continuous lighting 3 x green
≥ 2/3
Continuous lighting 2 x green
≥ 1/3
Continuous lighting 1 x green
< 1/3
Flashing light 1 x green
Reserve
OBJ_BUCH-3210-001.book Page 15 Thursday, August 10, 2017 2:56 PM
Содержание
- 103 Безопасность людей
- 104 Сервис; Описание продукта и услуг; Применение по назначению
- 105 Технические данные; Пользуйтесь средствами защиты органов слуха!; Сборка; Зарядка аккумулятора; Извлечение аккумулятора; Замена рабочего инструмента; Кромкофрезерный станок; СИД
- 106 Фрезы с твердосплавными режущими кромками (HM); Отсос пыли и стружки; Работа с инструментом; Включение электроинструмента
- 107 Указания по применению; Техобслуживание и сервис; Техобслуживание и очистка; Материал
- 108 Россия; Транспортировка
Характеристики

Остались вопросы?Не нашли свой ответ в руководстве или возникли другие проблемы? Задайте свой вопрос в форме ниже с подробным описанием вашей ситуации, чтобы другие люди и специалисты смогли дать на него ответ. Если вы знаете как решить проблему другого человека, пожалуйста, подскажите ему :)


