Электрорубанки Metabo HO 26-82 - инструкция пользователя по применению, эксплуатации и установке на русском языке. Мы надеемся, она поможет вам решить возникшие у вас вопросы при эксплуатации техники.
Если остались вопросы, задайте их в комментариях после инструкции.
"Загружаем инструкцию", означает, что нужно подождать пока файл загрузится и можно будет его читать онлайн. Некоторые инструкции очень большие и время их появления зависит от вашей скорости интернета.


ENGLISH
en
10
- Use an extraction unit and/or air purifiers.
- Ensure good ventilation of the workplace and
keep clean using a vacuum cleaner. Sweeping or
blowing stirs up dust.
- Vacuum or wash the protective clothing. Do not
blow, beat or brush.
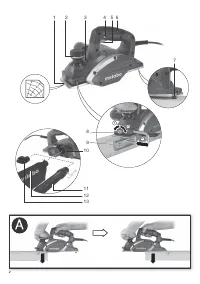
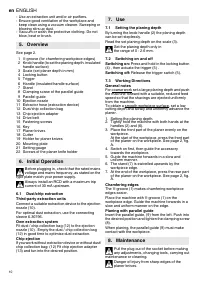
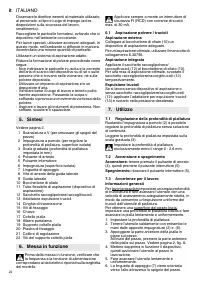
See page 2.
1 V-groove (for chamfering workpiece edges)
2 Knob handle (to set the planing depth, insulated
handle surface)
3 Scale (set planer depth in mm)
4 Locking button
5 Trigger
6 Handle (insulated handle surface)
7 Stand
8 Clamping screw of the parallel guide
9 Parallel guide
10 Ejection nozzle
11 Extractor hose (extraction device)
12 Dust/chip collection bag
13 Chip ejection adapter
14 Drive belt
15 Fastening screws
16 Key
17 Planer knives
18 Cutter
19 Holder for planer knives
20 Mounting plate
21 Setting gauge
22 Screws of the planer knife holder
Before plugging in, check that the rated mains
voltage and mains frequency, as stated on the
type plate match your power supply.
Always install an RCD with a maximum trip
current of 30 mA upstream.
6.1 Dust/chip extraction
Third-party extraction units
Connect a suitable extraction device to the ejection
nozzle (10).
For optimal dust extraction, use the connecting
sleeve 6.30796.
Own extraction system
Fit dust / chip collection bag (12) to the ejection
nozzle (10) . Empty the dust / chip collection bag
(12) in good time to optimise dust extraction.
Chip ejection
If you work without extraction device or without dust/
chip collection bag: (12) Fit chip ejection adapter
(13) and tun into the desired position.
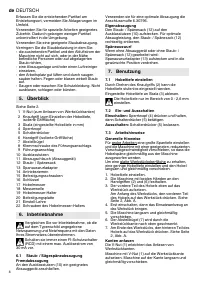
7.1 Setting the planing depth
By turning the knob handle (2) the planing depth
can be set steplessly.
Read the set planing depth on the scale (3).
Set the planing depth only in
the range of 0 - 2.6 mm.
7.2 Switching on and off
Switching on:
Press and hold in the locking button
(4) , then actuate the trigger (5) .
Switching off:
Release the trigger switch (5).
7.3 Working Directions
General notes
For coarse work set a large planing depth and push
the machine forward with a suitable, reduced feed
speed so that the shavings are ejected uniformly
from the machine.
To obtain a smooth workpiece surface, set a low
cutting depth and slowly and uniformly advance the
planer.
1. Setting the planing depth.
2. Tightly hold the machine with both hands at the
3. Place the front part of the planer evenly on the
workpiece.
At the start of the workpiece, press the front part
of the planer on the workpiece. See page 2, fig.
A.
4. Switch on first, then guide the accessory
towards the workpiece.
5. Guide the machine forwards in a slow and
uniform manner.
6. The stand (7) is swivelled upwards by the
workpiece edge.
7. At the end of the workpiece, press the rear part
of the planer on the workpiece. See page 2, fig.
A.
Chamfering edges
The V-groove (1) makes chamfering workpiece
edges easier.
Place the machine with V-groove (1) on the
workpiece edge. Guide the machine forwards in a
slow and uniform manner on the edge.
Planing with parallel guide
Insert the parallel guide, (9) from the left. Push into
the desired position and tighten the clamping screw
(8).
When planing, the parallel guide (9) must make
contact with the workpiece.
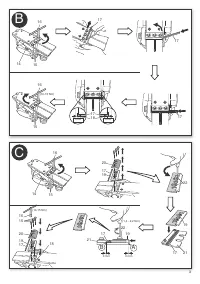
Pull the plug out of the socket before making
any adjustments, changing tools, carrying out
maintenance or cleaning.
Danger of injury from sharp edges of the
planer knives.
5. Overview
6. Initial Operation
7. Use
8. Maintenance
Характеристики

Остались вопросы?Не нашли свой ответ в руководстве или возникли другие проблемы? Задайте свой вопрос в форме ниже с подробным описанием вашей ситуации, чтобы другие люди и специалисты смогли дать на него ответ. Если вы знаете как решить проблему другого человека, пожалуйста, подскажите ему :)

