
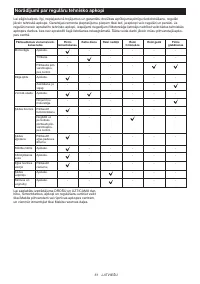
Электропилы Makita LXT DUC303Z - инструкция пользователя по применению, эксплуатации и установке на русском языке. Мы надеемся, она поможет вам решить возникшие у вас вопросы при эксплуатации техники.
Если остались вопросы, задайте их в комментариях после инструкции.
"Загружаем инструкцию", означает, что нужно подождать пока файл загрузится и можно будет его читать онлайн. Некоторые инструкции очень большие и время их появления зависит от вашей скорости интернета.


15 ENGLISH
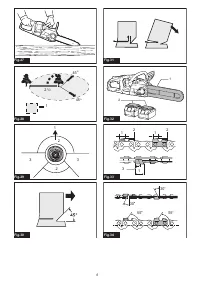
Observe local regulations if you wish to fell a tree.
►
Fig.28:
1.
Felling area
— Before starting felling work, ensure that:
•
Only persons involved in the felling operation
are in the vicinity;
•
Any person involved has an unhindered path
of retreat through a range of approximately
45° either side of the felling axis. Consider
the additional risk of tripping over electrical
cables;
•
The base of the trunk is free of foreign
objects, roots and ranches;
•
No persons or objects are present over a
distance of 2 1/2 tree lengths in the direction
in which the tree will fall.
— Consider the following with respect to each tree:
•
Direction of lean;
•
Loose or dry branches;
•
Height of the tree;
•
Natural overhang;
•
Whether or not the tree is rotten.
— Consider the wind speed and direction. Do not
carry out felling work if the wind is gusting strongly.
— Trimming of root swellings: Begin with the largest
swellings. Make the vertical cut first, then the
horizontal cut.
— Stand to the side of the falling tree. Keep an area
clear to the rear of the falling tree up to an angle of
45° either side of the tree axis (refer to the “felling
area” figure). Pay attention to falling branches.
— An escape path should be planned and cleared
as necessary before cuts are started. The escape
path should extend back and diagonally to the rear
of the expected line of fall as illustrated in figure.
►
Fig.29:
1.
Felling direction
2.
Danger zone
3.
Escape route
When felling trees, follow the proceduers below:
1.
Cut a scarf as close to the ground as possible.
First make the horizontal cut to a depth of 1/5 -1/3 of the
trunk diameter. Do not make the scarf too large. Then
make the diagonal cut.
►
Fig.30
NOTE:
The scarf determines the direction in which
the tree will fall, and guides it. It is made on the side
towards which the tree is to fall.
2.
Make the back cut a little higher than the base
cut of the scarf. The back cut must be exactly horizon-
tal. Leave approximately 1/10 of the trunk diameter
between the back cut and the scarf. The wood fibers in
the uncut trunk portion act as a hinge. Insert wedges
into the back cut in time.
►
Fig.31
WARNING:
Do not cut right through the fibers
under any circumstances.
The tree will otherwise
fall unchecked.
NOTICE:
Only plastic or aluminum wedges may
be used to keep the back cut open. The use of
iron wedges is prohibited.
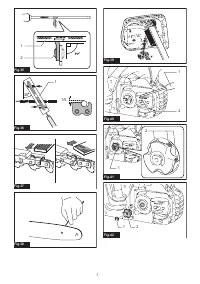
Carrying tool
Before carrying the tool, always apply the chain brake
and remove the battery cartridges from the tool. Then
attach the guide bar cover. Also cover the battery car
-
tridge with the battery cover.
►
Fig.32:
1.
Guide bar cover
2.
Battery cover
MAINTENANCE
CAUTION:
Always be sure that the tool is
switched off and the battery cartridge is removed
before attempting to perform inspection or
maintenance.
CAUTION:
Always wear gloves when perform-
ing any inspection or maintenance.
NOTICE:
Never use gasoline, benzine, thinner,
alcohol or the like. Discoloration, deformation or
cracks may result.
Sharpening the saw chain
Sharpen the saw chain when:
•
Mealy sawdust is produced when damp wood is
cut;
•
The chain penetrates the wood with difficulty, even
when heavy pressure is applied;
•
The cutting edge is obviously damaged;
•
The saw pulls to the left or right in the wood.
(caused by uneven sharpening of the saw chain or
damage to one side only)
Sharpen the saw chain frequently but a little each time.
Two or three strokes with a file are usually sufficient for
routine resharpening. When the saw chain has been
resharpened several times, have it sharpened in our
authorized service center.
Sharpening criteria:
WARNING:
An excessive distance between
the cutting edge and depth gauge increases the
risk of kickback.
►
Fig.33:
1.
Cutter length
2.
Distance between cutting
edge and depth gauge
3.
Minimum cutter
length (3 mm)
— All cutter length must be equal. Different cutter
lengths prevent the saw chain from running
smoothly and may cause the saw chain to break.
— Do not sharpen the chain when the cutter length
has reached 3 mm or shorter. The chain must be
replaced with new one.
— The chip thickness is determined by the distance
between the depth gauge (round nose) and the
cutting edge.
— The best cutting results are obtained with following
distance between cutting edge and depth gauge.
•
Chain blade 90PX : 0.65 mm (0.025″)
•
Chain blade 91PX : 0.65 mm (0.025″)
►
Fig.34
Содержание
- 85 ТЕХНИЧЕСКИЕ ХАРАКТЕРИСТИКИ; Символы
- 86 МЕРЫ БЕЗОПАСНОСТИ; Сохраните брошюру с инструк
- 87 СОХРАНИТЕ ДАННЫЕ; Важные правила техники
- 88 ОПИСАНИЕ ДЕТАЛЕЙ
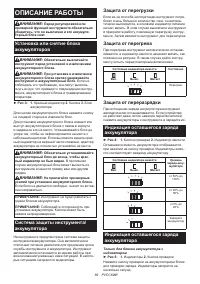
- 89 ОПИСАНИЕ РАБОТЫ; Защита от перегрузки
- 90 Основной переключатель питания
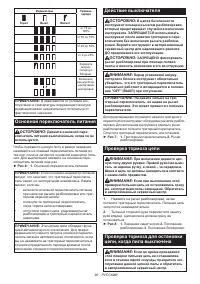
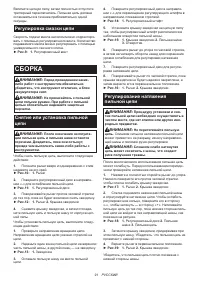
- 91 Регулировка смазки цепи; СБОРКА; Снятие или установка пильной
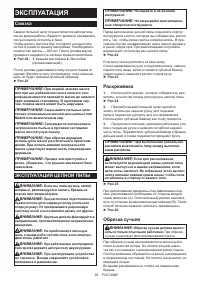
- 92 ЭКСПЛУАТАЦИЯ; Смазка
- 93 Врезка и пиление параллельно; ОБСЛУЖИВАНИЕ
- 94 Заточка пильной цепи; Очистка пильной шины
- 95 Замена звездочки; Хранение инструмента
- 96 ПОИСК И УСТРАНЕНИЕ НЕИСПРАВНОСТЕЙ
- 97 ДОПОЛНИТЕЛЬНЫЕ


