Страница 2 - En g l i sh; camcorder. With your Digital; W ARNING; Русский; ПРЕДУПРЕЖДЕНИЕ; ВНИМАНИЕ; or; Fo r t h e cu st o m e r s i n Ge r m a n y
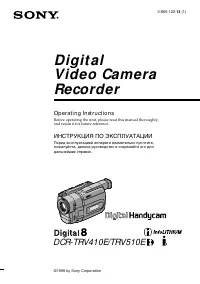
2 En g l i sh We l co m e ! Congratulations on your purchase of this SonyDigital Handycam camcorder. With your Digital Handycam you can capture life’s preciousmoments with superior picture and soundquality.Your Digital Handycam is loaded with advancedfeatures, but at the same time it is very easy to...
Страница 4 - Оглавление; Руководство по быстрому запуску; Подготовка к эксплуатации
4 Русский Оглавление Проверка прилагаемых принадлежностей ................................ 5 Руководство по быстрому запуску ..... 8 Подготовка к эксплуатации Использование данного руководства ... 10Пункт 1 Подготовка источника питания 12 Установка батарейного блока ......... 12Зарядка батарейного б...
Страница 5 - Stick this label on the recorded cassette.
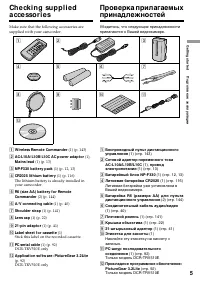
5 G etting s tarted Подготовка к эксплуатации Ch e ck i n g su p p l i e da cce sso r i e s 9 1 W ireless Remot e Commander (1) (p. 143) 2 AC-L10A/ L10B/ L10C AC pow er adapt or (1), M ains lead (1) (p. 13) 3 NP-F330 bat t ery pack (1) (p. 12, 13) 4 CR2025 lit hium bat t ery (1) (p. 116) The lithium...
Страница 8 - Установка кассеты; Сетевой адаптер переменного тока (прилагается); Подсоединение провода электропитания
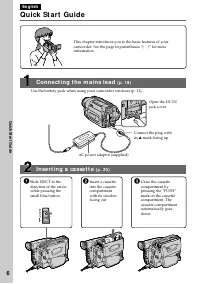
8 Руководство по быстрому запуску Русский Руководство по быстрому запуску В данной главе приведены основные функции Вашейвидеокамеры. Подробные сведения содержатся настранице в круглых скобках “( )”. Откройтекрышку гнездаDC IN. Подсоедините штекертак, чтобы его знак 4 был направлен вверх. Установка ...
Страница 9 - Запись изображения; Видоискатель
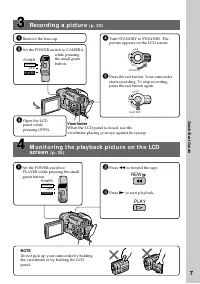
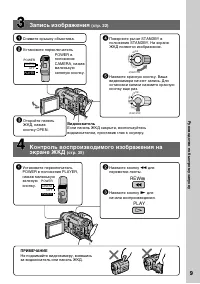
9 Руководство по быстрому запуску Запись изображения (стр. 22) Видоискатель Если панель ЖКД закрыта, воспользуйтесьвидоискателем, приставив глаз к окуляру. Контроль воспроизводимого изображения наэкране ЖКД (стр. 35) ПРИМЕЧАНИЕ Не поднимайте видеокамеру, взявшисьза видоискатель или панель ЖКД. 1 Уст...
Страница 10 - — Ge t t i n g st a r t e d —; Usi n g t h i s m a n u a l; Types of dif f erences; Built-in flash memory; Be f o r e u si n g y o u r ca m co r d e r; standard 8; N o t e o n TV co l o u r sy st e m s; — Подготовка к эксплуатации —; Использование данного руководства; Типы отличий; Встроенная флэш-память
10 — Ge t t i n g st a r t e d — Usi n g t h i s m a n u a l The instructions in this manual are for the twomodels listed in the table below. Before you startreading this manual and operating yourcamcorder, check the model number by lookingat the bottom of your camcorder. The DCR-TRV510E is the mode...
Страница 11 - • Do not let your camcorder get wet. Keep your; Предостережение об авторском праве
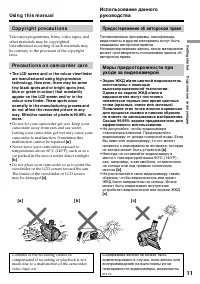
11 G etting s tarted Подготовка к эксплуатации Usi n g t h i s m a n u a l Co p y r i g h t p r e ca u t i o n s Television programmes, films, video tapes, andother materials may be copyrighted.Unauthorized recording of such materials maybe contrary to the provision of the copyrightlaws. Pr e ca u t...
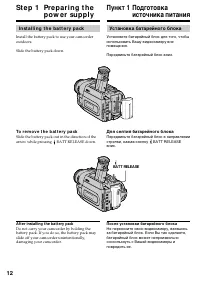
Страница 12 - I n st a l l i n g t h e b a t t e r y p a ck; Slide the battery pack down.; To r e m o v e t h e b a t t e r y p a ck; Af t er inst alling t he bat t ery pack; St e p 1 Pre p a r i n g t h e; Установка батарейного блока; Передвиньте батарейный блок вниз.; Для снятия батарейного блока; После установки батарейного блока; Пункт 1 Подготовка; BATT RELEASE
12 I n st a l l i n g t h e b a t t e r y p a ck Install the battery pack to use your camcorderoutdoors. Slide the battery pack down. To r e m o v e t h e b a t t e r y p a ck Slide the battery pack out in the direction of thearrow while pressing BATT RELEASE down. Af t er inst alling t he bat t ery...
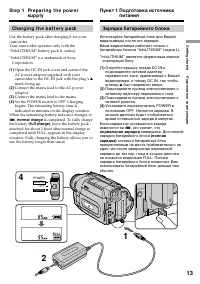
Страница 13 - St e p 1 Pr e p a r i n g t h e p o w e r; normal charge; Пункт 1 Подготовка источника; “InfoLITHIUM” является фирменным знаком; нормальная зарядка; завершена. Для полной
13 G etting s tarted Подготовка к эксплуатации POWER OFF PLAYER CAMERA 4 2 1 St e p 1 Pr e p a r i n g t h e p o w e r su p p l y Ch a r g i n g t h e b a t t e r y p a ck Use the battery pack after charging it for yourcamcorder.Your camcorder operates only with the“InfoLITHIUM” battery pack (L seri...
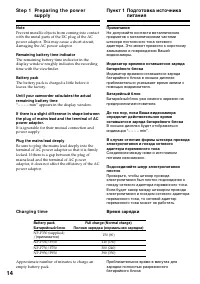
Страница 14 - “– – – – min” appears in the display window.; Plug t he mains lead deeply; Примечание; Время зарядки; Bat t ery pack; Ch a r g i n g t i m e
14 Not e Prevent metallic objects from coming into contactwith the metal parts of the DC plug of the ACpower adaptor. This may cause a short-circuit,damaging the AC power adaptor. Remaining bat t ery t ime indicat or The remaining battery time indicator in thedisplay window roughly indicates the rec...
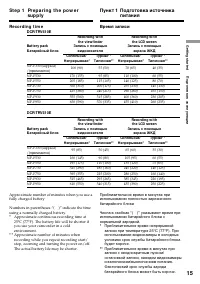
Страница 15 - Время записи; )” указывают время при; Re co r d i n g t i m e
15 G etting s tarted Подготовка к эксплуатации Время записи Приблизительное время в минутах прииспользовании полностью заряженногобатарейного блока Числа в скобках “( )” указывают время при использовании батарейного блока снормальной зарядкой. * Приблизительное время непрерывнойзаписи при температур...
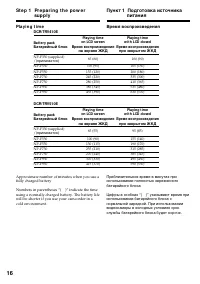
Страница 16 - Pl a y i n g t i m e; Время воспроизведения; Пункт 1 Подготовка источника
16 Pl a y i n g t i m e DCR-TRV410E DCR-TRV510E Approximate number of minutes when you use afully charged battery Numbers in parentheses “( )” indicate the timeusing a normally charged battery. The battery lifewill be shorter if you use your camcorder in acold environment. St e p 1 Pr e p a r i n g ...
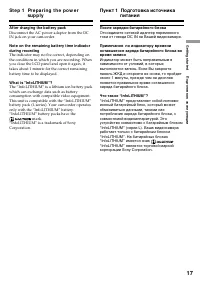
Страница 17 - Af t er charging t he bat t ery pack; После зарядки батарейного блока
17 G etting s tarted Подготовка к эксплуатации Af t er charging t he bat t ery pack Disconnect the AC power adaptor from the DCIN jack on your camcorder. Not e on t he remaining bat t ery t ime indicat orduring recording The indicator may not be correct, depending onthe conditions in which you are r...
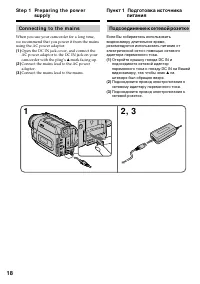
Страница 18 - Подсоединение к сетевой розетке; на; Co n n e ct i n g t o t h e m a i n s; Connect the mains lead to the mains.
18 Подсоединение к сетевой розетке Если Вы собираетесь использоватьвидеокамеру длительное время,рекомендуется использовать питание отэлектрической сети с помощью сетевогоадаптера переменного тока. (1 ) Откройте крышку гнезда DC IN иподсоедините сетевой адаптерпеременного тока к гнезду DC IN на Вашей...
Страница 19 - • The AC power adaptor can supply power even; Using a car bat t ery; • Питание от сетевого адаптера переменного
19 G etting s tarted Подготовка к эксплуатации W ARNING The mains lead must only be changed at aqualified service shop. PRECAUTION The set is not disconnected from the AC powersource (the mains) as long as it is connected tothe mains, even if the set itself has been turnedoff. Not es • The AC power ...
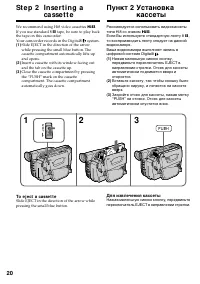
Страница 20 - Если Вы используете стандартную ленту 8; Для извлечения кассеты; We recommend using Hi8 video cassettes; St e p 2 I n se r t i n g a; To e j e ct a ca sse t t e
20 Рекомендуется использовать видеокассетытипа Hi8 со знаком H . Если Вы используете стандартную ленту 8 h , то воспроизводить ленту следует на даннойвидеокамере.Ваша видеокамера выполняет запись вцифровой системе Digital8 . (1 ) Нажав маленькую синюю кнопку,передвиньте переключатель EJECT внаправле...
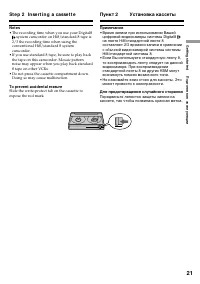
Страница 21 - Not es; • The recording time when you use your Digital8; To prevent accident al erasure; St e p 2 I n se r t i n g a ca sse t t e
21 G etting s tarted Подготовка к эксплуатации Not es • The recording time when you use your Digital8 system camcorder on Hi8/standard 8 tape is 2/3 the recording time when using theconventional Hi8/standard 8 systemcamcorder. • If you use standard 8 tape, be sure to play back the tape on this camco...
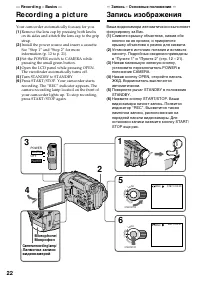
Страница 22 - — Re co r d i n g – Ba si cs —; Re co rd i n g a p i ct u re; Your camcorder automatically focuses for you.; Микрофон; Camera recording lamp/
22 5 6 3 POWER OFF PLAYER CAMERA 1 2 4 LO CK START/STOP M E M O RY ST AN D BY LO CK START/STOP M E M O RY ST AN D BY 40min STBY 0:00:00 40min REC 0:00:01 — Re co r d i n g – Ba si cs — Re co rd i n g a p i ct u re Your camcorder automatically focuses for you. (1 ) Remove the lens cap by pressing bot...
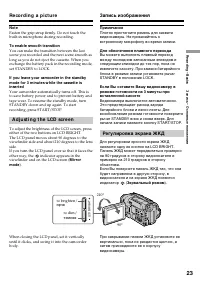
Страница 23 - Not e; A d j u st i n g t h e LCD scr e e n; indicator appears in the; M irror; ярче; Регулировка экрана ЖКД; Зеркальный режим
23 R ecording – B asic s Запись – Основные положения LCD BRIGHT Not e Fasten the grip strap firmly. Do not touch thebuilt-in microphone during recording. To enable smoot h t ransit ion You can make the transition between the lastscene you recorded and the next scene smooth aslong as you do not eject...
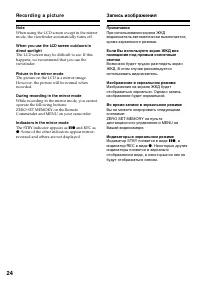
Страница 24 - The STBY indicator appears as; Индикатор STBY появится в виде
24 Re co r d i n g a p i ct u r e Not e When using the LCD screen except in the mirrormode, the viewfinder automatically turns off. W hen you use t he LCD screen out doors indirect sunlight The LCD screen may be difficult to see. If thishappens, we recommend that you use theviewfinder. Pict ure in t...
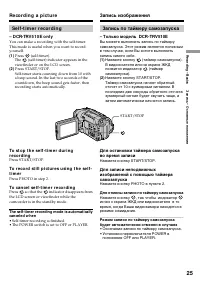
Страница 25 - Se l f -t i m e r r e co r d i n g; – D CR-TRV 5 1 0 E o n l y; – Только модель DCR-TRV510E; Для отмены записи по таймеру самозапуска; Нажмите кнопку
25 R ecording – B asic s Запись – Основные положения Se l f -t i m e r r e co r d i n g – D CR-TRV 5 1 0 E o n l y You can make a recording with the self-timer.This mode is useful when you want to recordyourself. (1 ) Press (self-timer). The (self-timer) indicator appears in the viewfinder or on the...
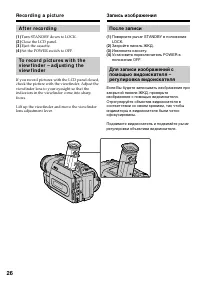
Страница 26 - Turn STANDBY down to LOCK.; После записи
26 To r e co r d p i ct u r e s w i t h t h ev i e w f i n d e r – a d j u st i n g t h ev i e w f i n d e r If you record pictures with the LCD panel closed,check the picture with the viewfinder. Adjust theviewfinder lens to your eyesight so that theindicators in the viewfinder come into sharpfocus...
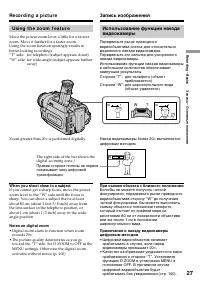
Страница 27 - Сторона “W”: для широкоугольного вида; При съемке объекта с близкого положения; Usi n g t h e zo o m f e a t u r e; Zoom greater than 20; W hen you shoot close t o a subject; • Digital zoom starts to function when zoom
27 R ecording – B asic s Запись – Основные положения Использование функции наездавидеокамеры Передвиньте рычаг приводноговариообъектива слегка для относительномедленного наезда видеокамеры.Передвиньте его сильнее для ускоренногонаезда видеокамеры.Использование функции наезда видеокамерыв небольшом к...
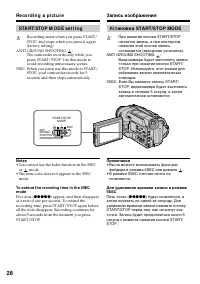
Страница 28 - STA RT/STOP M OD E se t t i n g; • You cannot use the fader function in the 5SEC; ANTI GROUND SHOOTING; Примечания; rrrrr
28 STA RT/STOP M OD E se t t i n g : Recording starts when you press START/STOP, and stops when you press it again(factory setting). ANTI GROUND SHOOTING : The camcorder records only while youpress START/STOP. Use this mode toavoid recording unnecessary scenes. 5SEC: When you press use this mode to ...
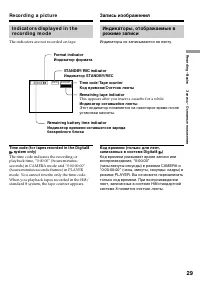
Страница 29 - The indicators are not recorded on tape.; Индикатор формата; Индикаторы не записываются на ленту.; Индикатор STANDBY/REC; This appears after you insert a cassette for a while.; Индикатор оставшейся ленты
29 R ecording – B asic s Запись – Основные положения I n d i ca t o r s d i sp l a y e d i n t h er e co r d i n g m o d e The indicators are not recorded on tape. Time code (f or t apes recorded in t he Digit al8 syst em only) The time code indicates the recording orplayback time, “0:00:00” (hours:...
Страница 30 - BACK LIGHT; Функция задней подсветки будет отменена.
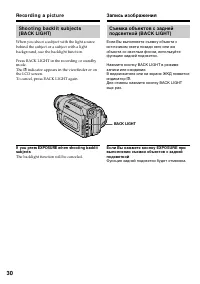
30 Sh o o t i n g b a ck l i t su b j e ct s( BA CK LI GHT) When you shoot a subject with the light sourcebehind the subject or a subject with a lightbackground, use the backlight function. Press BACK LIGHT in the recording or standbymode.The c indicator appears in the viewfinder or on the LCD scree...
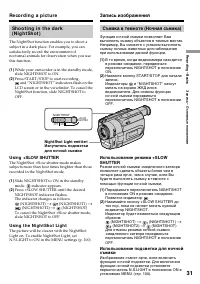
Страница 31 - and “NIGHTSHOT” indicators flash on the; Night Shot Light emit t er/; Usi n g +SLOW SHUTTER; и “NIGHTSHOT” начнут
31 R ecording – B asic s Запись – Основные положения Sh o o t i n g i n t h e d a r k( N i g h t Sh o t ) The NightShot function enables you to shoot asubject in a dark place. For example, you cansatisfactorily record the environment ofnocturnal animals for observation when you usethis function. (1 ...
Страница 33 - Ch e ck i n g t h e re co rd i n g; EN D SEA RCH; You can search for the next recording start point.; Проверка записи; END SEARCH
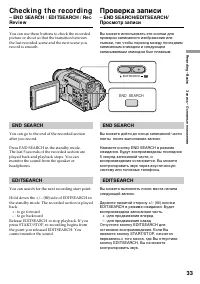
33 R ecording – B asic s Запись – Основные положения Ch e ck i n g t h e re co rd i n g – EN D SEA RCH / ED I TSEA RCH / Re cRe v i e w You can use these buttons to check the recordedpicture or shoot so that the transition betweenthe last recorded scene and the next scene yourecord is smooth. EN D S...
Страница 34 - Re c Re v i e w; You can check the last recorded section.; •END SEARCH, EDITSEARCH and Rec Review; Просмотр записи; Нажмите кратковременно сторону – (
34 Ch e ck i n g t h e r e co r d i n gРEN D SEA RCH / ED I TSEA RCH / Re cRe v i e w Re c Re v i e w You can check the last recorded section. Press the Р( Π) side of EDITSEARCH momentarily in the standby mode.The last few seconds of the recorded section areplayed back. You can monitor the sound ...
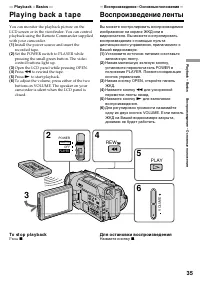
Страница 35 - — Pl a y b a ck – Ba si cs —; Pl a y i n g b a ck a t a p e; Open the LCD panel while pressing OPEN.; To st o p p l a y b a ck; — Воспроизведение – Основные положения —; Воспроизведение ленты; Для остановки воспроизведения
35 P laybac k – B asic s Воспроизведение – Основные положения — Pl a y b a ck – Ba si cs — Pl a y i n g b a ck a t a p e You can monitor the playback picture on theLCD screen or in the viewfinder. You can controlplayback using the Remote Commander suppliedwith your camcorder. (1) Install the power s...
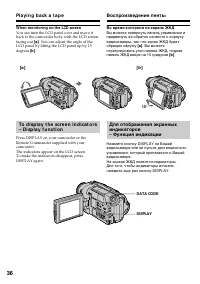
Страница 36 - Во время контроля на экране ЖКД; W hen monit oring on t he LCD screen; . You can adjust the angle of the; DISPLAY
36 Во время контроля на экране ЖКД Вы можете повернуть панель управления ипридвинуть ее обратно на место к корпусувидеокамеры, так что экран ЖКД будетобращен наружу [a] . Вы можете отрегулировать угол панели ЖКД, поднявпанель ЖКД вверх на 15 градусов [b ] . Для отображения экранныхиндикаторов– Функц...
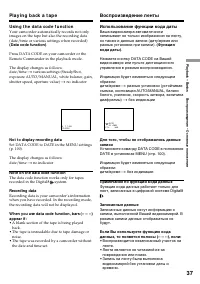
Страница 37 - Использование функции кода даты; разные установки (устойчивая; Примечание по функции кода данных; Usi n g t h e d a t a co d e f u n ct i o n; Not t o display recording dat a
37 P laybac k – B asic s Воспроизведение – Основные положения Использование функции кода даты Ваша видеокамера автоматическизаписывает не только изображения на ленту,но также и данные записи (дату/время илиразные установки при записи). (Функция кода даты) . Нажмите кнопку DATA CODE на Вашейвидеокаме...
Страница 38 - V a r i o u s p l a y b a ck m o d e s; To a d v a n ce t h e t a p e
38 V a r i o u s p l a y b a ck m o d e s To operate control buttons, set the POWERswitch to PLAYER. To v i e w a st i l l p i ct u r e ( p l a y b a ckp a u se ) Press P during playback. To resume playback, press P or ( . To a d v a n ce t h e t a p e Press ) in the stop mode. To resume normal play...
Страница 39 - To v i e w t h e p i ct u r e a t d o u b l e sp e e d; In t he various playback modes; В переменных режимах воспроизведения
39 P laybac k – B asic s Воспроизведение – Основные положения Pl a y i n g b a ck a t a p e To v i e w t h e p i ct u r e a t d o u b l e sp e e d Press × 2 on the Remote Commander during playback. For double speed playback in thereverse direction, press < , then press × 2 on the Remote Commander...
Страница 40 - Передача сигнала
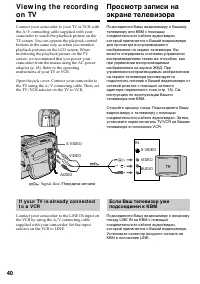
40 Vi e w i n g t h e re co rd i n go n TV Connect your camcorder to your TV or VCR withthe A/V connecting cable supplied with yourcamcorder to watch the playback picture on theTV screen. You can operate the playback controlbuttons in the same way as when you monitorplayback pictures on the LCD scre...
Страница 41 - If your TV or VCR has an S video jack; V i e w i n g t h e r e co r d i n g o n TV; TV
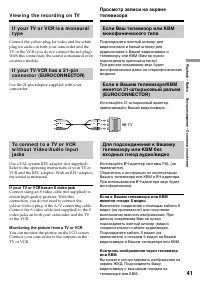
41 P laybac k – B asic s Воспроизведение – Основные положения I f y o u r TV o r V CR i s a m o n a u r a lt y p e Connect the yellow plug for video and the whiteplug for audio on both your camcorder and theTV or the VCR (you do not connect the red plug).With this connection, the sound is monaural e...
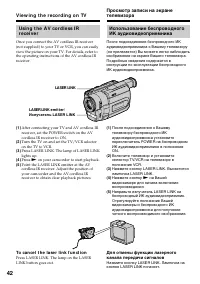
Страница 42 - To ca n ce l t h e l a se r l i n k f u n ct i o n; LASER LINK
42 V i e w i n g t h e r e co r d i n g o n TV Usi n g t h e A V co r d l e ss I Rr e ce i v e r Once you connect the AV cordless IR receiver(not supplied) to your TV or VCR, you can easilyview the picture on your TV. For details, refer tothe operating instructions of the AV cordless IRreceiver. (1)...
Страница 43 - If you t urn t he pow er of f; Laser link turns off automatically.; Если Вы выключите питание
43 P laybac k – B asic s Воспроизведение – Основные положения If you t urn t he pow er of f Laser link turns off automatically. Not e When laser link is activated (the LASER LINKbutton is lit), your camcorder consumes power.Press LASER LINK to turn off the laser linkfunction when it is not needed. V...
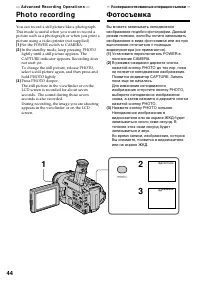
Страница 44 - — A d v a n ce d Re co r d i n g Op e r a t i o n s —; Ph o t o re co rd i n g; Set the POWER switch to CAMERA.; — Усовершенствованные операции съемки —; Фотосъемка
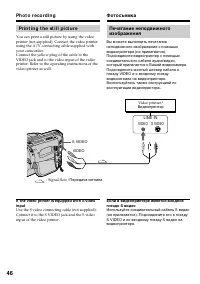
44 — A d v a n ce d Re co r d i n g Op e r a t i o n s — Ph o t o re co rd i n g You can record a still picture like a photograph.This mode is useful when you want to record apicture such as a photograph or when you print apicture using a video printer (not supplied). (1 ) Set the POWER switch to CA...
Страница 45 - Ph o t o r e co r d i n g; функция цифрового эффекта.
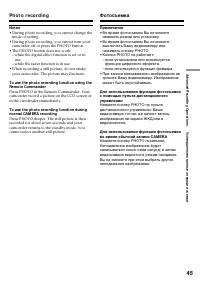
45 Advanc ed R ecording Operat ions Усовершенствованные операции съемки Not es • During photo recording, you cannot change the mode or setting. • During photo recording, you cannot turn your camcorder off or press the PHOTO button. • The PHOTO button does not work: – while the digital effect functio...
Страница 46 - Видеопринтер
46 VIDEO S VIDEO LINE IN VIDEO S VIDEO Ph o t o r e co r d i n g Pr i n t i n g t h e st i l l p i ct u r e You can print a still picture by using the videoprinter (not supplied). Connect the video printerusing the A/V connecting cable supplied withyour camcorder.Connect the yellow plug of the cable...
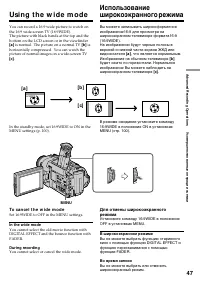
Страница 47 - is normal. The picture on a normal TV; To ca n ce l t h e w i d e m o d e; Set 16:9WIDE to OFF in the MENU settings.; In t he w ide mode; You cannot select or cancel the wide mode.; Usi n g t h e w i d e m o d e; M ENU; Изображение на обычном телевизоре; В широкоэкранном режиме
47 Advanc ed R ecording Operat ions Усовершенствованные операции съемки You can record a 16:9 wide picture to watch onthe 16:9 wide-screen TV (16:9WIDE).The picture with black bands at the top and thebottom on the LCD screen or in the viewfinder [a ] is normal. The picture on a normal TV [b ] is hor...
Страница 48 - You cannot use this function when D ZOOM is; MONOTONE
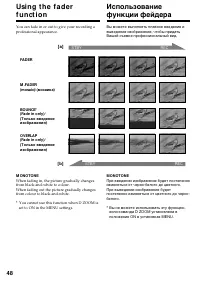
48 You can fade in or out to give your recording aprofessional appearance. Usi n g t h e f a d e rf u n ct i o n FADER M .FADER(mosaic)/ (мозаика) BOUNCE*(Fade in only)/ (Только введениеизображения) OVERLAP(Fade in only)/ (Только введениеизображения) M ONOTONE When fading in, the picture gradually c...
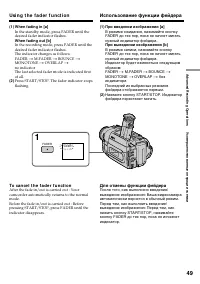
Страница 49 - Usi n g t h e f a d e r f u n ct i o n; To ca n ce l t h e f a d e r f u n ct i o n; Использование функции фейдера; При введении изображения; BOUNCE; Для отмены функции фейдера
49 Advanc ed R ecording Operat ions Усовершенствованные операции съемки Usi n g t h e f a d e r f u n ct i o n (1 ) W hen f ading in [a ] In the standby mode, press FADER until thedesired fader indicator flashes. W hen f ading out [b ] In the recording mode, press FADER until thedesired fader indica...
Страница 50 - • The overlap function works only for tapes; W hen t he OVERLAP indicat or appears; You cannot use the fader function.; Not e on t he bounce f unct ion; Usi n g t h e Fa d e r f u n ct i o n; ON в установках MENU
50 Not es • The overlap function works only for tapes recorded in the Digital8 system. • You cannot use the following functions while using the fader function. Also, you cannot usethe fader function while using the followingfunctions.– Digital effect– Low lux mode of PROGRAM AE (Overlap function onl...
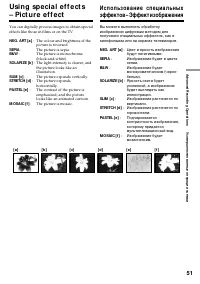
Страница 51 - : The colour and brightness of the; The picture is sepia.; SEPIA; : Яркость света будет
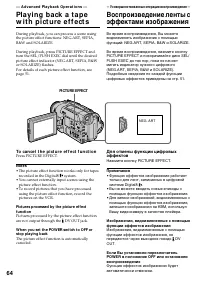
51 Advanc ed R ecording Operat ions Усовершенствованные операции съемки You can digitally process images to obtain specialeffects like those in films or on the TV. NEG. ART [a ] : The colour and brightness of the picture is reversed. SEPIA : The picture is sepia. B&W : The picture is monochrome(...
Страница 53 - Неподвижное изображение; STILL
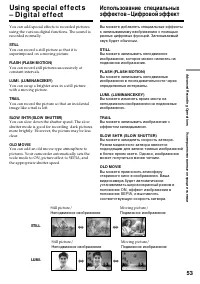
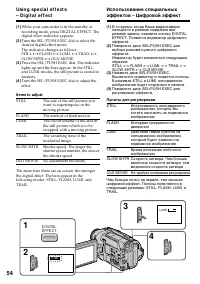
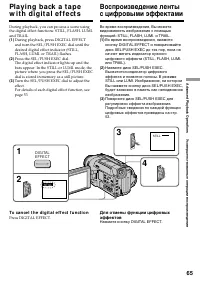
53 Advanc ed R ecording Operat ions Усовершенствованные операции съемки Usi n g sp e ci a l e f f e ct s– D i g i t a l e f f e ct You can add special effects to recorded picturesusing the various digital functions. The sound isrecorded normally. STILL You can record a still picture so that it issup...
Страница 54 - DIGITAL
54 Usi n g sp e ci a l e f f e ct s– D i g i t a l e f f e ct (1 ) While your camcorder is in the standby orrecording mode, press DIGITAL EFFECT. Thedigital effect indicator appears. (2 ) Turn the SEL/PUSH EXEC dial to select thedesired digital effect mode.The indicator changes as follows:STILL ˜ FL...
Страница 55 - To ca n ce l t h e d i g i t a l e f f e ct; Для отмены цифрового эффекта
55 Advanc ed R ecording Operat ions Усовершенствованные операции съемки Usi n g sp e ci a l e f f e ct s– D i g i t a l e f f e ct To ca n ce l t h e d i g i t a l e f f e ct Press DIGITAL EFFECT. The digital effectindicator disappears. Not es • The following functions do not work during digital eff...
Страница 57 - Usi n g t h e PROGRA M A E f u n ct i o n; Появится индикатор PROGRAM
57 Advanc ed R ecording Operat ions Усовершенствованные операции съемки Usi n g t h e PROGRA M A E f u n ct i o n (1 ) Press PROGRAM AE in the standby mode.The PROGRAM AE indicator appears. (2 ) Turn the SEL/PUSH EXEC dial to select thedesired PROGRAM AE mode.The indicator changes as follows: ˜ a ˜ ...
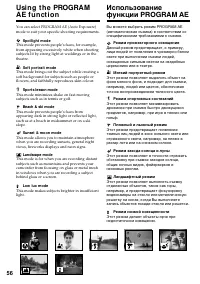
Страница 58 - • In the spotlight, sports lesson and beach & ski
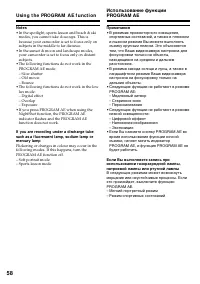
58 Not es • In the spotlight, sports lesson and beach & ski modes, you cannot take close-ups. This isbecause your camcorder is set to focus only onsubjects in the middle to far distance. • In the sunset & moon and landscape modes, your camcorder is set to focus only on distantsubjects. • The...
Страница 59 - faithfully; Объект на фоне задней подсветки
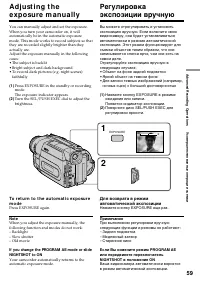
59 Advanc ed R ecording Operat ions Усовершенствованные операции съемки You can manually adjust and set the exposure.When you turn your camcorder on, it willautomatically be in the automatic exposuremode. This mode works to record subjects so thatthey are recorded slightly brighter than theyactually...
Страница 60 - Fo cu si n g m a n u a l l y; FOCUS; Фокусировка вручную; таком фоне, как стена или небо
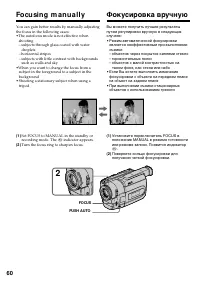
60 Fo cu si n g m a n u a l l y You can gain better results by manually adjustingthe focus in the following cases:•The autofocus mode is not effective when shooting– subjects through glass coated with water droplets – horizontal stripes– subjects with little contrast with backgrounds such as walls a...
Страница 61 - To r e t u r n t o t h e a u t o f o cu s m o d e; indicator appears. When; W hen you shoot close t o t he subject; Для съемки удаленных объектов; Следующие индикаторы могут появиться; чтобы выполнить фокусировку на него.
61 Advanc ed R ecording Operat ions Усовершенствованные операции съемки To r e t u r n t o t h e a u t o f o cu s m o d e Set FOCUS to AUTO. To r e co r d d i st a n t su b j e ct s When you press FOCUS down to INFINITY. Thelens focuses on and indicator appears. When you release FOCUS, your camcorde...
Страница 62 - I n se r t i n g a sce n e; Keep pressing the –; Вставка эпизода; Держите нажатой сторону –
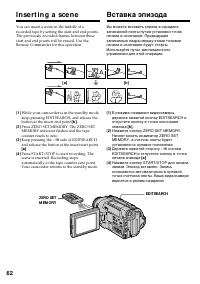
62 I n se r t i n g a sce n e You can insert a scene in the middle of arecorded tape by setting the start and end points.The previously recorded frames between thesestart and end points will be erased. Use theRemote Commander for this operation. (1 ) While your camcorder is in the standby mode,keep ...
Страница 63 - • The zero set memory function works only for; W hen START/ STOP M ODE is set t o or 5SEC; You cannot use the zero set memory function.
63 Advanc ed R ecording Operat ions Усовершенствованные операции съемки I n se r t i n g a sce n e Not es • The zero set memory function works only for tapes recorded in the Digital8 system. • The picture and the sound may be distorted at the end of the inserted section when it is playedback. If you...
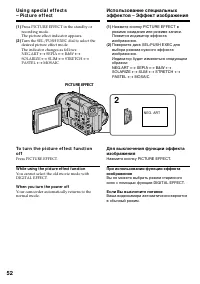
Страница 64 - — A d v a n ce d Pl a y b a ck Op e r a t i o n s —; To ca n ce l t h e p i ct u r e e f f e ct f u n ct i o n; Нажмите кнопку PICTURE EFFECT.
64 — A d v a n ce d Pl a y b a ck Op e r a t i o n s — Pl a y i n g b a ck a t a p ew i t h p i ct u re e f f e ct s During playback, you can process a scene usingthe picture effect functions: NEG.ART, SEPIA,B&W and SOLARIZE. During playback, press PICTURE EFFECT andturn the SEL/PUSH EXEC dial u...
Страница 65 - To ca n ce l t h e d i g i t a l e f f e ct f u n ct i o n; Press DIGITAL EFFECT.
65 Advanc ed P laybac k Operat ions Усовершенствованные операции воспроизведения During playback, you can process a scene usingthe digital effect functions: STILL, FLASH, LUMI.and TRAIL. (1 ) During playback, press DIGITAL EFFECTand turn the SEL/PUSH EXEC dial until thedesired digital effect indicat...
Страница 66 - • The digital effect function works only for tapes; Pict ure processed by t he digit al ef f ect f unct ion; DV
66 Not es • The digital effect function works only for tapes recorded in the Digital8 system. • You cannot process externally input scenes using the digital effect function. • To record pictures that you have processed using the digital effect function, record thepictures on the VCR. Pict ure proces...
Страница 68 - Поиск записи по дате
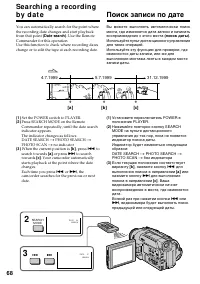
68 You can automatically search for the point wherethe recording date changes and start playbackfrom that point (Dat e search) . Use the Remote Commander for this operation.Use this function to check where recording dateschange or to edit the tape at each recording date. (1 ) Set the POWER switch to...
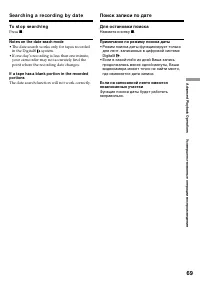
Страница 69 - To st o p se a r ch i n g; Not es on t he dat e seach mode; • The date search works only for tapes recorded; Se a r ch i n g a r e co r d i n g b y d a t e; Для остановки поиска; Примечания по режиму поиска даты
69 Advanc ed P laybac k Operat ions Усовершенствованные операции воспроизведения To st o p se a r ch i n g Press p . Not es on t he dat e seach mode • The date search works only for tapes recorded in the Digital8 system. • If one day’s recording is less than one minute, your camcorder may not accura...
Страница 70 - Se a r ch i n g f o r a p h o t o; Поиск фото
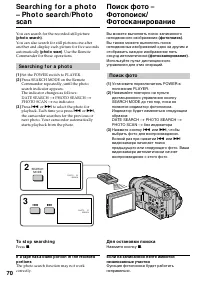
70 You can search for the recorded still picture (phot o search) . You can also search for still pictures one afteranother and display each picture for five secondsautomatically (phot o scan) . Use the Remote Commander for these operations. Se a r ch i n g f o r a p h o t o (1 ) Set the POWER switch...
Страница 71 - Sca n n i n g p h o t o; To st o p sca n n i n g; Сканирование фото; Для остановки сканирования
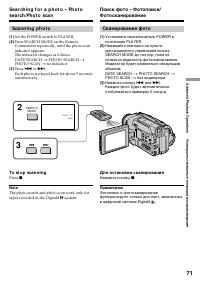
71 Advanc ed P laybac k Operat ions Усовершенствованные операции воспроизведения Sca n n i n g p h o t o (1 ) Set the POWER switch to PLAYER. (2 ) Press SEARCH MODE on the Remote Commander repeatedly, until the photo scanindicator appears.The indicator changes as follows:DATE SEARCH n PHOTO SEARCH n...
Страница 72 - — Ed i t i n g o n Ot h e r Eq u i p m e n t —; D u b b i n g a t a p e; Set the POWER switch to PLAYER.; — Монтаж на другую аппаратуру —; Перезапись ленты; Начните запись на Вашем КВМ.; Если Вы закончили перезапись ленты
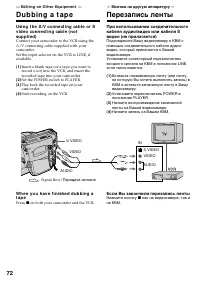
72 — Ed i t i n g o n Ot h e r Eq u i p m e n t — D u b b i n g a t a p e Usi n g t h e A /V co n n e ct i n g ca b l e o r Sv i d e o co n n e ct i n g ca b l e ( n o tsu p p l i e d ) Connect your camcorder to the VCR using theA/V connecting cable supplied with yourcamcorder.Set the input selector...
Страница 73 - If your VCR is a monaural t ype; mini; Если Ваш КВМ монофонического типа
73 E diting on Ot her E quipment Монтаж на другую аппаратуру D u b b i n g a t a p e If you have displayed t he screen indicat ors ont he TV Make the indicators disappear by pressingSEARCH MODE on the Remote Commander,DISPLAY or DATA CODE so that they will notbe superimposed on the edited tape. You ...
Страница 74 - Usi n g t h e i .LI N K ca b l e; During digit al edit t ing; Использование кабеля i.LINK; DV OUT и гнезду DV IN цифровых; Во время цифрового монтажа
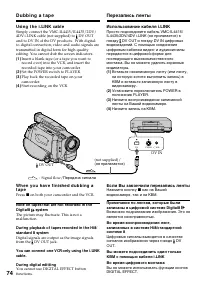
74 D u b b i n g a t a p e Usi n g t h e i .LI N K ca b l e Simply connect the VMC-IL4415/IL4435/2DV/4DV i.LINK cable (not supplied) to DV OUTand to DV IN of the DV products. With digital-to-digital connection, video and audio signals aretransmitted in digital form for high-qualityediting. You canno...
Страница 75 - — Операции с флэш-памятью —; – Только модель DCR-TRV510E; Типичное имя файла данных изображения
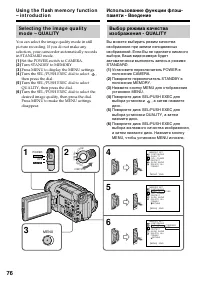
75 F lash M emory Operat ions Операции с флэш-памятью — Fl a sh M e m o r y Op e r a t i o n s — Using t he f lash m em oryf unct ion – int roduct ion – D CR-TRV 5 1 0 E o n l y Your camcorder has a built-in flash memory witha capacity of 2MB.The built-in flash memory can record still images,exchang...
Страница 77 - I m a g e q u a l i t y se t t i n g s
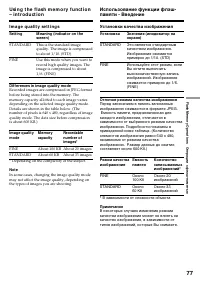
77 F lash M emory Operat ions Операции с флэш-памятью Usi n g t h e f l a sh m e m o r y f u n ct i o n– i n t r o d u ct i o n I m a g e q u a l i t y se t t i n g s Set t ing M eaning (indicat or on t hescreen) STANDARD This is the standard imagequality. The image is compressedto about 1/10. (STD)...
Страница 79 - Re co r d i n g m o d e se t t i n g s; Set t ing; Установки режимов записи; Установка Значение (индикатор на; FIELD
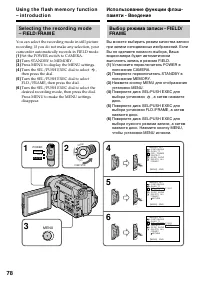
79 F lash M emory Operat ions Операции с флэш-памятью Re co r d i n g m o d e se t t i n g s Set t ing M eaning (indicat or on t he screen) FIELD Field recording. Your camcordercompensates for camera-shake. (noindicator) FRAME Frame recording. Your camcorderrecords images in high quality.(FRAME) Not...
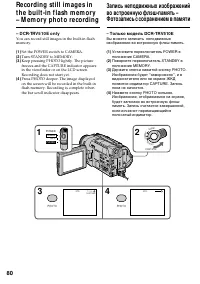
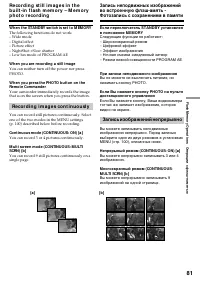
Страница 81 - W hen t he STANDBY sw it ch is set t o M EM ORY; Re co r d i n g i m a g e s co n t i n u o u sl y; You can record 3 or 4 pictures continuously.; При записи неподвижного изображения; Запись изображений непрерывно; Непрерыный режим
81 F lash M emory Operat ions Операции с флэш-памятью W hen t he STANDBY sw it ch is set t o M EM ORY The following functions do not work:– Wide mode– Digital effect– Picture effect– NightShot +Slow shutter– Low lux mode of PROGRAM AE W hen you are recording a st ill image You can neither turn off t...
Страница 83 - Co n t i n u o u s sh o o t i n g se t t i n g s; Number of images in cont inuous shoot ing; images; Установки непрерывной съемки; Установка
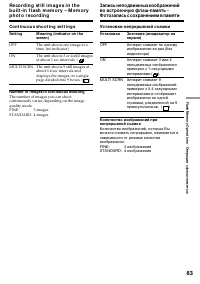
83 F lash M emory Operat ions Операции с флэш-памятью Co n t i n u o u s sh o o t i n g se t t i n g s Set t ing M eaning (indicat or on t hescreen) OFF The unit shoots one image at atime. (no indicator) ON The unit shoots 3 or 4 still imagesat about 1 sec intervals. ( ) MULTI SCRN The unit shoots 9...
Страница 84 - Bef ore operat ion; Insert a recorded tape.; PLAY; Перед началом работы; Вставьте записанную ленту.
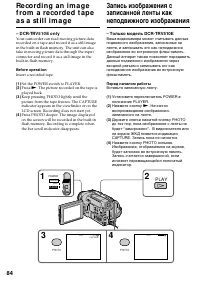
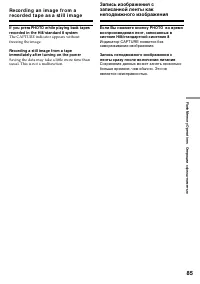
84 Re co rd i n g a n i m a g ef ro m a re co rd e d t a p ea s a st i l l i m a g e – D CR-TRV 5 1 0 E o n l y Your camcorder can read moving picture datarecorded on a tape and record it as a still imagein the built-in flash memory. The unit can alsotake in moving picture data through the inputconn...
Страница 86 - Insert a recorded tape and rewind the tape.
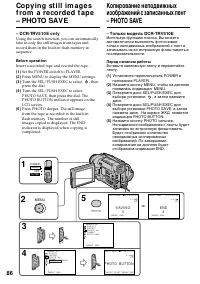
86 Co p y i n g st i l l i m a g e sf ro m a re co rd e d t a p e– PHOTO SAV E – D CR-TRV 5 1 0 E o n l y Using the search function, you can automaticallytake in only the still images from tapes andrecord them in the built-in flash memory insequence. Bef ore operat ion Insert a recorded tape and rew...
Страница 87 - To st o p co p y i n g; Для остановки копирования
87 F lash M emory Operat ions Операции с флэш-памятью Co p y i n g st i l l i m a g e s f r o m ar e co r d e d t a p e – PHOTO SA V E To st o p co p y i n g Press MENU. Not e Photo save function works only for tapesrecorded in the Digital8 system. To record all t he images recorded on t he t ape Re...
Страница 88 - To st o p m e m o r y p h o t o p l a y b a ck; Press MEMORY PLAY again.; Нажмите кнопку MEMORY PLAY еще раз.
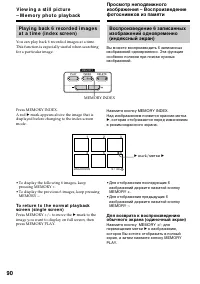
88 Vi e w i n g a st i l l p i ct u re– M e m o r y p h o t o p l a y b a ck – D CR-TRV 5 1 0 E o n l y You can play back still images recorded in thebuilt-in flash memory. You can also play back 6images at a time by selecting the index screen. (1 ) Set the POWER switch to CAMERA. (2 ) Turn STANDBY ...
Страница 89 - To play back recorded images on a TV screen; • Connect your camcorder to the TV with the
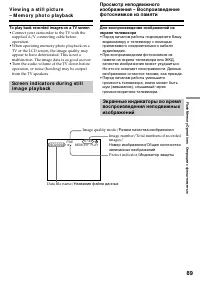
89 F lash M emory Operat ions Операции с флэш-памятью FINE 6 / 33 MEMORY PLAY DSC0 0 0 0 6 To play back recorded images on a TV screen • Connect your camcorder to the TV with the supplied A/V connecting cable beforeoperation. • When operating memory photo playback on a TV or the LCD screen, the imag...
Страница 90 - , которая отображается перед изменением
90 V i e w i n g a st i l l p i ct u r e– M e m o r y p h o t o p l a y b a ck Pl a y i n g b a ck 6 r e co r d e d i m a g e sa t a t i m e ( i n d e x scr e e n ) You can play back 6 recorded images at a time.This function is especially useful when searchingfor a particular image. Press MEMORY IND...
Страница 92 - To f i n i sh PC m o d e
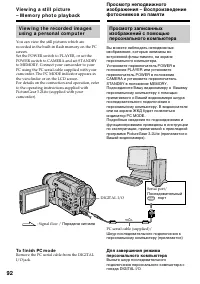
92 V i e w i n g t h e r e co r d e d i m a g e su si n g a p e r so n a l co m p u t e r You can view the still pictures which arerecorded in the built-in flash memory on the PCscreen.Set the POWER switch to PLAYER, or set thePOWER switch to CAMERA and set STANDBYto MEMORY. Connect your camcorder t...
Страница 93 - Applicat ion; • When you view images recorded with the; Прикладная программа; – в то время, когда открыт отсек кассеты.
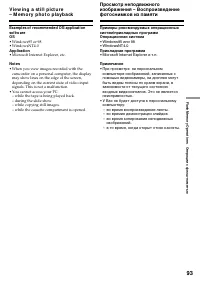
93 F lash M emory Operat ions Операции с флэш-памятью Examples of recommended OS/ applicat ionsof t w areOS • Windows95 or 98• WindowsNT4.0 Applicat ion • Microsoft Internet Explorer, etc. Not es • When you view images recorded with the camcorder on a personal computer, the displaymay show lines on ...
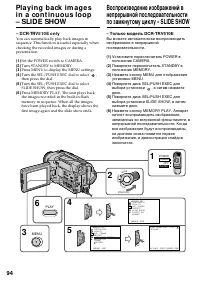
Страница 95 - To st o p t h e sl i d e sh o w; To view t he recorded images on TV; Нажмите кнопку MEMORY PLAY.; Примечание по демонстрации слайдов
95 F lash M emory Operat ions Операции с флэш-памятью To st o p t h e sl i d e sh o w Press MENU. To p a u se d u r i n g a sl i d e sh o w Press MEMORY PLAY. To st a r t t h e sl i d e sh o w f r o m ap a r t i cu l a r i m a g e Select the desired image using MEMORY +/–buttons before step 3. To vi...
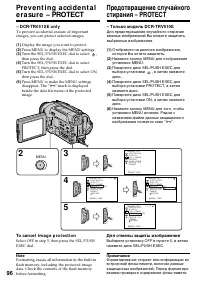
Страница 96 - Display the image you want to protect.; Для отмены защиты изображения
96 Pre v e n t i n g a cci d e n t a le r a su re – PROTECT – D CR-TRV 5 1 0 E o n l y To prevent accidental erasure of importantimages, you can protect selected images. (1 ) Display the image you want to protect. (2 ) Press MENU to display the MENU settings. (3 ) Turn the SEL/PUSH EXEC dial to sele...
Страница 97 - D e l e t i n g se l e ct e d i m a g e s; To ca n ce l d e l e t i n g a n i m a g e; Нажмите кнопку MEMORY – в пункте 3.
97 F lash M emory Operat ions Операции с флэш-памятью – D CR-TRV 5 1 0 E o n l y D e l e t i n g se l e ct e d i m a g e s (1 ) Display the image you want to delete. (2 ) Press MEMORY DELETE. “DELETE?”appears on the LCD screen. (3 ) Press MEMORY DELETE again. The selectedimage is deleted. To ca n ce...
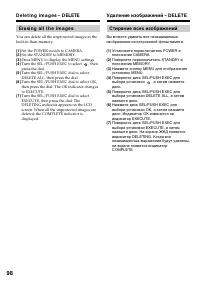
Страница 98 - Er a si n g a l l t h e i m a g e s; D e l e t i n g i m a g e s – D ELETE
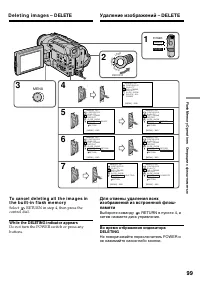
98 Er a si n g a l l t h e i m a g e s You can delete all the unprotected images in thebuilt-in flasn memory. (1 ) Set the POWER switch to CAMERA. (2 ) Set the STANDBY to MEMORY. (3 ) Press MENU to display the MENU settings. (4 ) Turn the SEL/PUSH EXEC to select , then press the dial. (5 ) Turn the ...
Страница 99 - Select; W hile t he DELETING indicat or appears; Удаление изображений – DELETE; Выберите команду
99 F lash M emory Operat ions Операции с флэш-памятью To ca n ce l d e l e t i n g a l l t h e i m a g e s i nt h e b u i l t -i n f l a sh m e m o r y Select RETURN in step 4, then press the control dial. W hile t he DELETING indicat or appears Do not turn the POWER switch or press anybuttons. D e ...
Страница 100 - — Cu st o m i zi n g Y o u r Ca m co r d e r —; Changing t he M ENU set t ings; — Выполнение индивидуальных установок на видеокамере —; Изменение установок MENU
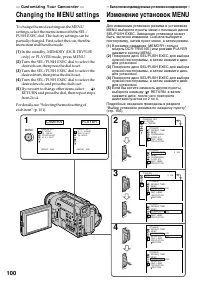
100 — Cu st o m i zi n g Y o u r Ca m co r d e r — Changing t he M ENU set t ings To change the mode settings in the MENUsettings, select the menu items with the SEL/PUSH EXEC dial. The factory settings can bepartially changed. First, select the icon, then themenu item and then the mode. (1) In the ...
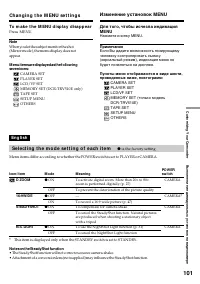
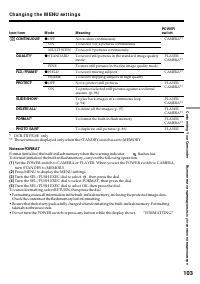
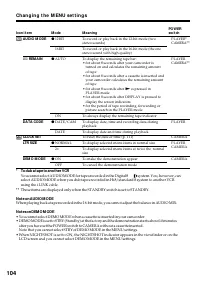
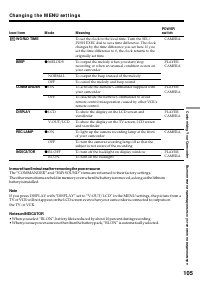
Страница 101 - Ch a n g i n g t h e M EN U se t t i n g s; To m a k e t h e M EN U d i sp l a y d i sa p p e a r; Note; Se l e ct i n g t h e m o d e se t t i n g o f e a ch i t e m; is the factory setting.; Notes on the SteadyShot function
101 C ustomizing Your C amc order Выполнение индивидуальных установок на видеокамере Ch a n g i n g t h e M EN U se t t i n g s To m a k e t h e M EN U d i sp l a y d i sa p p e a r Press MENU. Note When you let the subject monitor the shot(Mirror mode), the menu display does notappear. M enu items ...
Страница 106 - Выбор установок режима по каждому пункту; D ZOOM; Примечания по функции устойчивой съемки
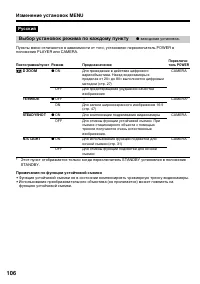
106 Русский Выбор установок режима по каждому пункту r заводская установка. Пункты меню отличаются в зависимости от того, установлен переключатель POWER вположение PLAYER или CAMERA. Пиктограмма/пункт D ZOOM 16:9W IDE STEADYSHOT N.S. LIGHT Режим r ON OFF r OFF ON r ON OFF r ON OFF Предназначение Для...
Страница 107 - HiFi SOUND; Примечания по функции AUDIO MIX; Режим вернется к заводской установке при:
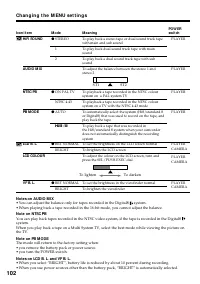
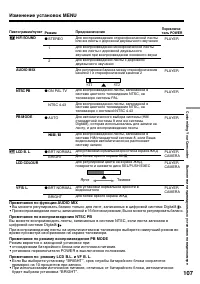
107 C ustomizing Your C amc order Выполнение индивидуальных установок на видеокамере Изменение установок MENU Пиктограмма/пункт HiFi SOUND AUDIO M IX NTSC PB PB M ODE LCD B. L. LCD COLOUR VF B. L. Режим r STEREO 1 2 r ON PAL TV NTSC 4.43 r AUTO H / h r BRT NORMAL BRIGHT r BRT NORMAL BRIGHT Предназна...
Страница 108 - Только модель DCR-TRV510E; Примечание по процедуре FORMAT; Нажмите кнопку MENU для отображения установок MENU.
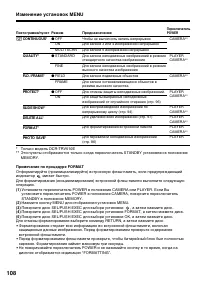
108 Изменение установок MENU * Только модель DCR-TRV510E * * Эти пункты отображаются только когда переключатель STANDBY установлен в положениеMEMORY. Примечание по процедуре FORMAT Отформатируйте (проинициализируйте) встроенную флэш-память, если предупреждающийиндикатор мигает быстро. Для форматиров...
Страница 109 - Режим; Для перезаписи ленты на другой КВМ
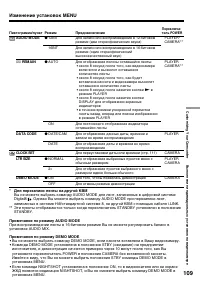
109 C ustomizing Your C amc order Выполнение индивидуальных установок на видеокамере Изменение установок MENU Пиктограмма/пункт AUDIO M ODE Ò REM AIN DATA CODE CLOCK SET LTR SIZE DEM O M ODE Режим r 12BIT 16BIT r AUTO ON r DATE/CAM DATE r NORMAL 2 × r ON OFF Предназначение Для записи или воспроизвед...
Страница 110 - Если после извлечения источника питания пройдет более 5 минут
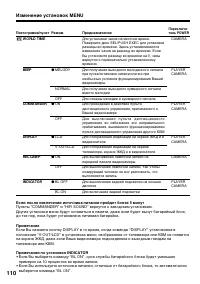
110 Изменение установок MENU Пиктограмма/пункт W ORLD TIM E BEEP COM M ANDER DISPLAY REC LAM P INDICATOR Режим r MELODY NORMAL OFF r ON OFF r LCD V-OUT/LCD r ON OFF r BL OFF BL ON Предназначение Для установки часов на местное время.Поверните диск SEL/PUSH EXEC для установкиразницы во времени. Здесь ...
Страница 111 - Turn the SEL/PUSH EXEC dial to select
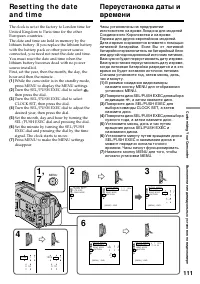
111 C ustomizing Your C amc order Выполнение индивидуальных установок на видеокамере Re se t t i n g t h e d a t ea n d t i m e The clock is set at the factory to London time forUnited Kingdom to Paris time for the otherEuropean countries.The date and time are held in memory by thelithium battery. I...
Страница 112 - Re se t t i n g t h e d a t e a n d t i m e; The year changes as f ollow s:; Переустановка даты и времени; Год изменяется следующим образом:
112 Re se t t i n g t h e d a t e a n d t i m e The year changes as f ollow s: Not e on t he t ime indicat or The internal clock of your camcorder operates ona 24-hour cycle. Переустановка даты и времени Год изменяется следующим образом: Примечание по индикатору времени Встроенные часы Вашей видеока...
Страница 113 - — A d d i t i o n a l I n f o r m a t i o n —; D i g i t a l 8; W h a t i s t h e “ D i g i t a l 8; Pl a y b a ck sy st e m; Display during aut omat ic det ect ion of syst em; Что такое “система Digital8 ”?; Система воспроизведения
113 Addit ional Inf ormat ion Дополнительная информация — A d d i t i o n a l I n f o r m a t i o n — D i g i t a l 8 sy st e m , re co rd i n g a n d p l a y b a ck W h a t i s t h e “ D i g i t a l 8 sy st e m ” ? This video system has been developed to enabledigital recording to Hi8 video cassett...
Страница 114 - W h e n y o u p l a y b a ck; Playing back an NTSC-recorded t ape; • During playback, a black band appears on the; При воспроизведении
114 Pl a y b a ck a n d r e p l a y i n t h eD i g i t a l 8 sy st e m W h e n y o u p l a y b a ck Playing back an NTSC-recorded t ape You can play back tapes recorded in the NTSCvideo system, if the tape is recorded in theDigital8 system. If the tape is recorded in theAFM HiFi system, the AFM HiFi...
Страница 115 - sy st e m
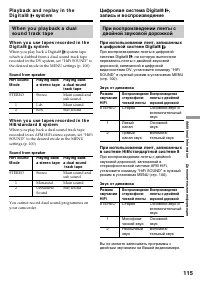
115 Addit ional Inf ormat ion Дополнительная информация W h e n y o u p l a y b a ck a d u a lso u n d t r a ck t a p e W h e n y o u u se t a p e s r e co r d e d i n t h eD i g i t a l 8 sy st e m When you play back a Digital8 system tapewhich is dubbed from a dual sound track taperecorded in the ...
Страница 116 - будет мигать в; Этой батарейки может не хватить на 1 год.
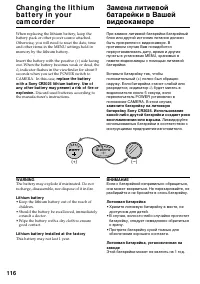
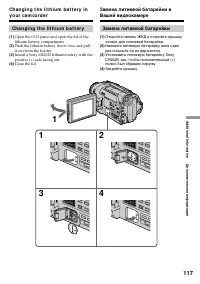
116 When replacing the lithium battery, keep thebattery pack or other power source attached.Otherwise, you will need to reset the date, timeand other items in the MENU settings hold inmemory by the lithium battery. Insert the battery with the positive (+) side facingout. When the battery becomes wea...
Страница 117 - Ch a n g i n g t h e l i t h i u m b a t t e r y
117 Addit ional Inf ormat ion Дополнительная информация Ch a n g i n g t h e l i t h i u m b a t t e r y (1 ) Open the LCD panel and open the lid of thelithium battery compartment. (2 ) Push the lithium battery down once and pullit out from the holder. (3 ) Install a Sony CR2025 lithium battery with...
Страница 124 - Поиск и устранение неисправностей; В режиме записи; Возможная неисправность
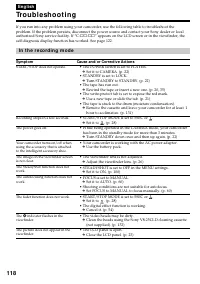
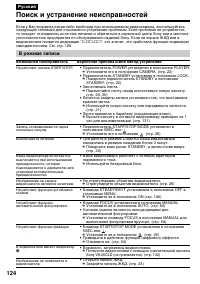
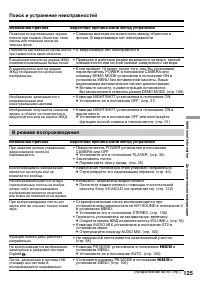
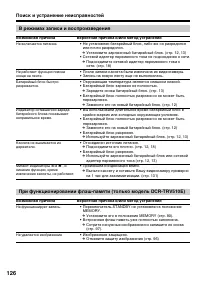
124 Русский Поиск и устранение неисправностей Если у Вас возникла какая-либо проблема при использовании видеокамеры, воспользуйтесьследующей таблицей для отыскания и устранения проблемы. Если проблема не устраняется,то следует отсоединить источник питания и обратиться в сервисный центр Sony или в ме...
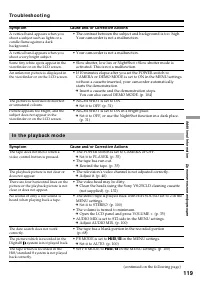
Страница 125 - В режиме воспроизведения; Возможная причина
125 Addit ional Inf ormat ion Дополнительная информация Поиск и устранение неисправностей Возможная причина Вероятная причина и/или метод устранения • Слишком высокая контрастность между объектом ифоном. В видеокамере нет неисправности. • В видеокамере нет неисправности. • Приведен в действие режим ...
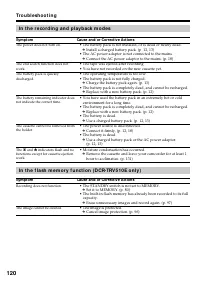
Страница 127 - Прочее
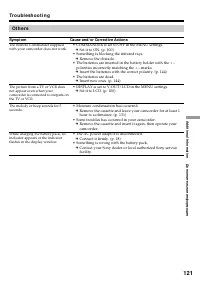
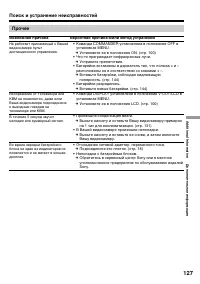
127 Addit ional Inf ormat ion Дополнительная информация Прочее Возможная причина Вероятная причина и/или метод устранения • Команда COMMANDER установлена в положение OFF вустановках MENU. m Установите ее в положение ON. (стр. 100) • Что-то преграждает инфракрасные лучи. m Устраните препятствие. • Ба...
Страница 128 - Пятизначная индикация; Произошла конденсация влаги.
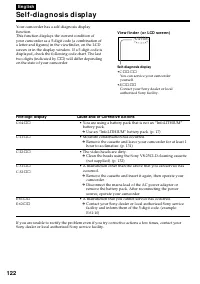
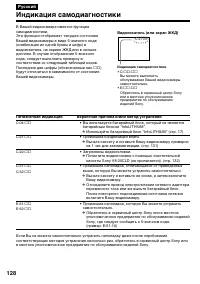
128 Русский Индикация самодиагностики Пятизначная индикация Вероятная причина и/или метод устранения • Вы используете батарейный блок, который не являетсябатарейным блоком “InfoLITHIUM”. m Используйте батарейный блок “InfoLITHIUM” (стр. 17) • Произошла конденсация влаги. m Выньте кассету и оставьте ...
Страница 129 - Предупреждающие индикаторы и сообщения; Индикаторы и сообщения отображаются желтым цветом.; Предупреждающие индикаторы; Лента почти достигла конца.; Предупреждающие сообщения; Загрязнились видеоголовки.; Изображение защищено
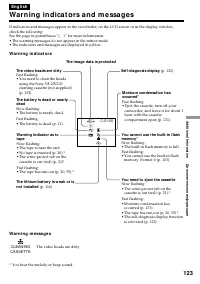
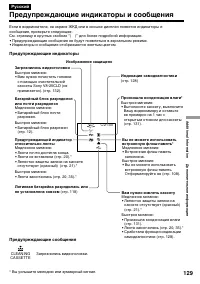
129 Addit ional Inf ormat ion Дополнительная информация C:21:00 Русский Предупреждающие индикаторы и сообщения Если в видоискателе, на экране ЖКД или в окошке дисплея появятся индикаторы исообщения, проверьте следующее:См. страницу в круглых скобках “( )” для более подробной информации. • Предупрежд...
Страница 130 - Usi n g y o u r ca m co r d e r a b r o a d; PAL syst em; Brazil; NTSC syst em; Бразилия; Система NTSC
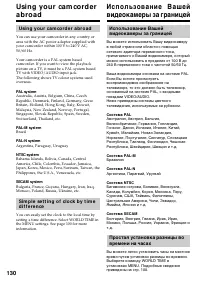
130 Usi n g y o u r ca m co r d e r a b r o a d You can use your camcorder in any country orarea with the AC power adaptor supplied withyour camcorder within 100 V to 240 V AC,50/60 Hz. Your camcorder is a PAL system basedcamcorder. If you want to view the playbackpicture on a TV, it must be a PAL s...
Страница 131 - M o i st u r e co n d e n sa t i o n; I f m o i st u r e co n d e n sa t i o n o ccu r r e d; Not e on moist ure condensat ion; Конденсация влаги; самое время будет мигать индикатор; Если произошла конденсация влаги; не появится; Примечание по конденсации влаги
131 Addit ional Inf ormat ion Дополнительная информация M a i n t e n a n cei n f o r m a t i o n a n dp re ca u t i o n s M o i st u r e co n d e n sa t i o n If your camcorder is brought directly from a coldplace to a warm place, moisture may condenseinside your camcorder, on the surface of the ta...
Страница 132 - M a i n t e n a n ce i n f o r m a t i o n; Cl e a n i n g t h e v i d e o h e a d; indicator and “; Cl e a n i n g t h e LCD scr e e n
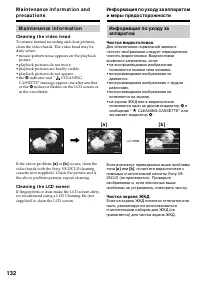
132 M a i n t e n a n ce i n f o r m a t i o n Cl e a n i n g t h e v i d e o h e a d To ensure normal recording and clear pictures,clean the video heads. The video head may bedirty when:• mosaic-pattern noise appears on the playback picture. • playback pictures do not move.• playback pictures are h...
Страница 133 - Pr e ca u t i o n s; Ca m co r d e r o p e r a t i o n; Меры предосторожности; Эксплуатация видеокамеры
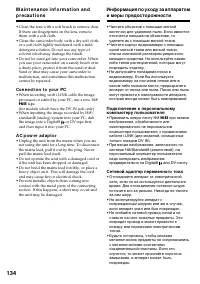
133 Addit ional Inf ormat ion Дополнительная информация M a i n t e n a n ce i n f o r m a t i o n a n dp r e ca u t i o n s Pr e ca u t i o n s Ca m co r d e r o p e r a t i o n • Operate your camcorder on 7.2 V (battery pack) or 8.4 V (AC power adaptor). • For DC or AC operation, use the accessori...
Страница 134 - Применить новую ленту Hi8; Сетевой адаптер переменного тока
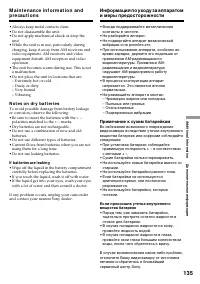
134 • Clean the lens with a soft brush to remove dust. If there are fingerprints on the lens, removethem with a soft cloth. • Clean the camcorder body with a dry soft cloth, or a soft cloth lightly moistened with a milddetergent solution. Do not use any type ofsolvent which may damage the finish. • ...
Страница 135 - N o t e s o n d r y b a t t e r i e s; If bat t eries are leaking; Не разбирайте аппарат.; Примечание к сухим батарейкам; Сухие батарейки нельзя перезаряжать.
135 Addit ional Inf ormat ion Дополнительная информация M a i n t e n a n ce i n f o r m a t i o n a n dp r e ca u t i o n s • Always keep metal contacts clean.• Do not disassemble the unit.• Do not apply mechanical shock or drop the unit. • While the unit is in use, particularly during charging, ke...
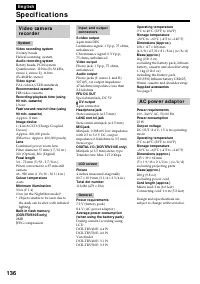
Страница 137 - Технические характеристики; Видеокамера
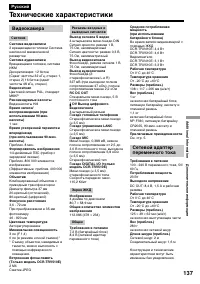
137 Addit ional Inf ormat ion Дополнительная информация Русский Технические характеристики Средняя потребляемаямощность(при использованиибатарейного блока) Во время записи видеокамерой спомощью ЖКДDCR-TRV410E: 4,4 ВтDCR-TRV510E: 4,6 ВтВидоискателяDCR-TRV410E: 3,1 ВтDCR-TRV510E: 3,3 Вт Рабочая темпер...
Страница 139 - I d e n t i f y i n g t h e p a r t s a n d co n t r o l s; mark by using infrared rays.
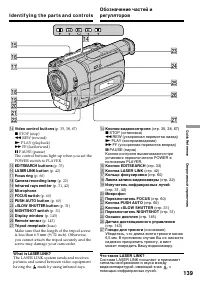
139 Quic k R eferenc e Оперативный справочник I d e n t i f y i n g t h e p a r t s a n d co n t r o l s !¢ Video cont rol but t ons (p. 35, 38, 67) p STOP (stop) 0 REW (rewind) ( PLAY (playback) ) FF (fastforward) P PAUSE (pause) The control buttons light up when you set thePOWER switch to PLAYER. ...
Страница 140 - • The intelligent accessory shoe supplies power
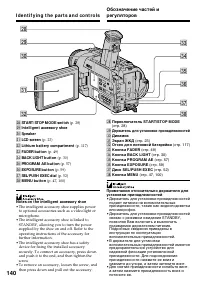
140 I d e n t i f y i n g t h e p a r t s a n d co n t r o l s @• START/ STOP M ODE sw it ch (p. 28) @ª Int elligent accessory shoe #º Speaker #¡ LCD screen (p. 23) #™ Lit hium bat t ery compart ment (p. 117) #£ FADER but t on (p. 49) #¢ BACK LIGHT but t on (p. 30) #∞ PROGRAM AE but t on (p. 57) #§ ...
Страница 142 - control jack is used for
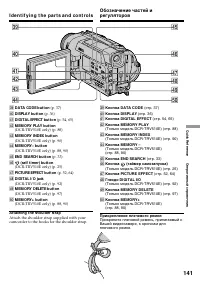
142 I d e n t i f y i n g t h e p a r t s a n d co n t r o l s %¡ View f inder (p. 26) %™ EJECT sw it ch (p. 20) %£ LANC l cont rol jack LANC stands for Local Application ControlBus System. The l control jack is used for controlling the tape transport of videoequipment and other peripherals connecte...
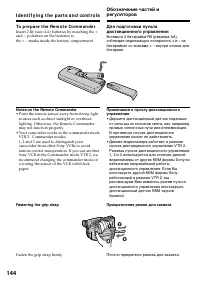
Страница 144 - To p r e p a r e t h e Re m o t e Co m m a n d e r; Not es on t he Remot e Commander; • Point the remote sensor away from strong light; Fast ening t he grip st rap; Fasten the grip strap firmly.; Прикрепление ремня для захвата; Плотно прикрепите ремень для захвата.
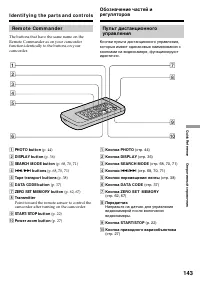
144 I d e n t i f y i n g t h e p a r t s a n d co n t r o l s To p r e p a r e t h e Re m o t e Co m m a n d e r Insert 2 R6 (size AA) batteries by matching the +and – polarities on the batteries tothe + – marks inside the battery compartment. Not es on t he Remot e Commander • Point the remote sen...
Страница 145 - V i e w f i n d e r /; Рабочие индикаторы; STBY
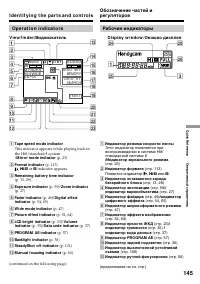
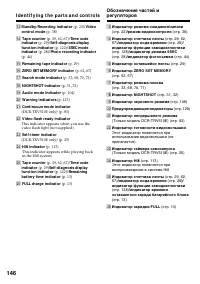
145 Quic k R eferenc e Оперативный справочник I d e n t i f y i n g t h e p a r t s a n d co n t r o l s Op e r a t i o n i n d i ca t o r s V i e w f i n d e r / Видоискатель D i sp l a y w i n d o w / Окошко дисплея 1 Tape speed mode indicat or This indicator appears while playing back inthe Hi8/s...
Страница 148 - Руководство по быстрым функциям
148 Функции для регулировки экспозиции (в режиме записи) • В темном месте NIGHTSHOT (стр. 31) • При недостаточном освещении Режим низкой освещенности (стр. 56) • В темных окружающих условиях, например, Режим захода солнца и луны (стр. 56) заход солнца, фейерверки или общиеночные виды • Съемка объект...
Страница 150 - Алфавитный указатель
150 Русский Алфавитный указатель А, Б, В, Г Батарейный блок .................. 12Батарейный блок “InfoLITHIUM” ...................... 17 Вариообъектив ...................... 27Введение/выведение изображения ....................... 48 Внешний микрофон (не прилагается) ............... 142 Время записи...


 Sony CCD-TR2300E
Инструкция по эксплуатации
Sony CCD-TR2300E
Инструкция по эксплуатации
 Sony CCD-TR3100E
Инструкция по эксплуатации
Sony CCD-TR3100E
Инструкция по эксплуатации
 Sony CCD-TR311E
Инструкция по эксплуатации
Sony CCD-TR311E
Инструкция по эксплуатации
 Sony CCD-TR315E
Инструкция по эксплуатации
Sony CCD-TR315E
Инструкция по эксплуатации
 Sony CCD-TR317E
Инструкция по эксплуатации
Sony CCD-TR317E
Инструкция по эксплуатации
 Sony CCD-TR3300E
Инструкция по эксплуатации
Sony CCD-TR3300E
Инструкция по эксплуатации
 Sony CCD-TR3400E
Инструкция по эксплуатации
Sony CCD-TR3400E
Инструкция по эксплуатации
 Sony CCD-TR411E / CCD-TR412E
Инструкция по эксплуатации
Sony CCD-TR411E / CCD-TR412E
Инструкция по эксплуатации
 Sony CCD-TR415E
Инструкция по эксплуатации
Sony CCD-TR415E
Инструкция по эксплуатации
 Sony CCD-TR417E
Инструкция по эксплуатации
Sony CCD-TR417E
Инструкция по эксплуатации
 Sony CCD-TR425E
Инструкция по эксплуатации
Sony CCD-TR425E
Инструкция по эксплуатации
 Sony CCD-TR427E
Инструкция по эксплуатации
Sony CCD-TR427E
Инструкция по эксплуатации
 Sony CCD-TR501E / CCD-TR502E
Инструкция по эксплуатации
Sony CCD-TR501E / CCD-TR502E
Инструкция по эксплуатации
 Sony CCD-TR503E / CCD-TR506E
Инструкция по эксплуатации
Sony CCD-TR503E / CCD-TR506E
Инструкция по эксплуатации
 Sony CCD-TR511E / CCD-TR512E
Инструкция по эксплуатации
Sony CCD-TR511E / CCD-TR512E
Инструкция по эксплуатации
 Sony CCD-TR515E
Инструкция по эксплуатации
Sony CCD-TR515E
Инструкция по эксплуатации
 Sony CCD-TR516E
Инструкция по эксплуатации
Sony CCD-TR516E
Инструкция по эксплуатации
 Sony CCD-TR617E
Инструкция по эксплуатации
Sony CCD-TR617E
Инструкция по эксплуатации
 Sony CCD-TR618E
Инструкция по эксплуатации
Sony CCD-TR618E
Инструкция по эксплуатации