Страница 2 - En g l i sh; camcorder. With your Handycam; W ARNING; or; ПРЕДУПРЕЖДЕНИЕ; Русский
2 En g l i sh We l co m e ! Congratulations on your purchase of this SonyHandycam R camcorder. With your Handycam you can capture life’s precious moments withsuperior picture and sound quality.Your Handycam is loaded with advancedfeatures, but at the same time it is very easy touse. You will soon be...
Страница 4 - Оглавление; Перед началом эксплуатации
4 Оглавление Русский Перед началом эксплуатации Использование данного руководства ........... 5Проверка прилагаемых принадлежностей ... 7 Подготовка к эксплуатации Установка и зарядка батарейного блока ..... 8Вставка кассеты ........................................... 13 Основные операции Запись с п...
Страница 5 - Usi n g t h i s m a n u a l; 60x в некоторых областях
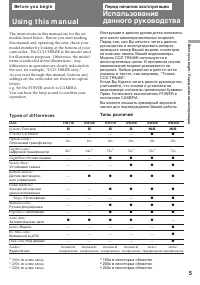
5 Be f o r e y o u b e g i n The instructions in this manual are for the sixmodels listed below. Before you start readingthis manual and operating the unit, check yourmodel number by looking at the bottom of yourcamcorder. The CCD-TR845E is the model usedfor illustration purposes. Otherwise, the mod...
Страница 6 - • Do not let the camcorder get wet. Keep the
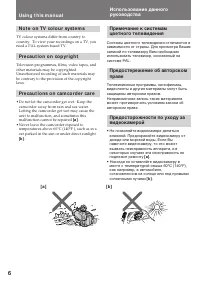
6 Usi n g t h i s m a n u a l [ a ] [ b ] N o t e o n TV co l o u r sy st e m s TV colour systems differ from country tocountry. To view your recordings on a TV, youneed a PAL system-based TV. Pr e ca u t i o n o n co p y r i g h t Television programmes, films, video tapes, andother materials may be...
Страница 8 - I n st a l l i n g t h e b a t t e r y p a ck; Install the battery pack in the direction of the; Ge t t i n g st a r t e d; Not e on t he bat t ery pack; Подготовка к эксплуатации; Установка батарейного блока; на батарейном; Примечание к батарейному блоку
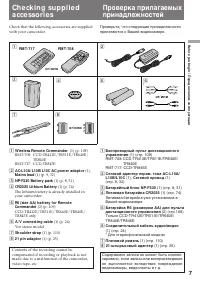
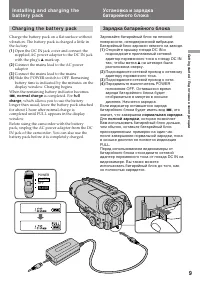
8 Before using your camcorder, you first need toinstall and charge the battery pack.This camcorder operates only with the“InfoLITHIUM” battery pack.“InfoLITHIUM” is a trademark of Sonycorporation. I n st a l l i n g t h e b a t t e r y p a ck (1) While pressing BATT RELEASE, slide thebattery termina...
Страница 9 - Ch a r g i n g t h e b a t t e r y p a ck; Connect the mains lead to the mains.; normal charge; , which allows you to use the battery; Зарядка батарейного блока; на штекере была; нормальная зарядка; Для; полной зарядки
9 G etting s tarted / Подготовка к эксплуатации I n st a l l i n g a n d ch a r g i n g t h eb a t t e r y p a ck Ch a r g i n g t h e b a t t e r y p a ck Charge the battery pack on a flat surface withoutvibration. The battery pack is charged a little inthe factory. (1 ) Open the DC IN jack cover a...
Страница 10 - Not es; remaining battery time appears.; Ch a r g i n g t i m e; Bat t ery pack; Ba t t e r y l i f e; Bat t ery; Примечания; • Индикация оставшегося времени заряда; Время зарядки
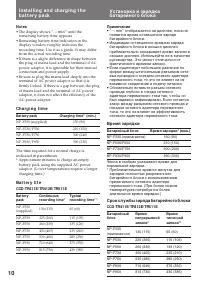
10 Not es • The display shows “--- min” until the remaining battery time appears. • Remaining battery time indication in the display window roughly indicates therecording time. Use it as a guide. It may differfrom the actual recording time. • If there is a slight difference in shape between the plug...
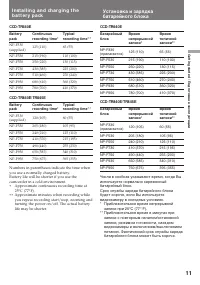
Страница 11 - Approximate continuous recording time at
11 G etting s tarted / Подготовка к эксплуатации CCD-TR640E Bat t ery Cont inuous Typical pack recording t ime* recording t ime* * NP-F330(supplied) 125 (110) 65 (55) NP-F530 215 (190) 110 (100) NP-F550 250 (220) 130 (115) NP-F730 430 (385) 225 (200) NP-F750 510 (460) 270 (240) NP-F930 680 (610) 360...
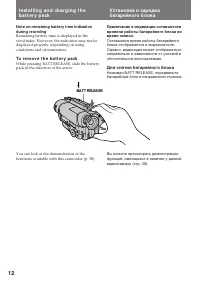
Страница 12 - To r e m o v e t h e b a t t e r y p a ck; BATT RELEASE; Для снятия батарейного блока
12 Not e on remaining bat t ery t ime indicat ionduring recording Remaining battery time is displayed in theviewfinder. However, the indication may not bedisplayed properly, depending on usingconditions and circumstances. To r e m o v e t h e b a t t e r y p a ck While pressing BATT RELEASE, slide t...
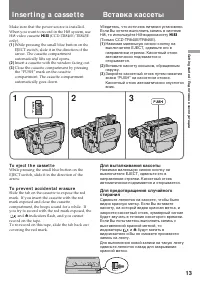
Страница 13 - Insert a cassette with the window facing out.; I n se r t i n g a ca sse t t e; Для выталкивания кассеты; будут мигать в; To e j e ct t h e ca sse t t e; and
13 G etting s tarted / Подготовка к эксплуатации Make sure that the power source is installed.When you want to record in the Hi8 system, useHi8 video cassette H (CCD-TR840E/TR845E only). (1 ) While pressing the small blue button on theEJECT switch, slide it in the direction of thearrow. The cassette...
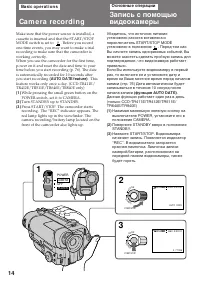
Страница 14 - Ba si c o p e r a t i o n s; Ca m e r a re co rd i n g; Turn STANDBY up to STANDBY.; Основные операции
14 2 3 1 LO CK START/STOP S TA N D B Y LO CK START/STOP S TA N D B Y POWER OFF PLAYER CAMERA 40min SP H STBY 0:00:00 40min SP H REC 0:00:01 AUTO DATE 4 7 1998 Ba si c o p e r a t i o n s Ca m e r a re co rd i n g Make sure that the power source is installed, acassette is inserted and that the START/...
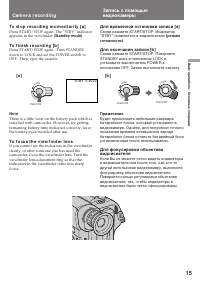
Страница 15 - To st o p r e co r d i n g m o m e n t a r i l y [ a ]; Ca m e r a r e co r d i n g; Примечание; To f o cu s t h e v i e w f i n d e r l e n s
15 B asic operat ions / Основные операции LO CK START/STOP S TA N D B Y START/STOP LO CK S TA N D B Y STBY 0:35:20 LO CK START/STOP S TA N D B Y To st o p r e co r d i n g m o m e n t a r i l y [ a ] Press START/STOP again. The “STBY” indicatorappears in the viewfinder (St andby mode) . To f i n i s...
Страница 16 - Not e on St andby mode; • The tape counter indicates the recording or; Not e on t he beep sound; • Счетчик ленты указывает время записи или
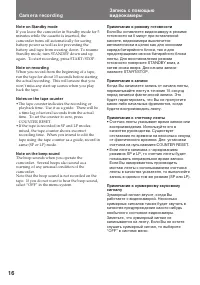
16 Ca m e r a r e co r d i n g Not e on St andby mode If you leave the camcorder in Standby mode for 5minutes while the cassette is inserted, thecamcorder turns off automatically for savingbattery power as well as for preventing thebattery and tape from wearing down. To resumeStandby mode, turn STAN...
Страница 17 - only; ON again in the menu system.; Usi n g t h e zo o m f e a t u r e; – Вы установили функцию AUTO DATE в
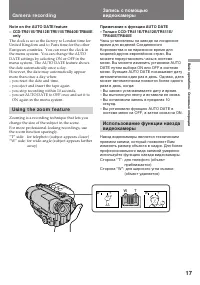
17 B asic operat ions / Основные операции Not e on t he AUTO DATE f eat ure– CCD-TR411E/ TR412E/ TR511E/ TR640E/ TR840E only The clock is set at the factory to London time forUnited Kingdom and to Paris time for the otherEuropean countries. You can reset the clock inthe menu system. You can change t...
Страница 18 - Not es on digit al zoom; • The right side; Примечания к цифровому трансфокатору; • Правая сторона
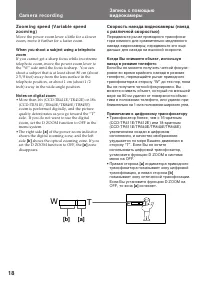
18 T W T W [a] [b] Ca m e r a r e co r d i n g Zo o m i n g sp e e d ( V a r i a b l e sp e e dzo o m i n g ) Move the power zoom lever a little for a slowerzoom, move it further for a faster zoom. W hen you shoot a subject using a t elephot ozoom If you cannot get a sharp focus while in extremetele...
Страница 19 - Se l e ct i n g t h e STA RT/STOP m o d e; : Recording starts when you press; Выбор режима START/STOP; : Запись начинается когда Вы; Примечаниa к режиму START/STOP; You cannot use FADER in 5SEC or
19 B asic operat ions / Основные операции Se l e ct i n g t h e STA RT/STOP m o d e Your camcorder has three modes. These modesenable you to take a series of quick shotsresulting in a lively video. ( 1 ) Set START/STOP MODE to the desiredmode. : Recording starts when you press START/STOP, and stops ...
Страница 21 - Hi n t s f o r b e t t e r sh o o t i n g; Caut ions on t he view f inder; • Do not pick up the camcorder by the; Советы для лучшей съемки; Предосторожности к видоискателю; • Не поднимайте видеокамеру за
21 B asic operat ions / Основные операции Hi n t s f o r b e t t e r sh o o t i n g Place t he camcorder on a f lat surf ace or use at ripod Try placing the camcorder on a table top or anyother flat surface of suitable height. If you have atripod for a still camera, you can also use it withthe camco...
Страница 22 - На мгновение нажмите сторону – (
22 Ch e ck i n g t h ere co rd e d p i ct u re Using EDITSEARCH, you can review the lastrecorded scene or check the recorded picture inthe viewfinder. (1 ) While pressing the small green button on thePOWER switch, set it to CAMERA. (2 ) Turn STANDBY up to STANDBY. (3 ) Press the Р( Π) side of EDIT...
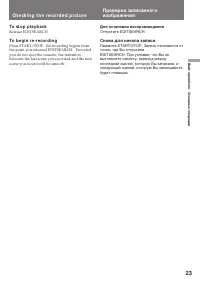
Страница 23 - To st o p p l a y b a ck; Ch e ck i n g t h e r e co r d e d p i ct u r e; Для остановки воспроизведения; Отпустите EDITSEARCH.; Снова для начала записи
23 B asic operat ions / Основные операции To st o p p l a y b a ck Release EDITSEARCH. To b e g i n r e -r e co r d i n g Press START/STOP. Re-recording begins fromthe point you released EDITSEARCH. Providedyou do not eject the cassette, the transitionbetween the last scene you recorded and the next...
Страница 25 - to obtain a high quality picture . If you are; Co n n e ct i o n s f o r p l a y b a ck; для получения высокого
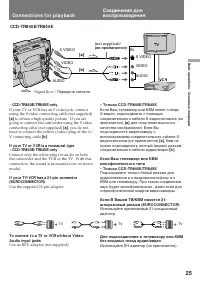
25 B asic operat ions / Основные операции – CCD-TR840E/ TR845E only If your TV or VCR has an S video jack, connectusing the S video connecting cable (not supplied) [a] to obtain a high quality picture . If you are going to connect the camcorder using the S videoconnecting cable (not supplied) [a ] ,...
Страница 26 - Pl a y i n g b a ck a t a p e; Press; To rew ind t he t ape,; press
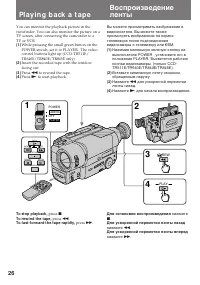
26 Pl a y i n g b a ck a t a p e You can monitor the playback picture in theviewfinder. You can also monitor the picture on aTV screen, after connecting the camcorder to aTV or VCR. (1 ) While pressing the small green button on thePOWER switch, set it to PLAYER. The videocontrol buttons light up (CC...
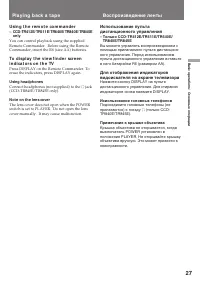
Страница 27 - Usi n g t h e r e m o t e co m m a n d e r; Connect headphones (not supplied) to the; Not e on t he lens cover; Исиользование головных телефонов
27 B asic operat ions / Основные операции Usi n g t h e r e m o t e co m m a n d e r – CCD-TR412E/ TR511E/ TR640E/ TR840E/ TR845E only You can control playback using the suppliedRemote Commander. Before using the RemoteCommander, insert the R6 (size AA) batteries. To d i sp l a y t h e v i e w f i n...
Страница 28 - V a r i o u s p l a y b a ck m o d e s; To l o ca t e a sce n e ( p i ct u r e se a r ch ); To v i e w t h e p i ct u r e a t d o u b l e sp e e d
28 V a r i o u s p l a y b a ck m o d e s To v i e w a st i l l p i ct u r e ( p l a y b a ckp a u se ) Press P during playback. To resume playback, press P or ( . To l o ca t e a sce n e ( p i ct u r e se a r ch ) Keep pressing 0 or ) during playback. To resume normal playback, release the button. ...
Страница 29 - To v i e w t h e p i ct u r e f r a m e -b y -f r a m e; Not es on playback; Для покадрового просмотра изображения; Примечания к воспроизведению
29 B asic operat ions / Основные операции To v i e w t h e p i ct u r e f r a m e -b y -f r a m e – CCD-TR845E only Press '/< or >/7 on the Remote Commander in playback pause mode. If youkeep pressing the button, you can view thepicture at 1/25 speed. To resume normalplayback, press ( . To ch ...
Страница 30 - Воспроизведение ленты
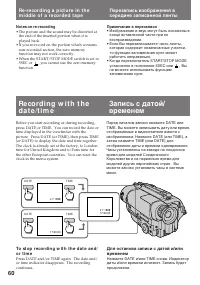
30 To d i sp l a y t h e d a t e o r t i m e w h e n y o ur e co r d e d Press DATE or TIME on the camcorder. To makethe date or time disappear, press it again.To display the date and time when you recorded,press TIME (or DATE) after pressing DATE (orTIME). To make the date and time disappear,press ...
Страница 31 - A d v a n ce d o p e r a t i o n s; Place; Not es on pow er sources; • Disconnecting the power source or removing; Усовершенствованные операции; Примечания по источникам питания; • Отсоединение источника питания или
31 Advanc ed operat ions / Усовершенствованные операции A d v a n ce d o p e r a t i o n s Usi n g a l t e r n a t i v ep o w e r so u rce s You can choose any of the following powersources for your camcorder: battery pack, mains,alkaline batteries and 12/24 V car battery.Choose the appropriate powe...
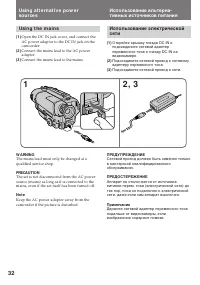
Страница 32 - Usi n g t h e m a i n s; Подсоедините сетевой провод к сети.
32 Usi n g t h e m a i n s (1 ) Open the DC IN jack cover, and connect theAC power adaptor to the DC IN jack on thecamcorder. (2 ) Connect the mains lead to the AC poweradaptor. (3 ) Connect the mains lead to the mains. 2 , 3 1 Usi n g a l t e r n a t i v e p o w e rso u r ce s W ARNING The mains le...
Страница 33 - Usi n g a ca r b a t t e r y; To remove t he car bat t ery charger
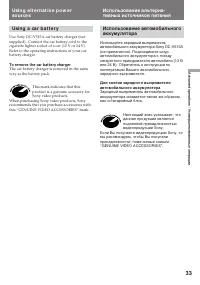
33 Advanc ed operat ions / Усовершенствованные операции Usi n g a ca r b a t t e r y Use Sony DC-V515A car battery charger (notsupplied). Connect the car battery cord to thecigarette lighter socket of a car (12 V or 24 V).Refer to the operating instructions of your carbattery charger. To remove t he...
Страница 34 - Нажмите MENU для отображения меню.
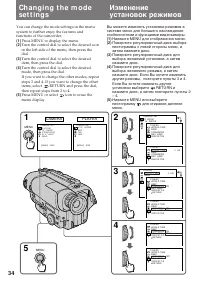
34 Ch a n g i n g t h e m o d ese t t i n g s You can change the mode settings in the menusystem to further enjoy the features andfunctions of the camcorder. (1) Press MENU to display the menu. (2) Turn the control dial to select the desired iconin the left side of the menu, then press thedial. (3) ...
Страница 35 - Not e on t he menu display; Ch a n g i n g t h e m o d e se t t i n g s; Примечание к дисплею меню
35 Advanc ed operat ions / Усовершенствованные операции Not e on t he menu display Depending on the model of your camcorder, themenu display may be different from that in thisillustration. Not e on changing t he mode set t ing Menu items differ depending on the setting ofthe POWER switch to PLAYER o...
Страница 36 - • Select ON so that beeps sound when you start/; I t e m s f o r CA M ERA m o d e o n l y; Изменение установок режимов
36 Ch a n g i n g t h e m o d e se t t i n g s LTR SIZE* <NORM AL/ 2x> • Normally select NORMAL.• Select 2x to display selected menu item by twice size of normal. BEEP* <ON/ OFF> • Select ON so that beeps sound when you start/ stop recording, etc. • Select OFF when you do not want to hea...
Страница 38 - Not es on DEM O M ODE; Примечания к DEMO MODE
38 Ch a n g i n g t h e m o d e se t t i n g s DEM O M ODE* <ON/ OFF> • Select ON to make the demonstration appear.• Select OFF to deactivate the demonstration mode. Not es on DEM O M ODE • DEMO MODE is set to STBY (Standby) at the factory and the demonstration startsabout 10 minutes after you...
Страница 39 - I t e m s f o r PLA Y ER m o d e o n l y; Not e on TBC set t ing; Установки только для режима PLAYER; Примечания к установке ТВС
39 Advanc ed operat ions / Усовершенствованные операции Ch a n g i n g t h e m o d e se t t i n g s I t e m s f o r PLA Y ER m o d e o n l y HiFi SOUND <STEREO/ 1/ 2> (CCD-TR840E/ TR845E only) • Normally select STEREO.• Select 1 or 2 to play back a dual sound track tape. EDIT <ON/ OFF> •...
Страница 40 - Нажмите BACK LIGHT. Индикатор; После съемки; • Для объекта, расположенного рядом с; Для выполнения точной регулировки
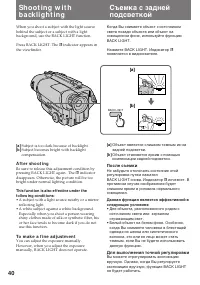
40 Sh o o t i n g w i t hb a ck l i g h t i n g When you shoot a subject with the light sourcebehind the subject or a subject with a lightbackground, use the BACK LIGHT function. Press BACK LIGHT. The c indicator appears in the viewfinder. [a] [b] BACK LIGHT Съемка с заднейподсветкой Когда Вы снимае...
Страница 41 - o n l y; Se l e ct i n g t h e f a d e r f u n ct i o n; FADER
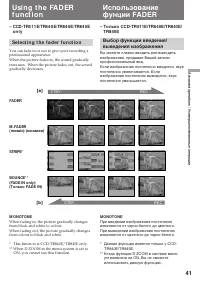
41 Advanc ed operat ions / Усовершенствованные операции BOUNCE* *(FADE IN only)/ (Только FADE IN) [ a ] REC STBY REC STBY [ b ] – CCD -TR5 1 1 E/TR6 4 0 E/TR8 4 0 E/TR8 4 5 E o n l y Se l e ct i n g t h e f a d e r f u n ct i o n You can fade in or out to give your recording aprofessional appearance...
Страница 42 - Usi n g t h e f a d e r f u n ct i o n; W h e n y o u u se t h e b o u n ce f u n ct i o n; Set D ZOOM to OFF in the menu system.; Not e on t he bounce f unct ion; Использование фунции FADER; Установите D ZOOM на OFF в системе меню.
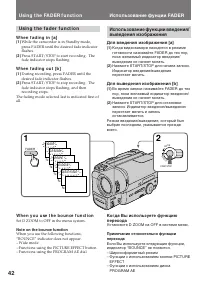
42 1 2 LO CK START/STOP S TA N D B Y FADER FADER M.FADER STRIPE BOUNCE MONOTONE Usi n g t h e f a d e r f u n ct i o n W h e n f a d i n g i n [ a ] (1 ) While the camcorder is in Standby mode,press FADER until the desired fade indicatorflashes. (2 ) Press START/STOP to start recording. Thefade indi...
Страница 43 - To ca n ce l t h e f a d e r f u n ct i o n; You cannot use the fader function.; Not e on t he f ader f unct ion; Usi n g t h e FA D ER f u n ct i o n
43 Advanc ed operat ions / Усовершенствованные операции To ca n ce l t h e f a d e r f u n ct i o n Before pressing START/STOP, press FADERuntil the indicator disappears. W hen t he dat e or t ime indicat or and t it le aredisplayed The date or time indicator and title do not fade inor fade out. W h...
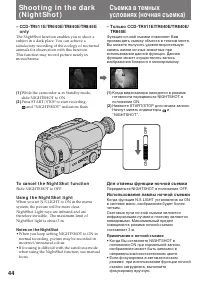
Страница 44 - OFF; Для отмены функции ночной съемки; Передвиньте NIGHTSHOT в положение OFF.; Использование лампы ночной съемки; Примечания к ночной съемке; • Когда Вы оставляете NIGHTSHOT в; To ca n ce l t h e N i g h t Sh o t f u n ct i o n; Slide NIGHTSHOT to OFF.; Usi n g t h e N i g h t Sh o t l i g h t; Not es on t he Night Shot; • When you keep setting NIGHTSHOT to ON in
44 – CCD -TR5 1 1 E/TR6 4 0 E/TR8 4 0 E/TR8 4 5 E o n l y The NightShot function enables you to shoot asubject in a dark place. You can achieve asatisfactory recording of the ecology of nocturnalanimals for observation with this function.This function may record picture nearly inmonochrome. Sh o o t...
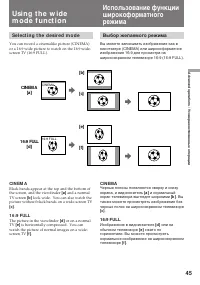
Страница 45 - CINEM A; Se l e ct i n g t h e d e si r e d m o d e; CI N EM A; Выбор желаемого режима; CINEMA
45 Advanc ed operat ions / Усовершенствованные операции [b] CINEM A [a] [c] [e] [f ] CINEMA 16:9 FULL 16:9 FULL [d] Se l e ct i n g t h e d e si r e d m o d e You can record a cinemalike picture (CINEMA)or a 16:9 wide picture to watch on the 16:9 wide-screen TV (16:9 FULL). Usi n g t h e w i d em o ...
Страница 46 - To ca n ce l w i d e m o d e; Not es on w ide mode; Usi n g t h e w i d e m o d e f u n ct i o n; Для отмены режима; Примечания к широкоформатному режиму
46 Usi n g t h e w i d e m o d e f u n ct i o n You can select the wide mode (OFF, CINEMA,16:9FULL) in the menu system (p. 34). To ca n ce l w i d e m o d e Select OFF in the menu system. To w a t ch t h e t a p e r e co r d e d i n w i d em o d e To watch the tape recorded in CINEMA mode,set the sc...
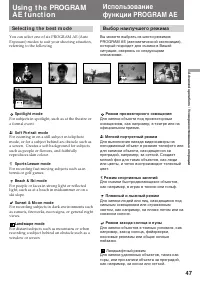
Страница 47 - Se l e ct i n g t h e b e st m o d e; Spot light mode; Выбор наилучшего режима; Режим прожекторного освещения; Ландшафтный режим
47 Advanc ed operat ions / Усовершенствованные операции Usi n g t h e PROGRA MA E f u n ct i o n Se l e ct i n g t h e b e st m o d e You can select one of six PROGRAM AE (AutoExposure) modes to suit your shooting situation,referring to the following. Spot light mode For subjects in spotlight, such ...
Страница 48 - To t u r n o f f p r o g r a m A E; Set the PROGRAM AE dial to the; Not es on f ocus set t ing; • In the Spotlight, Sports lesson and Beach & Ski; Примечания к установке фокусировки; • В режимах прожекторного освещения,
48 Usi n g t h e PROGRA M A Ef u n ct i o n Turn the PROGRAM AE dial to select the desiredPROGRAM AE mode. To t u r n o f f p r o g r a m A E Set the PROGRAM AE dial to the r position. Not es on f ocus set t ing • In the Spotlight, Sports lesson and Beach & Ski modes, you cannot take close-ups b...
Страница 49 - Fo cu si n g m a n u a l l y; W h e n t o u se m a n u a l f o cu s; • Insufficient light; Ручная фокусировка
49 Advanc ed operat ions / Усовершенствованные операции [ a ] [ b ] [ c] [ d ] Fo cu si n g m a n u a l l y – CCD -TR5 1 1 E/TR6 4 0 E/TR8 4 0 E/TR8 4 5 E o n l y W h e n t o u se m a n u a l f o cu s In the following cases you should obtain betterresults by adjusting the focus manually. • Insuffici...
Страница 50 - появляется в видоискателе.; Съемка в относительно темном месте; Для записи очень удаленного объекта; Примечание к ручной фокусировке; Могут появляться следующие индикаторы; To r e t u r n t o a u t o f o cu s m o d e; Shoot ing in relat ively dark places; To r e co r d a v e r y d i st a n t su b j e ct; Not e on manual f ocusing
50 1 2 3 T W 4 T W AUTO MANUALINFINITY W T W T FAR NEAR Fo cu si n g m a n u a l l y When focusing manually, first focus in telephotobefore recording, and then reset the shot length. (1 ) Set FOCUS to MANUAL. The f indicator appears in the viewfinder. (2 ) Move the power zoom lever to the “T” side i...
Страница 51 - Se l e ct i n g p i ct u r e e f f e ct; The picture is sepia.; Выбор эффекта изображения; SEPIA; Изображение будет в цвете сепия.
51 Advanc ed operat ions / Усовершенствованные операции [ a ] [ b ] [ c] [ d ] [ e ] [ f ] En j o y i n g p i ct u ree f f e ct Se l e ct i n g p i ct u r e e f f e ct You can make pictures like those of televisionwith the Picture Effect function. PASTEL [a] The contrast of the picture is emphasized...
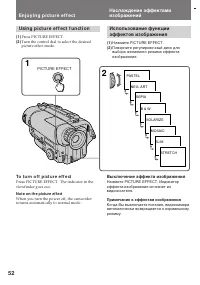
Страница 52 - Usi n g p i ct u r e e f f e ct f u n ct i o n; Press PICTURE EFFECT.; En j o y i n g p i ct u r e e f f e ct; To t u r n o f f p i ct u r e e f f e ct; Not e on t he pict ure ef f ect; PICTURE EFFECT; Выключение эффекта изображения; Примечание к эффектам изображения
52 Usi n g p i ct u r e e f f e ct f u n ct i o n (1 ) Press PICTURE EFFECT. (2 ) Turn the control dial to select the desiredpicture effect mode. En j o y i n g p i ct u r e e f f e ct To t u r n o f f p i ct u r e e f f e ct Press PICTURE EFFECT. The indicator in theviewfinder goes out. Not e on t ...
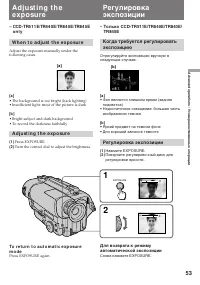
Страница 53 - W h e n t o a d j u st t h e e x p o su r e; Turn the control dial to adjust the brightness.; • Фон является слишком ярким (задняя; Регулировка экспозиции; Снова нажмите EXPOSURE.
53 Advanc ed operat ions / Усовершенствованные операции [a ] [b ] A d j u st i n g t h ee x p o su re – CCD -TR5 1 1 E/TR6 4 0 E/TR8 4 0 E/TR8 4 5 E o n l y W h e n t o a d j u st t h e e x p o su r e Adjust the exposure manually under thefollowing cases. [a ] • The background is too bright (back li...
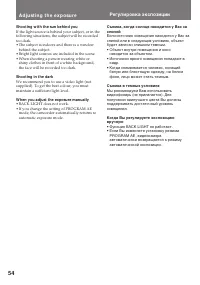
Страница 54 - A d j u st i n g t h e e x p o su r e; находится за объектом.; Съемка в темных условиях
54 Shoot ing w it h t he sun behind you If the light source is behind your subject, or in thefollowing situations, the subject will be recordedtoo dark.• The subject is indoors and there is a window behind the subject. • Bright light sources are included in the scene.• When shooting a person wearing...
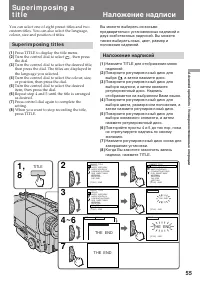
Страница 55 - Su p e r i m p o si n g t i t l e s; Press TITLE to display the title menu.; Наложение надписи; Наложение надписей
55 Advanc ed operat ions / Усовершенствованные операции Su p e r i m p o si n g at i t l e You can select one of eight preset titles and twocustom titles. You can also select the language,colour, size and position of titles. Su p e r i m p o si n g t i t l e s (1 ) Press TITLE to display the title m...
Страница 56 - Not es on superimposing a t it le; Su p e r i m p o si n g a t i t l e; Для наложения надписи от начала; Примечания к наложению надписи
56 To su p e r i m p o se t h e t i t l e f r o mb e g i n n i n g After step 7, press START/STOP to startrecording. To su p e r i m p o se t h e t i t l e w h i l e y o ua r e r e co r d i n g After pressing START/STOP to start recording,start from step 1. In this case, beep is not heard. To se l e...
Страница 58 - To e d i t a t i t l e y o u h a v e st o r e d; Not e; You can not enter over 20 characters title.; To d e l e t e a t i t l e; In step 4, turn the control dial to select [; – CCD -TR8 4 5 E o n l y; M a k i n g y o u r o w n t i t l e s; Вы не можете ввести больше, чем 20 знаков.; Для отмены надписи
58 To e d i t a t i t l e y o u h a v e st o r e d In step 3, select CUSTOM1 or CUSTOM2,depending on which title you want to edit, thenchange the title. Not e You can not enter over 20 characters title. If you t ake 5 minut es or longer t o ent ercharact ers w hile a casset t e is in t he camcorder ...
Страница 59 - . The camcorder enters Standby; Для изменения конечной точки
59 Advanc ed operat ions / Усовершенствованные операции Re -r e co r d i n g a p i ct u r e i n t h em i d d l e o f a r e co r d e d t a p e (1 ) While the camcorder is in Standby mode,keep pressing the + (forward playback) or –(reverse playback) side of EDITSEARCH, andrelease the button where you ...
Страница 60 - Not es on re-recording; • The picture and the sound may be distorted at; Примечания к перезаписи; • Изображение и звук могут быть искажены в
60 Re -r e co r d i n g a p i ct u r e i n t h em i d d l e o f a r e co r d e d t a p e Not es on re-recording • The picture and the sound may be distorted at the end of the inserted portion when it isplayed back. • If you re-record on the portion which contains non-recorded section, the zero memor...
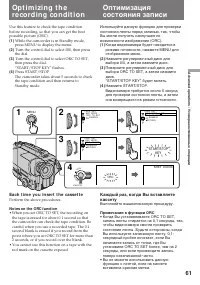
Страница 61 - Ea ch t i m e y o u i n se r t t h e ca sse t t e; Not es on t he ORC f unct ion; Выполняйте вышеописанную процедуру.; Примечания к функции ORC; • Когда Вы устанавливаете ORC TO SET,
61 Advanc ed operat ions / Усовершенствованные операции Op t i m i zi n g t h ere co rd i n g co n d i t i o n Use this feature to check the tape conditionbefore recording, so that you can get the bestpossible picture (ORC). (1 ) While the camcorder is in Standby mode, press MENU to display the menu...
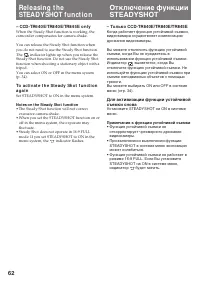
Страница 62 - Not es on t he St eady Shot f unct ion; • The Steady Shot function will not correct; Примечания к функции устойчивой съемки; • Функция устойчивой съемки не
62 – CCD -TR6 4 0 E/TR8 4 0 E/TR8 4 5 E o n l y When the Steady Shot function is working, thecamcorder compensates for camera-shake. You can release the Steady Shot function whenyou do not need to use the Steady Shot function.The indicator lights up when you release the Steady Shot function. Do not ...
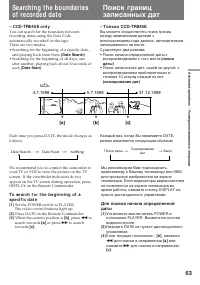
Страница 63 - Date Search
63 Advanc ed operat ions / Усовершенствованные операции – CCD -TR8 4 5 E o n l y You can search for the boundary betweenrecording dates using the Data Codeautomatically recorded on the tape.There are two modes:• Searching for the beginning of a specific date, and playing back from there (Dat e Searc...
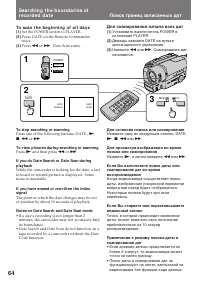
Страница 64 - To sca n t h e b e g i n n i n g o f a l l d a y s; To st op searching or scanning; Поиск границ записанных дат; Для сканирования начала всех дат; Для останова поиска или сканирования
64 To sca n t h e b e g i n n i n g o f a l l d a y s (1 ) Set the POWER switch to PLAYER. (2 ) Press DATE on the Remote Commander twice. (3 ) Press 0 or ) . Date Scan starts. Se a r ch i n g t h e b o u n d a r i e s o fr e co r d e d d a t e To st op searching or scanning Press one of the followin...
Страница 66 - M a r k i n g a n i n d e x si g n a l; Not es on t he t ape count er; Запись индексного сигнала
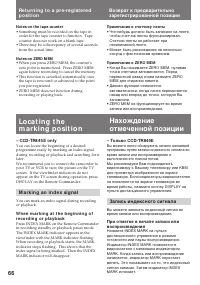
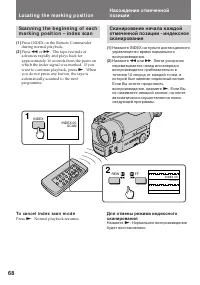
66 – CCD -TR8 4 5 E o n l y You can locate the beginning of a desiredprogramme easily by marking an index signalduring recording or playback and searching for itlater.We recommend you to connect the camcorder toyour TV or VCR to view the picture on the TVscreen. If the viewfinder indicators do notap...
Страница 67 - Not es on marking; Lo ca t i n g t h e m a r k i n g p o si t i o n; Примечания к записи индексного сигнала
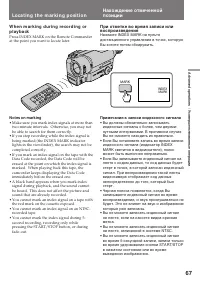
67 Advanc ed operat ions / Усовершенствованные операции W h e n m a r k i n g d u r i n g r e co r d i n g o rp l a y b a ck Press INDEX MARK on the Remote Commanderat the point you want to locate later. Not es on marking • Make sure you mark index signals at more than two-minute intervals. Otherwis...
Страница 68 - To ca n ce l i n d e x sca n m o d e; Нажмите
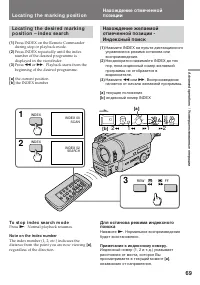
68 Sca n n i n g t h e b e g i n n i n g o f e a chm a r k i n g p o si t i o n – i n d e x sca n (1 ) Press INDEX on the Remote Commanderduring normal playback. (2 ) Press 0 or ) . The tape rewinds or advances rapidly and plays back forapproximately 10 seconds from the point onwhich the index signa...
Страница 69 - To st o p i n d e x se a r ch m o d e; Not e on t he index number
69 Advanc ed operat ions / Усовершенствованные операции Lo ca t i n g t h e m a r k i n g p o si t i o n Lo ca t i n g t h e d e si r e d m a r k i n gp o si t i o n – i n d e x se a r ch (1 ) Press INDEX on the Remote Commanderduring stop or playback mode. (2 ) Press INDEX repeatedly until the inde...
Страница 70 - Стирание индексного сигнала; Примечания к стиранию индексного сигнала; • Нажмите ERASE более, чем на 2 секунды; Примечание к коду данных
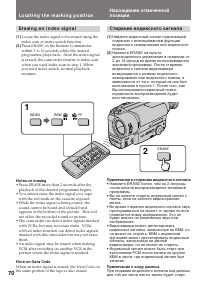
70 Lo ca t i n g t h e m a r k i n g p o si t i o n Er a si n g a n i n d e x si g n a l (1 ) Locate the index signal to be erased using theindex scan or index search function. (2 ) Press ERASE on the Remote Commanderwithin 2 to 10 seconds while the desiredprogramme plays back. After the index signa...
Страница 71 - To st o p w r i t i n g t h e RC t i m e co d e
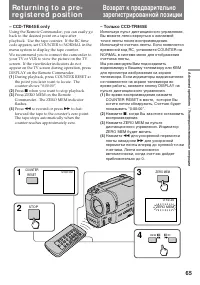
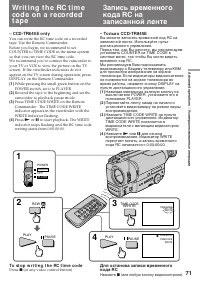
71 Advanc ed operat ions / Усовершенствованные операции – CCD -TR8 4 5 E o n l y You can write the RC time code on a recordedtape. Use the Remote Commander.Before you begin, we recommend to setCOUNTER to TIME CODE in the menu systemso that you can view the RC time code.We recommend you to connect th...
Страница 73 - Be f o r e e d i t i n g; To e d i t m o r e sce n e s; Not e on t he DISPLAY f unct ion; Перед монтажем; Для монтажа других сцен; Примечание к функции DISPLAY
73 Advanc ed operat ions / Усовершенствованные операции Ed i t i n g o n t o a n o t h e rt a p e You can create your own video programme byediting with any other h 8 mm, H Hi8, j VHS, k S-VHS, VHSC, K S-VHSC or l Betamax VCR that has video/audio inputs. Be f o r e e d i t i n g Connect the camcor...
Страница 74 - A d d i t i o n a l i n f o r m a t i o n; indicator flashes in the; Дополнительная информация; будет мигать в видоискателе приблизи-; Примечания к литиевой батарейке; • Протрите батарейку сухой тканью для; N o t e s o n l i t h i u m b a t t e r y; • Wipe the battery with a dry cloth to assure a
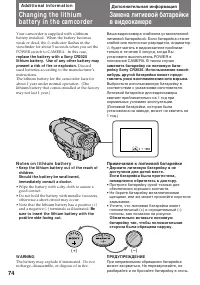
74 (+) (--) - A d d i t i o n a l i n f o r m a t i o n Changing t he lit hiumbat t ery in t he cam corder Your camcorder is supplied with a lithiumbattery installed. When the battery becomesweak or dead, the I indicator flashes in the viewfinder for about 5 seconds when you set thePOWER switch to C...
Страница 75 - Ch a n g i n g t h e l i t h i u m b a t t e r y
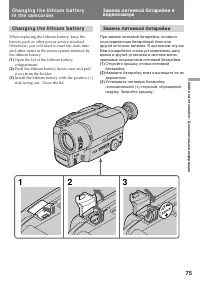
75 Addit ional inf ormat ion / Дополнительная информация Ch a n g i n g t h e l i t h i u m b a t t e r y When replacing the lithium battery, keep thebattery pack or other power source attached.Otherwise, you will need to reset the date, timeand other items in the menu system retained bythe lithium ...
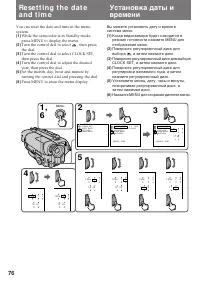
Страница 76 - , а затем нажмите диск
76 Re se t t i n g t h e d a t ea n d t i m e You can reset the date and time in the menusystem. (1 ) While the camcorder is in Standby mode,press MENU to display the menu. (2 ) Turn the control dial to select , then press the dial. (3 ) Turn the control dial to select CLOCK SET,then press the dial....
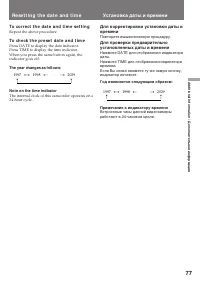
Страница 77 - To co r r e ct t h e d a t e a n d t i m e se t t i n g; Repeat the above procedure.; To ch e ck t h e p r e se t d a t e a n d t i m e; The year changes as f ollow s:; Re se t t i n g t h e d a t e a n d t i m e; Повторите вышеописанную процедуру.; Год изменяется следующим образом:; Установка даты и времени
77 Addit ional inf ormat ion / Дополнительная информация 1997 ˜ 1998 N · · · · n 2029 n n To co r r e ct t h e d a t e a n d t i m e se t t i n g Repeat the above procedure. To ch e ck t h e p r e se t d a t e a n d t i m e Press DATE to display the date indicator.Press TIME to display the time indi...
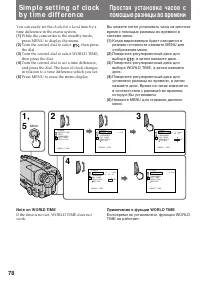
Страница 78 - Not e on W ORLD TIM E; Примечание к фукции WORLD TIME
78 Si m p l e se t t i n g o f cl o ckb y t i m e d i f f e re n ce You can easily set the clock for a local time by atime difference in the menu system. (1 ) While the camcorder is the standby mode,press MENU to display the menu. (2 ) Turn the control dial to select , then press the dial. (3 ) Turn...
Страница 79 - Se l e ct i n g ca sse t t e t y p e s; W h a t i s V i d e o 8; Выбор типа кассеты; Что такое видео 8
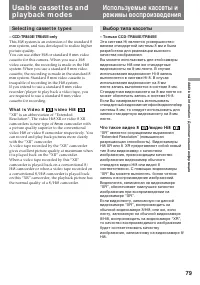
79 Addit ional inf ormat ion / Дополнительная информация Usa b l e ca sse t t e s a n dp l a y b a ck m o d e s Se l e ct i n g ca sse t t e t y p e s – CCD-TR840E/ TR845E only This Hi8 system is an extension of the standard 8mm system, and was developed to realize higherpicture quality.You can use ...
Страница 80 - W h e n y o u p l a y b a ck; N o t e o n A FM Hi Fi st e r e o; Playing back an NTSC-recorded t ape; Примечание к стереозвучанию AFM Hi-Fi
80 Usa b l e ca sse t t e s a n d p l a y b a ckm o d e s W h e n y o u p l a y b a ck The playback mode (SP/LP) and system (Hi8/standard 8 mm) are selected automaticallyaccording to the format in which the tape hasbeen recorded. The quality of the recordedpicture in LP mode, however, will not be as...
Страница 81 - Pr e p a r i n g t h e b a t t e r y p a ck; A l w a y s ca r r y a d d i t i o n a l b a t t e r i e s; Подготовка батарейного блока; появляется и начинает
81 Addit ional inf ormat ion / Дополнительная информация Ti p s f o r u si n g t h eb a t t e r y p a ck This section shows you how you can get the mostout of your battery pack. Pr e p a r i n g t h e b a t t e r y p a ck A l w a y s ca r r y a d d i t i o n a l b a t t e r i e s Have sufficient bat...
Страница 82 - • Do not expose the battery pack to any; Th e l i f e o f t h e b a t t e r y p a ck; Ti p s f o r u si n g t h e b a t t e r y p a ck; Предостережение; • Храните батарейный блок подальше от; Срок службы батарейного блока
82 N o t e s o n t h e r e ch a r g e a b l eb a t t e r y p a ck Ca u t i o n Never leave the battery pack in temperaturesabove 60°C (140°F), such as in a car parked in thesun or under direct sunlight. Th e b a t t e r y p a ck h e a t s u p During charging or recording, the battery packheats up. T...
Страница 83 - W h a t i s “ I n f o LI THI UM ”; indicator may also flash under some condition.; Что такое “InfoLITHIUM”; , видеоаппаратура будет
83 Addit ional inf ormat ion / Дополнительная информация Ti p s f o r u si n g t h e b a t t e r y p a ck N o t e s o n t h e “ I n f o LI THI UM ”b a t t e r y p a ck W h a t i s “ I n f o LI THI UM ” The “InfoLITHIUM” is a lithium ion battery packwhich can exchange data with compatible videoequipm...
Страница 84 - • После использования батарейного блока
84 Ti p s f o r u si n g t h e b a t t e r y p a ck To o b t a i n m o r e a ccu r a t e r e m a i n i n gb a t t e r y i n d i ca t i o n Set the camcorder to recording standby modeand point towards a stationary object. Do notmove the camcorder for 30 seconds or more.• If the indication seems incor...
Страница 85 - M o i st u r e co n d e n sa t i o n; I n si d e t h e ca m co r d e r; indicator flashes. If this; On t h e l e n s; Конденсация влаги; Внутри видеокамеры; будет; На объективе
85 Addit ional inf ormat ion / Дополнительная информация M aint enance inf orm at ionand precaut ions M o i st u r e co n d e n sa t i o n If the camcorder is brought directly from a coldplace to a warm place, moisture may condenseinside the camcorder, on the surface of the tape,or on the lens. In t...
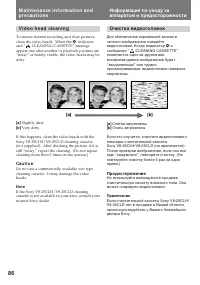
Страница 86 - V i d e o h e a d cl e a n i n g; indicator; Очистка видеоголовок; сообщение “; Slightly dirty; Ca u t i o n
86 [a] [b] M a i n t e n a n ce i n f o r m a t i o n a n dp r e ca u t i o n s V i d e o h e a d cl e a n i n g To ensure normal recording and clear pictures,clean the video heads. When the v indicator and “ CLEANING CASSETTE” message appear one after another or playback pictures are“noisy” or hard...
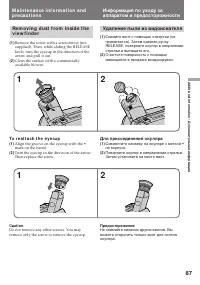
Страница 87 - Caut ion; To r e a t t a ch t h e e y e cu p; Удаление пыли из видоискателя; Для присоединения окуляра
87 Addit ional inf ormat ion / Дополнительная информация M a i n t e n a n ce i n f o r m a t i o n a n dp r e ca u t i o n s 1 2 1 2 Re m o v i n g d u st f r o m i n si d e t h ev i e w f i n d e r (1 ) Remove the screw with a screwdriver (notsupplied). Then, while sliding the RELEASEknob, turn th...
Страница 88 - Pr e ca u t i o n s; Ca m co r d e r o p e r a t i o n; Предосторожности; Эксплуатация видеокамеры
88 Pr e ca u t i o n s Ca m co r d e r o p e r a t i o n • Operate the camcorder on 7.2 V (battery pack) or 8.4 V (AC power adaptor). • For DC or AC operation, use the accessories recommended in this manual. • Should any solid object or liquid get inside the casing, unplug the camcorder and have itc...
Страница 89 - Сетевой адаптер перем. тока
89 Addit ional inf ormat ion / Дополнительная информация M a i n t e n a n ce i n f o r m a t i o n a n dp r e ca u t i o n s Информация по уходу зааппаратом и предосторожности • Не позволяйте песку попасть в видеокамеру. Когда Вы используетевидеокамеру на песчаном пляже или впыльном месте, предохра...
Страница 90 - N o t e s o n d r y b a t t e r i e s; If bat t ery leakage occurred; • Wipe off the liquid in the battery case carefully; Примечания к сухим батарейкам; Если случится протечка батареек
90 M a i n t e n a n ce i n f o r m a t i o n a n dp r e ca u t i o n s N o t e s o n d r y b a t t e r i e s To avoid possible damage from battery leakageor corrosion, observe the following.• Be sure to insert the batteries in the correct direction. • Dry batteries are not rechargeable.• Do not use...
Страница 91 - Po w e r so u r ce s; PAL syst em; Brazil; NTSC syst em; Источники питания; Система PAL; Бразилия; Система NTSC
91 Addit ional inf ormat ion / Дополнительная информация Usi n g y o u rca m co rd e r a b ro a d Each country or area has its own electric and TVcolour systems. Before using your camcorderabroad, check the following points. Po w e r so u r ce s You can use your camcorder in any country orarea with ...
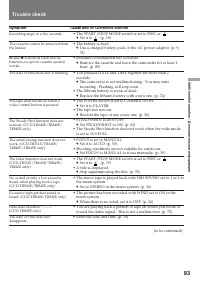
Страница 95 - Видеокамера; Проверка неисправностей
95 Addit ional inf ormat ion / Дополнительная информация Признак Причина и/или действия по устранению • Не установлен батарейный блок. m Установите батарейный блок. (стр. 8) • Батарейный блок полностью разрядился. m Используйте заряженный батарейный блок. (стр. 9) • Сетевой адаптер перем. тока не по...
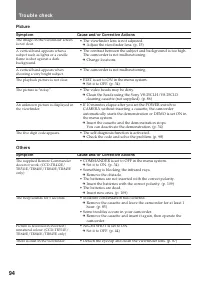
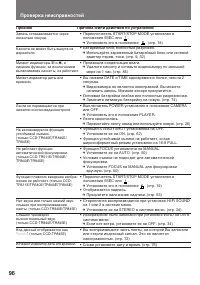
Страница 96 - Признак
96 Проверка неисправностей Признак Причина и/или действия по устранению • Переключатель START/STOP MODE установлен в положение 5SEC или . m Установите его в положение . (стр. 19) • Батарейный блок полностью разряжен. m Используйте заряженный батарейный блок или сетевойадаптер перем. тока. (стр. 9, 3...
Страница 97 - Прочее; Изображение
97 Addit ional inf ormat ion / Дополнительная информация Признак Причина и/или действия по устранению • Функция COMMANDER установлена на OFF в системе меню. m Установите ее на ON. (стр. 34) • Что-то закрывает путь инфракрасных лучей. m Удалите препятствие. • Батарейка вставлена с неправильной полярн...
Страница 99 - Пятизначный дисплей; Видоискатель; Дисплей самодиагностики
99 Addit ional inf ormat ion / Дополнительная информация Пятизначный дисплей Вероятная причина и/или метод устранения. • Произошла конденсация влаги. m Выньте кассету и оставьте видеокамеру по меньшеймере на 1 час. (стр. 85) • Грязные видеоголовки. m Очистите видеоголовки с использованиемочистительн...
Страница 102 - Технические характеристики
102 Русский Технические характеристики Входные и выходные гнезда Выход S-видеосигнала (толькоCCD-TR840E/TR845E) 4-штырьковое минигнездо по DINСигнал яркости: 1 В по двойнойамплитуде, 75 Ом,несиммеричныйСигнал цветности: 0,3 В подвойной амплитуде, 75 Ом,несимметричный Выход видеосигнала Фоногнездо, 1...
Страница 105 - I d e n t i f y i n g t h e p a r t s
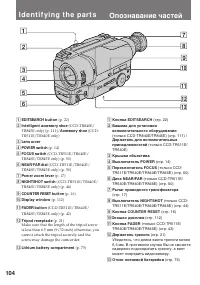
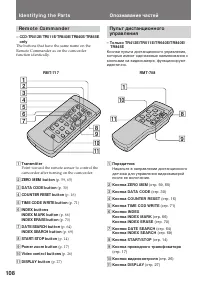
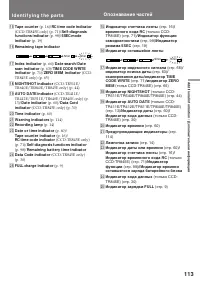
105 Addit ional inf ormat ion / Дополнительная информация I d e n t i f y i n g t h e p a r t s !¶ !∞ !¢ !§ !• @™ !ª @£ @¡ @º !¢ Remot e sensor (CCD-TR412E/TR511E/ TR640E/TR840E/TR845E only) (p. 109)Aim the Remote Commander here forremote control. !∞ Camera recording/ bat t ery lamp (p. 14) !§ M icr...
Страница 107 - I d e n t i f y i n g t h e Pa r t s; означает систему канала местного; Опознавание частей
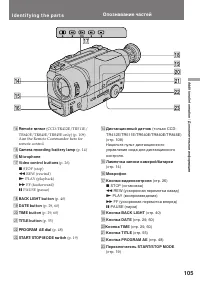
107 Addit ional inf ormat ion / Дополнительная информация I d e n t i f y i n g t h e Pa r t s $º $¡ #ª $™ $£ $§ $¢ $• $∞ $¶ #ª EJECT sw it ch (p. 13) $º LANC l cont rol jack l stands for Local Application Control Bus System. The l control jack is used for controlling the tape transport of video equ...
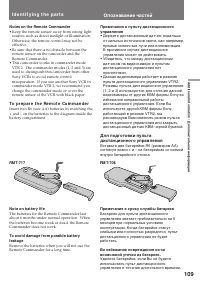
Страница 109 - Not es on t he Remot e Commander; • Keep the remote sensor away from strong light; To p r e p a r e t h e Re m o t e Co m m a n d e r; • Держите дистанционный датчик подальше; Примечание к сроку службы батареек
109 Addit ional inf ormat ion / Дополнительная информация Not es on t he Remot e Commander • Keep the remote sensor away from strong light sources such as direct sunlight or illumination.Otherwise, the remote control may not beeffective. • Be sure that there is no obstacle between the remote sensor ...
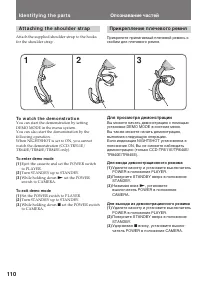
Страница 110 - To w a t ch t h e d e m o n st r a t i o n; Для просмотра демонстрации; Для ввода демонстрационного режима; Нажимая вниз; Для выхода из демонстрационного режима; Удерживая
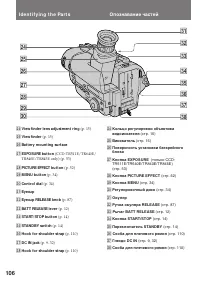
110 A t t a ch i n g t h e sh o u l d e r st r a p Attach the supplied shoulder strap to the hooksfor the shoulder strap . I d e n t i f y i n g t h e p a r t s 1 2 3 To w a t ch t h e d e m o n st r a t i o n You can start the demonstration by settingDEMO MODE in the menu system.You can also start ...
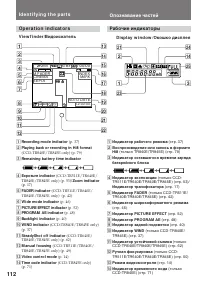
Страница 112 - Op e r a t i o n i n d i ca t o r s
112 D i sp l a y w i n d o w / Окошко дисплея V i e w f i n d e r / Видоискатель 40 min SP H STBY 0:00:00 M.FADERCINEMASEPIA INDEX MARK AUTO DATE 12:00:00 c „ f T W 2 4567 8 9!º!¡!™ 3 1 !£ !∞ !¶ !• !ª @º @¡ @™ !§ !¢ Op e r a t i o n i n d i ca t o r s I d e n t i f y i n g t h e p a r t s 1 Recordin...
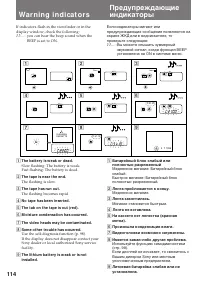
Страница 114 - Wa r n i n g i n d i ca t o r s; The flashing is slow.; Лента приближается к концу.; Мигание становится быстрым.; Произошла конденсация влаги.
114 Wa r n i n g i n d i ca t o r s If indicators flash in the viewfinder or in thedisplay window, check the following: ≥≥ ... : you can hear the beep sound when the BEEP is set to ON. 1 The bat t ery is w eak or dead. Slow flashing: The battery is weak.Fast flashing: The battery is dead. 2 The t ap...
Страница 116 - Алфавитный указатель; Автоматическая фокусировка
116 Алфавитный указатель А, Б, В Автоматическая фокусировка ............................................... 50 Автомобильный аккумулятор .......................................... 32 Временной код ............ 35, 71Временной код RC ............ 71 Г, Д, Е, Ж,З Гнездо дистанционного управления (LANC...


 Sony CCD-TR2300E
Инструкция по эксплуатации
Sony CCD-TR2300E
Инструкция по эксплуатации
 Sony CCD-TR3100E
Инструкция по эксплуатации
Sony CCD-TR3100E
Инструкция по эксплуатации
 Sony CCD-TR311E
Инструкция по эксплуатации
Sony CCD-TR311E
Инструкция по эксплуатации
 Sony CCD-TR315E
Инструкция по эксплуатации
Sony CCD-TR315E
Инструкция по эксплуатации
 Sony CCD-TR317E
Инструкция по эксплуатации
Sony CCD-TR317E
Инструкция по эксплуатации
 Sony CCD-TR3300E
Инструкция по эксплуатации
Sony CCD-TR3300E
Инструкция по эксплуатации
 Sony CCD-TR3400E
Инструкция по эксплуатации
Sony CCD-TR3400E
Инструкция по эксплуатации
 Sony CCD-TR411E / CCD-TR412E
Инструкция по эксплуатации
Sony CCD-TR411E / CCD-TR412E
Инструкция по эксплуатации
 Sony CCD-TR415E
Инструкция по эксплуатации
Sony CCD-TR415E
Инструкция по эксплуатации
 Sony CCD-TR417E
Инструкция по эксплуатации
Sony CCD-TR417E
Инструкция по эксплуатации
 Sony CCD-TR425E
Инструкция по эксплуатации
Sony CCD-TR425E
Инструкция по эксплуатации
 Sony CCD-TR427E
Инструкция по эксплуатации
Sony CCD-TR427E
Инструкция по эксплуатации
 Sony CCD-TR501E / CCD-TR502E
Инструкция по эксплуатации
Sony CCD-TR501E / CCD-TR502E
Инструкция по эксплуатации
 Sony CCD-TR503E / CCD-TR506E
Инструкция по эксплуатации
Sony CCD-TR503E / CCD-TR506E
Инструкция по эксплуатации
 Sony CCD-TR511E / CCD-TR512E
Инструкция по эксплуатации
Sony CCD-TR511E / CCD-TR512E
Инструкция по эксплуатации
 Sony CCD-TR515E
Инструкция по эксплуатации
Sony CCD-TR515E
Инструкция по эксплуатации
 Sony CCD-TR516E
Инструкция по эксплуатации
Sony CCD-TR516E
Инструкция по эксплуатации
 Sony CCD-TR617E
Инструкция по эксплуатации
Sony CCD-TR617E
Инструкция по эксплуатации
 Sony CCD-TR618E
Инструкция по эксплуатации
Sony CCD-TR618E
Инструкция по эксплуатации