
Вытяжки Elica ADAGIO BL/F/90 - инструкция пользователя по применению, эксплуатации и установке на русском языке. Мы надеемся, она поможет вам решить возникшие у вас вопросы при эксплуатации техники.
Если остались вопросы, задайте их в комментариях после инструкции.
"Загружаем инструкцию", означает, что нужно подождать пока файл загрузится и можно будет его читать онлайн. Некоторые инструкции очень большие и время их появления зависит от вашей скорости интернета.


13
WARNING!
Failure to install the screws or fixing device in
accordance with these instructions may result in electrical
hazards.
Use
The hood is designed to be used either for exhausting or filter
version.
Ducting version
In this case the fumes are conveyed outside of the building by
means of a special pipe connected with the connection ring
located on top of the hood.
Attention
! The exhausting pipe is not supplied and must be
purchased apart.
Diameter of the exhausting pipe must be equal to that of the
connection ring.
In the horizontal runs the exhausting pipe must be slightly
slanted (about 10°) and directed upwards to vent the air easily
from the room to the outside.
Attention! If the hood is supplied with active charcoal filter,
then it must be removed.
Filter version
One active charcoal filter is needed for this and can be
obtained from your usual retailer.
The filter removes the grease and smells from the extracted
air before sending it back into the room through the upper
outlet grid.
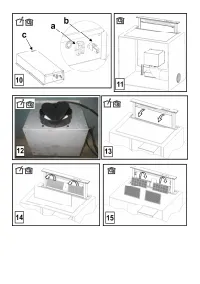
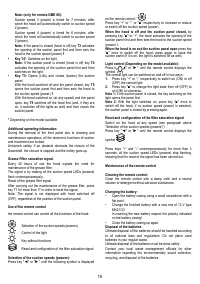
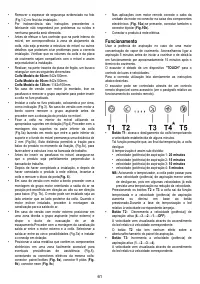
Note:
The recycled air in the charcoal filter is sent back to the
kitchen through a duct which conveys air on a side of the
cabinet (
Picture 11
).
Non-return valve locking
Attention, before connecting the flexible air outlet pipe make
sure that the non-return valves of the suction unit can freely
rotate (
Picture 12
).
The models with no suction motor only operate in ducting
mode, and must be connected to an external suction device
(not supplied).
The connecting instructions are supplied with the peripheral
suction unit.
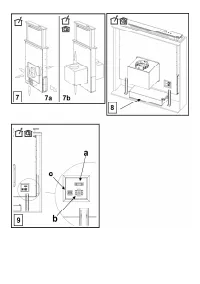
Installation
Note:
The installation must be performed so that accessibility
to the hood and its electronic components is always ensured
for possible technical assistance interventions.
When installing the product, it is recommended to keep a
minimum distance of 400mm between the worktop and any
components laid on top of the hood.
This is to let the suction panel move upwards (opening) and
downwards (closing) without any obstacles, and to facilitate
access to the hood controls on the panel.
WARNING:
Put the metal box containing the electronic
components at a distance not shorter than 65 cm from the gas
hob or 65 cm from the hood suction point.
The minimum distance between downdraft edge and hob
edge must be at least 50mm.
RECOMMENDATION:
We recommend you to install the
metal box containing the electronic components at a distance
of at least 10 cm from the ground and sufficiently from all the
sources of heat (e.g.: side of an oven or hob).
If the instructions for installation for the gas hob specify a
greater distance, this must be adhered to.
Electrical connection
The hood must be connected to the mains supply by qualified
and trained technicians.
The mains power supply must correspond to the rating
indicated on the plate situated inside the hood. If provided with
a plug connect the hood to a socket in compliance with current
regulations and positioned in an accessible area, after
installation. If it not fitted with a plug (direct mains connection)
or if the plug is not located in an accessible area, after
installation, apply a double pole switch in accordance with
standards which assures the complete disconnection of the
mains under conditions relating to over-current category III, in
accordance with installation instructions.
Warning!
Before re-connecting the hood circuit to the mains
supply and checking the efficient function, always check that
the mains cable is correctly assembled.
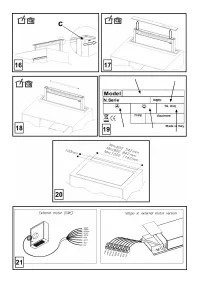
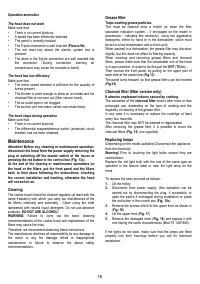
Note:
in applications with a remote GME motor, connect the
cable of the motor unit in the designated terminal board
located inside the plastic box in the downdraft's wiring. Make
sure you follow the colours of the cables during the
connection.
Fig. 20
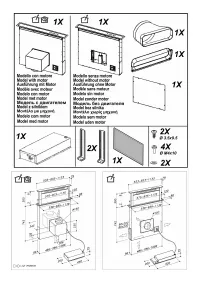
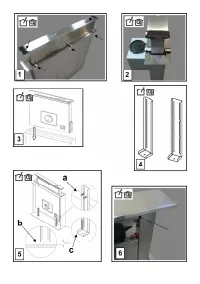
Mounting
Before starting to mount the appliance, make sure that no
component is damaged, otherwise contact the dealer and stop
mounting. In addition, read all the instructions below carefully.
•
Use an air outlet pipe no longer than 5 metres.
•
Limit the number of curves in the duct since each curve
reduces the suction effectiveness equivalent to 1 linear
metre. (E.g.: if two 90° curves are used, the duct should
be no longer than 3 metres).
•
Avoid drastic changes of direction.
•
Use a duct with 150mm diameter constant for the whole
length.
•
Use a duct made of standard complying material.
•
Remove the safety shim highlighted in the picture (
Fig. 1-
2
) at the end of the installation.
• In case of failure to observe the instructions above, the
supplier can not be held responsible for capacity or noise
problems and no warranty will be granted.
•
Before making the hole, make sure that the inside of the
cabinet, near the hood housing area, does not have the
structure of the cabinet or other particulars which may
cause problems for the proper installation. Make sure
Характеристики

Остались вопросы?Не нашли свой ответ в руководстве или возникли другие проблемы? Задайте свой вопрос в форме ниже с подробным описанием вашей ситуации, чтобы другие люди и специалисты смогли дать на него ответ. Если вы знаете как решить проблему другого человека, пожалуйста, подскажите ему :)


