Вытяжки DeLonghi KD-LN60 - инструкция пользователя по применению, эксплуатации и установке на русском языке. Мы надеемся, она поможет вам решить возникшие у вас вопросы при эксплуатации техники.
Если остались вопросы, задайте их в комментариях после инструкции.
"Загружаем инструкцию", означает, что нужно подождать пока файл загрузится и можно будет его читать онлайн. Некоторые инструкции очень большие и время их появления зависит от вашей скорости интернета.


- 6 -
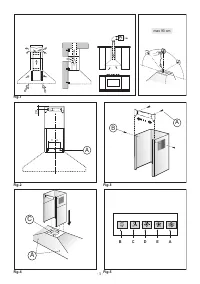
• Fixing to the wall
Drill the holes
A
respecting the distances indicated (Fig.2). Fix
the appliance to the wall and align it in horizontal position
to the wall units. When the appliance has been adjusted,
deinitely ix the hood using the screws
A
(Fig.4).
For the various installations use screws and screw anchors
suited to the type of wall (e.g. reinforced concrete, plaster-
board, etc.). If the screws and screw anchors are provided with
the product, check that they are suitable for the type of wall
on which the hood is to be ixed.
• Fixing the decorative telescopic lue
Arrange the electrical power supply within the dimensions of
the decorative lue. If your appliance is to be installed in the
ducting version or in the version with external motor, prepare
the air exhaust opening. Adjust the width of the support
bracket of the upper lue (Fig.3). Then ix it to the ceiling using
the screws
A
(Fig.3) in such a way that it is in line with your
hood and respecting the distance from the ceiling indicated
in Fig.2. Connect the lange
C
to the air exhaust hole using a
connection pipe (Fig.4). Insert the upper lue into the lower
lue and rest above the frame. Extract the upper lue up to
the bracket and ix it with the screws
B
(Fig.3). To transform
the hood from a ducting version into a iltering version, ask
your dealer for the charcoal ilters and follow the installation
instructions.
• Filtering version
Install the hood and the two flues as described in the
paragraph for installation of the hood in ducting version. To
assemble the iltering lue refer to the instructions contained
in the kit. If the kit is not provided, order it from your dealer
as accessory. The ilters must be applied to the suction unit
positioned inside the hood. They must be centred by turning
them 90 degrees until the stop catch is tripped (ig. 7).
USE AND MAINTENANCE
•
We recommend that the cooker hood is switched on before
any food is cooked. We also recommend that the appliance is
left running for 15 minutes after the food is cooked, in order
to thoroughly eliminate all contaminated air. The efective
performance of the cooker hood depends on constant
maintenance; the anti-grease ilter and the active carbon
ilter both require special attention.
• The anti-grease ilter
is used to trap any grease particles
suspended in the air, therefore is subject to saturation (the
time it takes for the ilter to become saturated depends on
the way in which the appliance is used).
- To prevent potential ire hazards, the anti-grease ilters
should be washed a minimum of every 2 months (it is
possible to use the dishwasher for this task).
- After a few washes, the colour of the ilters may change. This
does not mean they have to be replaced. If the replacement
and washing instructions are not followed, the anti-grease
ilters may present a ire hazard.
• The active carbon ilters
are used to purify the air which
is released back into the room. The ilters are not washable
or re-usable and must be replaced at least once every four
months. The active carbon ilter saturation level depends on
the frequency with which the appliance is used, the type of
cooking performed and the regularity with which the anti-
grease ilters are cleaned.
• Clean the cooker hood frequently, both inside and outside,
using a cloth which has been dampened with denatured
alcohol or neutral,
non
-abrasive liquid detergents.
• The light on the cooker hood is designed for use during
cooking and not for general room illumination.
Extended use of the light reduces the average duration of
the bulb.
• Replacing halogen light bulbs (Fig. 8).
To replace the halogen light bulbs
B
, remove the glass pane
C
using a lever action on the relevant cracks.
Replace the bulbs with new ones of the same type.
Caution:
do not touch the light bulb with bare hands.
• Commands:
(fig.5)
mechanical
the key symbols are
explained below:
A
= LIGHT
B
= OFF
C
= SPEED I
D
= SPEED II
E
= SPEED III
THE MANUFACTURER DECLINES ALL RESPONSIBILITY
FOR EVENTUAL DAMAGES CAUSED BY BREACHING THE
ABOVE WARNINGS.
ČESKY
CZ
ÚVOD’
Přečtěte si pozorně obsah nįvodu, protože poskytuje důležité
informace týkající se bezpečné instalace, používįní i údržby
zařízení.
Uchovejte si nįvod pro jakoukoliv budoucí potřebu.
Přístroj je určen k odsįvįní (odvįdění vzduchu ven – obr.1B),
filtrovįní (recyklace vzduchu v místnosti – obr.1A).
BEZPECNOSTNÍ OPATRENÍ
1. Vyžaduje se opatrnost, jestliže jsou současně v činnosti
odsįvač par a jiný hořįk nebo tepelné zařízení zįvisející na
vzduchu místnosti a napįjené jinou energií než elektrickou,
protože odsįvač par spotřebovįvį vzduch z okolí, který hořįk
nebo jiné tepelné zařízení potřebují ke spalovįní.
Negativní tlak nesmí překročit 4Pa (4x10
–5
bar).
K bezpečnému provozu je tedy nutnį odpovídající ventilace
místnosti. Při odvįdění vzduchu do vnějšího prostředí je nutné
se řídit platnými předpisy Vaší země.
Před napojením modelu na elektrickou síť:
- Zkontrolujte tabulku s údaji umístěnou uvnitř přístroje a
ověřte si, že napětí a výkon odpovídají místní síti a rovněž
zįsuvka je vhodnį. V případě jakékoliv pochyby se poraďte
s kvalifikovaným elektrikįřem.
- Je-li napįjecí kabel poškozen, musí být nahrazen speciįlním
kabelem nebo sadou, které jsou k dispozici u výrobce nebo
v jeho servisním středisku.
- Připojte zařízení k napįjení prostřednictvím zįstrčky s
pojistkou 3A nebo ke dvěma vodičům dvou fįzí, chrįněným
pojistkou 3A.
2. Upozornění!
V některých situacích mohou být elektrickį zařízení


