
Винные шкафы Liebherr WTEes 2053 - инструкция пользователя по применению, эксплуатации и установке на русском языке. Мы надеемся, она поможет вам решить возникшие у вас вопросы при эксплуатации техники.
Если остались вопросы, задайте их в комментариях после инструкции.
"Загружаем инструкцию", означает, что нужно подождать пока файл загрузится и можно будет его читать онлайн. Некоторые инструкции очень большие и время их появления зависит от вашей скорости интернета.

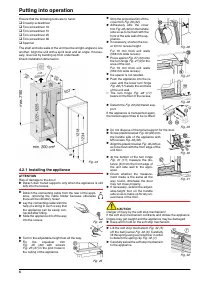
The packaging is made of recycable materials:
–
corrugated board/board
–
EPS moulded parts
–
polythene bags and sheets
–
polypropylene straps
u
Take the packaging material to an official collecting point.
4.6 Connecting the appliance
ATTENTION
Risk of damage to the electronic control system!
u
Do not use a stand-alone inverter (DC/AC conversion) or en-
ergy-saving plug.
WARNING
Fire and overheating hazard!
u
Do not use an extension cable or multiple socket outlet.
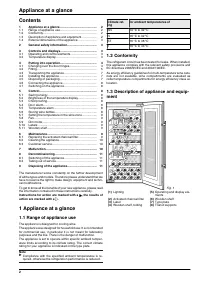
The type of current (alternating current) and voltage at the site of
installation must conform with the data on the type plate (see
section relating to the description of appliance and equipment).
Connect the appliance only with a properly installed
socket outlet with earthing contact. The socket outlet
must be fused with 10 A or higher.
u
Check electrical connection.
u
Clean the appliance. For details, see the section on cleaning.
u
Plug in the power plug.
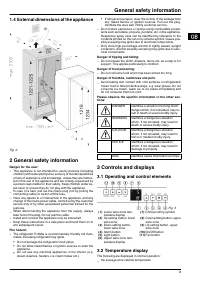
4.7 Switching on the appliance
u
Press On/Off button
Fig. 3 (10).
w
The temperature display and the alarm button flash until the
set temperature is reached.
5 Control
5.1 Saving energy
u
Always make sure there is good ventilation.
u
Keep the time the appliance is open to a minimum.
u
Store food logically.
5.2 Brightness of the temperature dis-
play
You can adjust the brightness of the temperature display to the
light conditions of the room in which the appliance is installed.
5.2.1 Adjusting the brightness
The brightness is adjustable between
h0
(no illumination) and
h5
(maximum luminosity).
u
To activate the setting mode: press the fan button
Fig. 3 (11)
for about 5s.
w
The fan button
Fig. 3 (11) flashes. The display indicates
c
.
u
Using the Up setting button, upper wine zone
Fig. 3 (9) and
Down setting button, upper wine zone
Fig. 3 (8) select
h
.
u
To confirm: briefly press the fan button
Fig. 3 (11).
u
To set the display brighter: press the Up setting but-
ton, upper wine zone
Fig. 3 (9).
u
To set the display darker: press the Down setting
button, upper wine zone
Fig. 3 (8).
u
To confirm: briefly press the fan button
Fig. 3 (11).
w
The brightness is adjusted to the new value.
u
To deactivate the setting mode: press the On/Off button
Fig. 3 (10).
-or-
u
Wait for 5 minutes.
w
The temperature is indicated again in the temperature display.
5.3 Child proofing
The child-proofing function enables you to make sure that the
appliance is not inadvertently switched off by playing children.
5.3.1 Setting the child-proofing function
u
To activate the setting mode: press the fan button
Fig. 3 (11)
for about 5s.
w
The fan button flashes. The display indicates
c
.
u
Briefly press the fan button
Fig. 3 (11) to confirm.
u
To switch on: using the Up setting button, upper
wine zone
Fig. 3 (9) or Down setting button, upper
wine zone
Fig. 3 (8) select
c1
.
u
To switch off: using the Up setting button, upper
wine zone
Fig. 3 (9) or Down setting button, upper
wine zone
Fig. 3 (8) select
c0
.
u
To confirm: press the fan button
Fig. 3 (11).
w
The child-proofing function is switched on when the child-
proofing symbol
Fig. 3 (7) shines.
u
To deactivate the setting mode: press the On/Off button
Fig. 3 (10).
-or-
u
Wait for 5 minutes.
w
The temperature is indicated again in the temperature display.
5.4 Door alarm
If the door is open longer then 60 s, the audible alarm sounds.
The audible alarm is automatically silenced when the door is
closed.
5.4.1 Muting the door alarm
The audible alarm can be muted when the door is open. The
sound switch-off function is active as long as the door is left open.
When the door is closed, the alarm function is active again.
u
Press alarm button
Fig. 3 (4).
w
The door alarm is silenced.
5.5 Temperature alarm
The audible alarm sounds if the wine storage temperature is too
warm or too cold.
The temperature display flashes at the same time.
The cause of the temperature being too high may be:
–
too much warm ambient air flowed in when rearranging and
removing food
–
power failure for some time
–
the appliance is faulty
The audible alarm is automatically silenced and the temperature
display stops flashing when the temperature is sufficiently cold/
warm again.
If the alarm status persists, proceed according to the section on
troubleshooting.
5.5.1 Muting the temperature alarm
The audible alarm can be muted. When the temperature is suf-
ficiently cold again, the alarm function is active again.
u
Press alarm button
Fig. 3 (4).
w
The audible alarm is silenced.
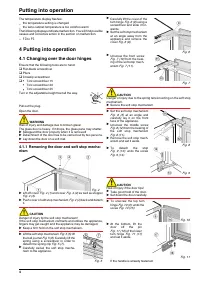
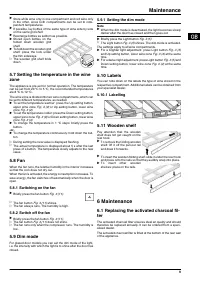
5.6 Storing wine bottles
64 Bordeaux bottles (0.75 l) can be stored in the wine zone.
Control
8
Характеристики

Остались вопросы?Не нашли свой ответ в руководстве или возникли другие проблемы? Задайте свой вопрос в форме ниже с подробным описанием вашей ситуации, чтобы другие люди и специалисты смогли дать на него ответ. Если вы знаете как решить проблему другого человека, пожалуйста, подскажите ему :)


