
Винные шкафы Liebherr WTEes 2053 - инструкция пользователя по применению, эксплуатации и установке на русском языке. Мы надеемся, она поможет вам решить возникшие у вас вопросы при эксплуатации техники.
Если остались вопросы, задайте их в комментариях после инструкции.
"Загружаем инструкцию", означает, что нужно подождать пока файл загрузится и можно будет его читать онлайн. Некоторые инструкции очень большие и время их появления зависит от вашей скорости интернета.

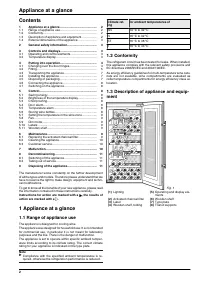

The temperature display flashes:
–
the temperature setting is changed
–
the wine cabinet temperature is too cold/too warm
The following displays indicate malfunction. You will find possible
causes and corrective action in the section on malfunction.
–
F0
to
F5
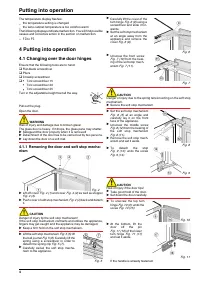
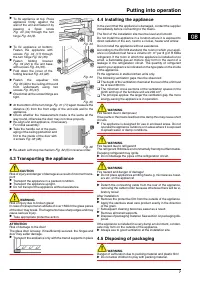
4 Putting into operation
4.1 Changing over the door hinges
Ensure that the following tools are to hand:
q
Flat-blade screwdriver
q
Pliers
q
Crosstip screwdriver
q
•
Torx screwdriver 15
•
Torx screwdriver 20
•
Torx screwdriver 25
Turn in the adjustable-height feet all the way.
Pull out the plug.
Open the door.
WARNING
Risk of injury and damage due to broken glass!
The glass door is heavy. If it drops, the glass pane may shatter.
u
Safeguard the door properly when it is removed!
u
Detachment of the door has to be carried out by two persons.
u
Lay down the door on a soft mat.
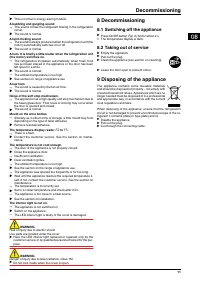
4.1.1 Removing the door and soft stop mecha-
nism
Fig. 4
u
Lift off cover
Fig. 4 (1) and cover Fig. 4 (2) as well as stopper
Fig. 4 (3).
u
Push cover of soft stop mechanism
Fig. 4 (4) back and detach
it.
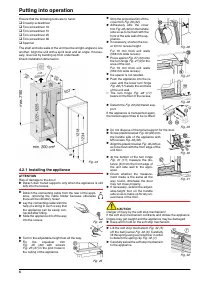
CAUTION
Danger of injury by the soft stop mechanism!
If the soft stop mechanism contracts and strikes the appliance,
fingers may get caught and the appliance may be damaged.
u
Keep a firm hold on the soft stop mechanism.
u
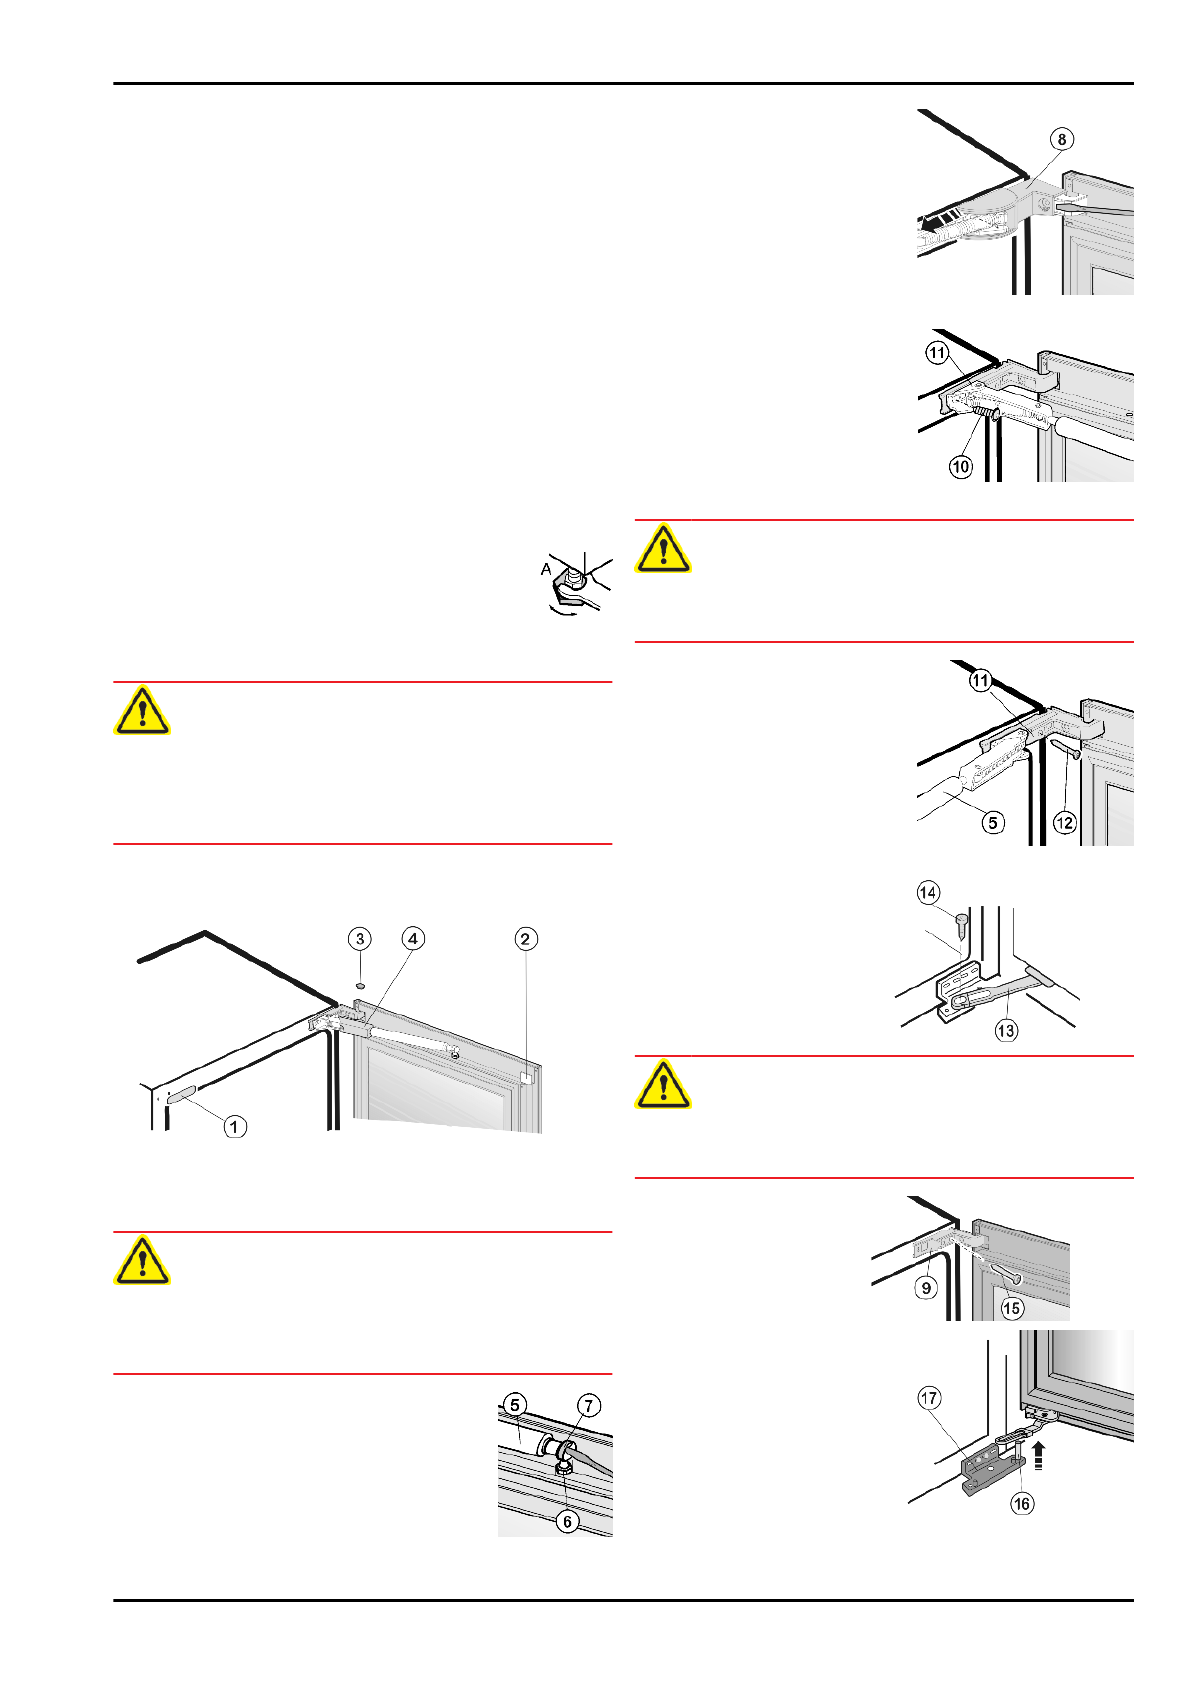
Lift the soft stop mechanism
Fig. 5 (5) off
the ball journal
Fig. 5 (6). Carefully lift the
spring using a screwdriver in order to
detach the spring clip
Fig. 5 (7).
u
Carefully swivel the soft stop mecha-
nism to the appliance.
Fig. 5
u
Carefully lift the cover of the
turn hinge
Fig. 6 (8) using a
screwdriver and slide it for-
wards.
u
Set the soft stop mechanism
at an angle away from the
appliance and remove the
cover
Fig. 6 (8).
Fig. 6
u
Unscrew the front screw
Fig. 7 (10) from the bear-
ing of the soft stop mech-
anism
Fig. 7 (11).
Fig. 7
CAUTION
Danger of injury due to the spring tension acting on the soft stop
mechanism.
u
Secure the soft stop mechanism.
u
Set the soft stop mechanism
Fig. 8 (5) at an angle and
carefully lay it on the front
face of the appliance.
u
Unscrew the middle screw
Fig. 8 (12) from the bearing of
the soft stop mechanism
Fig. 8 (11).
u
Remove the soft stop mech-
anism and set it aside.
Fig. 8
u
To
detach
the
stop
Fig. 9 (13): undo the screw
Fig. 9 (14).
Fig. 9
CAUTION
Risk of injury if the door tips!
u
Take good hold of the door.
u
Set down the door carefully.
u
To unscrew the top turn
hinge
Fig. 10 (9): undo the
screw
Fig. 10 (15).
Fig. 10
u
At the bottom, lift the
door off the pin
Fig. 11 (16) of the lower
turn hinge
Fig. 11 (17)
and set it aside.
Fig. 11
If the handle is already fastened:
Putting into operation
4
Характеристики

Остались вопросы?Не нашли свой ответ в руководстве или возникли другие проблемы? Задайте свой вопрос в форме ниже с подробным описанием вашей ситуации, чтобы другие люди и специалисты смогли дать на него ответ. Если вы знаете как решить проблему другого человека, пожалуйста, подскажите ему :)


