
Винные шкафы Liebherr WTEes 2053 - инструкция пользователя по применению, эксплуатации и установке на русском языке. Мы надеемся, она поможет вам решить возникшие у вас вопросы при эксплуатации техники.
Если остались вопросы, задайте их в комментариях после инструкции.
"Загружаем инструкцию", означает, что нужно подождать пока файл загрузится и можно будет его читать онлайн. Некоторые инструкции очень большие и время их появления зависит от вашей скорости интернета.


u
detach the handle.
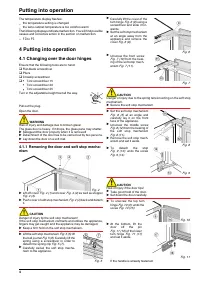
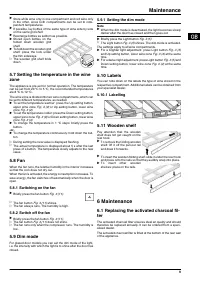
4.1.2 Transferring the bearing parts
u
To raise the bearing pin
Fig. 12 (18): Move turn hinge
Fig. 12 (9) up and down.
u
Using pliers, pull out the bear-
ing pin
Fig. 12 (18) and set it
aside.
Fig. 12
u
Pull the plastic sleeve
Fig. 13 (19) out of the door
bearing.
u
Transfer the stop
Fig. 13 (13)
to the opposite side.
Do not insert the plastic sleeve
Fig. 13 (19) inverted:
Fig. 13
u
insert the plastic sleeve
Fig. 13 (19) with an exact fit at the
opposite side of the door.
u
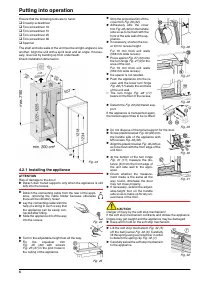
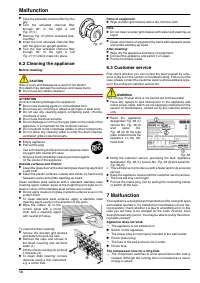
Detach the transit sup-
port of the door
Fig. 14 (20) .
u
Do not dispose of the
transit support of the
door.
u
Unscrew the lower turn
hinge
Fig. 14 (17).
u
Screw down the lower
turn hinge
Fig. 14 (17)
at the opposite site,
through the third and
sixth oblong hole from
the outside.
u
Screw down transit
support of the door
Fig. 14 (20) at the op-
posite side.
Fig. 14
u
Turn the upper turn hinge
Fig. 15 (9) through180° and
screw it down at the opposite
side
with
the
screw
Fig. 15 (15). Fit turn hinge to the
side wall of the appliance.
Fig. 15
4.1.3 Re-fitting the door and soft stop mecha-
nism
CAUTION
Danger of injury due to the spring tension acting on the soft stop
mechanism.
u
Secure the soft stop mechanism.
u
Again set the soft stop mecha-
nism
Fig. 16 (5) at such an an-
gle that the screw
Fig. 16 (12)
can be inserted.
Fig. 16
u
Then set the soft stop mechanism
at an angle so that the front
screw
Fig. 17 (10) can be fitted.
u
Carefully lay the soft stop mecha-
nism
Fig. 8 (5) on the front face of
the appliance.
Fig. 17
u
At the bottom, place the
door on the bearing pin
Fig. 18 (16).
Fig. 18
Fig. 19
u
At the top, move the door over the turn hinge
Fig. 19 (9) and
insert the
Fig. 19 (18) bearing pin.
u
Re-engage the cover of the turn hinge
Fig. 6 (8).
u
Transfer the ball journal
Fig. 5 (6).
u
Engage the soft stop mechanism with the ball journal.
u
Attach the cover
Fig. 4 (4) of the soft stop mechanism and slide
it forwards.
u
Screw
on
the
stop
Fig. 20 (13) through the white
slide
Fig. 20 (23) with screw
Fig. 20 (14).
u
Re-fit all the cover parts and
stoppers at the opposite side.
Fig. 20
4.2 Fitting
All the fasteners accompany the appliance.
Fig. 21
Fig. 22
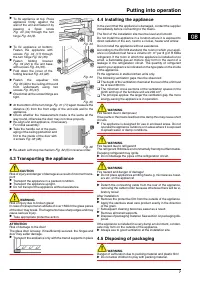
Putting into operation
5
Характеристики

Остались вопросы?Не нашли свой ответ в руководстве или возникли другие проблемы? Задайте свой вопрос в форме ниже с подробным описанием вашей ситуации, чтобы другие люди и специалисты смогли дать на него ответ. Если вы знаете как решить проблему другого человека, пожалуйста, подскажите ему :)


