
Телевизоры Toshiba 32WA2063DG - инструкция пользователя по применению, эксплуатации и установке на русском языке. Мы надеемся, она поможет вам решить возникшие у вас вопросы при эксплуатации техники.
Если остались вопросы, задайте их в комментариях после инструкции.
"Загружаем инструкцию", означает, что нужно подождать пока файл загрузится и можно будет его читать онлайн. Некоторые инструкции очень большие и время их появления зависит от вашей скорости интернета.


English
- 12 -
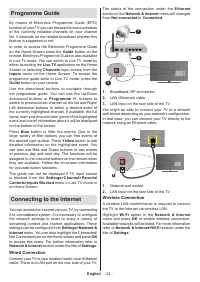
later using the
Settings>Device Preferences>Usage
& Diagnostics
menu on the Home Screen.
Information on Google services and some features of
your TV will be displayed next. You can turn on person
-
al results for Assistant by choosing the related option
when prompted. Press
OK
consecutively to proceed.
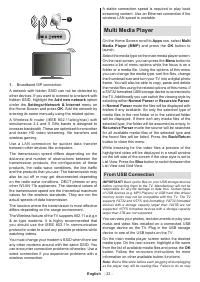
8. Country
In the next step select your
Country
from the list and
press
OK
to continue.
9. Password
Depending on the country selection you made in the
previous step you may be asked to define a password
(PIN) at this point. Press
OK
to proceed. The selected
PIN cannot be 0000. This PIN will be required in order
to access some menus, contents or to release locked
channels, sources etc. You will have to enter it if you
are asked to enter a PIN for any menu operation later.
10. Select TV Mode
In the following step of the initial setup, you can set
the TV’s operation mode either as
Home
or as
Store
.
Store
option will configure your TV’s settings for store
environment. This option is intended only for store
use. It is recommended to select
Home
for home use.
11. Chromecast built-in always available
Select your chromecast availability preference. If set as
On
your TV will be detected as a Google Cast device
and allow Google Assistant and other services to wake
your TV up to respond to Cast commands, even when
on standby mode and the screen is off.
12. Tuner Mode
Note:
If you don’t want to perform a tuner scan, select one of
the available options anyway. You can skip the scan at some
later stage of the installation wizard. If you skip this step you
can perform a channel search later using the related
Channels
menu options.
The next step is the selection of the tuner mode. Select
your tuner preference to install channels for Live TV
function.
Antenna
,
Cable
and
Satellite
options are
available. Highlight the option that corresponds to
your environment and press
OK
or
Right
directional
button to proceed.
Antenna
If
Antenna
option is selected, the TV will search for
digital terrestrial and analogue broadcasts. On the next
screen highlight
Scan
option and press
OK
to start
the search or select
Skip Scan
to continue without
performing a search.
Cable
If
Cable
option is selected, the TV will search for
digital cable and analogue broadcasts. If any, available
operator options will be listed on the
Select Operator
screen. Otherwise this step will be skipped. You
can select only one operator from the list. Highlight
the desired operator and press
OK
or the
Right
directional button to proceed. On the next screen
select
Scan
option to start a search or select
Skip
Scan
to continue without performing a search. If
Scan
is selected a configuration screen will be displayed
next.
Scan Mode
,
Frequency(KHz)
,
Modulation
,
Symbol Rate(Ksym/s)
,
Network ID
options may need
to be set. To perform a full scan set the
Scan Mode
as
Full/Advance
if available. Depending on the selected
operator and/or
Scan Mode
some options may not be
available to be set.
Once you are done with setting available options,
press the
Right
directional button to proceed. The TV
will start to search available broadcasts.
Satellite
If
Satellite
option is selected,
Satellite Type
screen
will be displayed next.
Preferred Satellite
and
General
Satellite
options will be available. Select one and press
OK
to proceed.
Note:
Preferred Satellite
and
General Satellite
options may
not be available depending on the selected country. In this case
the
DVBS Configuration Setting
screen will be displayed
after selecting the tuner mode as
Satellite
.
If
Preferred Satellite
option is selected, next screen
will be
Select Operator
screen. You can select only
one operator from the list. Highlight the desired
operator and press
OK
or the
Right
directional button
to proceed. Some of the following
options may be
preset depending on the selected operator in this
step. Check the parameters before proceeding and
adjust if necessary.
DVBS Configuration Setting
screen will be displayed
next. First
Antenna type(*)
should be set.
Universal
,
Single Cable
and
Jess Singlecable
options are
available. Set the
Antenna Type
as
Universal
for
Direct and DiSEqC satellite systems. If you set the
antenna type as
Universal
, press the
Right
directional
button to proceed to the next step. If the antenna
type is set as
Single Cable
or
Jess Singlecable
,
there will be three more additional options on the
DVBS Configuration Setting
screen:
Tuner
,
Band
frequency
and
User Defined
.
User Defined
option
will be available if the
Band frequency
is set as
User
Defined
. Set these options if available and press the
Right
directional button to proceed.
(*)
This option may be named as
Satellite type
depending on
the country selection.
After the parameters on the
DVBS Configuration
Setting
screen are configured according to your
environment the next step may be
Select
Satellite
screen. You may be able to set up different satellites
depending on the selected antenna type and operator
in the previous steps. Highlight the desired satellite
option and press
OK
to set the parameters
(*)
. The
Satellite Status
of the first satellite option will be
set as
On
. In order to configure other settings of the
Характеристики

Остались вопросы?Не нашли свой ответ в руководстве или возникли другие проблемы? Задайте свой вопрос в форме ниже с подробным описанием вашей ситуации, чтобы другие люди и специалисты смогли дать на него ответ. Если вы знаете как решить проблему другого человека, пожалуйста, подскажите ему :)


