
Телескопы Levenhuk LabZZ MT2 - инструкция пользователя по применению, эксплуатации и установке на русском языке. Мы надеемся, она поможет вам решить возникшие у вас вопросы при эксплуатации техники.
Если остались вопросы, задайте их в комментариях после инструкции.
"Загружаем инструкцию", означает, что нужно подождать пока файл загрузится и можно будет его читать онлайн. Некоторые инструкции очень большие и время их появления зависит от вашей скорости интернета.


7
With Levenhuk LabZZ MT2 Microscope you will make lots of interesting discoveries and create exciting memories! Remember
that following safety rules is absolutely necessary. In the kit you will find the microscope, as well as many useful accessories.
Everything in place? Check it together with your parents.
4
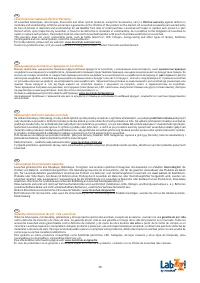
Welcome to the microworld!
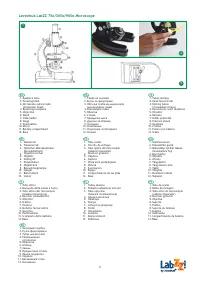
Eyepiece.
You observe the magnified image of the sample through the eyepiece. Eyepiece is a lens system that works the same
way as a magnifying glass.
Focusing knob.
Blurry images? Rotate the knob gently, adjusting the focus until all details become clear. Be careful
—
rotate
the knob slowly so as not to damage the objective or observed slide.
Monocular head.
This is a very important part of the microscope. The light travels right up the tube of the head directly into
the eyepiece, where the resulting image is formed.
Revolving nosepiece.
This is a device that holds three objectives with different magnifications. To change magnification,
rotate the nosepiece until it clicks (the sound means that the chosen objective is in place).
Objective.
This is needed for magnifying images. Levenhuk LabZZ MT2 Microscope comes with three objectives with different
magnifications. They magnify images 75, 300 and 900 times compared to what you see with the naked eye.
Stand.
This curved part of the microscope connects all other parts together. If you are feeling uncomfortable looking through
the eyepiece, tilt or lift the stand until it's more comfortable.
Change the inclination angle slowly, without abrupt movements.
Stage.
This is exactly where you place the slide in order to observe it.
The stage has two
, which, as is clear from their name, hold slides in place.
slide holders
The mirror
is located under the stage. It refracts the light from the lamp or the window illuminating the sample on the stage.
Illumination lamp.
If illumination in your room is not enough, turn on the built-in illumination by turning over the mirror.
Battery compartment.
The battery compartment is in the base of the microscope. What's it for? That's simple
—
it's where you
put batteries to make the illumination work. More details on how it's done can be found below.
1.
2.
3.
4.
5.
6.
7.
8.
9.
10.
11.
Microscope's construction
1
2
1.
2.
First install batteries for illumination. Flip the microscope over and remove the cap from the battery compartment. Insert two
AA batteries (those are not the thinnest penlight batteries, but those that are a bit thicker). Insert the batteries according to
their polarity
—
make sure that the “+” sign on the battery matches “+” in the compartment (same goes for “
−
” signs). Put
the cap back on. Don't hesitate to ask adults for help if you are not sure.
Place the microscope on the flat surface near the source of bright light (window or a lamp). Turn the mirror towards the
illumination source. You should see a bright light spot through the eyepiece.
3.
4.
5.
6.
Now the microscope is ready for work.
Take a prepared microscope slide, place it on the stage and secure with holders.
Choose the objective by rotating the revolving nosepiece. The microscope comes with three objectives with different
magnifications. The longer the objective, the higher magnification it produces. Most observations are better performed with
lower magnification, so choose the shortest objective to start. You will hear a “click” when the objective is in place.
Slowly rotate the focusing knob so the objective is almost touching the slide.
BUT!
It shouldn't actually touch the slide as both
the slide and the objective may be damaged if it does. That's why you need to do everything very slowly and carefully. When
the objective is very close to the slide (but doesn't touch it!), look through the eyepiece and start to rotate the focusing knob in
the opposite direction very slowly until you see a clear image.
How to work with the microscope
CAUTION! Never direct the mirror towards the Sun, as it may ruin your eyesight and even cause blindness.
3
џ
Do not disassemble batteries.
џ
Remember to switch off devices after use.
џ
Keep batteries out of the reach of children, to avoid risk of ingestion, suffocation, or poisoning.
џ
Utilize used batteries as prescribed by your country laws.
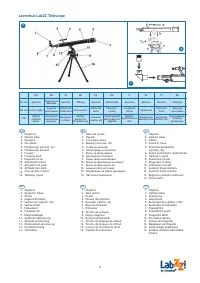
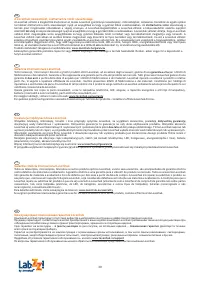
Wonderful telescope
Objective.
The most important part of the telescope. The objective is a lens system that gathers light from the distant object
and forms its image. The objective should always be pointed in the direction of the object you want to observe.
Optical tube.
Light rays collected by the objective travel down the optical tube to enter the eyepiece.
Eyepiece.
You look at the Moon, planets and stars through the eyepiece. The eyepiece enlarges images of objects many times;
that's why all objects look bigger than when observed with the naked eye.
Sun shade.
The shade is a short tube that is put on the objective. It's needed to not let the light from street lamps, car lights,
windows and other close-by light sources get in the objective and ruin the resulting image of the object you want to observe.
Finderscope
—
is a small telescope that is attached to the tube of the big telescope. The finderscope has small magnification
and wide field of view (the latter means that you can see larger areas at once). The finderscope is made to help you find the
desired object more quickly and easily. After you've found the object using the finderscope, you can observe it in detail
through the telescope.
Finderscope bracket
is required
to attach the finderscope to the telescope tube.
Focuser
—
is a special device in which the eyepiece is inserted. The focuser is needed for bringing the eyepiece closer or
farther from the objective. By doing so, you can achieve the maximum clarity of images.
Telescope's construction
5
1.
2.
3.
4.
5.
6.
7.
Содержание
- 35 Набор Levenhuk LabZZ MT2 (микроскоп и телескоп); Детский набор Levenhuk LabZZ; Информация для родителей; Использование элементов питания
- 36 Как работать с микроскопом; Добро пожаловать в микромир!; Окуляр; Как устроен микроскоп; Удивительный телескоп
- 37 Как собрать телескоп; Важно: не перетяни винты, чтобы не сорвать; Как начать наблюдения; повредить зрение и даже ослепнуть!; Как работать с телескопом; Важно: перед фокусировкой (настройкой; увеличение и подходит для ночных наблюдений.
- 39 Gwarancja międzynarodowa Levenhuk; dożywotnią gwarancję; Международная пожизненная гарантия Levenhuk; пожизненная гарантия; Garanzia internazionale Levenhuk; garanzia a vita; due anni; Garantia vitalícia internacional Levenhuk; élettartamra szóló; két évig
Характеристики

Остались вопросы?Не нашли свой ответ в руководстве или возникли другие проблемы? Задайте свой вопрос в форме ниже с подробным описанием вашей ситуации, чтобы другие люди и специалисты смогли дать на него ответ. Если вы знаете как решить проблему другого человека, пожалуйста, подскажите ему :)
