
Строительные пылесосы Bosch AdvancedVac 20 - инструкция пользователя по применению, эксплуатации и установке на русском языке. Мы надеемся, она поможет вам решить возникшие у вас вопросы при эксплуатации техники.
Если остались вопросы, задайте их в комментариях после инструкции.
"Загружаем инструкцию", означает, что нужно подождать пока файл загрузится и можно будет его читать онлайн. Некоторые инструкции очень большие и время их появления зависит от вашей скорости интернета.


18
| English
1 609 92A 43W | (6.9.17)
Bosch Power Tools
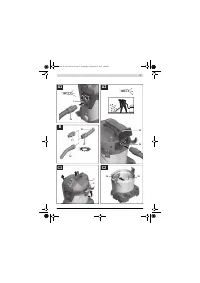
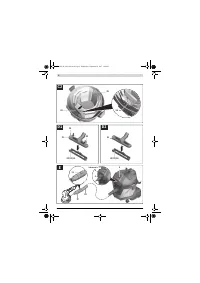
Cleaning/replacing filters (see figures F1 – F4)
Replace any damaged filters immediately.
– Unlock the latches
8
and remove the vacuum lid
7
.
– Remove the fabric filter
32
from the filter
33
and beat it
throroughly.
– Turn the filter holder
34
all the way in direction of rotation
“
” and take the filter
33
out of the container
1
.
– Brush down the flaps of the filter with a soft brush.
or
Replace a damaged filter.
– Put the filter
33
over the filter basket
35
and turn the filter
holder
34
all the way in direction of rotation “
”.
Ensure that the opening of the filter
33
sits exactly on the
positioning cam on the filter basket
35
. The filter holder
34
clicks into place.
– Put the fabric filter
32
over the filter
33
.
Please ensure that the fabric filter
32
encloses the filter
33
completely and that the rubber insert sits in the groove be-
tween the filter and the housing.
– Reattach the vacuum lid
7
again and lock the latches
8
.
Container
– Wipe out the container
1
from time to time with a commer-
cially available, non-scouring cleaning agent and allow to
dry.
Cleaning the permanent filter (see figure G)
Clean the permanent filter
36
from time to time in order to en-
sure that the vacuum cleaner continues to perform optimally.
– Open the exhaust air cover
26
and remove the permanent
filter
36
.
– Rinse out the permanent filter
36
under running water and
then leave it to dry thoroughly.
– Re-insert the cleaned filter, ensuring that it is seated cor-
rectly and securely. Close the exhaust air cover again.
Malfunctions
In the case of insufficient vacuuming performance, check the
following:
– Is the vacuum lid
7
attached properly?
– Is the hose system clogged?
– Are the suction tubes
20
securely fixed together?
– Is the container
1
full?
– Is the dust bag
29
full?
– Are the filters clogged with dust?
The vacuum cleaner switches off on overheating. Proceed as
follows:
– Leave the vacuum cleaner to cool down for 60 min.
– Briefly remove the mains plug from the socket and then re-
insert it.
– Make sure that the container
1
and dust bag
29
are empty
and that the vacuum hose
16
, filter
33
and permanent fil-
ter
36
are not blocked.
Emptying at regular intervals ensures optimum vacuuming
performance.
If the vacuuming performance is not achieved thereafter, take
the vacuum cleaner to customer service.
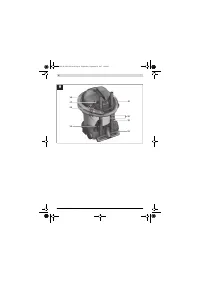
Storage (see figure H)
– Insert the vacuum tubes
20
into the holders
14
.
– Put the vacuum hose
16
around the vacuum lid in the hold-
ers
11
, place the end of the vacuum hose on one of the two
holders
11
.
– Wind the mains cable around the cable holder
37
.
– Fasten the retaining straps
38
to the cable storage
37
.
– Insert the curved nozzle
18
or the extraction adapter
17
in-
to the holder
15
.
– Insert the crevice nozzle
19
into the holder
12
.
– Insert the floor nozzle
21
into the holder
13
.
– Carry the vacuum cleaner only by the carrying handle
6
.
– Store the vacuum cleaner in a dry room and secure it
against unauthorised use.
– To lock the castors
9
, actuate the castor brakes
10
by
pushing down.
After-sales Service and Application Service
Our after-sales service responds to your questions concern-
ing maintenance and repair of your product as well as spare
parts. Exploded views and information on spare parts can al-
so be found under:
www.bosch-pt.com
Bosch’s application service team will gladly answer questions
concerning our products and their accessories.
In all correspondence and spare parts orders, please always
include the 10-digit article number given on the nameplate of
the product.
Great Britain
Robert Bosch Ltd. (B.S.C.)
P.O. Box 98
Broadwater Park
North Orbital Road
Denham
Uxbridge
UB 9 5HJ
At www.bosch-pt.co.uk you can order spare parts or arrange
the collection of a product in need of servicing or repair.
Tel. Service: (0344) 7360109
E-Mail: boschservicecentre@bosch.com
Ireland
Origo Ltd.
Unit 23 Magna Drive
Magna Business Park
City West
Dublin 24
Tel. Service: (01) 4666700
Fax: (01) 4666888
Australia, New Zealand and Pacific Islands
Robert Bosch Australia Pty. Ltd.
Power Tools
Locked Bag 66
Clayton South VIC 3169
Customer Contact Center
Inside Australia:
Phone: (01300) 307044
Fax: (01300) 307045
OBJ_BUCH-3012-003.book Page 18 Wednesday, September 6, 2017 3:04 PM
Содержание
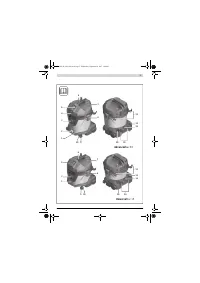
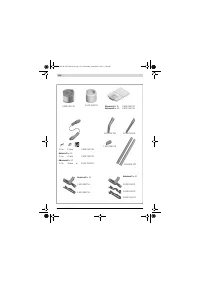
- 95 Символы; Изображенные составные части
- 96 Технические данные; Сборка; Подключение шланга всасывания
- 97 Монтаж принадлежностей для всасывания; Работа с инструментом; Включение электроинструмента
- 98 Всасывание жидкостей; Техобслуживание и сервис; Техобслуживание и очистка
- 100 Утилизация; Українська; Вказівки з техніки безпеки; Цей пилосмок не розрахований; Інакше можливе
Характеристики

Остались вопросы?Не нашли свой ответ в руководстве или возникли другие проблемы? Задайте свой вопрос в форме ниже с подробным описанием вашей ситуации, чтобы другие люди и специалисты смогли дать на него ответ. Если вы знаете как решить проблему другого человека, пожалуйста, подскажите ему :)


