
Шуруповерты Stanley SBD201M2K-RU - инструкция пользователя по применению, эксплуатации и установке на русском языке. Мы надеемся, она поможет вам решить возникшие у вас вопросы при эксплуатации техники.
Если остались вопросы, задайте их в комментариях после инструкции.
"Загружаем инструкцию", означает, что нужно подождать пока файл загрузится и можно будет его читать онлайн. Некоторые инструкции очень большие и время их появления зависит от вашей скорости интернета.


(Original instructions)
ENGLISH
7
Leaving the battery in the charger
The charger and battery pack can be left connected with the
LED glowing indefinitely. The charger will keep the battery pack
fresh and fully charged.
Electronic protection system
Li-Ion batteries are designed with an Electronic Protection
System that will protect the battery against overloading,
overheating or deep discharge. The tool will automatically turn
off if the Electronic Protection System engages. If this occurs,
place the Li-Ion battery on the charger until it is fully charged.
IMPORTANT CHARGING NOTES
• Longest life and best performance can be obtained if the
battery pack is charged when the air temperature is
between (18°- 24°C). DO NOT charge the battery pack in
an air temperature below (+4.5°C), or above (+40.5°C).
This is important and will prevent serious damage to the
battery pack.
• The charger and battery pack may become warm to touch
while charging. This is a normal condition, and does not
indicate a problem. To facilitate the cooling of the battery
pack after use, avoid placing the charger or battery pack in
a warm environment such as in a metal shed, or an
uninsulated trailer.
• If the battery pack does not charge properly:
- Check current at receptacle by plugging in a lamp or other
appliance.
- Check to see if receptacle is connected to a light switch
which turns power off when you turn out the lights.
- Move charger and battery pack to a location where the
surrounding air temperature is approximately (18°- 24°C).
If charging problems persist, take the tool, battery pack and
charger to your local STANLEY service center.
• The battery pack should be recharged when it fails to
produce sufficient power on jobs which were easily done
previously.
• DO NOT CONTINUE to use under these conditions. Follow
the charging procedure.
• You may also charge a partially used pack whenever you
desire with no adverse affect on the battery pack.
NOTE:
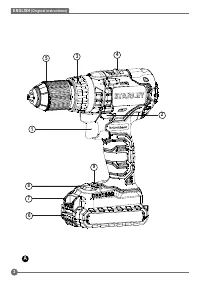
Make sure your battery pack (6) is fully charged.
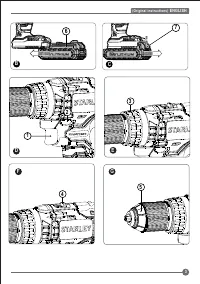
To install the battery pack into the tool - (Fig B)
• Align the battery pack with the rails inside the handle.
• Slide it firmly into place until you hear the lock snap into
place.
To remove the battery pack from the tool - (Fig C)
• Press the battery release button (7) and firmly pull the
battery pack out of the tool handle.
• Insert battery pack into the charger as described in the
charger section of this manual.
Trigger switch & forward/reverse button - (Fig D)
• The drill is turned ON and OFF by pulling and releasing
the trigger switch (1) shown in Fig D.
The farther the trigger is depressed, the higher the speed
of the drill.
• A forward/reverse control button (2) determines the
rotational direction of the tool and also serves as a lock off
button.
• To select forward rotation, release the trigger switch and
depress the forward/reverse control button on the right side
of the tool.
• To select reverse, depress the forward/reverse control
button on the left side of the tool.
• The center position of the control button locks the tool in the
off position. When changing the position of the control
button, be sure the trigger is released.
Adjusting torque control - (Fig E)
This tool is fitted with a torque adjustment collar (3) to select the
operating mode and to set the torque for tightening screws.
Large screws and hard workpiece materials require a higher
torque setting than small screws and soft workpiece materials.
• For drilling in wood, metal and plastics, set the collar to the
drilling position symbol.
• For screwdriving, set the collar to the desired setting. If you
do not yet know the appropriate setting, proceed as
follows:
• Set the collar to the lowest torque setting.
• Tighten the first screw.
• If the clutch ratchets before the desired result is achieved,
increase the collar setting and continue tightening the
screw.
• Repeat until you reach the correct setting.
• Use this setting for the remaining screws.
Dual range switch - (Fig F)
The dual range feature of your drill allows you to shift gears for
greater versatility.
• To select low speed, high torque setting (position1), turn
tool off and permit to stop. Slide gear shifter button (4)
away from the chuck.
• To select the high speed, low torque setting (position 2),
turn tool off and permit to stop. Slide gear shifter button
back toward the chuck.
NOTE:
Do not change gears when tool is running. If you are
having trouble changing gears, make sure that the dual range
gear button is either completely pushed forward or completely
pushed back.
Keyless chuck - (Fig G)
WARNING!
Make certain the battery pack is removed to
prevent tool actuation before installing or removing accesso-
ries. To insert a drill bit or other accessory:
• Grasp the chuck (5) and rotate it in the counterclockwise
direction, as viewed from the chuck end.
• Insert the bit or other accessory fully into the chuck, and
tighten securely by rotating the chuck in the clockwise
direction as viewed from the chuck end.
Содержание
- 21 Зарядное устройство; ЭКСПЛУАТАЦИЯ
- 23 Курковый пусковой выключатель и переключатель; РУССКИЙ
- 24 Заворачивание; Примечание: При перек лючении направления; Сверление; ПРИМЕЧАНИЕ: Подсветка служит для освещения; ТЕХНИЧЕСКОЕ ОБСЛУЖИВАНИЕ
- 25 ВНИМАНИЕ! Перед любыми видами работ по; ЗАЩИТА ОКРУЖАЮЩЕЙ СРЕДЫ; Зарядное устройство
- 26 Приложение к руководству по эксплуатации электроинструмента


