Пылесос Polaris PVCR 1226 - инструкция пользователя по применению, эксплуатации и установке на русском языке. Мы надеемся, она поможет вам решить возникшие у вас вопросы при эксплуатации техники.
Если остались вопросы, задайте их в комментариях после инструкции.
"Загружаем инструкцию", означает, что нужно подождать пока файл загрузится и можно будет его читать онлайн. Некоторые инструкции очень большие и время их появления зависит от вашей скорости интернета.


28
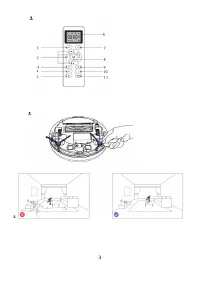
hours to minutes and vice versa. To save the adjustments, push the
button on the control panel. This causes
uttering a beep meaning that the adjustments have been saved.
To reset parameters, push and hold down the
button for 4 seconds. Once the adjustments are saved, the
device utters a transient beep.
Replacement of power supply elements causes resetting of parameters. Therefore, remember to re-adjust the
time after electric battery replacement.
ACCUMULATOR CHARGING
1.
CHARGING BASE USAGE
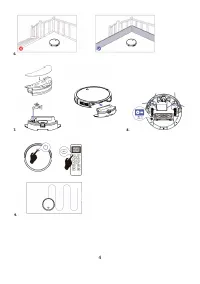
During use of the charging base, the necessity of charging the accumulator and the charging base location is
automatically determined by the device. The I/O switch on the device body shall be in the "I" position.
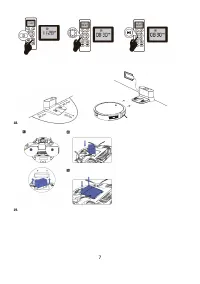
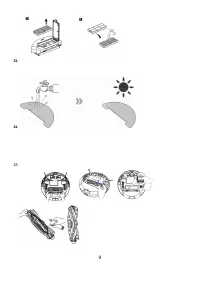
Place the charging base right against the wall beside a power outlet in a room to be cleaned, insert the adapter
plug into the outlet. This causes illumination of the signal indicator on the base.
There shall be no obstacles at a distance of 1 meter from two lateral sides, and at a distance of 2 meters from the
front side of the charging base. At the base location area, there shall also be no mirrors and intensively reflecting
surfaces within 15 cm heightwise from the floor. In case of presence of such surfaces, they shall be blanketed.
Do not place the base against a window if exposure to direct solar radiation is possible. (Fig. 18)
To start charging, move the power switch to the ON position, and put the vacuum cleaner on the base. Make sure
that contact leads on the base align with contact leas on the device.
The device status
Indicator color
Under charging
Pink, glittering
Low-charged battery
Blue+pink, steady illumination
Fully charged / under the cleanup mode
Blue, steady illumination
Turned off / under Sleep mode/ charged a long ago
Dim
Displays an error
Red
Do not leave the adapter unattended if energized after charging.
Do not leave the charging base on the floor for long when not in operation.
Attention! In is strictly prohibited to short-circuit the leads of the charging base!
Prior to a long-term storage discharge the accumulator to the half. Do not keep the accumulator under subzero
ambient temperature.
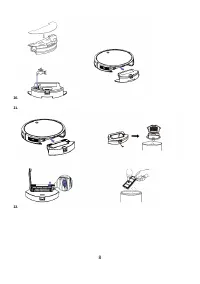
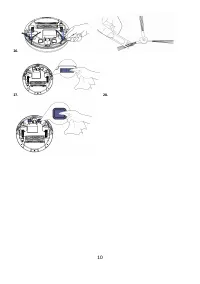
ACCUMULATOR REPLACEMENT (Fig. 19)
1.
Turn off the device through the power switch.
2.
Position the device so that its bottom panel faced upward.
3.
Use a cross screwdriver (beyond the delivery set) to unscrew the screws of the battery compartment
lid, and remove the lid by prying it up from the screws location side.
4.
Take out the depleted accumulator from its compartment, and disconnect its socket by pressing the
power socket latch on the vacuum cleaner, and pulling out the accumulator plug. To connect a new accumulator,
insert the accumulator plug into the power socket on the vacuum cleaner until the click. Carefully position the
accumulator inside the compartment avoiding jamming connective wires.
5.
Put the battery compartment lid back on its place. Tighten the screws.
CLEANING AND MAINTENANCE OF THE DEVICE
1.
Prior to cleaning and maintenance, make sure to disconnect the device from the charger, and to
disconnect the charger from a power network.
2.
Do not dip the device or the charger into water or any liquids.
3.
Do not use petrol, alcohol, and chemical solvents during cleaning the device.
4.
Metal components of the device shall be wiped with a clean dry piece of cloth.
5.
Plastic components of the device shall be wiped with a wet wrung piece of cloth. No water droplets
are allowable.


