Пилы торцовочные Einhell TE-SM 2131 - инструкция пользователя по применению, эксплуатации и установке на русском языке. Мы надеемся, она поможет вам решить возникшие у вас вопросы при эксплуатации техники.
Если остались вопросы, задайте их в комментариях после инструкции.
"Загружаем инструкцию", означает, что нужно подождать пока файл загрузится и можно будет его читать онлайн. Некоторые инструкции очень большие и время их появления зависит от вашей скорости интернета.


GB
- 28 -
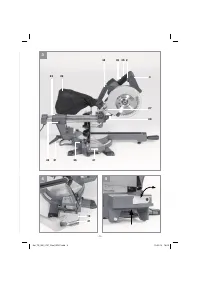
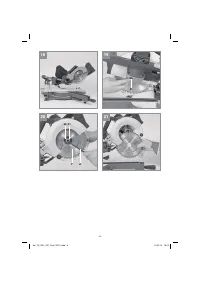
6.2 Cross cut 90° and turntable 0° - 45°
(Fig. 1-3, 13, 14)
The crosscut saw can be used to make crosscuts
of 0°- 45° to the left and 0° - 45° to the right in re-
lation to the stop rail.
•
Release the turntable (17) by undoing the
locking screw (14).
•
Turn the turntable (17) and scale pointer (15)
to the desired angular setting on the dial (16)
and lock into place with the locking screw
(14). The saw has locking positions at angles
of - 45°, -30°, -22.5°, -15°, 0°, 15°, 22.5°, 30°
and 45°, at which the turntable (17) audibly
clicks into position.
•
Retighten the locking screw (14) to secure the
turntable (17) in place.
•
Cut as described in section 6.1.
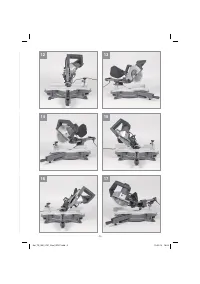
6.3 Miter cut 0°- 45° and turntable 0°
(Fig. 1–3, 15, 16)
The crosscut saw can be used to make miter cuts
to the left of 0°-45° and to the right of 0°-45° in
relation to the work surface.
•
If required, dismantle the clamping device
(8) or mount on the opposite side of the fixed
saw table (18).
•
Move the machine head (4) to its upper po-
sition.
•
Fasten the turntable (17) in 0° position.
•
Adjust the miter angle on the machine head
and the stop rail as described under points
5.5 and 5.6.
•
Cut as described in section 6.1.
6.4 Miter cut 0°- 45° and turntable 0°- 45°
(Fig. 1–3, 17, 18)
The crosscut saw can be used to make miter cuts
to the left of 0°-45° and to the right of 0°-45° in
relation to the work surface, with simultaneous
setting of the turntable from 0°-45° to the left or
0°-45° to the right in relation to the stop rail (dou-
ble miter cut).
•
If required, dismantle the clamping device
(8) or mount on the opposite side of the fixed
saw table.(18)
•
Move the machine head (4) to its upper po-
sition.
•
Release the turntable (17) by undoing the
locking screw (14).
•
Use the handle (1) to adjust the turntable (17)
to the angle required (in this connection see
also section 6.2).
•
Retighten the locking screw (14) to secure the
turntable in place.
•
Adjust the miter angle on the machine head
and the stop rail as described under points
5.5 and 5.6.
•
Cut as described in section 6.1.
6.5 Limiting the cutting depth (Fig. 3)
•
The cutting depth can be infinitely adjusted
using the screw (27). To do so, undo the
knurled nut on the screw (27). Turn the screw
(27) in or out to set the required cutting depth
and then retighten the knurled nut on the
screw (27).
•
Check the setting by completing a test cut.
6.6 Sawdust bag (Fig. 2)
The saw is equipped with a sawdust bag (22) for
sawdust and chips. Slip the sawdust bag onto the
connector alongside the transport handle (34).
The sawdust bag (22) can be emptied by means
of a zipper at the bottom. The sawdust bag can be
removed in order to connect the suction hose of
a dust extractor (wet and dry vacuum cleaner or
extraction system). The extraction system is then
plugged onto the same position (suction hose/
extraction system is not included in the scope of
this delivery).
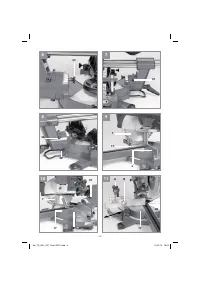
6.7 Changing the saw blade (Fig. 1, 19-21)
•
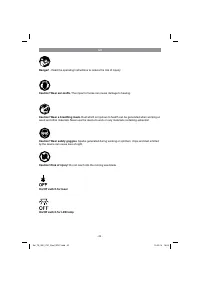
Warning! Before changing the saw blade:
Pull out the power plug!
•
Caution! Wear work gloves to prevent in-
jury when changing the saw blade.
•
Swing the machine head upwards (4).
•
Press the saw shaft lock (5) with one hand
while positioning the Allen key (d) on the
flange bolt (31) with the other hand. The saw
shaft lock (5) engages after no more than one
rotation.
•
Now, using a little more force, slacken the
flange screw (31) in the clockwise direction.
•
Turn the flange screw (31) right out and remo-
ve the external flange (32).
•
Take the blade (7) off the inner flange and pull
out downwards.
•
Carefully clean the flange screw (31), outer
flange (32) and inner flange.
•
Fit and fasten the new saw blade (7) in rever-
se order.
•
Important! The cutting angle of the teeth, in
other words the direction of rotation of the
saw blade (7) must coincide with the direction
of the arrow on the housing.
•
Check to make sure that all safety devices
are properly mounted and in good working
condition before you begin working with the
saw again.
Anl_TE_SM_2131_Dual_SPK7.indb 28
Anl_TE_SM_2131_Dual_SPK7.indb 28
13.05.14 16:04
13.05.14 16:04
Характеристики

Остались вопросы?Не нашли свой ответ в руководстве или возникли другие проблемы? Задайте свой вопрос в форме ниже с подробным описанием вашей ситуации, чтобы другие люди и специалисты смогли дать на него ответ. Если вы знаете как решить проблему другого человека, пожалуйста, подскажите ему :)


