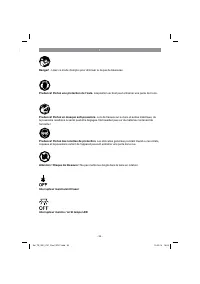
Пилы торцовочные Einhell TE-SM 2131 - инструкция пользователя по применению, эксплуатации и установке на русском языке. Мы надеемся, она поможет вам решить возникшие у вас вопросы при эксплуатации техники.
Если остались вопросы, задайте их в комментариях после инструкции.
"Загружаем инструкцию", означает, что нужно подождать пока файл загрузится и можно будет его читать онлайн. Некоторые инструкции очень большие и время их появления зависит от вашей скорости интернета.


GB
- 27 -
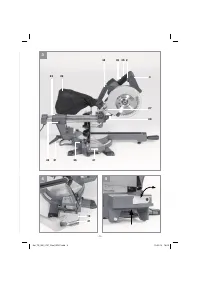
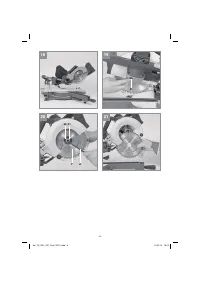
5.5 Precision adjustment of the stop for miter
cuts 45° (Fig. 7-10)
•
Fasten the turntable (17) in 0° position.
•
Undo the locking screw (21) and move the
machine head (4) all the way to the left using
the handle (1), until it coincides at 45°.
•
Place the 45° stop angle (b) between the bla-
de (7) and the turntable (17).
•
Open the counternut on the adjustment screw
(37 or 38).
•
Adjust the adjustment screw (37 or 38) so
that the angle between the blade (7) and the
turntable (17) equals exactly 45°.
•
Then tighten the counternut again.
•
No stop angle included.
5.6 Adjusting the movable stop rails (Fig. 1,
10-14)
•
Important! This saw is equipped with movable
stop rails (9, 11) that are screwed to the fixed
workpiece stop (40).
•
For carrying out angle and miter cuts the mo-
vable stop rails must be adjusted to prevent a
collision with the saw blade.
•
For miter and angle cuts to the left, the left
stop rail must be moved outwards. For angle
cuts to the right, the right stop rail must be
moved outwards.
•
Undo the locking screws (43) on the movable
stop rails and pull the rails back so far that a
collision with the saw blade can be ruled out.
Prior to every cut retighten the locking screws
of the stop rails.
•
For cleaning purposes you can remove the
stop rails from the workpiece stop (40).
•
Always fasten the movable stop rails on the
equipment again after you have completed
your cleaning work.
6. Operation
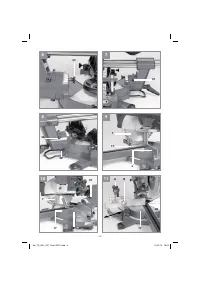
6.1 Cross cut 90° and turntable 0°
(Fig. 1–3, 11, 12)
For cutting widths up to approx. 100 mm it is
possible to
fi
x the saw‘s drag function with the
locking screw for drag guide (24) in rear position.
If the cutting width exceeds 100 mm you must
ensure that the locking screw for drag guide (24)
is slackened and that the machine head (4) can
be moved.
•
Move the machine head (4) to its upper po-
sition.
•
Use the handle (1) to push back the machine
head (4) and fix it in this position if required
(dependent on the cutting width).
•
Place the piece of wood to be cut against the
workpiece stop (40) and on the turntable (17).
•
Caution!
Lock the material with the clam-
ping device (8) on the fixed saw table (18) to
prevent the material from moving during the
cutting operation.
•
Clamp flat material in lying position using the
vertical clamping device (position A).
•
Alternatively, clamp flat material which you
want to cut in upright position using the hori-
zontal clamping device (position B).
•
Push down the release lever (3) to release the
machine head (4).
•
Press the On/Off switch (2) to start the motor.
•
With the drag guide (23) fixed in place: Use
the handle (1) to move the machine head (4)
steadily and with light pressure downwards
until the saw blade (7) has completely cut
through the workpiece.
•
With the drag guide (23) not fixed in place:
Pull the machine head (4) all the way to the
front and then use the handle (1) to move it
downwards steadily and with light pressure.
Now push the machine head (4) slowly and
steadily to the very back until the saw blade
(7) has completely cut through the workpiece.
•
When the cutting operation is completed,
move the machine head (4) back to its upper
(home) position and release the On/Off but-
ton (2).
Important!
The integral resetting springs will
automatically lift the machine head. Do not simply
let go of the handle (1) after cutting, but allow the
machine head (4) to rise slowly, applying slight
counter pressure as it does so.
Anl_TE_SM_2131_Dual_SPK7.indb 27
Anl_TE_SM_2131_Dual_SPK7.indb 27
13.05.14 16:04
13.05.14 16:04
Характеристики

Остались вопросы?Не нашли свой ответ в руководстве или возникли другие проблемы? Задайте свой вопрос в форме ниже с подробным описанием вашей ситуации, чтобы другие люди и специалисты смогли дать на него ответ. Если вы знаете как решить проблему другого человека, пожалуйста, подскажите ему :)


