
Перфораторы Bosch GBH 240F - инструкция пользователя по применению, эксплуатации и установке на русском языке. Мы надеемся, она поможет вам решить возникшие у вас вопросы при эксплуатации техники.
Если остались вопросы, задайте их в комментариях после инструкции.
"Загружаем инструкцию", означает, что нужно подождать пока файл загрузится и можно будет его читать онлайн. Некоторые инструкции очень большие и время их появления зависит от вашей скорости интернета.


English |
17
Bosch Power Tools
1 609 92A 3SE | (24.4.17)
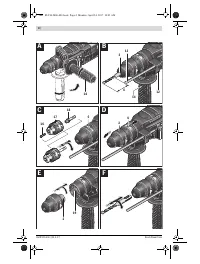
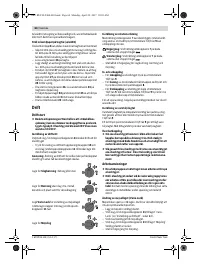
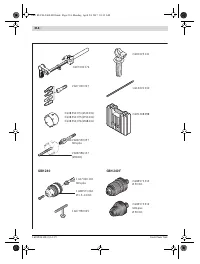
– Press the button for depth stop adjustment
12
and remove
the depth stop
13
. Press button
12
again and insert the
dust extraction attachment into the auxiliary handle
14
from the front.
– Connect an extraction hose (diameter 19 mm, accessory)
to the extraction sleeve
22
of the dust extraction attach-
ment.
The vacuum cleaner must be suitable for the material being
worked.
When vacuuming dry dust that is especially detrimental to
health or carcinogenic, use a special vacuum cleaner.
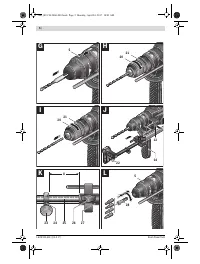
Adjusting the Drilling Depth on the Dust Extraction
Attachment (see figure K)
The required drilling depth
X
can also be adjusted when the
dust extraction attachment is mounted.
– Insert the SDS-plus drilling tool to the stop into the SDS-
plus tool holder
3
. Otherwise, the movability of the SDS-
plus drilling tool can lead to incorrect adjustment of the
drilling depth.
– Loosen the wing bolt
26
on the dust extraction attach-
ment.
– Without switching the power tool on, apply it firmly to the
drilling location. The SDS-plus drilling tool must face
against the surface.
– Position the the guide pipe
27
of the dust extraction at-
tachment in its holding fixture in such a manner that the
head of the dust extraction attachment faces against the
surface to be drilled. Do not slide the guide pipe
27
further
over the telescopic pipe
25
of the dust extraction attach-
ment than required, so that as much as possible of the
scale
25
on the telescopic pipe remains visible.
– Retighten the wing bolt
26
again. Loosen the clamping
screw
23
on the depth stop of the dust extraction attach-
ment.
– Move the depth stop
24
on the telescopic pipe
25
in such
a manner that the clearance
X
shown in the figure corre-
sponds with the required drilling depth.
– Tighten the clamping screw
23
in this position.
Operation
Starting Operation
Observe correct mains voltage! The voltage of the pow-
er source must agree with the voltage specified on the
nameplate of the machine. Power tools marked with
230 V can also be operated with 220 V.
Products sold in AUS and NZ only
: Use a residual current de-
vice (RCD) with a rated residual current of 30 mA or less.
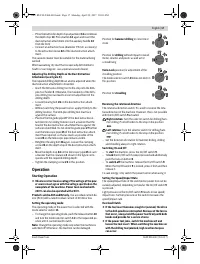
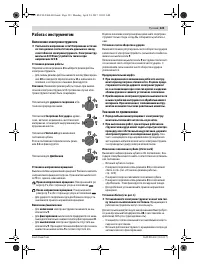
Setting the operating mode
The operating mode of the power tool is selected with the
mode selector switch
11
.
– To change the operating mode, push the release button
10
and turn the mode selector switch
11
to the requested po-
sition until it can be heard to latch.
Note:
Change the operating mode only when the machine is
switched off! Otherwise, the machine can be damaged.
Reversing the rotational direction
The rotational direction switch
7
is used to reverse the rota-
tional direction of the machine. However, this is not possible
with the On/Off switch
9
actuated.
Right rotation:
Turn the selector switch for drilling/ham-
mer drilling
7
on both sides to the stop in the position
.
Left rotation:
Turn the selector switch for drilling/ham-
mer drilling
7
on both sides to the stop in the position
.
– Set the direction of rotation for hammer drilling, drilling
and chiselling always to right rotation.
Switching On and Off
– To
start
the machine, press the On/Off switch
9
.
– To
lock
the On/Off switch, keep it pressed and additionally
push the lock-on button
8
.
– To
switch off
the machine, release the On/Off switch
9
.
When the On/Off switch
9
is locked, press it first and then
release it.
To save energy, only switch the power tool on when using it.
Setting the Speed/Impact Rate
The speed/impact rate of the switched on power tool can be
variably adjusted, depending on how far the On/Off switch
9
is pressed.
Light pressure on the On/Off switch
9
results in low speed/
impact rate. Further pressure on the switch increases the
speed/impact rate.
Overload Clutch
If the tool insert becomes caught or jammed, the drive
to the drill spindle is interrupted. Because of the forces
that occur, always hold the power tool firmly with both
hands and provide for a secure stance.
If the power tool jams, switch the machine off and
loosen the tool insert. When switching the machine on
with the drilling tool jammed, high reaction torques
can occur.
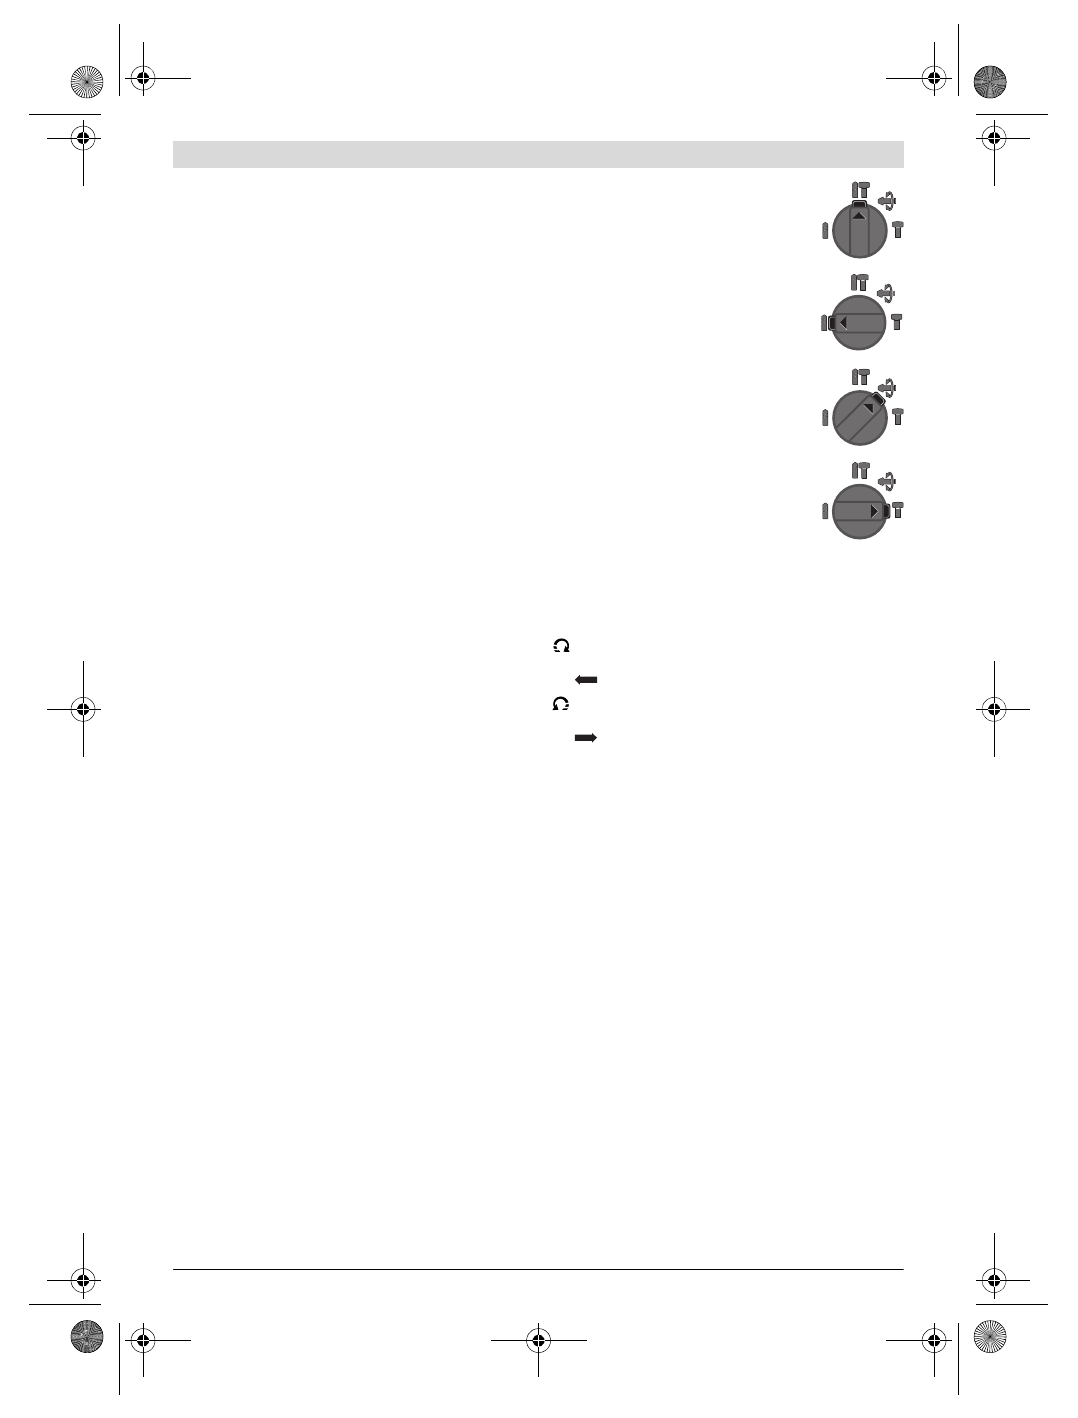
Position for
hammer drilling
in concrete or
stone
Position for
drilling
without impact in wood,
metal, ceramic and plastic as well as for
screwdriving
Vario-Lock
position for adjustment of the
chiselling position
The mode selector switch
11
does not latch in
this position.
Position for
chiselling
OBJ_BUCH-2460-003.book Page 17 Monday, April 24, 2017 10:03 AM
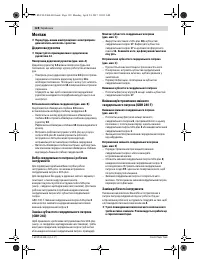
Содержание
- 118 Указания по технике безопасности для
- 119 Описание продукта и услуг; Применение по назначению
- 120 Технические данные; Сборка; Дополнительная рукоятка
- 121 Выбор сверлильного патрона и инструмента
- 123 Работа с инструментом; Включение электроинструмента
- 124 Техобслуживание и сервис; Техобслуживание и очистка
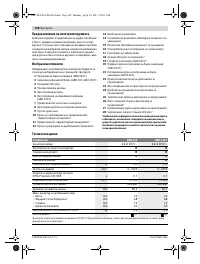
Характеристики

Остались вопросы?Не нашли свой ответ в руководстве или возникли другие проблемы? Задайте свой вопрос в форме ниже с подробным описанием вашей ситуации, чтобы другие люди и специалисты смогли дать на него ответ. Если вы знаете как решить проблему другого человека, пожалуйста, подскажите ему :)


