Мясорубки VITEK VT-3616 ST - инструкция пользователя по применению, эксплуатации и установке на русском языке. Мы надеемся, она поможет вам решить возникшие у вас вопросы при эксплуатации техники.
Если остались вопросы, задайте их в комментариях после инструкции.
"Загружаем инструкцию", означает, что нужно подождать пока файл загрузится и можно будет его читать онлайн. Некоторые инструкции очень большие и время их появления зависит от вашей скорости интернета.


6
ENGLISH
•
After you finish operating, switch the unit off
by pressing the button (4.a) «OFF», unplug
the meat grinder and only after that you can
disassemble it.
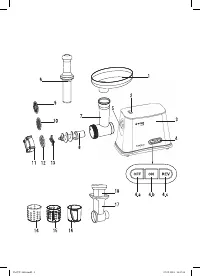
MEAT PROCESSING
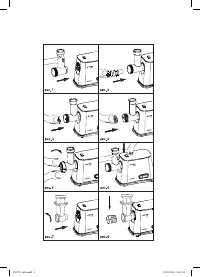
1.
Install the meat grinder head (7) to the set-
ting place (5).
2.
To install the meat grinder head (7), press and
hold the meat grinder head lock button (2).
Then match the grooves on the meat grinder
head (7) with the ledges on the installation
place (5) and turn the meat grinder head (7)
counterclockwise until locking. Release the
button (5) (pic. 1).
3.
Install the screw (8) into the meat grinder
head (7) body (pic. 2).
4.
Set the crossed blade (13) on the screw (8)
(pic. 3).
5.
Select one of the plates (9, 10 or 12) and set
it over the blade, matching the ledges on the
grate with the grooves on the meat grinder
head body (7), tighten the nut (11) strongly
turning it clockwise (pic. 4, 5).
Attention!
Face the blade (13) cutting side to the grate
(9, 10 and 12). If the blade (13) is installed
improperly, it will not grind the products.
•
The fine cutting plate (9) is suited for process-
ing both raw and cooked meat, fish etc.
•
Coarse (11, 12) plates suit for processing raw
meat, fish, vegetables, dried fruit, cheese, etc.
Notes:
–
Make sure that the meat is fully defrosted,
remove excess fat and all bones, and cut the
meat into cubes or strips fitting the opening of
the food tray (1).
–
During the operation use only the pusher (6)
supplied with the unit; do not use any other
objects, never push the meat with your fingers.
6.
Install the food tray (1) on the meat grinder
head body (7).
7.
Insert the power plug into the mains socket.
8.
Switch the unit on by pressing the “ON” but-
ton (4.b).
9.
During the operation use the pusher (6) sup-
plied with the unit.
10.
After you finish operating, switch the meat
grinder off by pressing the button (4.a) «OFF»
and unplug the unit; only after that you can
disassemble it.
11.
To remove the meat grinder head, press the
lock button (2), turn the meat grinder head (7)
clockwise and remove it (see pic. 6).
12.
To disassemble the meat grinder head,
unscrew the nut (11) turning it counterclock-
wise and take out the installed plate (9, 10
or 12), the blade (13) and the screw (8) from
the meat grinder head body.
VEGETABLE SLICER
•
Install the vegetable slicer attachment
body (17) into the meat grinder head setting
place (5).
•
To install the vegetable slicer attachment (17)
body, press and hold the lock button (2). Then
match the grooves on the attachment (17) with
the ledges on the installation place (5) and
turn the attachment (17) counterclockwise
until locking. Release the button (5) (pic. 7).
•
Insert one of the attachments (14, 15, 16) into
the vegetable slicer body (17) until bumping
(pic. 8).
•
Insert the power plug into the mains socket.
•
Switch the unit on by pressing the “ON” but-
ton (4.b).
•
During the operation use only the pusher (18)
supplied with the unit; do not use any other
objects to push vegetables, never push veg-
etables with your hands.
•
After you finish operating, switch the unit off
by pressing the button (4.a) «OFF» and unplug
the unit; only after that you can remove the
vegetable slicer (17).
•
To remove the vegetable slicer attach-
ment (17), press the lock button (2), turn the
vegetable slicer (17) clockwise and remove it.
•
Remove the installed grater (14 or 16) or slicing
attachment (15) from the vegetable slicer (17).
MEAT GRINDER CARE
•
After you finish operating, switch the meat
grinder off by pressing the button (4.a) «OFF»
and unplug it.
•
Press the lock button (2), turn the meat
grinder head (7) or the vegetable slicer
attachment (17) clockwise and remove it.
•
Unscrew the nut (11), remove the installed
plates (9, 10 or 12) and the crossed blade (13)
from the screw (8) and remove the screw (8)
from the meat grinder head (7).
•
Remove remnants of products from the screw.
•
Remove the installed grater (14 or 16) or slicing
attachment (15) from the vegetable slicer (17).
•
Wash all the parts of the meat grinder with warm
soapy water and a neutral detergent, then rinse
and dry thoroughly before assembling.
IM VT-3616.indd 6
07.09.2018 16:57:58
Содержание
- 9 Не разрешайте детям играть с; ОСОБЕННОСТИ МЯСОРУБКИ; – Лоток для продуктов обеспечивает удобное
- 10 Запрещается переключать мясо-; ПЕРЕРАБОТКА МЯСА; – Убедитесь в том, что мясо полностью отта-
- 11 Для разборки головки мясорубки открутите
- 12 Срок службы устройства – 3 года; Информация для связи –; Единая справочная служба:
- 24 RUS


